Thingiverse

Ghostbusters Pedal - Remix by ImperialWalker
by Thingiverse
Last crawled date: 3 years, 1 month ago
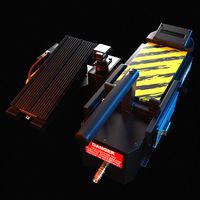
Countspatula's pedal is great, but there were some inaccuracies and missing details that I wanted to add into my trap.
Changes
Added side extension (small project box)
Removed CD logo (sorry Count) and cut out the middle as seen on the original
Added hole for Bullet Latch ( https://www.thingiverse.com/thing:4772769 )
Adjusted overall dimensions to closer resemble movie size
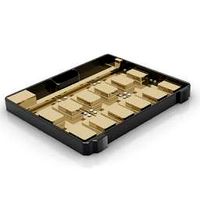
Added a bottom plate with "nubs" to fit the faucet washers
Added faux metal around front of trap
Adjusted position of hinge holes
Bottom Plate
I reduced the overall height of the pedal by 1/16" to give you some options. The bottom plate can be printed using PLA, or an aluminium plate can be attached.
In the movie, Faucet Washers were used as the pedal feet. Based on my research they should be 5/8" OD Bevelled Faucet (Bibb) Washers. These can be found at most hardware stores.
The screws are #4 3/8" Flat Wood screws. They should be Phillips head for accuracy.
Front Metal
On the screen used versions of the trap (which were made of wood), they had a 1/2" metal bar that wrapped around the front and sides.
On my trap I opted to use an aluminum bar, but a 3D printed version can also be used. The 3D printed version is pretty straight forward. Simply print it and finish it as you would your other parts.
If you opt for using real metal you can print and use the template provided for accurate hole placement. I opted to drill one hole, attach it to the pedal, bend it, then mark and drill the second set of holes. I continued this all the way around.
The reason for this is that I was unsure of how accurate the corner bends would be and if I had predrilled all the holes they may not have lined up of the corner radius was too tight or loose.
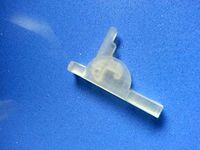
Bullet Latch
You can use a genuine K&V 903 Bullet latch if you can find one online, or you can print one as I did.
As getting one shipped to me was not an option I modelled (with the help of GBFans) a version which I think is pretty accurate. I then printed it in resin and slid it into place.
https://www.thingiverse.com/thing:4772769
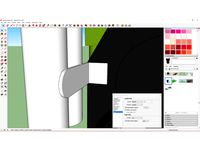
Centre Cutout
On the original pedals, which were made of wood, the centre piece was left as a hole with the metal bottom covering it up.
On the GB1 trap a resistor (same as on the side of the trap) can be seen, which the yellow tube connect to. I am unable to find what was done for the GB2 pedal, but I opted to go with the GB1 design.
I first resin printed the resistor in CountSpatula's files. In my files you'll find ( GB-Pedal-ElectronicsTemplate.stl ). I used this to mark and cut out a thin sheet of plastic card where I could attach the resistor (and other greeblies).
This isn't necessary and you can simply glue yours in, but I wanted some flexibility and it saves me having to sand inside.
Final Thoughts
These changes were made based on my research and from the help of GBFans. However, there may still be inaccuracies that I have not caught.
I opted to print this with a fairly high infill (85%) as I wanted it to be strong and have some weight to it. I also printed it with supports, but with the "Touching build plate only" settings as I didn't want the internal holes to be filled.
Let me know if there are any issues and have fun!
Changes
Added side extension (small project box)
Removed CD logo (sorry Count) and cut out the middle as seen on the original
Added hole for Bullet Latch ( https://www.thingiverse.com/thing:4772769 )
Adjusted overall dimensions to closer resemble movie size
Added a bottom plate with "nubs" to fit the faucet washers
Added faux metal around front of trap
Adjusted position of hinge holes
Bottom Plate
I reduced the overall height of the pedal by 1/16" to give you some options. The bottom plate can be printed using PLA, or an aluminium plate can be attached.
In the movie, Faucet Washers were used as the pedal feet. Based on my research they should be 5/8" OD Bevelled Faucet (Bibb) Washers. These can be found at most hardware stores.
The screws are #4 3/8" Flat Wood screws. They should be Phillips head for accuracy.
Front Metal
On the screen used versions of the trap (which were made of wood), they had a 1/2" metal bar that wrapped around the front and sides.
On my trap I opted to use an aluminum bar, but a 3D printed version can also be used. The 3D printed version is pretty straight forward. Simply print it and finish it as you would your other parts.
If you opt for using real metal you can print and use the template provided for accurate hole placement. I opted to drill one hole, attach it to the pedal, bend it, then mark and drill the second set of holes. I continued this all the way around.
The reason for this is that I was unsure of how accurate the corner bends would be and if I had predrilled all the holes they may not have lined up of the corner radius was too tight or loose.
Bullet Latch
You can use a genuine K&V 903 Bullet latch if you can find one online, or you can print one as I did.
As getting one shipped to me was not an option I modelled (with the help of GBFans) a version which I think is pretty accurate. I then printed it in resin and slid it into place.
https://www.thingiverse.com/thing:4772769
Centre Cutout
On the original pedals, which were made of wood, the centre piece was left as a hole with the metal bottom covering it up.
On the GB1 trap a resistor (same as on the side of the trap) can be seen, which the yellow tube connect to. I am unable to find what was done for the GB2 pedal, but I opted to go with the GB1 design.
I first resin printed the resistor in CountSpatula's files. In my files you'll find ( GB-Pedal-ElectronicsTemplate.stl ). I used this to mark and cut out a thin sheet of plastic card where I could attach the resistor (and other greeblies).
This isn't necessary and you can simply glue yours in, but I wanted some flexibility and it saves me having to sand inside.
Final Thoughts
These changes were made based on my research and from the help of GBFans. However, there may still be inaccuracies that I have not caught.
I opted to print this with a fairly high infill (85%) as I wanted it to be strong and have some weight to it. I also printed it with supports, but with the "Touching build plate only" settings as I didn't want the internal holes to be filled.
Let me know if there are any issues and have fun!
Similar models
thingiverse
free

Ghostbusters Trap Pedal - K&V 903 Bullet Latch by ImperialWalker
...nted flat.
head over to countspatula's page for more ghostbusters trap downloads.
https://www.thingiverse.com/thing:1394639
thingiverse
free

Ghostbusters Ghost Trap (1984) by countspatula
...d out by using the 3d printed ones as a template.
to learn more about how the trap was designed and built, see me on tested.com:
thingiverse
free

Ghostbusters Ghost Trap Knob GB1 1984 Heathkit
...he knob was too small for the post. i have corrected it, but it is a tight fit. i would recommend sanding down the post slightly.
thingiverse
free

Ghostbusters Spirit Halloween Ghost Trap Upgrades by WindDrake
...pdate 9/9/2018 - updated bearing axle to r2 - slight dimensional changes to better fit all traps due to manufacturing tolerances.
thingiverse
free

Mostly Printed CNC Optical End Stop Mount for Z Axis by towa
...this version as z stop mount.
you can put a m8 washer between "middle end" and the plate to achieve a better alignment.
thingiverse
free
Proton Pack L-Bracket (GB1 & GB2) by Jimsy33
...;m gonna do. i made four version gb1 and 2 without holes, and the same models with holes.
link to gbfans: https://www.gbfans.com/
thingiverse
free
Latch with pin lock prototype by siderits
...of the latch to fit your needs.
good luck!
3d model: truespace
printer: form1+, resin version 2
time from art to part: 30 min
thingiverse
free

Mendel y-bar-clamp_10off remake in OpenSCAD w nut traps by josefprusa
...e of the plain type so that a washer and bolt rest properly on them.
updated:
bigger holes, you should not have to drill them out
thingiverse
free

Bathroom sink drain hair trap
...s in the pictures.
supports: if you print it upside-down you need less support material compared to printed in mounting position.
thingiverse
free

Guitar Pedal Effect Holder by Simmons
...bottom.
you just need 4 screw to hold it.
the screw i used is 1,5 cm width but you can use whatever you want that fit your needs.
Imperialwalker
thingiverse
free

Funnel Insert by ImperialWalker
...he excess mesh around the outside.
you should now have a nice little insert that you can place or glue into your printed funnel.
thingiverse
free

Star Trek: TNG - Tensegrity Table by ImperialWalker
... dabble in 3d modelling, so hopefully it works well for everyone. let me know if you have any issues and i'll try and fix it.
thingiverse
free
Ghostbusters Trap Pedal - K&V 903 Bullet Latch by ImperialWalker
...nted flat.
head over to countspatula's page for more ghostbusters trap downloads.
https://www.thingiverse.com/thing:1394639
Ghostbusters
3d_export
$5

ghostbusters
...ghostbusters
3dexport
ghostbusters.охотники за привидениями.
3d_export
$25

proton ghostbusters
...ly polarized protons that electrostatically traps the negatively charged energy of a ghost, allowing it to be held in the stream.
turbosquid
$5

GHOSTBUSTER GUN 2
... available on turbo squid, the world's leading provider of digital 3d models for visualization, films, television, and games.
3d_export
$35
Containment Unit Ghostbusters
...firehouse. it is a large, laser-confinement grid that holds and restrains all the vapors and entities that the ghostbusters trap.
3d_export
$25
Ghostbusters home
... city. its exterior has become famous as the base of the ghostbusters in the supernatural comedy film franchise of the same name.
3d_export
$25

proton pack ghostbusters
...ly polarized protons that electrostatically traps the negatively charged energy of a ghost, allowing it to be held in the stream.
3d_export
$99

Cadillac ECTO1 Ghostbusters 1959 3D Model
...ring 1959 movie famous ghost ecto-1 ghostbusters busters emergency
cadillac ecto1 ghostbusters 1959 3d model squir 86957 3dexport
3d_export
$25
ghost trap ghostbusters
...t when a captured ghost is put into the containment unit, the entity is pumped out of the trap cartridge so it can be used again.
3d_export
$5

Ecto ghostbusters
...al information about number of polygons or the vertices are mentioned in 3d model specifications package includes: -fbx -obj -stl
cg_studio
$99

Cadillac ECTO-1 Ghostbusters 19593d model
...fbx .lwo .max .obj - cadillac ecto-1 ghostbusters 1959 3d model, royalty free license available, instant download after purchase.
Pedal
3d_export
$29

bike pedal
...bike pedal
3dexport
bike pedal lowpoly 3d model. multiple import formats thank you for reading
archive3d
free
Pedal 3D Model
...3d model
archive3d
pedal
pedal n240709 - 3d model (*.gsm+*.3ds) for interior 3d visualization.
archive3d
free
Pedal 3D Model
... 3d model
archive3d
pedal
pedal n121109 - 3d model (*.gsm+*.3ds) for interior 3d visualization.
3d_ocean
$7

Kids pedal car
...kids pedal car
3docean
car kids pedal red toy yellow
kids yellow and red pedal car
archive3d
free
Pedal 3D Model
... 3d model
archive3d
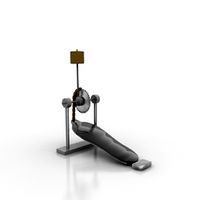
drum pedal
ft pedal - 3d model (*.gsm+*.3ds) for interior 3d visualization.
archive3d
free
Pedal 3D Model
...3d model
archive3d
drum kit pedal
pedal - 3d model (*.gsm+*.3ds) for interior 3d visualization.
turbosquid
$29

guitar pedal
...squid
royalty free 3d model guitar pedal for download as c4d on turbosquid: 3d models for games, architecture, videos. (1659748)
turbosquid
$4

Guitar Pedal
...squid
royalty free 3d model guitar pedal for download as max on turbosquid: 3d models for games, architecture, videos. (1363201)
3d_export
$5

brake pedal
...ort
brake pedal with 6:1 paddle ratio. available in step, iges and sldprt formats. can be converted to other formats on request.
turbosquid
$29

guitar pedal
... free 3d model guitar pedal for download as 3ds, obj, and c4d on turbosquid: 3d models for games, architecture, videos. (1442278)
Remix
turbosquid
$5

MODA Collection Remix Chair
... available on turbo squid, the world's leading provider of digital 3d models for visualization, films, television, and games.
3d_export
$12

remix yamaha rm1x
...remix yamaha rm1x
3dexport
geometry triangles 15.2k vertices 7.6k pbr no textures 1 materials 1 uv layers yes
3d_ocean
$5

Vray fabric Kvadrat remix green - tileable
...th vray and 3dsmax. high-resolution texture images (2000×2000 px) file included: shader vray 2.40 texture image 3ds max 2011 file
turbosquid
$20

Gerrit Rietveld 1938 Zig Zag Chair Remix
... available on turbo squid, the world's leading provider of digital 3d models for visualization, films, television, and games.
3d_export
$10

multicolored remix parametric table furniture
... fbx, obj, mtl, archive with textures. the model has no glitches. render and materials - vray . without using plugins. good use!
3ddd
$1

Barovier&Toso / Manhattan Remix 7192
... 004293-142405
в коллекции есть люстры 7, 9, 12 рожковые. диаметр соответственный 1000, 1250, 1500 мм.
3ddd
$1

Muuto fiber chair
...grey/grey, dusty green/dusty green, nature/oak, natural white/oak upholstery options remix 183/black, remix 133/grey, remix 643/dusty red leather options black...
3ddd
$1

Barovier&Toso 7190-7195
...7190-7195 3ddd barovier&toso потолочнай люстра фабрики barovier&toso;, коллекция manhattan remix артикул 7190-7195. размеры в inches: 39"...
3d_export
$5

3D Locking Handle Weatherproof Storage Box Container
...handle weatherproof storage box container 3dexport new, improved and remixd! no screws required. print-in-place. weatherproof. parametric. 2 parts. easy...
cg_studio
$49

HTC One Mini 2 Amber Gold3d model
...cell phone mobile cellular super lcd touchscreen touch screen remix amber gold .max .obj .mb .lwo .fbx .c4d .3ds...