Thingiverse
Ghost S1 Ventilation Stand Sauginator 9001 (2 Fans with 120mmx15mm) by RolfZuckowskiUltras
by Thingiverse
Last crawled date: 3 years, 1 month ago
Do you like this design and want to give a Tip for it? Do it here
Hey
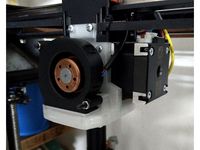
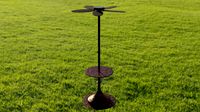
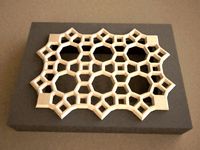
I designed this Ghost S1 foot for a more efficient Ventilation of the Ghost S1. It's optimized for Noctua NF-A12x15 PWM fans and seem to work very efficiently. Since I like to give things dumb names, I decided to call this Sauginator 9001.
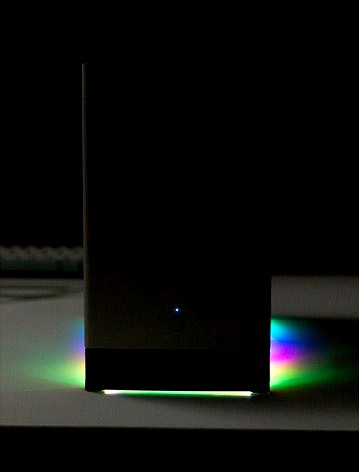
Refer photo for temps. Look out for the FAN-RPM. It's not a direct scientific comparisson under same conditions, but with the tunings, you probably gonna go for.
Feel free to use and modify this for anything, but not comercially (see CC-License Terms). The design took quite a long time to make. I would appreciate if you would send me a little tip over the tip-button on thingiverse, if you liked the design. This will enable me to afford the hardware for a custom loop to do a next iteration.
You can also find a unfinished expermental 25mm-Version in the .stp file. It needs some work on the screw holes. It's not tested yet.
Adressable WS2812b-LED-Strips can be fitted optionally for RGB-Lighting. It's a quite nice possibility, since you won't notice it, if turned of.
Printing the Part:
You'll find two versions of the bottom plate and foot. One is the complete file, which can be printed on printers with a print bed of at least 330mm (Anycubic Predator, Ender 5 Plus). Those huge sizes are quite rare, so I also made a cut version for 300mm machines (CR-10, Sapphire Plus). This is the version you can see on the pictures.
I did not do a 200mm version for machines like the Ender-3 yet, because I had not the time to test it yet and was not quite shure about the stability, since the cut is forced to be done in the fan cutout.
Material:
Filament:
I would reccomend PETG as Material, since it can widthstand the generated heat and does not loose it's strenght, when glued.
Glue:
PETG needs quite nasty glue. Most instant adhesives (gel) should work fine. I used UHU Super Power. Its very Strong.
Postprocessing:
Deburr all the corners on the printbed side, so your parts fit perfectly fine. The surfaces to be glued should be sanded a little with 100 grid sandpaper. 300mm-Versions: You have to glue the foot and bottom plate parts first.
After that, the complete bottom plate and foot can be glued together. I would advise you to use at least two 4mm sticks in the screw holes of the foot (like drills) to center foot and plate. Then mark the fan cutout on on the bottom side of the bottom plate, so you know, where to put the glue later.
Glue it:
Put the glue onto the bottom plate and spread it with your finger (gloves!). Be fast with it. then press the plate onto the the foot. Use your drills to center it (again) and maybe use some clamps to secure it. Wipe of the spare glue.
You should glue it in a well ventilationed area. The usage of a respirator is advised, if available. A big surface means a lot of fumes.
Finish it:
At least at the 300mm-Version you are going to have some glue residues at the foot. I would recommend to use some steel wool to polish it off.
Recommended fan config (Air-Cooled):
Negative pressure (Chassis-Fans outwards, CPU-Fan inwards)
Hey
I designed this Ghost S1 foot for a more efficient Ventilation of the Ghost S1. It's optimized for Noctua NF-A12x15 PWM fans and seem to work very efficiently. Since I like to give things dumb names, I decided to call this Sauginator 9001.
Refer photo for temps. Look out for the FAN-RPM. It's not a direct scientific comparisson under same conditions, but with the tunings, you probably gonna go for.
Feel free to use and modify this for anything, but not comercially (see CC-License Terms). The design took quite a long time to make. I would appreciate if you would send me a little tip over the tip-button on thingiverse, if you liked the design. This will enable me to afford the hardware for a custom loop to do a next iteration.
You can also find a unfinished expermental 25mm-Version in the .stp file. It needs some work on the screw holes. It's not tested yet.
Adressable WS2812b-LED-Strips can be fitted optionally for RGB-Lighting. It's a quite nice possibility, since you won't notice it, if turned of.
Printing the Part:
You'll find two versions of the bottom plate and foot. One is the complete file, which can be printed on printers with a print bed of at least 330mm (Anycubic Predator, Ender 5 Plus). Those huge sizes are quite rare, so I also made a cut version for 300mm machines (CR-10, Sapphire Plus). This is the version you can see on the pictures.
I did not do a 200mm version for machines like the Ender-3 yet, because I had not the time to test it yet and was not quite shure about the stability, since the cut is forced to be done in the fan cutout.
Material:
Filament:
I would reccomend PETG as Material, since it can widthstand the generated heat and does not loose it's strenght, when glued.
Glue:
PETG needs quite nasty glue. Most instant adhesives (gel) should work fine. I used UHU Super Power. Its very Strong.
Postprocessing:
Deburr all the corners on the printbed side, so your parts fit perfectly fine. The surfaces to be glued should be sanded a little with 100 grid sandpaper. 300mm-Versions: You have to glue the foot and bottom plate parts first.
After that, the complete bottom plate and foot can be glued together. I would advise you to use at least two 4mm sticks in the screw holes of the foot (like drills) to center foot and plate. Then mark the fan cutout on on the bottom side of the bottom plate, so you know, where to put the glue later.
Glue it:
Put the glue onto the bottom plate and spread it with your finger (gloves!). Be fast with it. then press the plate onto the the foot. Use your drills to center it (again) and maybe use some clamps to secure it. Wipe of the spare glue.
You should glue it in a well ventilationed area. The usage of a respirator is advised, if available. A big surface means a lot of fumes.
Finish it:
At least at the 300mm-Version you are going to have some glue residues at the foot. I would recommend to use some steel wool to polish it off.
Recommended fan config (Air-Cooled):
Negative pressure (Chassis-Fans outwards, CPU-Fan inwards)
Similar models
thingiverse
free

screwable y-bushings for prusa by BonsaiBrain
...cribed on: www.ifeelbeta.de
if you don't have a 3d printer yet you can order some at: www.2printbeta.de
greetings
bonsaibrain
thingiverse
free

SDX's Double CR-10 Stock Fan by SDX
... fit tight.
screw on the 40mm fan and (optional) the front plate (the bottom holes are not optimal placed... i used cable straps)
thingiverse
free

Macbook pro 15" 2013 foot by aspinx
...esn't stick out too much, as bottom legs are next to the battery.
alternatively, you can just shorten up the tip and glue it.
thingiverse
free

Round Tip for Fitbit One Pocket Clip by HappyMaryCo
...g for more serious permanence.
(works with fitbit one, but should also work with the fitbit zip since the clips are the same.)
:)
thingiverse
free

Robot from ghost in the shell_cookie_cutter by Quality_prints
...t and i think it wourl be a cool thing to give a present like this to a fan. i havent printed yet but i think that this can work.
thingiverse
free

Silencer for fan by TheMaffin
...or fan by themaffin
thingiverse
fan silencer, lowers fan noise
if you would like to leave a small tip, i would be very grateful
cg_trader
$3

Moon Rocket Chandelier | 3D
... 300mm bed printer, i included a file with them all together arranged. after all pieces printed you can mount and glue all parts.
cg_trader
$3

Destiny Ghost 40MM Fan Cover Silencer | 3D
... the ghost is just for show. i can work some led's into it if requested. it would be easier to just buy those clear led fans.
thingiverse
free

Silenced fan by TheMaffin
...silenced fan by themaffin
thingiverse
silenced fan diameter 95 mm
if you would like to leave a tip i would be really grateful!
thingiverse
free

Kongroon KP3S base plate by felixna
...it in with super glue.
openscad file included, feel free to modify.
if you like this design, please leave a like and post a make.
Rolfzuckowskiultras
thingiverse
free
Sapphire Pro / Plus Hemera mount for EBM Pabst RLF35 by RolfZuckowskiUltras
...fzuckowskiultras/marlin-2.0.x-mks-robin-nanohttps://github.com/rolfzuckowskiultras/twotrees-sapphire-pro-plus-marlin2.0-with-gui/
thingiverse
free
E61 / 58mm Portafilter Basket Wall Mount by RolfZuckowskiUltras
...vable by water or heat and mostly safe for the usage with food.
you can find the other wall mounts in my collection or my profile
thingiverse
free

Cyber Cyber Cyber Cyber Cyber Stamp by RolfZuckowskiUltras
...pment/cyber_sticker_export.pdf
workflow:
pdf was converted to svg and imported into fusion360 as a sketch, where it was modified.
thingiverse
free

E61 / 58mm Tamper Wall Mount by RolfZuckowskiUltras
...vable by water or heat and mostly safe for the usage with food.
you can find the other wall mounts in my collection or my profile
thingiverse
free

Espresso GrindDozer Wall Mount (E61 Distributor / Funnel) by RolfZuckowskiUltras
...vable by water or heat and mostly safe for the usage with food.
you can find the other wall mounts in my collection or my profile
thingiverse
free

UE Megaboom 3 Mount (Ikea Pax) by RolfZuckowskiUltras
...or the blast and boom 3, while the mounting holes will not align with the pax-cabinet. feel free to remix from the .step project.
thingiverse
free

Megaboom 3 Protection Holster by RolfZuckowskiUltras
...ads sit tight in the tpu and a minimal gap between holster and handle is existant. the m5-thread will work as a friction bearing.
thingiverse
free

Bosch Professional GLI 18V-10000 C / Scangrip Nova 10 SPS Wall Mount by RolfZuckowskiUltras
...erivate of that lamp.
the holder has to be less wide for the 6k and 4k versions. feel free to do a remix by using the .step-file.
thingiverse
free

Bosch Professional GLI 18v-4000C | Scangrip Nova 4 SPS Wall Mount by RolfZuckowskiUltras
...y other mount due to weight concerncs.
it's printed out of plain petg with 15% gyroid support. made for spax 3x20[mm] screws.
thingiverse
free

Bosch GBL 18V-120 Wall Mount | Should also work for other Bosch Professional 18V-Tools by RolfZuckowskiUltras
...e for other leight bosch pro 18v-tools, since it's attached to the base.
screw holes are optimized for spax wirrox 4mm(x30mm)
9001
3ddd
$1

Searchlight 9001
...searchlight 9001
3ddd
searchlight
высота - 46 мм
количество ламп - 1
тип лампы - e27
мощность - 60w
3d_export
free

Download free Samsung Galaxy S Plus i 9001 3D Model
...download free samsung galaxy s plus i 9001 3d model
3dexport
samsung galaxy s plus i 9001 3d model bu1266 71581 3dexport
3ddd
$1

умывальник Coliseum
...умывальник coliseum 3ddd умывальник coliseum 9001 3dmax 2008, vray1.5 sp1. текстуры и превью в архиве....
3d_export
$69

korean mask machine kf94 plane one drag two willow leaf mask machine
...the fish shaped mask body, which can process 3m 9001 9002 and other mask bodies.<br>the fish type respirator needs...
3d_sky
$8
Searchlight 9001
...searchlight 9001
3dsky
height: 46 mm
number of lamps-1
type of lamp-e27
wattage-60w
thingiverse
free
Dual hose mod for Eurom Polar 9001 by peterwilli
...ose mod for eurom polar 9001 by peterwilli
thingiverse
backplate mod for a dual-hose setup on the eurom polar 9001.
still a wip!
thingiverse
free
Box for spot welding machine by Egor812
...a pcb of spot welding machine of this type https://fixfly.ru/zproduct/9001 ...
3d_sky
free
Laver Coliseum
...laver coliseum 3dsky laver coliseum 9001 3dmax 2008, vray 1.5 sp1. textures and previews in...
thingiverse
free

fillament cradle by eunseok
...is eunseok. i'm korean. company : (주)samdi tel : 010-7417-9001 instagram :...
S1
3ddd
$1

Frise S1
...frise s1
3ddd
frise , masiero
frise s1 каталог masiero
3ddd
$1
Table S1
... металлический стол , стол-патерн
металический стол-паттерн (s1) design by ar3+
3d_export
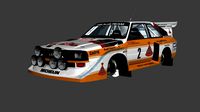
$5

Audi quattro S1
...audi quattro s1
3dexport
audi quattro s1
3d_export
$5
Audi quattro S1
...audi quattro s1
3dexport
1986 audi quattro s1
turbosquid
$999

City S1
...s1
turbosquid
royalty free 3d model city s1 for download as on turbosquid: 3d models for games, architecture, videos. (1473440)
turbosquid
$149

Hamilton S1
...osquid
royalty free 3d model hamilton s1 for download as max on turbosquid: 3d models for games, architecture, videos. (1158659)
3ddd
$1

Masiero Donna S1
...masiero donna s1
3ddd
люстра производства фабрики masiero, модель donna s1
3d_export
free

Audi quattro S1
...audi quattro s1
3dexport
audi quattro s1 hb audi team sport
turbosquid
$90

Sniper S1
... available on turbo squid, the world's leading provider of digital 3d models for visualization, films, television, and games.
turbosquid
$18

S1.dwg
... available on turbo squid, the world's leading provider of digital 3d models for visualization, films, television, and games.
Ghost
3d_export
$5

ghost
...ghost
3dexport
ghost for halloween
3ddd
$1

Ghost Chair
...ghost chair
3ddd
ghost chair , ghost
ghost chair
3d_export
$5

Ghost
...loped using a single modifier and precise projection. the ghost can be used both for 3d printing and for use as a game character.
3d_export
$5

Ghost
...loped using a single modifier and precise projection. the ghost can be used both for 3d printing and for use as a game character.
3d_export
$10

Ghost baby
...ghost baby
3dexport
ghost
turbosquid
$40
Ghost
...t
turbosquid
royalty free 3d model ghost for download as fbx on turbosquid: 3d models for games, architecture, videos. (1172836)
3d_ocean
$3

pacman ghosts
...pacman ghosts
3docean
3d ghost low poly pacman texture
low poly pacman ghosts
turbosquid
$50

Ghost
...lty free 3d model ghost for download as ma, max, obj, and fbx on turbosquid: 3d models for games, architecture, videos. (1161653)
turbosquid
$100

Ghost
... available on turbo squid, the world's leading provider of digital 3d models for visualization, films, television, and games.
turbosquid
$15

Ghost
...ee 3d model ghost for download as max, fbx, 3ds, dae, and obj on turbosquid: 3d models for games, architecture, videos. (1627481)
Ventilation
3d_export
$5

ventilation
...ventilation
3dexport
5 types of ventilation
3d_export
$10

ventilation
...ventilation
3dexport
5 types of ventilation and engineer communication
3d_ocean
$5

Ventilator
...pliance blower desk detailed electric electro fan hvac oscillating realistic table ventilator
high poly, very detailed ventilator
3d_export
$25
ventilator
...ventilator
3dexport
turbosquid
$20
Ventilator
... free 3d model ventilator for download as blend, fbx, and obj on turbosquid: 3d models for games, architecture, videos. (1612370)
turbosquid
$43

Ventilator
... available on turbo squid, the world's leading provider of digital 3d models for visualization, films, television, and games.
turbosquid
$25
ventilation
... available on turbo squid, the world's leading provider of digital 3d models for visualization, films, television, and games.
turbosquid
$4
Ventilator
... available on turbo squid, the world's leading provider of digital 3d models for visualization, films, television, and games.
3d_export
$5
ventilation and columns
...ventilation and columns
3dexport
ventilation and columns.<br>3 types of ventilation<br>2 types of columns
archive3d
free
Ventilators 3D Model
...ventilators 3d model archive3d ventilation ventilation equipment...
Fans
3d_export
$5

fan
...fan
3dexport
fan 3d model, table fan, fan, electric fan, ventilator
archibase_planet
free

Fan
...fan
archibase planet
fan large fan
fan out n260707 - 3d model for interior 3d visualization.
archibase_planet
free

Fan
...fan
archibase planet
fan ceiling fan ventilator
fan stealth n300615 - 3d model (*.gsm+*.3ds) for interior 3d visualization.
3d_export
$15

fan
...fan
3dexport
is an ancient fan
3ddd
$1

Fan-C-Fan by marco gallegos
...n-c-fan by marco gallegos
3ddd
вентилятор , marco gallegos
fan-c-fan by marco gallegos
3d_export
$10

fan
...fan
3dexport
a detailed fan designed for home or space blowing is now available for only 19.99!
turbosquid
$1

Fan
...fan
turbosquid
free 3d model fan for download as on turbosquid: 3d models for games, architecture, videos. (1427865)
turbosquid
$14

Fan
...fan
turbosquid
royalty free 3d model fan for download as on turbosquid: 3d models for games, architecture, videos. (1415642)
3ddd
$1

Светильник Fan
...светильник fan
3ddd
fan , italamp
светильник fan, производитель italamp
turbosquid
$25

Fan
...fan
turbosquid
royalty free 3d model fan for download as c4d on turbosquid: 3d models for games, architecture, videos. (1483246)
Stand
turbosquid
$50

stand watermelon stand
...yalty free 3d model stand watermelon stand for download as ma on turbosquid: 3d models for games, architecture, videos. (1528284)
archibase_planet
free
Stand
...stand
archibase planet
stand post pole
stand - 3d model for interior 3d visualization.
archibase_planet
free
Stand
...stand
archibase planet
stand sport barbell
stand kettler - 3d model for interior 3d visualization.
archibase_planet
free
Stand
...stand
archibase planet
locker drawer stand
stand 897810 - 3d model for interior 3d visualization.
archibase_planet
free
Stand
...stand
archibase planet
stand rack post
stand 2 - 3d model for interior 3d visualization.
archibase_planet
free
Stand
...stand
archibase planet
stand storefront shelving
stand 3 - 3d model for interior 3d visualization.
archibase_planet
free
Stand
...stand
archibase planet
stand shelf shelving
stand 4 - 3d model for interior 3d visualization.
archibase_planet
free
Stand
...stand
archibase planet
stand post stall
stand 5 - 3d model for interior 3d visualization.
archibase_planet
free
Stand
...stand
archibase planet
stand post stall
stand 6 - 3d model for interior 3d visualization.
archibase_planet
free
Stand
...stand
archibase planet
stand post shelving
stand 7 - 3d model for interior 3d visualization.
2
design_connected
$11

No 2
...no 2
designconnected
sibast no 2 computer generated 3d model. designed by sibast, helge.
turbosquid
$6

Cliff Rock 2-2
...uid
royalty free 3d model cliff rock 2-2 for download as obj on turbosquid: 3d models for games, architecture, videos. (1619161)
turbosquid
$29

Book variation 2 2
...3d model book variation 2 2 for download as max, obj, and fbx on turbosquid: 3d models for games, architecture, videos. (1366868)
turbosquid
$22

Classic baluster (2) (2)
...assic baluster (2) (2) for download as max, obj, fbx, and stl on turbosquid: 3d models for games, architecture, videos. (1483789)
turbosquid
$99

Smilodon 2 Pose 2
... available on turbo squid, the world's leading provider of digital 3d models for visualization, films, television, and games.
turbosquid
$20

Barrel Barricade 2-2
... available on turbo squid, the world's leading provider of digital 3d models for visualization, films, television, and games.
turbosquid
$6

Wall Trophy (2) (2)
... available on turbo squid, the world's leading provider of digital 3d models for visualization, films, television, and games.
turbosquid
free

Tire label 2 of 2
... available on turbo squid, the world's leading provider of digital 3d models for visualization, films, television, and games.
3ddd
$1

Кровать, 2 тумбочки, 2 светильника
...кровать, 2 тумбочки, 2 светильника
3ddd
кровать, 2 тумбочки, 2 светильника
нормальное качество
формат 3ds max
без текстур
3ddd
free

Кровать, 2 тумбочки, 2 светильника
...кровать, 2 тумбочки, 2 светильника
3ddd
кровать, 2 тумбочки, 2 светильника
нормальное качество
формат 3ds max
без текстур