Thingiverse
Gen6 Camaro Sound Tube Defeat Firewall Plug by ronschauer
by Thingiverse
Last crawled date: 3 years ago
I looked around for a permanent solution to neatly remove the sound tube my 2017 V6 Camaro and was not really happy with anything I found commercially.
Notes-
The intake plugs on a V8 are a different size than on a V6.
The V6 intake tube opening is 30mm in diameter.
So the intake caps shown here will not work for a V8.
However the firewall plug will work on either one.
I recently posted an alternate version of this set which is a bit simpler to print and install.
It also includes intake tube plugs (several versions) that will fit V8 intake tubes (24mm openings).
Here is a link to it- https://www.thingiverse.com/thing:3267691
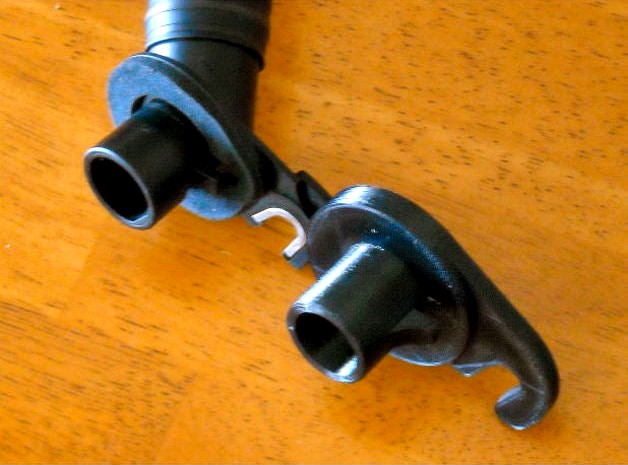
First the firewall plug-
This will fit any gen6 Camaro with a V6 or V8 engine.
I cannot speak for any other vehicles, but if equipped with a "sound tube" having a firewall end such as the one shown, it should work.
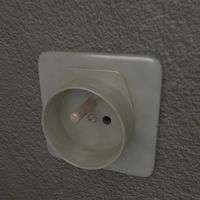
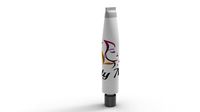
I designed and printed a plug to replace the firewall end of the "sound tube" and plugged the air intake tube with a rubber cap originally (various sources sell them as chair leg tips).
Later on I made a custom cap for the air intake end (see below).
The original tube end has two tabs that engage notches in the edge of the firewall hole.
When designing my own replacement I duplicated their positions and sizes and also strengthened them quite a bit by adding fillets.
I printed this in ABS because of the under hood temperatures and because I could acetone vapor polish it to increase its strength.
You can probably get away with PLA, but you will need to be very careful about layer adhesion.
In either case the plug face is likely to be slightly porous so you will need to seal it to prevent noise and vapors from the engine compartment from entering the cabin.
For ABS this is quite easy, just pour some ABS juice into the interior of the plug shaft, swish it around so that it coats everything, and pour out the excess.
That might also work for PLA, but most likely a coat of silicone RTV would work better.
When the print is cleaned up, you will need to add gasket material to the face of it where it meets the firewall.
I used 1/8" thick "Frost King" pipe wrap (closed cell foam) but almost anything similar should work.
If you have 2" wide wrap, you can simply cut a doughnut circle of it and it will work perfectly by stretching it past the tabs.
If not, you will need to patch together a seal from narrower strips.
Do not go too thick on this because you will have to compress it to install it.
When installing the new plug, engage the two tabs into the notches in the firewall opening, then push to compress the gasket foam and twist counterclockwise to engage the fastening stud.
Re-use the original clamping nut.
It made a very large reduction in the low pitched rumble in the passenger cabin and even reduced road noise (which must have been coming in through the tube).
The cabin is now much quieter and more pleasant and the natural engine sounds can still be heard, only to a considerably less extent.Side benefit- The stereo system sounds even better because it is not competing with engine and road noises.
I left the support material in the face of the plug because I thought it looked interesting and might be more like something the factory would do ("reinforcement ribs"), there is no structural need for keeping it.
Now the intake tube plug-
The following only applies to V6 cars.
For V8 cars please refer to my posting of alternate styles at-https://www.thingiverse.com/thing:3267691
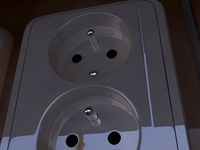
I didn't like the unfinished look of the chair tip cap I had used at the intake tube opening so I decided to plug it with an expanding rubber plug (Dorman 02602, available from most auto parts stores) and a custom printed cap.
This Dorman rubber plug is a very tight fit, but with a thin film of lubricant it can be stuffed completely up into the intake pipe hole so that it is flush with the outer edge.
Examples- Vaseline or white grease.
Just barely wet the rubber plug so it looks shiny.
Use lubricants sparingly or the plug can pop out when you tighten it up!!
Don't use the large metal washer they supply with it and use the printed cap instead.
Put the cap over the plug's center bolt and push the cap firmly onto the intake pipe.
Then use the original nut to secure the cap in place and to expand the rubber plug so it won't slide out.
Tighten so it is snug and won't come undone but don't get crazy with the torque on it or you could split the intake pipe (which is an expensive part).
If this causes you any potential concern, please check out my other posting on this subject which contains two plugs that are much more gentle to the intake duct and don't require purchasing the rubber stopper at all.https://www.thingiverse.com/thing:3267691
The end result looks more like a "factory" thing and is very inconspicuous.
Most people would never realize it was not original if you didn't tell them.
As with the firewall plug, I printed it in ABS, sanded it lightly and vapor polished it so that it looks slick and molded.
The camera flash on the photo makes it look rather crude, but it really does just sort of disappear underneath the intake tube.
If in doubt, paint it with some matte or flat black paint. :-)
Don't be surprised if you need to re-tighten it after a few days because the rubber plug will change shape a bit, but it shouldn't fall out.
I had to tighten mine slightly twice in about 3000 miles but since then I have replaced the intake tube plug and cover with a different design (see https://www.thingiverse.com/thing:3267691 ).
It is even simpler to install and has not loosened at all from the time of installation.
There is also a second version of the intake tube plug which should allow you to use the original washer as supplied with a Dorman 02602 rubber plug. It is 2mm larger in diameter and is slightly thicker on the base for added strength.
But again, the versions I posted on the other link are easier to install, although the covers shown here could be used by gluing or screwing them to the plug sets at the other link.
Again, neither of these intake plugs will work for V8 cars.
Please see my other posting link for updates on a V8 version.
Thanks very much for viewing this.
Notes-
The intake plugs on a V8 are a different size than on a V6.
The V6 intake tube opening is 30mm in diameter.
So the intake caps shown here will not work for a V8.
However the firewall plug will work on either one.
I recently posted an alternate version of this set which is a bit simpler to print and install.
It also includes intake tube plugs (several versions) that will fit V8 intake tubes (24mm openings).
Here is a link to it- https://www.thingiverse.com/thing:3267691
First the firewall plug-
This will fit any gen6 Camaro with a V6 or V8 engine.
I cannot speak for any other vehicles, but if equipped with a "sound tube" having a firewall end such as the one shown, it should work.
I designed and printed a plug to replace the firewall end of the "sound tube" and plugged the air intake tube with a rubber cap originally (various sources sell them as chair leg tips).
Later on I made a custom cap for the air intake end (see below).
The original tube end has two tabs that engage notches in the edge of the firewall hole.
When designing my own replacement I duplicated their positions and sizes and also strengthened them quite a bit by adding fillets.
I printed this in ABS because of the under hood temperatures and because I could acetone vapor polish it to increase its strength.
You can probably get away with PLA, but you will need to be very careful about layer adhesion.
In either case the plug face is likely to be slightly porous so you will need to seal it to prevent noise and vapors from the engine compartment from entering the cabin.
For ABS this is quite easy, just pour some ABS juice into the interior of the plug shaft, swish it around so that it coats everything, and pour out the excess.
That might also work for PLA, but most likely a coat of silicone RTV would work better.
When the print is cleaned up, you will need to add gasket material to the face of it where it meets the firewall.
I used 1/8" thick "Frost King" pipe wrap (closed cell foam) but almost anything similar should work.
If you have 2" wide wrap, you can simply cut a doughnut circle of it and it will work perfectly by stretching it past the tabs.
If not, you will need to patch together a seal from narrower strips.
Do not go too thick on this because you will have to compress it to install it.
When installing the new plug, engage the two tabs into the notches in the firewall opening, then push to compress the gasket foam and twist counterclockwise to engage the fastening stud.
Re-use the original clamping nut.
It made a very large reduction in the low pitched rumble in the passenger cabin and even reduced road noise (which must have been coming in through the tube).
The cabin is now much quieter and more pleasant and the natural engine sounds can still be heard, only to a considerably less extent.Side benefit- The stereo system sounds even better because it is not competing with engine and road noises.
I left the support material in the face of the plug because I thought it looked interesting and might be more like something the factory would do ("reinforcement ribs"), there is no structural need for keeping it.
Now the intake tube plug-
The following only applies to V6 cars.
For V8 cars please refer to my posting of alternate styles at-https://www.thingiverse.com/thing:3267691
I didn't like the unfinished look of the chair tip cap I had used at the intake tube opening so I decided to plug it with an expanding rubber plug (Dorman 02602, available from most auto parts stores) and a custom printed cap.
This Dorman rubber plug is a very tight fit, but with a thin film of lubricant it can be stuffed completely up into the intake pipe hole so that it is flush with the outer edge.
Examples- Vaseline or white grease.
Just barely wet the rubber plug so it looks shiny.
Use lubricants sparingly or the plug can pop out when you tighten it up!!
Don't use the large metal washer they supply with it and use the printed cap instead.
Put the cap over the plug's center bolt and push the cap firmly onto the intake pipe.
Then use the original nut to secure the cap in place and to expand the rubber plug so it won't slide out.
Tighten so it is snug and won't come undone but don't get crazy with the torque on it or you could split the intake pipe (which is an expensive part).
If this causes you any potential concern, please check out my other posting on this subject which contains two plugs that are much more gentle to the intake duct and don't require purchasing the rubber stopper at all.https://www.thingiverse.com/thing:3267691
The end result looks more like a "factory" thing and is very inconspicuous.
Most people would never realize it was not original if you didn't tell them.
As with the firewall plug, I printed it in ABS, sanded it lightly and vapor polished it so that it looks slick and molded.
The camera flash on the photo makes it look rather crude, but it really does just sort of disappear underneath the intake tube.
If in doubt, paint it with some matte or flat black paint. :-)
Don't be surprised if you need to re-tighten it after a few days because the rubber plug will change shape a bit, but it shouldn't fall out.
I had to tighten mine slightly twice in about 3000 miles but since then I have replaced the intake tube plug and cover with a different design (see https://www.thingiverse.com/thing:3267691 ).
It is even simpler to install and has not loosened at all from the time of installation.
There is also a second version of the intake tube plug which should allow you to use the original washer as supplied with a Dorman 02602 rubber plug. It is 2mm larger in diameter and is slightly thicker on the base for added strength.
But again, the versions I posted on the other link are easier to install, although the covers shown here could be used by gluing or screwing them to the plug sets at the other link.
Again, neither of these intake plugs will work for V8 cars.
Please see my other posting link for updates on a V8 version.
Thanks very much for viewing this.
Similar models
thingiverse
free

Gen6 Camaro Sound Tube plug V8 by robertd33
...dit:
after driving for a while... it's better with the sound tube. this plug is still a good design, though (self fist bump).
thingiverse
free

Mustang GT Sound Tube Delete
...uv light nor excessive heat there, so you could probably get away with pla, but i'd recommend using petg for added stability.
thingiverse
free

FRS / BRZ / 86 - Intake Sound Tube Plug by ed7coyne
...with intake temps measuring around 150-160f and this part was no worse for the wear but i wouldn't trust it long term in pla.
thingiverse
free

Dry Box 1/4" Tube Cap by TyCreek
...st cap didn't fit snug. so i made a longer one with more taper so tube ends that become compressed over time will still seal.
thingiverse
free

Square tube end caps (2 inch tube, 14 gauge thickness) by dege13
...it great, but i broke one of the supports installing it.
"tube end caps-stronger" is the design with stronger supports.
thingiverse
free
End caps for tubes (Snap In Rectangular Cap Plugs) by hellc2
...r abs.
this model size is for tubes with 40x20mm and 60x32mm but i attach the original models if you need modify for other sizes.
thingiverse
free

Drip Distribution Tubing Cap by ruminant1
...cing the cap in as far as it will go. i generally spread some super glue on the inner plug end to make sure it's waterproof.
thingiverse
free

1.5" Square Tubing End Cap Plug by jmleach1987
...g by jmleach1987
thingiverse
simple 1.5" square tube end cap plug for square tubing with a wall thickness of ~0.1875".
thingiverse
free

Prusa MINI Handle by burrowsa
...les so it ended up looking rather neat.
hardware required:
2x m6 drop in t nuts 30 series
3x 12mm long m6 button head allen bolts
grabcad
free

Handlebar Plug v1.02
... the same thing as in the previous model.
http://grabcad.com/library/handlebar-plug
http://grabcad.com/library/handlebar-end-v2
Ronschauer
thingiverse
free

Skelly Oil Placard by ronschauer
...yourself i have included all three versions of the artwork and the original sign photo.
i hope you like this.
thanks for looking.
thingiverse
free

Felix the Cat by ronschauer
...sanding and vapor polishing (i used abs).
i hope you like this display model which stands about 5 inches tall including the base.
thingiverse
free

IKEA "Dioder" light strip bracket clips by ronschauer
...i used an earlier clip design that i had with a finger tab as a basis.
the finger tabs make them very easy to install and remove.
thingiverse
free

Honda CBX logo placard by ronschauer
...s store) and they work perfectly as tool box and refrigerator magnets.
i have printed three so far and they all turned out great.
thingiverse
free

Motorcycle Plate Frame (reverse) by ronschauer
...hope these will work for you, thanks for looking.
note that these are designed for typical usa-standard size license plates only.
thingiverse
free

Cruze (and others) coil connector lock tab by ronschauer
...these all share the same coil pack and connector.
it may fit other applications using "weatherpack" connectors as well.
thingiverse
free

Diagonal braces for 2020 rails using EMT tubing by ronschauer
...t or if you use that instead of glue to hold the brackets into the conduit.
thanks for looking, i hope these prove useful to you.
thingiverse
free

Tilt fan duct and domed 30mm fan grille for E3D V6 hot end (updated) by ronschauer
...placement parts as i did in the past, i can simply print new ones.
but so far they have held up very well.
i hope these help you.
Gen6
thingiverse
free

Gen6 Cooling Fanmount by M_Alban
...
thingiverse
this fanmount i designed in few seconds is for mounting a 8x8 fan on the gen6 motherboard holder for cooling the mb
thingiverse
free

Portabee gen6.d electronics casing by purrcreate
...portabee gen6.d electronics casing by purrcreate
thingiverse
casing for the gen6.d electronics included with the portabee kit.
thingiverse
free

Support for fan for gen6 orca 0.4i by jiip
... fan for gen6 orca 0.4i by jiip
thingiverse
all in the title,
support for a 60mm fan
mount to a orca 0.4i to ventilate the gen6
thingiverse
free

Enclosure Gen6 by Clax
...enclosure gen6 by clax
thingiverse
i made ​​the container a little more robust, reinforcing the air ducts, and cable guide.
thingiverse
free

Gen6 Electronics Mount Plate by drstock
...rap. it was designed to be cut on a laser cutter out of 3mm acrylic or plywood, but it should be easy to cut on a cnc router too.
thingiverse
free

Gen6 Click On Fan Holder by vela3
...gen6 click on fan holder by vela3
thingiverse
click-on fan holder for gen-6 electronics.
thingiverse
free

Enclosure with fan Gen6 by Clax
...his in order to remove the cover with more ease.
this project requires a 40mm fan, four 3mm screws and two 2mm screws (like wood)
thingiverse
free

Gen6 Electronics Mount Plate for Prusa Mendel by rlander
...mendel. the plate is designed for holding a gen6 electronics board, but it can be modified to keep any other electronics as well.
thingiverse
free

HDD / SDD HP Proliant Gen6 / Gen7 Drive Tray / Caddy by losinapetrovski
... hp proliant gen6 / gen7 drive tray / caddy by losinapetrovski
thingiverse
hdd / sdd hp proliant gen6 / gen7 drive tray / caddy
thingiverse
free

Warhammer 40k Gen6/7 Template by TrueFuFLeaderG
...warhammer 40k gen6/7 template by truefufleaderg
thingiverse
this is a 3 in one template for warhammer 40k generation 7 and 6
Firewall
turbosquid
$75

Maya FumeFx Firewall
... available on turbo squid, the world's leading provider of digital 3d models for visualization, films, television, and games.
3ddd
free

Asus WL-520GC
...тип оборудования: маршрутизатор для выделенной линии, коммутатор, межсетевой экран (firewall ...
3d_export
$39
Computer PC 3D Model
...computer pc 3d model 3dexport tower pc desktop usb firewall cd-rom dvd-rom fans cpu motherboard cable gpu card computer...
thingiverse
free

FliteTest Firewall by justindp2006
...flitetest firewall by justindp2006
thingiverse
flitetest firewall for power pods. i use it on my spitfire and works great.
thingiverse
free
mighty minis firewall by kerstens
...mighty minis firewall by kerstens
thingiverse
firewall for the flitetest mighty minis
thingiverse
free

FT Swappable Firewall by tophe75
...ft swappable firewall by tophe75
thingiverse
firewall for the flitetest swappable powerpod
thingiverse
free

Finwing Penguin firewall by Ferga2014
...hingiverse
firewall replacement for the fpv penguin.
3d printing and laser cutt
49mm x 59mm is the right size for this firewall.
thingiverse
free

HRC Wasp Firewall by thehangarrc
...hrc wasp firewall by thehangarrc
thingiverse
firewall/motor mount for the hrc wasp
thingiverse
free
FT Spear Firewall by shniggysaurus
...verse
this is the firewall for flite tests ft spear. its actually just a remix of cannerbals ft firewall made to fit the spear.
thingiverse
free
Firewall for Swappable Power pod by flitetest
...firewall for swappable power pod by flitetest
thingiverse
firewall for swappable power pod
Defeat
turbosquid
$29
Dragon Defeat Sculpture
...del dragon defeat sculpture for download as max, obj, and stl on turbosquid: 3d models for games, architecture, videos. (1466133)
3d_export
$15

Armour Bundle
...of popular strongest guns which can be used for defeatng the opponent in one...
3d_export
$20
Terminator
...terminator 3dexport a robot created by skynet to defeat the resistance. better watch the movie if you haven’t...
3d_ocean
$1

Wooden Boomerang
...weapon wooden what is that? it’s wooden boomerang! let’s defeat the bandit! have any problem? contact...
3d_export
$5

covid-19 face shield
...covid-19 face shield 3dexport together we defeat corona.<br>maybe i should have uploaded late to win but...
3d_export
$15
ambubag ventilator covid-19 crisis
...who are infected with the corona virus (covid-19).<br>together we defeat corona.<br>maybe i should have uploaded late to win but...
3d_export
$20

Evil snowman
...idle look around move roar attack bite get damage defeat the package contains models, materials, animations, unity textures pack,...
3d_export
$10

tom low-poly
...although there are some stories where he outwits and defeat ...
3d_export
$20
M36 Jackson
...in the korean war, where it was able to defeat any of the soviet tanks used in that conflict....
3d_export
$10

Sports tribune for spectators
...sincerely rejoice at their victories and grieve at their defeat. in order for the audience to be comfortable watching...
Camaro
3d_ocean
$40

Camaro
... smooth , no textures no materials included , only the model . file exported to *.obj , and *.fbx – version 2012. *.obj file c...
3d_export
$5

camaro
...camaro
3dexport
camaro 2015
3ddd
free

Camaro
...camaro
3ddd
классика chevrolet camaro z28
3d_export
free

Camaro
...camaro
3dexport
chevy camaro 3d model available to download
3d_ocean
$49

Camaro 2010
...camaro 2010
3docean
camaro camaro2010 car
car,camaro,camaro2010
3ddd
$1

chevrolet camaro
... camaro , автомобиль , машина
chevrolet camaro
3d_ocean
$39
Chevrolet Camaro
...chevrolet camaro
3docean
3d model cars chevrolet camaro
car chevrolet camaro
3d_export
$5
chevrolet camaro
...chevrolet camaro
3dexport
chevrolet camaro
3d_export
$9

chevrolet camaro
...chevrolet camaro
3dexport
high poly model of chevrolet camaro... images are rendered with vray.
3d_export
$5

chevrolet camaro
...chevrolet camaro
3dexport
low-poly 3d model sport car chevrolet camaro
Sound
turbosquid
$5

sound
...royalty free 3d model sound for download as max, obj, and fbx on turbosquid: 3d models for games, architecture, videos. (1211937)
3ddd
$1

Sound Bed
...sound bed
3ddd
sound
bed
3ddd
$1
Natuzzi / SOUND
...natuzzi / sound
3ddd
natuzzi
natuzzi модель - sound
turbosquid
$109

Sound Boom
...bosquid
royalty free 3d model sound boom for download as c4d on turbosquid: 3d models for games, architecture, videos. (1568341)
turbosquid
$5

Sound Booster
...quid
royalty free 3d model sound booster for download as stl on turbosquid: 3d models for games, architecture, videos. (1363395)
turbosquid
$3

Sound Card
...bosquid
royalty free 3d model sound card for download as fbx on turbosquid: 3d models for games, architecture, videos. (1709721)
turbosquid
$1

Stereo Sound
...squid
royalty free 3d model stereo sound for download as obj on turbosquid: 3d models for games, architecture, videos. (1342541)
3d_ocean
$5

Sound Heart
... day wing wings
sound heart with wings. setup render and environment map with vray. thank you! please see some of my collection…
turbosquid
$45

Sound Car
...lty free 3d model sound car for download as max, fbx, and obj on turbosquid: 3d models for games, architecture, videos. (1540353)
turbosquid
$25

Speaker Sound
...ee 3d model speaker sound for download as 3ds, obj, and blend on turbosquid: 3d models for games, architecture, videos. (1323810)
Plug
3d_export
$5
plug
...plug
3dexport
3d_export
$5
plug cover
...plug cover
3dexport
plug cover
3d_export
$5
spark plug
...spark plug
3dexport
spark plug
3d_export
free
spark plug
...spark plug
3dexport
spark plug
turbosquid
$30
plug
... available on turbo squid, the world's leading provider of digital 3d models for visualization, films, television, and games.
turbosquid
$15
plug
... available on turbo squid, the world's leading provider of digital 3d models for visualization, films, television, and games.
turbosquid
$10
Plug
... available on turbo squid, the world's leading provider of digital 3d models for visualization, films, television, and games.
turbosquid
$10
Plug
... available on turbo squid, the world's leading provider of digital 3d models for visualization, films, television, and games.
turbosquid
$1
Plug
... available on turbo squid, the world's leading provider of digital 3d models for visualization, films, television, and games.
turbosquid
free
plug
... available on turbo squid, the world's leading provider of digital 3d models for visualization, films, television, and games.
Tube
archibase_planet
free

Tube
...tube
archibase planet
paint tube stationery
tube - 3d model (*.gsm+*.3ds) for interior 3d visualization.
turbosquid
free
tube
...tube
turbosquid
free 3d model tube for download as c4d on turbosquid: 3d models for games, architecture, videos. (1378271)
archibase_planet
free
Tube
...tube
archibase planet
mascara cosmetics make-up
tube 1 - 3d model (*.gsm+*.3ds) for interior 3d visualization.
3d_export
$5
Tube pants
...tube pants
3dexport
tube pants
3d_export
free
Tube
...tube
3dexport
turbosquid
free
TUBE
...
free 3d model tube for download as blend, dae, fbx, and obj on turbosquid: 3d models for games, architecture, videos. (1672199)
3ddd
$1

perfume tube
...perfume tube
3ddd
тюбик
perfume tube, тюбик
3ddd
$1
Olivieri Tube
...olivieri tube
3ddd
olivieri
кровать olivieri tube
turbosquid
$22

Tube
... available on turbo squid, the world's leading provider of digital 3d models for visualization, films, television, and games.
turbosquid
$17

Tube
... available on turbo squid, the world's leading provider of digital 3d models for visualization, films, television, and games.