Thingiverse
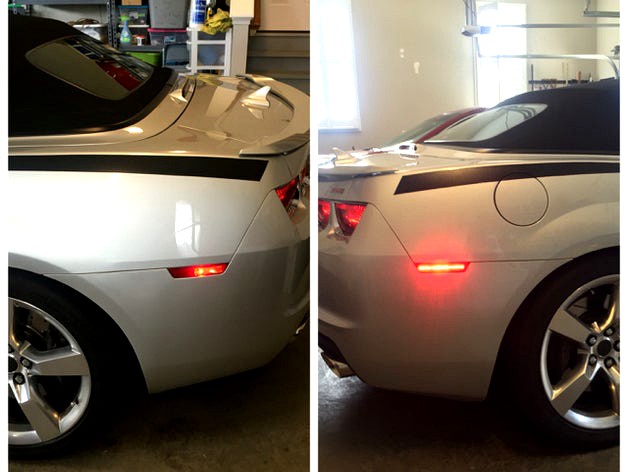
Gen 5 Camaro Side Markers by JEBariffic
by Thingiverse
Last crawled date: 3 years ago
Front and rear side markers for gen 5 camaro. You'll need:
Two sets of prints, front and rear. One as is, one set rotated on Y axis. ABS recommended.
17 5mm red LEDs for each rear marker. (I used: https://goo.gl/ypBqIt )
4 150ohm resistors
2 220ohm resistors
15 5mm orange LEDs for each front marker. ( https://goo.gl/SysBpN )
3 100ohm resistors
Epoxy ( https://goo.gl/TGuacR )
Soldering and wiring equipment / supplies
Files ( https://goo.gl/WrM1D6 )
Pins (I cut some off of voltage regulators: https://goo.gl/D7pyPF )
Hot glue gun
3M Tape ( https://goo.gl/5nxyFA )
Optional: small brush to apply epoxy ( https://goo.gl/MY4XmA )
Steps:
Print two sets of each STL. Rotate the second of each on the Y axis.
File out LED holes and push LEDs in
Optional: Paint markers (I used Krylon outdoor furniture paint)
--- Front markers will be soldered as three groups of five LEDs in serial with 100 ohm resistor.
--- Rear markers will be soldered as two groups of six LEDs with 150 ohm resistor and one group of five with 220 ohm resistor also in serial.
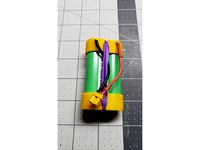
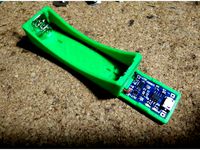
--- Place LEDs so that you can bend and connect the positive / negative leads down and together, then solder. See picture.
--- Solder the first positive lead of the series to the appropriate resistor, the resistor to lead wire. The final negative of the series solder to a lead wire.
Apply hot glue to keep resistors and leads from touching LEDs
Run lead wires thru holes in covers, use epoxy to bond covers to marker. Allow to sit for at least one hour.
Solder pins onto leads. You'll want positive leads to one pin and negative leads to one pin.
Remove factory makers. Clean area. Apply tape to opening and remove backing.
Connect pins to harness. Turn on aux lights and make sure markers light. If not, switch around pins.
Fill in hole in back of marker with hot glue. Cover harness and leads with hot glue. Allow to cool.
Press in makers into position and hold for ~ a minute.
Two sets of prints, front and rear. One as is, one set rotated on Y axis. ABS recommended.
17 5mm red LEDs for each rear marker. (I used: https://goo.gl/ypBqIt )
4 150ohm resistors
2 220ohm resistors
15 5mm orange LEDs for each front marker. ( https://goo.gl/SysBpN )
3 100ohm resistors
Epoxy ( https://goo.gl/TGuacR )
Soldering and wiring equipment / supplies
Files ( https://goo.gl/WrM1D6 )
Pins (I cut some off of voltage regulators: https://goo.gl/D7pyPF )
Hot glue gun
3M Tape ( https://goo.gl/5nxyFA )
Optional: small brush to apply epoxy ( https://goo.gl/MY4XmA )
Steps:
Print two sets of each STL. Rotate the second of each on the Y axis.
File out LED holes and push LEDs in
Optional: Paint markers (I used Krylon outdoor furniture paint)
--- Front markers will be soldered as three groups of five LEDs in serial with 100 ohm resistor.
--- Rear markers will be soldered as two groups of six LEDs with 150 ohm resistor and one group of five with 220 ohm resistor also in serial.
--- Place LEDs so that you can bend and connect the positive / negative leads down and together, then solder. See picture.
--- Solder the first positive lead of the series to the appropriate resistor, the resistor to lead wire. The final negative of the series solder to a lead wire.
Apply hot glue to keep resistors and leads from touching LEDs
Run lead wires thru holes in covers, use epoxy to bond covers to marker. Allow to sit for at least one hour.
Solder pins onto leads. You'll want positive leads to one pin and negative leads to one pin.
Remove factory makers. Clean area. Apply tape to opening and remove backing.
Connect pins to harness. Turn on aux lights and make sure markers light. If not, switch around pins.
Fill in hole in back of marker with hot glue. Cover harness and leads with hot glue. Allow to cool.
Press in makers into position and hold for ~ a minute.
Similar models
thingiverse
free

BLtouch cover with integrated LED by codysuzz
...turn off and on the leds through the interface. just assign the pin on the plugin to pin 12.
https://github.com/gigibu5/octolight
thingiverse
free
18650 holder 1S / 2S
...make sure they are correctly oriented. 1s instructions follow similar steps as described in the2s construction, however: solder two...
thingiverse
free
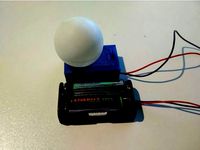
PS Move DIY VR Headtracker by Nanafalke
...nto the lid and the ball from above. close the lid and you are done.
for software setup, watch the video on daleytechs channel.
thingiverse
free

Lighted Fan Duct by Vyrago
... positive cable connects to one of the v+ terminals on the power supply, the negative cable connects to one of the com terminals.
thingiverse
free

Part Lamp by elwood127
... final led negative connecting to the ground from the power supply. sorry, i forgot to convert the stl to metric. good to go now.
thingiverse
free
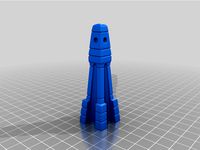
Targa Pylon by FlynnD273
...fits onto the base from above, then you glue the pylon on top in the indent. the bottom of the base slots in and twists to close.
thingiverse
free

Traffic Lights (3 Leds) by hardmoduino
...se and pole.
the base has four 3mm holes, to place four m3 screws, that are placed in the vertex of a 1/2" square (12,7 mm).
thingiverse
free
TP4056 18650 Holder Charger by zeroeffekt
...lue them in place.
it's easier if you solder the wires to the tp4056 then slide it in place and then solder the contacts on.
thingiverse
free

FreeTrack / TrackIR Infrared LED Clip by MelihKa
... resistor
1x on/off switch
1x cr2032 battery holder
1x cr2032 battery
~30cm wire.
epoxy resin or hot glue to fix the components.
thingiverse
free

Smart Christmas Light Arch by auo
...ith a
corresponding firmware and home automation system you can now control
each single led (i used esp-home and home-assistant).

Camaro
3d_ocean
$40

Camaro
... smooth , no textures no materials included , only the model . file exported to *.obj , and *.fbx – version 2012. *.obj file c...
3d_export
$5

camaro
...camaro
3dexport
camaro 2015
3ddd
free

Camaro
...camaro
3ddd
классика chevrolet camaro z28
3d_export
free

Camaro
...camaro
3dexport
chevy camaro 3d model available to download
3d_ocean
$49

Camaro 2010
...camaro 2010
3docean
camaro camaro2010 car
car,camaro,camaro2010
3ddd
$1

chevrolet camaro
... camaro , автомобиль , машина
chevrolet camaro
3d_ocean
$39
Chevrolet Camaro
...chevrolet camaro
3docean
3d model cars chevrolet camaro
car chevrolet camaro
3d_export
$5
chevrolet camaro
...chevrolet camaro
3dexport
chevrolet camaro
3d_export
$9

chevrolet camaro
...chevrolet camaro
3dexport
high poly model of chevrolet camaro... images are rendered with vray.
3d_export
$5

chevrolet camaro
...chevrolet camaro
3dexport
low-poly 3d model sport car chevrolet camaro
Gen
turbosquid
$15
gen
... available on turbo squid, the world's leading provider of digital 3d models for visualization, films, television, and games.
turbosquid
$2
Gen. Rifle
...bosquid
royalty free 3d model gen. rifle for download as fbx on turbosquid: 3d models for games, architecture, videos. (1374075)
3d_export
$8

pokemon sprite voxel 1 gen
...pokemon sprite voxel 1 gen
3dexport
pokemon voxel 1 gen
turbosquid
$45
Chest Next-Gen
... available on turbo squid, the world's leading provider of digital 3d models for visualization, films, television, and games.
turbosquid
$39
Nano 6th Gen
... available on turbo squid, the world's leading provider of digital 3d models for visualization, films, television, and games.
3d_export
$8

pokemon sprite voxel 7 gen
...pokemon sprite voxel 7 gen
3dexport
pokemon sprite voxel 7 gen
3d_export
$8
pokemon sprite voxel 5 gen
...pokemon sprite voxel 5 gen
3dexport
pokemon sprite voxel 5 gen
3d_export
$8

pokemon sprite voxel 3 gen
...pokemon sprite voxel 3 gen
3dexport
pokemon sprite voxel 3 gen
3d_export
$8

pokemon sprite voxel 4 gen
...pokemon sprite voxel 4 gen
3dexport
4 gen pokemon voxel sprites
3d_export
$8

pokemon sprite voxel 2 gen
...pokemon sprite voxel 2 gen
3dexport
pokemon sprite voxel 2 gen
Markers
3d_export
$5

Marker
...marker
3dexport
low pily marker.<br>you can apply subdivision
turbosquid
$2

marker
...urbosquid
royalty free 3d model marker for download as blend on turbosquid: 3d models for games, architecture, videos. (1322754)
turbosquid
$1

Markers
...rbosquid
royalty free 3d model markers for download as blend on turbosquid: 3d models for games, architecture, videos. (1597501)
3d_export
$10

coffee marker
...coffee marker
3dexport
coffee marker, blender 2.79, cycles
turbosquid
$5

markers
... available on turbo squid, the world's leading provider of digital 3d models for visualization, films, television, and games.
turbosquid
$5

Markers
... available on turbo squid, the world's leading provider of digital 3d models for visualization, films, television, and games.
3d_export
$5

Marker 3D Model
...marker 3d model
3dexport
marker colour draw paint picture
marker 3d model haker_km 76730 3dexport
turbosquid
$24

Markers Holder
...uid
royalty free 3d model markers holder for download as obj on turbosquid: 3d models for games, architecture, videos. (1464164)
turbosquid
$6

brush marker
...squid
royalty free 3d model brush marker for download as c4d on turbosquid: 3d models for games, architecture, videos. (1492609)
archive3d
free
Marker 3D Model
...marker writing materials
marker n230608 - 3d model (*.gsm+*.3ds) for interior 3d visualization.
Side
3ddd
free
Side-by-side холодильник
...side-by-side холодильник
3ddd
холодильник
side-by-side холодильник samsung
turbosquid
free

siding
... available on turbo squid, the world's leading provider of digital 3d models for visualization, films, television, and games.
3ddd
$1

Кресло Side
...ресло side
3ddd
side , eero saarinen
eero saarinen кресло side.
материалы corona render.
turbosquid
$15
Mausoleum Entrances Lined Side By Side
...model mausoleum entrances lined side by side for download as on turbosquid: 3d models for games, architecture, videos. (1696515)
3ddd
$1

Side-by-Side SHARP SJ-F78PEBE
... холодильник
холодильник side-by-side sharp sj-f78pebe, габариты (шxгxв) 89x77x183 см, с материалами
3ddd
$1

Liebherr Refrigerator Side By Side Sbes 7165
... side sbes 7165
3ddd
liebherr , холодильник
liebherr refrigerator side by side sbes 7165
3ddd
$1
Side table
...side table
3ddd
журнальный
classic side table
3ddd
$1

Зеркало Side
...зеркало side
3ddd
винтаж , зеркало
зеркало side
3ddd
$1

Side Table
...side table
3ddd
кофейный , круглый
side table
3ddd
$1

Side table
...side table
3ddd
приставной
bed side table, coffee table
5
turbosquid
$6

Rock 5-5
...urbosquid
royalty free 3d model rock 5-5 for download as obj on turbosquid: 3d models for games, architecture, videos. (1639063)
3d_export
$5

hinge 5
...hinge 5
3dexport
hinge 5
turbosquid
$10

A-5
... available on turbo squid, the world's leading provider of digital 3d models for visualization, films, television, and games.
turbosquid
$2

A-5
... available on turbo squid, the world's leading provider of digital 3d models for visualization, films, television, and games.
turbosquid
$12

Calligraphic Digit 5 Number 5
...hic digit 5 number 5 for download as max, obj, fbx, and blend on turbosquid: 3d models for games, architecture, videos. (1389333)
3ddd
$1

5 роз
...5 роз
3ddd
5 роз в стеклянной вазе
design_connected
$11

iPhone 5
...iphone 5
designconnected
apple iphone 5 computer generated 3d model.
3ddd
$1

Lola 5
...lola 5
3ddd
miniforms
lola 5 miniforms 300*65*134
3ddd
$1

Nexus 5
...dd
nexus , phone , телефон
google nexus 5 phone
3d_ocean
$15

iPhone 5
...iphone 5
3docean
3d 4d apple cinema iphone model modeling phone screen texture
iphone 5 3d model and texture realistic iphone 5.