Thingiverse
Geartar by hugoarchicad
by Thingiverse
Last crawled date: 3 years ago
UPDATE 1: I have added a little video here for you to see all the gears moving:
https://youtu.be/DH4wXGN3lu0
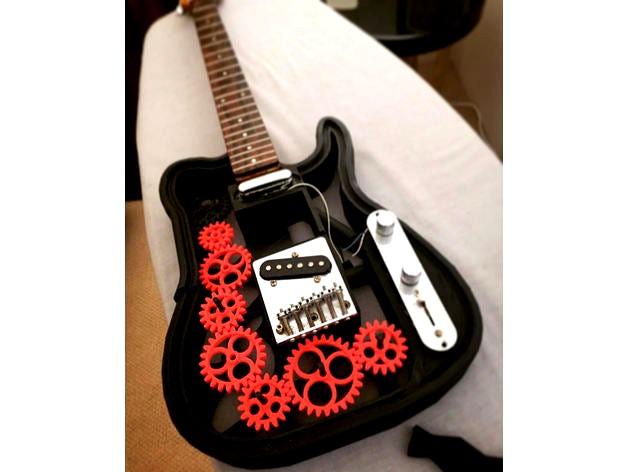
I have here my 3D printed guitar.
follow me on instagram (you will see videos of the guitar in action dont forget to like it there!)
hugo archicad
I have zero music knowledge.
My friend Steve has a band called 44 inch chest and he saw the guitar on YouTube that was 3D printed and jokingly asked me to make one just like it for him.
I said I would need a donor guitar first so one day he got one at a flea market.
Then it sat in my wardrobe for about 6 months until one day I couldn't think of what to 3D print next so I started.
In terms of parts I used the donor guitar, pulled it all apart then I photocopied it and started modeling.
I had to reduce the body by 97% to get it to fit on my cr-10 because it did say it had a 300x300x400 high but the reality was a little smaller.
I did not shrink anything else only the body.
So I used the gears from a thingiverse post that someone else had made already.
I did not shrink anything else.
Because of the 97% I had to cut away a little of the wooden handle thing because it would not slot perfectly because although it was modeled to fit I couldn't fit it on the printer bed.
List of things you need to make this guitar:
about 2 kilos of pla -1 mini servo motor which I had to open to make sure it would do full rotation( I found the answer on YouTube) -1 EL wire (1 meter)(red) with its electronic part. -1 battery holder (2xaa) for the servo -glue (clear for the EL wire) -glue to stick the main guitar pieces, the bottom lid has a groove on its top for the glue to go on so it doesnt lift the lid too much with the thickness of the glue blob -wire to add length to the componets and that tube thing that you put on the wires that shrinks when you put it under heat or cigar lighter (I dont know the name but better than using electrical tape looks so professional with it and all the soldering stays put)
I wanted to fit the servo motor battery inside the guitar, I left a space there but I couldn't at the end because I couldn't get the EL wire to work without its little box ( there is some electronic stuff in it that I couldn't get out of the box so it sits outside.
I would like to find a way to fit it inside (my electronic know how is not the best)
I did managed to solder all the connections and connect a switch (a key that turns the servo on).
I designed everything to conceal the wiring and made hidden little tunnels to run the wiring, and also made a little channel to run the EL wire through cleanly.
I don't know if my donor guitar is like other guitars so the design I have made works for this guitar but don't know if it would work on others.
Nu supports needed at all anywhere.
A nice big 3D printer would be nice but nothing stopping anyone from cutting it up in pieces.
If you do end up cutting it in pieces do not shrink anything then everything will work perfectly.
Enjoy
I know i did designing it and putting it together.
Also when putting screws i learned that if you put your soldering iron on top of the screw for a bit and hold it there, the heat transfers to the plastic making it easier to screw then when its cooled its stick super well.
One thing...the gears are not my design, i got them from here:https://www.thingiverse.com/thing:2218127
And have added them here so you can download everything you need from one place.
3D PRINTING SETTINGS
I used no supports
2 rolls of black PLA, and a bit of red for the gears.
I have one gear that is a little too tight in there, I suggest you print the gears a few times and see what colours work best.
you do not need all the gears I added BUT you might want to make a belt or something to hold the guitar.
I used cura so I used 1.75 nozzle, 30% infill for the main body.
BUT for the little gear holders I made them 70% infill as at first the little bits broke off but not when I made them stronger.
the gears were all 30% infill.
follow me on instagram (you will see videos of the guitar in action dont forget to like it there!)
hugo archicad
https://youtu.be/DH4wXGN3lu0
I have here my 3D printed guitar.
follow me on instagram (you will see videos of the guitar in action dont forget to like it there!)
hugo archicad
I have zero music knowledge.
My friend Steve has a band called 44 inch chest and he saw the guitar on YouTube that was 3D printed and jokingly asked me to make one just like it for him.
I said I would need a donor guitar first so one day he got one at a flea market.
Then it sat in my wardrobe for about 6 months until one day I couldn't think of what to 3D print next so I started.
In terms of parts I used the donor guitar, pulled it all apart then I photocopied it and started modeling.
I had to reduce the body by 97% to get it to fit on my cr-10 because it did say it had a 300x300x400 high but the reality was a little smaller.
I did not shrink anything else only the body.
So I used the gears from a thingiverse post that someone else had made already.
I did not shrink anything else.
Because of the 97% I had to cut away a little of the wooden handle thing because it would not slot perfectly because although it was modeled to fit I couldn't fit it on the printer bed.
List of things you need to make this guitar:
about 2 kilos of pla -1 mini servo motor which I had to open to make sure it would do full rotation( I found the answer on YouTube) -1 EL wire (1 meter)(red) with its electronic part. -1 battery holder (2xaa) for the servo -glue (clear for the EL wire) -glue to stick the main guitar pieces, the bottom lid has a groove on its top for the glue to go on so it doesnt lift the lid too much with the thickness of the glue blob -wire to add length to the componets and that tube thing that you put on the wires that shrinks when you put it under heat or cigar lighter (I dont know the name but better than using electrical tape looks so professional with it and all the soldering stays put)
I wanted to fit the servo motor battery inside the guitar, I left a space there but I couldn't at the end because I couldn't get the EL wire to work without its little box ( there is some electronic stuff in it that I couldn't get out of the box so it sits outside.
I would like to find a way to fit it inside (my electronic know how is not the best)
I did managed to solder all the connections and connect a switch (a key that turns the servo on).
I designed everything to conceal the wiring and made hidden little tunnels to run the wiring, and also made a little channel to run the EL wire through cleanly.
I don't know if my donor guitar is like other guitars so the design I have made works for this guitar but don't know if it would work on others.
Nu supports needed at all anywhere.
A nice big 3D printer would be nice but nothing stopping anyone from cutting it up in pieces.
If you do end up cutting it in pieces do not shrink anything then everything will work perfectly.
Enjoy
I know i did designing it and putting it together.
Also when putting screws i learned that if you put your soldering iron on top of the screw for a bit and hold it there, the heat transfers to the plastic making it easier to screw then when its cooled its stick super well.
One thing...the gears are not my design, i got them from here:https://www.thingiverse.com/thing:2218127
And have added them here so you can download everything you need from one place.
3D PRINTING SETTINGS
I used no supports
2 rolls of black PLA, and a bit of red for the gears.
I have one gear that is a little too tight in there, I suggest you print the gears a few times and see what colours work best.
you do not need all the gears I added BUT you might want to make a belt or something to hold the guitar.
I used cura so I used 1.75 nozzle, 30% infill for the main body.
BUT for the little gear holders I made them 70% infill as at first the little bits broke off but not when I made them stronger.
the gears were all 30% infill.
follow me on instagram (you will see videos of the guitar in action dont forget to like it there!)
hugo archicad
Similar models
cults
free

Geartar
... here:
https://www.thingiverse.com/thing:2218127
and have added them here so you can download everything you need from one place.
thingiverse
free

G-Scale switch activator
... fit on top of the gear, (mine goes below).
so, the original is more elegant and nicer design, this one fits my servo. like that.
thingiverse
free

9g Servo Glue-On Mount with Wire Guide by PlaneMaker1968
...ou!
i know it adds a little bit of weight, but with these, you can place the servo anywhere you like and firmly attach the mount.
thingiverse
free

Wrist Gear for standard servo mount for Inmoov rotating wrist by magicaltrevor
...the servo cap. it might be a little tall so you can shave some of the bottom off. i'll probably make a cleaner version later.
thingiverse
free
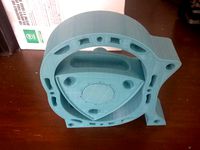
Wankel Rotary Engine by 3DQstudio
... the model an there was a lot of glue involve. so i redesign the core, the axis and the crank so that they don`t need to be glue.
thingiverse
free

lego technic idler gear by colec
...lego technic idler gear by colec
thingiverse
i couldn't find a lego idler gear so i made my own.
it fits a little loose
thingiverse
free

http://www.thingiverse.com/thing:921992 by fvt
...e.
but then i had to replace my power supply with a bigger one, so the box did not fit anymore.
i had to cut out a corner to fit.
thingiverse
free

Wire Holder
... am relecing this one incase soemone els has that problem. (i put a t-nut on mine because it was to small but i did fix the file)
thingiverse
free

Wire Holder for back of a desk by Sammcman
...there by the desk. works the best againt a wall.
printed this in petg as againt a radiator pla would soften.
hope you like it :)
thingiverse
free

D20 Not My creation dice by HAXORUSMAKES
...o added 3 more so you have 4 at once. perfect cool dice for magic the gathering. credit to south2012 for making this cool design.
Hugoarchicad
thingiverse
free

clock by hugoarchicad
...e next tuesday, details here:
http://www.meetup.com/brisbane-3d-printing-meetup/
okay, its a clock to get you a good life balance
thingiverse
free

hodor by hugoarchicad
...borrowed from
https://www.thingiverse.com/thing:1634861
i admit is a little too big, when i print it again i will print it at 70%
thingiverse
free

rocket by hugoarchicad
...s
i have added the smoke thing on its own, the rocket on another file and another with 3 rockets so you can size it to your needs
thingiverse
free

Guggenheim museum by hugoarchicad
...akhtiyor primkulov for helping me save it as a combined stl.
gracias al que coloco este obj aqui, nosotros solamente lo unimos.
thingiverse
free

Coffee Hand by hugoarchicad
...ry slightly so you can put coffees or those frzen drinks from 7-eleven.
credit goes to my mother in law who asked me to make one.
thingiverse
free

HU-GLO lamp holder by hugoarchicad
...//www.thingiverse.com/thing:730263
i hope you like it and use it.
i had a few rods left over from my 3d wheelchair design (hu-go)
thingiverse
free

4 pack can carrier by hugoarchicad
...y and please dont copy and ugly fy it!!!!
if you were kind enough to post photos i would be so happy.
thankyou
no supports needed
thingiverse
free

Drumstick holder (x4) by hugoarchicad
... could make it smaller to fit a smaller 3d printer, besides it would be great to see a smaller one for the 'mini' version
thingiverse
free
Mini Nitrous bottle by hugoarchicad
...tter, miner were a bit tight to fit.
hope to see your remote control car, scooter, real car with one of these.
please post photos
thingiverse
free
filament joiner by hugoarchicad
...oll it into the main roll
thats it.
i hope this helps people
btw i cannot give you the originals model unless you use archicad.