Thingiverse

Gameboy Advance SP Extended Capacity Battery Cover by makho
by Thingiverse
Last crawled date: 3 years ago
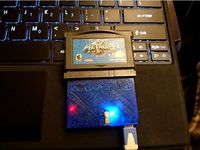
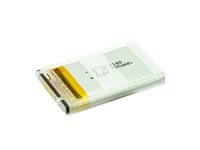
I tweaked the original cover from sheshin but I expanded it to hide a 2Ah turnigy battery from hobby king and I included a mount for a micro usb breakout board for charging.
Update 2018-05-17: I'm happy with the shape of the cover as is, but I will be adding a third option soon for a USB C breakout board to charge via USB C. Additionally, I updated my pictures with the actual model hosted instead of an older one.
Update 2018-12-29: I decided I wasn't happy with the shape of the cover. I added a new lower profile version that should still fit the same cell. This requires cutting out even more of the original casing and removing the springs for the shoulder buttons. There is no room for an extra charge port so there is only one version.
These are the parts I used:
Micro USB Breakout Board: https://www.aliexpress.com/item/5pcs-Mini-Micro-USB-to-DIP-2-54mm-Adapter-Connector-Module-Board-Panel-Female-5-Pin/32555774957.html
2 Ah LiPo Battery: https://hobbyking.com/en_us/turnigy-2000mah-1s-1c-lipoly-w-2-pin-jst-ph-connector.html
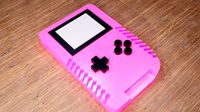
Warning: Completing this mod requires irreversible modification to the Gameboy Advance SP. You have to permanently remove portions of the lower housing to fit the battery snugly, even with the cover since the battery will sit at an angle. I recommend using an aftermarket housing. Soldering is REQUIRED.
You have to remove a large section of the internal battery tray on the lower housing near the cartridge connector. You must leave the other side intact otherwise the shoulder buttons will no longer install properly. After making physical room for the battery, I removed the battery connector from the motherboard and the JST connector from the battery and soldered the battery to the bare pads. Using a connector would be optimal but I have not yet found one that will fit properly and is skookum enough. I used hot glue on the soldered terminals to secure the wires. You can solder directly to the battery connector on the SP without removing it, but I opted to remove it since it will give me a little bit more room to work with and it will make the mod reversible as long as I replace the lower housing and do not lose the desoldered connector. Until final assembly, the battery should always remain disconnected from the circuit board to protect from shorts.
To add the Micro USB breakout board for charging, solder stranded wire (28 AWG is sufficient) to the VBUS and GND pads on the breakout board and connect the VBUS wire to pin 2 on the reverse of the power port and GND to pin 6. Make sure you use enough wire to maneuver the board through the hole made for the battery, around the battery and into the battery cover. I find that a service loop will give enough slack to maneuver the components and it will tuck neatly underneath the rear of the battery or to the right side. See pictures for more details.
Update 2018-05-17: I'm happy with the shape of the cover as is, but I will be adding a third option soon for a USB C breakout board to charge via USB C. Additionally, I updated my pictures with the actual model hosted instead of an older one.
Update 2018-12-29: I decided I wasn't happy with the shape of the cover. I added a new lower profile version that should still fit the same cell. This requires cutting out even more of the original casing and removing the springs for the shoulder buttons. There is no room for an extra charge port so there is only one version.
These are the parts I used:
Micro USB Breakout Board: https://www.aliexpress.com/item/5pcs-Mini-Micro-USB-to-DIP-2-54mm-Adapter-Connector-Module-Board-Panel-Female-5-Pin/32555774957.html
2 Ah LiPo Battery: https://hobbyking.com/en_us/turnigy-2000mah-1s-1c-lipoly-w-2-pin-jst-ph-connector.html
Warning: Completing this mod requires irreversible modification to the Gameboy Advance SP. You have to permanently remove portions of the lower housing to fit the battery snugly, even with the cover since the battery will sit at an angle. I recommend using an aftermarket housing. Soldering is REQUIRED.
You have to remove a large section of the internal battery tray on the lower housing near the cartridge connector. You must leave the other side intact otherwise the shoulder buttons will no longer install properly. After making physical room for the battery, I removed the battery connector from the motherboard and the JST connector from the battery and soldered the battery to the bare pads. Using a connector would be optimal but I have not yet found one that will fit properly and is skookum enough. I used hot glue on the soldered terminals to secure the wires. You can solder directly to the battery connector on the SP without removing it, but I opted to remove it since it will give me a little bit more room to work with and it will make the mod reversible as long as I replace the lower housing and do not lose the desoldered connector. Until final assembly, the battery should always remain disconnected from the circuit board to protect from shorts.
To add the Micro USB breakout board for charging, solder stranded wire (28 AWG is sufficient) to the VBUS and GND pads on the breakout board and connect the VBUS wire to pin 2 on the reverse of the power port and GND to pin 6. Make sure you use enough wire to maneuver the board through the hole made for the battery, around the battery and into the battery cover. I find that a service loop will give enough slack to maneuver the components and it will tuck neatly underneath the rear of the battery or to the right side. See pictures for more details.
Similar models
grabcad
free

Adafruit JST-PH 2-Pin SMT Right Angle Breakout Board
...teries as well as our 6v coin cell holder and 3xaaa battery pack. we also have simple jst pigtails that mate with this connector.
thingiverse
free

USB emulator enclosure
...in jst connectors. after passing wires through the input hole, i knotted the cable to prevent stress to the connectors and board.
thingiverse
free

Gameboy Advance SP battery extension cover by PuTaTuo
...other battery to the gameboy advance sp. soldering required to connect extra battery. can also fit a wireless charging module in.
3dwarehouse
free

IOIO OTG Board
...mark for the female header pin, micro-usb and jst connector respectively. #android #connectors #electronics #ioio #ioio_otg #ytai
grabcad
free

Pololu USB Micro-B Connector Breakout Board
...pololu usb micro-b connector breakout board
grabcad
3d model 1:1 of pololu usb micro-b connector breakout board
thingiverse
free

Gopro Remote Control Mount for El Grande Extension Pole by sjlu
...hat does not match.
screw the remote control on the top part. don't overwind!
screw the top part on the lower part.
have fun!
thingiverse
free

Ender 3 MKS Gen L frame with micro USB connector by gtortone
...gnd available on aux-1 connector (see mks genl pinout)
then use three cables to connect micro usb module to your selected pins...
3dwarehouse
free

Power Cell - LiPo Charger Booster PRT-11231
...der jumper on the back of the pcb). #battery #booster #charger #lipo #lipoly #lithium #polymer #regulator #sfe #sparkfun #voltage
thingiverse
free

USB Power Lift Adapter (3d Printer) by condraka
..._title_o04_s00?ie=utf8&th=1
https://www.amazon.com/gp/product/b07w6t9kpj/ref=ppx_yo_dt_b_asin_title_o04_s00?ie=utf8&psc=1
thingiverse
free

Micro USB Breakout Board Project Mount by Nick_C
...ing it as the charging port for a bluetooth speaker and so needed a proper way of mounting it nicely.. thank god for 3d printing!
Makho
thingiverse
free

AGB-101 LCD Bezel (backlight bleed hider) by makho
...petg on a .4mm nozzle. ymmv
works better with oem screen lenses as aftermarket ones may not have the cutout centered (like mine).
thingiverse
free

Game Boy Micro LCD Bezel For Game Boy Advance SP by makho
...ular) and a short version. i used the tall version. short version is untested but all the critical dimensions should be the same.
thingiverse
free
GBxCart RW v1.2b Case by makho
...e fillets so the original may print better.
need a case for gbxcart rw v1.3? see here: https://www.thingiverse.com/thing:4051388
thingiverse
free
GBA SP LiPo Battery Housing by retromoddingcom
...optional jst achr connector) available assembled from our store: https://www.retromodding.com/collections/game-boy-advance-sp/products/makhogame-boy-advance-sp-battery ...
thingiverse
free

GOLE1 Rear Cover w/ Keyboard Mount by makho
...ug it from the motherboard, you have to remove the battery which is stuck down with two strips of doublesided adhesive foam tape.
thingiverse
free

Xbox 360 Wired Controller USB C Bezel by makho
...male-plug-socket-connector-smt-type/32438313693.html
make sure you solder both a and b data pads so that the cable is reversible.
thingiverse
free

Duratrax Battery Strap & ESC Mount Evader EXT2 (DTXC6305 Replacement) by makho
...xm3x10 to attach the esc mount to the chassis. foam between the battery and the strap is not required but definitely recommended.
thingiverse
free

Evader ST Pro Suspension Mounts and Spacers (DTXC9584 Replacement) by makho
...alled on my evader st. will test eventually but i don't think that pla is durable enough. currently printing in petg as well.
Gameboy
3d_export
$5

GameBoy
...gameboy
3dexport
game boy
turbosquid
$39

Gameboy
... available on turbo squid, the world's leading provider of digital 3d models for visualization, films, television, and games.
turbosquid
free

Gameboy
... available on turbo squid, the world's leading provider of digital 3d models for visualization, films, television, and games.
turbosquid
$16

Gameboy Color
...free 3d model gameboy color for download as png, max, and obj on turbosquid: 3d models for games, architecture, videos. (1338626)
turbosquid
$40

Gameboy 1989
...model gameboy (1989) for download as blend, fbx, obj, and dae on turbosquid: 3d models for games, architecture, videos. (1550925)
turbosquid
$6

gameboy low poly
...d
royalty free 3d model gameboy low poly for download as lwo on turbosquid: 3d models for games, architecture, videos. (1335132)
turbosquid
$6

Nintendo Gameboy toys
...ree 3d model nintendo gameboy toys for download as ma and obj on turbosquid: 3d models for games, architecture, videos. (1398117)
turbosquid
$3

Gameboy(Old school)
...model gameboy(old school) for download as obj, fbx, and blend on turbosquid: 3d models for games, architecture, videos. (1473507)
3d_export
$30
pink retro gameboy console blender
...ameboy console blender
3dexport
pink gameboy console made in blender https://lynkfire.com/gv https://www.instagram.com/gv.art.e/
3d_export
$19
Game Boy 3D Model
...game boy 3d model 3dexport gameboy game boy nintendo handheld videogame high quality toy children...
Sp
turbosquid
$9
Speakers SVEN SPS SPS-866S
... model speakers sven sps sps-866s for download as max and obj on turbosquid: 3d models for games, architecture, videos. (1201075)
turbosquid
$30

Kronosaurus sp.
...id
royalty free 3d model kronosaurus sp. for download as stl on turbosquid: 3d models for games, architecture, videos. (1472857)
3ddd
$1

Vistosi / Minigio SP 60
...vistosi / minigio sp 60
3ddd
vistosi
vistosi / minigio sp 60
3ddd
$1
Vistosi / Minigio SP 35
...vistosi / minigio sp 35
3ddd
vistosi
vistosi / minigio sp 35
3ddd
$1

Shower and Hose SP 272
...shower and hose sp 272
3ddd
душ
shower and hose sp 272
3ddd
$1
Sven SPS-619 Gold
...sven sps-619 gold
3ddd
sven , колонки
sven sps-619 gold
design_connected
$9

Cheope SP G
...p g
designconnected
vistosi cheope sp g pendant lights computer generated 3d model. designed by studio tecnico vetreria vistosi.
design_connected
$7
Cheope SP P
... p
designconnected
vistosi cheope sp p pendant lights computer generated 3d model. designed by studio tecnico vetreria vistosi.
3ddd
free
JUSTer SP-676
... колонки
компьютерные колонки juster sp-676. размеры 114x152x240 мм. текстуры в комплекте, материалы настроены.
3d_ocean
$5
Chair SP
... use it in your 3d scene created in cinema 4d r16 to be rendred with vray render zip file include obj format for other 3d program
Capacity
turbosquid
$4

Industrial capacity barrel 1
...ndustrial capacity barrel 1 for download as max, obj, and fbx on turbosquid: 3d models for games, architecture, videos. (1312489)
turbosquid
$19

Vertical capacity metering system
...pacity metering system for download as max, fbx, obj, and 3ds on turbosquid: 3d models for games, architecture, videos. (1589287)
turbosquid
$15

Capacity for food (1st part)
... available on turbo squid, the world's leading provider of digital 3d models for visualization, films, television, and games.
3d_export
$5

oil can capacity of 5 ltr
...his is a oil can of 5 ltr. capacity which is use to store vegetable oil and other beverages. and this is made from polypropylene.
turbosquid
$5

Capacity for food (2nd part) - cap
... available on turbo squid, the world's leading provider of digital 3d models for visualization, films, television, and games.
3d_export
$10
9L Super-Capacity Composite Humidifier
...~ 100,000 model parts: 1 texture format: .png .jpg resolution: 1024*1024 pbr in substance painter formats: .obj .gltf .fbx .blend
3d_export
$99
LandRover Defender 110 High Capacity PickUp 2011 3D Model
... 2012 2013 2014 pickup pick up 4x4 suv offroad
landrover defender 110 high capacity pickup 2011 3d model humster3d 37708 3dexport
humster3d
$75

3D model of Land Rover Defender 110 High Capacity Pickup 2011
...r defender 110 high capacity pickup 2011 in various file formats. all our 3d models were created maximally close to the original.
3d_export
$10

Marimo Washing Large Capacity Humidifier 33L
...~ 100,000 model parts: 1 texture format: .png .jpg resolution: 1024*1024 pbr in substance painter formats: .obj .gltf .fbx .blend
3d_export
$99

LandRover Defender 130 High Capacity Double Cab P 3D Model
...12 2013 2014 pikup 4x4 suv offroad long 4door
landrover defender 130 high capacity double cab p 3d model humster3d 38044 3dexport
Advance
turbosquid
$139
Carol (Advanced)
... available on turbo squid, the world's leading provider of digital 3d models for visualization, films, television, and games.
turbosquid
$15

ADVANCED ROOM.max
... available on turbo squid, the world's leading provider of digital 3d models for visualization, films, television, and games.
turbosquid
$15

Explay Advance
... available on turbo squid, the world's leading provider of digital 3d models for visualization, films, television, and games.
turbosquid
$2

Advanced Crate
... available on turbo squid, the world's leading provider of digital 3d models for visualization, films, television, and games.
turbosquid
$1
Advanced Canister
... available on turbo squid, the world's leading provider of digital 3d models for visualization, films, television, and games.
turbosquid
$20

automatic Advance Gun
...
royalty free 3d model automatic advance gun for download as on turbosquid: 3d models for games, architecture, videos. (1609069)
turbosquid
$4

Advanced Shower Equipment
...free 3d model advanced shower equipment for download as blend on turbosquid: 3d models for games, architecture, videos. (1282411)
turbosquid
$1

Advanced Sniper Rifle
...oyalty free 3d model advanced sniper rifle for download as obj on turbosquid: 3d models for games, architecture, videos. (720205)
3d_ocean
$32

Advanced Hospital Bed
...ds max 2010 or higher and many others. formats *.max scanline *.max vray *.max mentalray *.c4d advanced render *.c4d cinema 4d...
turbosquid
$17

Advance Rifle Patrol
...free 3d model advance rifle patrol for download as ma and obj on turbosquid: 3d models for games, architecture, videos. (1409260)
Extended
turbosquid
$39
Extending table
...id
royalty free 3d model extending table for download as max on turbosquid: 3d models for games, architecture, videos. (1290552)
turbosquid
$5
Extend Table
...squid
royalty free 3d model extend table for download as skp on turbosquid: 3d models for games, architecture, videos. (1372508)
turbosquid
$40
Engine Extended
... available on turbo squid, the world's leading provider of digital 3d models for visualization, films, television, and games.
turbosquid
$12

Triple extender
... available on turbo squid, the world's leading provider of digital 3d models for visualization, films, television, and games.
turbosquid
$99

Monica (Extended Pack)
... available on turbo squid, the world's leading provider of digital 3d models for visualization, films, television, and games.
turbosquid
$19
Berlino Extendable Table
... available on turbo squid, the world's leading provider of digital 3d models for visualization, films, television, and games.
turbosquid
$3
Extendable Modern Table
... available on turbo squid, the world's leading provider of digital 3d models for visualization, films, television, and games.
3d_export
$32

KC10 Extender 3D Model
...c 10 aircraft jet fighter bomber close support interceptor spy attacker plane
kc10 extender 3d model martialartist 24527 3dexport
3d_export
$50
Extended Range Trailer 3D Model
...railer 3d model
3dexport
extended range trailer military patrol equipment
extended range trailer 3d model dougmavs 75684 3dexport
design_connected
$13

Big Dining Tables Extended
...ining tables extended
designconnected
bonaldo big dining tables extended computer generated 3d model. designed by gilles, alain.
Battery
3d_ocean
$2

Battery
...battery
3docean
battery electronic
a high quality battery .
3d_export
free
battery
...battery
3dexport
battery
3d_ocean
$5
Battery
...battery
3docean
battery electronics
a classic 6 v battery, high poly with materials
3d_ocean
$3
Batteries
...batteries 3docean aa aaa batteries battery d electronics energy materials power subdivision uv unwrapped aa,...
3d_export
$19
Lead-acid battery storage battery lithium battery
...ttery storage battery lithium battery
3dexport
1.lead-acid battery storage battery lithium battery 2.files include 3dmax obj fbx
3d_ocean
$7
Battery Model
...battery model
3docean
big battery car battery vehicle battery
car battery, big battery, vehicle battery.
3ddd
free
battery energier
...battery energier
3ddd
battery energier , батарейка
battery energier
turbosquid
free
battery
...battery
turbosquid
free 3d model battery for download as obj on turbosquid: 3d models for games, architecture, videos. (1151676)
3d_ocean
$1
Battery Model
...lack minus plus white yellow
this is battery model is about 1000 triangles. turntable preview is smoothed version of the battery.
3d_export
$10
battery 18650
...battery 18650
3dexport
battery 18650
Cover
archibase_planet
free

Cover
...cover
archibase planet
cover place setting
cover n170807 - 3d model for interior 3d visualization.
3ddd
$1
cover
...cover
3ddd
ковер , круглый
cover decor
archibase_planet
free

Cover
...cover
archibase planet
cover place setting setting
servis-cafe1930 - 3d model for interior 3d visualization.
turbosquid
free
Coverings
...rings
turbosquid
free 3d model coverings for download as dwg on turbosquid: 3d models for games, architecture, videos. (1279391)
3d_export
$5
plug cover
...plug cover
3dexport
plug cover
turbosquid
$25

Covers
... available on turbo squid, the world's leading provider of digital 3d models for visualization, films, television, and games.
3d_export
$10
manhole cover
...manhole cover
3dexport
manhole cover gost, stl, step
turbosquid
$5

Street Gas Cover Manhole Cover
... available on turbo squid, the world's leading provider of digital 3d models for visualization, films, television, and games.
3ddd
free
Bed cover
...bed cover
3ddd
постельное белье
very useful bed cover
3d_export
$5
cpu cover
...cpu cover
3dexport
cpu cover, cpu box, sheet metal container