Thingiverse
Funbot M8 version by madmike8
by Thingiverse
Last crawled date: 3 years ago
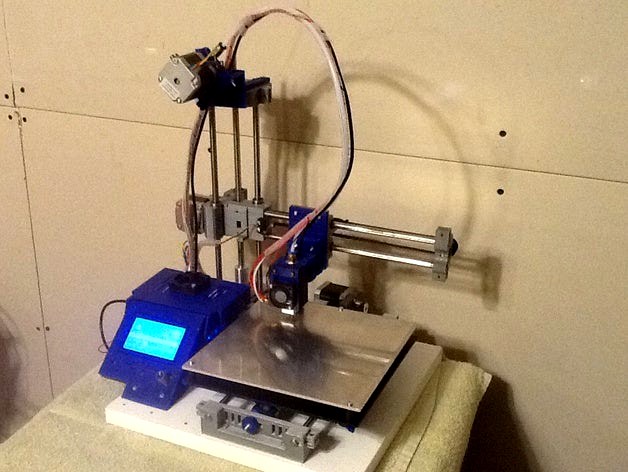
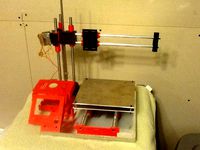
I had wanted to try a Funbot with 8mm Rods and Bearings, So here's my attempt at making that happen. This is just the parts required to redo the axis to 8mm.
Currently set for 15.5mm diameter for LM8UU 15mm OD bearings, and 8.15mm diameter for 8mm OD Rods.
This is also modified to also be able to use a T8 Leadscrew on the Z axis.
I think It's all good now. I will add accessories from here on out.
After nearly 3 years of using my Funbots, I find them very reliable printers. I'm going to try to do some updates to the files to make it better.
More Improvements coming soon.
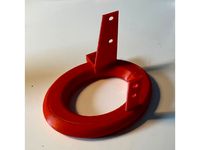
12/3/18 I added a spool holder that mounts on top and another version of the extruder holder that works with the new spool holder. Use a M4 size screw to attach spool end, amd M3 for mounting to Z top.
6/12/18 I updated the Z top part so that either a 608 bearing or a KFL08 Pillow Block could be used. I updated the Y stepper mount to have three mounting points instead of two.
5/21/18 I removed the old Marlin firmware and replaced it with Marlin 1.1.8 with bugfixes. It is set to have the Y endstop mounted in front. The Y endstop is still connected to the YMin pins, but will home to max. It has Bilinear Bed Leveling turned on along with BabyStepping and Linear Advance. Safe Z homing is enabled. Repaired the Part Fan Mount Hotend Cap. Sorry about that.
3/28/18 Added Extruder Plate remix with mounting holes for X carriage and hotend mount. I also upgraded the X carriage to include these mounting holes. It should make it easier to mount and align.
3/28/18 Added Hotend cap for e3dv6 hotend with 5015 part fan mount. FB 5015 fan duct Can be used with or without probe.
Optionally you can use the Semi-Circular Anet A8 Fan Duct for use without Z probe sensorhttps://www.thingiverse.com/thing:1954001
3/27/18 Added Drill template for the Base. The base is the most difficult part of building a Funbot, because the Z tower needs to be aligned with the Y axis. So I created this template to make it easier. You really only need Template1 unless your doing a non standard base plate. The template includes a back template and a front template. Align template to back left corner and clamp. Drill holes with 3mm drill bit except 2B. Move Template down to were the 2B hole aligns with were you drilled the B hole. Place screw through the 2B hole to hold alignment. Now drill the new B hole. This completes the Back holes. Now use the Front part of the Template to drill the holes for the Front Y mount and LCD. If your using a non standard base you might have to use Template3 to align your LCD with the electronics base.
02/26/18 Added Y Pulley Tensioner for use with Aluminum 20T Idler Pulleys. One for 3mm bolts or 5mm bolts depending on which you have. Xend Pulley should use a Aluminum 20T 5mm Bore Idler Pulley. I've had the original printed pulleys fail.
02/22/18 Added version 2 of the X,Y, and Z carriages. Mainly they add a way to keep the LM8UU bearings firmly in place by adding ziptie slots for the bearings. Added support for the Y axis and changed the Support for the Z axis T8 mount. Changed the X end stop on the Z Carriage to use the common board endstops with 19mm screw centers, and added End stop mounts the Y or Z that use the same ones. I will add pics later of printed parts
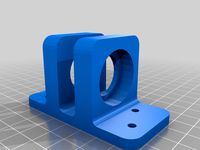
2/08/18 Added New Hotend Mounts that better fit mounting plate. One with sensor mount. One without.
10/27/15 Added 5/16" ID Bronze Bushing to lm8uu bearing adapter to allow use of 5/16" smooth rods with this machine. The Bronze Bushings have a 5/16" ID 7/16" OD and .062” Flange.
10/27/15 Added Bowden Extruder Support
This is the current Bowden Extruder I'm using, and like it really well.
I use the standard Mk8 hobbed pulley one.
Compact Bowden extruder, direct drive, bearing bloc, auto load 1.75mm filamenthttp://www.thingiverse.com/thing:669459
11/10/15 I added a Hotend mount with Inductive Auto Bed Leveling Sensor. This is designed for the Chinese metal hotends. The inductive sensor is offset in the Y direction 23mm. The NPN inductive sensor is wired directly to the RAMPS board (Brown to 12v, Black to Ground, and Blue to Z Min Signal Pin) Picture added.
12/03/15 Added Funbot M8 Marlin Firmware. It's set for 200 step motors with 16x microstepping with 20T GT2 pulleys on X and Y axis. TR8 Leadscrew on Z axis and Mk8 Gear on Extruder. It's also set for Auto Bed Leveling.
12/04/15 Added Funbot M8 Slic3r Configs. Hopefully it will give you a leg up on tuning your printer.
12/04/15 Added a Bill of Materials. I will adjust it a bit more soon.
12/17/15 Added Y Endstop
Wing Nut I use for Y Belt tensioninghttp://www.thingiverse.com/thing:495543
Wing Nut I use for Bed Mount / Levelinghttp://www.thingiverse.com/thing:19812
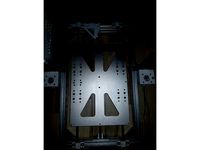
Base Plate / Build Plate Options.
You can either use a premade Aluminum Base Plates found on ebay and Mk2/3 Heatbeds or use 200mm or 8" square wood or Aluminum base plates. I use 8" square 1/8" thick Aluminum plates for the build plate. If you want to add heat to it I suggest a 160mm Diameter Kapton Heater mounted on the bottom of the build plate. The Kapton Heatbed combo will heat to 90C in about 6 minutes.
Pictures Added for reference.
https://youtu.be/lDKnS6WR9FY
http://youtu.be/SkEecrNrZW8
Currently set for 15.5mm diameter for LM8UU 15mm OD bearings, and 8.15mm diameter for 8mm OD Rods.
This is also modified to also be able to use a T8 Leadscrew on the Z axis.
I think It's all good now. I will add accessories from here on out.
After nearly 3 years of using my Funbots, I find them very reliable printers. I'm going to try to do some updates to the files to make it better.
More Improvements coming soon.
12/3/18 I added a spool holder that mounts on top and another version of the extruder holder that works with the new spool holder. Use a M4 size screw to attach spool end, amd M3 for mounting to Z top.
6/12/18 I updated the Z top part so that either a 608 bearing or a KFL08 Pillow Block could be used. I updated the Y stepper mount to have three mounting points instead of two.
5/21/18 I removed the old Marlin firmware and replaced it with Marlin 1.1.8 with bugfixes. It is set to have the Y endstop mounted in front. The Y endstop is still connected to the YMin pins, but will home to max. It has Bilinear Bed Leveling turned on along with BabyStepping and Linear Advance. Safe Z homing is enabled. Repaired the Part Fan Mount Hotend Cap. Sorry about that.
3/28/18 Added Extruder Plate remix with mounting holes for X carriage and hotend mount. I also upgraded the X carriage to include these mounting holes. It should make it easier to mount and align.
3/28/18 Added Hotend cap for e3dv6 hotend with 5015 part fan mount. FB 5015 fan duct Can be used with or without probe.
Optionally you can use the Semi-Circular Anet A8 Fan Duct for use without Z probe sensorhttps://www.thingiverse.com/thing:1954001
3/27/18 Added Drill template for the Base. The base is the most difficult part of building a Funbot, because the Z tower needs to be aligned with the Y axis. So I created this template to make it easier. You really only need Template1 unless your doing a non standard base plate. The template includes a back template and a front template. Align template to back left corner and clamp. Drill holes with 3mm drill bit except 2B. Move Template down to were the 2B hole aligns with were you drilled the B hole. Place screw through the 2B hole to hold alignment. Now drill the new B hole. This completes the Back holes. Now use the Front part of the Template to drill the holes for the Front Y mount and LCD. If your using a non standard base you might have to use Template3 to align your LCD with the electronics base.
02/26/18 Added Y Pulley Tensioner for use with Aluminum 20T Idler Pulleys. One for 3mm bolts or 5mm bolts depending on which you have. Xend Pulley should use a Aluminum 20T 5mm Bore Idler Pulley. I've had the original printed pulleys fail.
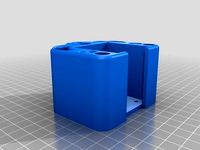
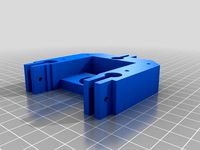
02/22/18 Added version 2 of the X,Y, and Z carriages. Mainly they add a way to keep the LM8UU bearings firmly in place by adding ziptie slots for the bearings. Added support for the Y axis and changed the Support for the Z axis T8 mount. Changed the X end stop on the Z Carriage to use the common board endstops with 19mm screw centers, and added End stop mounts the Y or Z that use the same ones. I will add pics later of printed parts
2/08/18 Added New Hotend Mounts that better fit mounting plate. One with sensor mount. One without.
10/27/15 Added 5/16" ID Bronze Bushing to lm8uu bearing adapter to allow use of 5/16" smooth rods with this machine. The Bronze Bushings have a 5/16" ID 7/16" OD and .062” Flange.
10/27/15 Added Bowden Extruder Support
This is the current Bowden Extruder I'm using, and like it really well.
I use the standard Mk8 hobbed pulley one.
Compact Bowden extruder, direct drive, bearing bloc, auto load 1.75mm filamenthttp://www.thingiverse.com/thing:669459
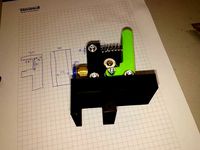
11/10/15 I added a Hotend mount with Inductive Auto Bed Leveling Sensor. This is designed for the Chinese metal hotends. The inductive sensor is offset in the Y direction 23mm. The NPN inductive sensor is wired directly to the RAMPS board (Brown to 12v, Black to Ground, and Blue to Z Min Signal Pin) Picture added.
12/03/15 Added Funbot M8 Marlin Firmware. It's set for 200 step motors with 16x microstepping with 20T GT2 pulleys on X and Y axis. TR8 Leadscrew on Z axis and Mk8 Gear on Extruder. It's also set for Auto Bed Leveling.
12/04/15 Added Funbot M8 Slic3r Configs. Hopefully it will give you a leg up on tuning your printer.
12/04/15 Added a Bill of Materials. I will adjust it a bit more soon.
12/17/15 Added Y Endstop
Wing Nut I use for Y Belt tensioninghttp://www.thingiverse.com/thing:495543
Wing Nut I use for Bed Mount / Levelinghttp://www.thingiverse.com/thing:19812
Base Plate / Build Plate Options.
You can either use a premade Aluminum Base Plates found on ebay and Mk2/3 Heatbeds or use 200mm or 8" square wood or Aluminum base plates. I use 8" square 1/8" thick Aluminum plates for the build plate. If you want to add heat to it I suggest a 160mm Diameter Kapton Heater mounted on the bottom of the build plate. The Kapton Heatbed combo will heat to 90C in about 6 minutes.
Pictures Added for reference.
https://youtu.be/lDKnS6WR9FY
http://youtu.be/SkEecrNrZW8
Similar models
thingiverse
free

FunBot U.S 3/8 by madmike8
...nds and has a mount for inductive sensor for autobed leveling. the inductive sensor is offset 23mm from the hotend on the y axis.
grabcad
free

BMG Extruder + V6 Hotend for Monoprice Maker Select (i3)
...et: m851 x1.00 y23.00 z-2.65
post-processing:
break off the supports and the front two legs which are added to prevent warping.
thingiverse
free

Anet A6 Z axis setup by qrisonline
... desire.
do not drill the mount holes for the adjustable z endstop switch. the m3 bolts will tighten nicely in the printed holes.
thingiverse
free
BMG Extruder + V6 Hotend for Monoprice Maker Select (i3) by marshes
...e measurement you see now on the y axis is exactly how much you should offset your y endstop. this will be the most accurate way.
grabcad
free

CNC_BDV (ver1.0RC)
... 0.71a
fixed: alignment of holes, diameter of holes, alignment of ballscrews and supports.
added slots to replace y axis bearings
thingiverse
free
AM8 - 200x300 buildplate - 350mm Z height by bipsen
...h additional material added for better strength (i saw some like these somewhere - but cannot remember if it was on thingiverse).
grabcad
free

CNC_BDV (ver1.1RC)
... 0.71a
fixed: alignment of holes, diameter of holes, alignment of ballscrews and supports.
added slots to replace y axis bearings
thingiverse
free
Wanhao Duplicator i3 v2.1 Y axis pulley mount
...he bearings. used 8-32 screws to attach the mount to the printer. i did drill two new holes and reused two of the original holes.
thingiverse
free

MPCNC J-Series 25.4 (1") Z Axis Drill Template by chiphead420
... just print, place on rail, line it up with the bottom of the rail and drill your holes.
i used 5mm hole with a 4.5mm drill bit.
thingiverse
free

Spacer for aluminum GT2 pulley and fan mount for X axis + Fan mount for Y axis by rafarcarvalho
... had to use a belt tensioner to gain space between the bed and the endstop of the y-axis. https://www.thingiverse.com/thing:10082
Funbot
unity_asset_store
$5

FUNBOTS.
...our workflow with the funbots. asset from tiger shark studios. find this & other robots options on the unity asset store.
thingiverse
free

Funbot MK8 Extruder Mount by Humanisticnick
...funbot mk8 extruder mount by humanisticnick
thingiverse
useful if your filament is mounted in a similar location
thingiverse
free

Funbot i1 - bowden hotend holder by Georg_cz
...er i have modify a little hotend holder. i would like to use bowden hotend because of weight of extruder instead original holder.
thingiverse
free
FunBot Foot by madmike8
...uan.
if you want to follow along on the funbot build you can check out this thread.http://forums.reprap.org/read.php?166,429588
thingiverse
free
Bernis extruder holder for Funbot i1 by Georg_cz
...ed use bowden and bernis extruder. so here is my holder for it. is working well as is and z axis can go to the end of posibility.
thingiverse
free

Funbot Y axis Motor mount by georgehine
...ht it might be a cleaner way to mount the nema 17 motor. i also added the tall carriage needed for the table to clear the motor.
thingiverse
free

Funbot 8mm x Carriage by Humanisticnick
...s are i3 compatible. also the zip ties hold the lm8uu a little better in my opinion. printed and jogged but not tested otherwise.
thingiverse
free
Funbot i1 Z Axis Base Remake - La Pedrada by Tempest815
...nd others) in a way to bring some aesthetics to the functionality.
this hasn't been tested, i am not responsible for failure
thingiverse
free
Funbot i1 Remake by moebius_2033
...red, and noticed i had the amount of bushings backwards. it's proper now. also added the 10mm version of the winged bushings.
thingiverse
free

Funbot Mods by djinn5150
...bracket for your auto level sensor, or whatever you wish to mount there, holes are spaced at 18mm to fit an ir sensor from pibot.
Madmike8
thingiverse
free

Still Bovine by madmike8
...still bovine by madmike8
thingiverse
a quick remix made to crudely look like still water... but with a cow.
thingiverse
free

Parametric Tube Corner by madmike8
...y madmike8
thingiverse
make corners for different sizes of aluminum tubes.
updated to flip it in the correct printing direction.
thingiverse
free

Jhead to Jhead Lite Adapter by madmike8
... use a jhead-lite hotend in a jhead extruder.
seems to work well with the jhead alex extruder and a course a jhead-lite hotend.
thingiverse
free

UM2 2510 fan to 3010 adapter by madmike8
...8
thingiverse
i liked xylenc4's design, but i wanted to keep the fan in the back. here's my changes to make that happen.
thingiverse
free

Modified Parametric Extruder by madmike8
...ports for the large nema opening and under the bearing support. i added a lever to the idler arm. the stl is for 1.75mm filament.
thingiverse
free

Prusa Mk2 Electronics case for KFB 2.0 Controller board by madmike8
...ronics case for kfb 2.0 controller board by madmike8
thingiverse
prusa mk2 style case for a kfb2.0 controller board and 40mm fan
thingiverse
free
FunBot Foot by madmike8
...uan.
if you want to follow along on the funbot build you can check out this thread.http://forums.reprap.org/read.php?166,429588
thingiverse
free

UA4C Speeduino EFI Case by madmike8
...a length between 8-18 will work.
the board can be purchased here: https://wtmtronics.com/product/ua4c-for-speeduino-va3-seawolf/
thingiverse
free

3010 5v Fan Top for Orange Pi PC Case by madmike8
...
i wanted to add a 5v 3010 fan to my orange pi case. so i remixed cyryllo's top. fan connected to gpio pins 4(+5v) and 6(gnd)
thingiverse
free

Airtripper Jhead-Lite Remix by madmike8
...d it printed at work. i will test for fit tonight.
edit: 5/15/14 added a relief for the strut.
edit: 5/19/14 corrected mistakes
M8
3d_ocean
$19

M8 Tank
...my game ready low poly m8 military tank us vehicle world war
low poly m8 world war 2 us tank, 2048×2048 diffuse texture included.
3d_ocean
$15

HTC One M8
...you see, were rendered in maya without any 3rd party plugin and photoshop manipulation! materials : maya and cinema 4d materia...
3ddd
$1

Wooder Miola Model M8
...wooder miola model m8
3ddd
wooder , дверь
дверь wooder, коллекция miola, модель m8
3d_export
free
barrett m8
...barrett m8
3dexport
in maya 2019 for free low poly<br>convert to .stl
turbosquid
$24

AN-M8 Smoke Grenade
... available on turbo squid, the world's leading provider of digital 3d models for visualization, films, television, and games.
turbosquid
$20

M8 Smoke Grenade
... available on turbo squid, the world's leading provider of digital 3d models for visualization, films, television, and games.
turbosquid
$20

Polar Grill M8
... available on turbo squid, the world's leading provider of digital 3d models for visualization, films, television, and games.
turbosquid
$17

HTC One M8
... available on turbo squid, the world's leading provider of digital 3d models for visualization, films, television, and games.
cg_studio
$49

HTC M8 Gray3d model
...tphone
.max .obj .mb .lwo .fbx .c4d .3ds - htc m8 gray 3d model, royalty free license available, instant download after purchase.
3d_ocean
$15

Htc one m8
...e screen) like image preview and it included in maps folder as (screen, screen2, screen3) - the preview images were rendered o...
Version
3ddd
$1
Diamond version
...nd , version , ванна
visionnaire - diamond bath
turbosquid
$50
LibraryMini Version
...free 3d model librarymini version for download as max and jpg on turbosquid: 3d models for games, architecture, videos. (1617724)
design_connected
$34

Barocco Version 01
...barocco version 01
designconnected
zanotta barocco version 01 computer generated 3d model. designed by progetti, emaf.
design_connected
$27

Barocco Version 02
...barocco version 02
designconnected
zanotta barocco version 02 computer generated 3d model. designed by progetti, emaf.
turbosquid
free
![Door [2 versions]](/t/13243146.jpg)
Door [2 versions]
...rbosquid
free 3d model door [2 versions] for download as fbx on turbosquid: 3d models for games, architecture, videos. (1223985)
turbosquid
$2
seat version 0.1
...
royalty free 3d model seat version 0.1 for download as blend on turbosquid: 3d models for games, architecture, videos. (1432653)
turbosquid
$12
Chip Version 03
...lty free 3d model chip version 03 for download as c4d and fbx on turbosquid: 3d models for games, architecture, videos. (1241145)
3d_export
$10

magnolia grandiflora mature version
...magnolia grandiflora mature version
3dexport
magnolia grandiflora mature version
3d_export
$8
room assets and voxel version
...room assets and voxel version
3dexport
room assets and voxel version
turbosquid
$35

Zil Civilian version
... model zil civilian version for download as cgf, fbx, and obj on turbosquid: 3d models for games, architecture, videos. (1639420)