Thingiverse
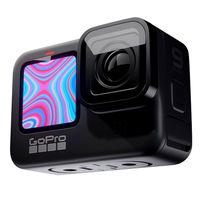
FPV LCD Screen Adaptor (Screen-to-GoPro Attachment) by Rabbs355
by Thingiverse
Last crawled date: 2 years, 11 months ago
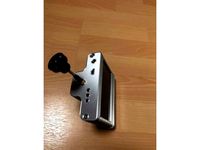
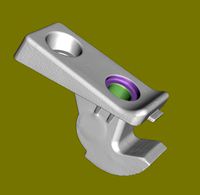
I am so excited with the possibilities of 3D printing, I have finally finished my second design. I have been using Google Sketchup every now and then over the last few years for various reasons; mostly to help visualise house dimensions and renovations. Now I am using it to create custom parts for my RC helicopter obsession.
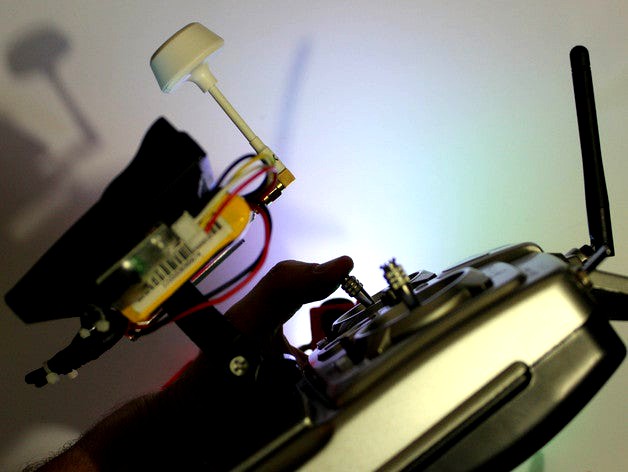
Recently I have started to get into the FPV craze and to go along with that I've been trying to modify my controller to mount the LCD screen. I have a fairly unique controller and limited financial backing (single income and a tight family budget) so I didn't want to buy a specific mount and I couldn't find one online to suit my controller.
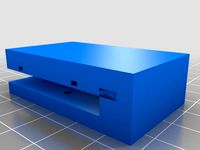
The simple option was to combine the orignal LCD mount designed to click into the car windscreen suction mount and customise it to finish with a GoPro attachment. Now I can click it into place on the RC controller. Looking at the pictures make more sense.
This is the printer I used on 3DHubs.com; It is printed with PLA at a "medium" print setting using a Rostock Max delta printer with a build volume of 290mm Diameter and 320mm Height. 0.4 - 0.6 mm nozzle extrusion.
I have uploaded two designs, one without holes (more expensive to print), and the other has some holes in it to reduce the amount of print material used. I have no idea how the "holes" version will work because I have not printed it but I have uploaded it so you can give it a go. As far as print quality goes, there were a few edges that I needed to sand back for it to click into place. The measurements were really accurate and it is a tight fit but I'm sure each printer will work differently so if it doesn't fit first time, it only took me about 15-20 minutes of trial and error.
Talking to my "3D printing guy" if the component was split into two parts and glued together you might get a better print quality. It used a fair bit of support structure in the process. I'm only new to this and don't have a printer so perhaps some trial and error to perfect this model.
This is a very unique design so change it as you see fit, if you make something similar I would love to see how it turned out.
Thanks.
If you want to give it a go yourself, go to:http://www.3dhubs.com/
I you live in Melbourne, Australia, go to:http://www.3dhubs.com/melbourne/hubs/christopher
Recently I have started to get into the FPV craze and to go along with that I've been trying to modify my controller to mount the LCD screen. I have a fairly unique controller and limited financial backing (single income and a tight family budget) so I didn't want to buy a specific mount and I couldn't find one online to suit my controller.
The simple option was to combine the orignal LCD mount designed to click into the car windscreen suction mount and customise it to finish with a GoPro attachment. Now I can click it into place on the RC controller. Looking at the pictures make more sense.
This is the printer I used on 3DHubs.com; It is printed with PLA at a "medium" print setting using a Rostock Max delta printer with a build volume of 290mm Diameter and 320mm Height. 0.4 - 0.6 mm nozzle extrusion.
I have uploaded two designs, one without holes (more expensive to print), and the other has some holes in it to reduce the amount of print material used. I have no idea how the "holes" version will work because I have not printed it but I have uploaded it so you can give it a go. As far as print quality goes, there were a few edges that I needed to sand back for it to click into place. The measurements were really accurate and it is a tight fit but I'm sure each printer will work differently so if it doesn't fit first time, it only took me about 15-20 minutes of trial and error.
Talking to my "3D printing guy" if the component was split into two parts and glued together you might get a better print quality. It used a fair bit of support structure in the process. I'm only new to this and don't have a printer so perhaps some trial and error to perfect this model.
This is a very unique design so change it as you see fit, if you make something similar I would love to see how it turned out.
Thanks.
If you want to give it a go yourself, go to:http://www.3dhubs.com/
I you live in Melbourne, Australia, go to:http://www.3dhubs.com/melbourne/hubs/christopher
Similar models
thingiverse
free
Mini Titan E325 RC Helicopter Modified Battery Mount by Rabbs355
...urself, go to:http://www.3dhubs.com/
i you live in melbourne, australia, go to:http://www.3dhubs.com/melbourne/hubs/christopher
grabcad
free

3D printer - LCD Stand
...ss of button presses. i designed this for my 3d printer's screen two years ago and haven't had any issues with it so far.
grabcad
free

3D printer - LCD Stand - Prusa i3 or Tronxy
...ss of button presses. i designed this for my 3d printer's screen two years ago and haven't had any issues with it so far.
thingiverse
free

FPV LCD mount with gopro style mount by evilbender
...fpv lcd mount with gopro style mount by evilbender
thingiverse
mount lcd screen with gopro style connector.
thingiverse
free

Adjustable LCD Graphic Display Mount for 3DR Simple by darco
...ckets", so that it has the holes ready for mounting. i recommend using the mounting holes closest to the bottom of the case.
thingiverse
free

DMR Doberman Printed Top Plate by VinnyBoomBoom
...ting service if you may come across this file but don't own your own printer.
https://www.3dhubs.com/service/vinnysprintshop
thingiverse
free

LCD Screen Mount for GEEETech i3 Pro B by XDr4g0nX
...nter yourself? contact me on my etsy store and i'll be happy to print it for you:https://www.etsy.com/shop/xdr4g0nx3dprinting
thingiverse
free
Rostock Max V2 7" LCD Mount by paulhut
... the green parts are "rostock max v2 - triple strong bed clamp - no hardware needed!" by artesian and can be found here
thingiverse
free

Gopro Buckle Grip (no hardware required) by JME3D
...y to snap when fully compressed.
i designed this to be printed on even the smaller 3d printers (such as mine, the mp mini delta).
thingiverse
free

Anet A8 lcd cover by GhostQuadRacer
...tting it on over the screen but i did not want it to fall of during the movement of a print! feel free to edit if need be! enjoy!
Rabbs355
thingiverse
free

Bracelet for my two daughters by Rabbs355
... be able to squeeze into the bracelet given the twits in the bracelet actually allow more room than the sketchup dimension allow.
thingiverse
free
Mini Titan E325 RC Helicopter Modified Battery Mount by Rabbs355
...urself, go to:http://www.3dhubs.com/
i you live in melbourne, australia, go to:http://www.3dhubs.com/melbourne/hubs/christopher
thingiverse
free

GoPro3 mounts for ZMR250 + ANY Quadcopter + anti-vibration mount. by Rabbs355
...er in portions so it prints better. there has been a few prints failed with and without supports printed so this should fix that.
Adaptor
turbosquid
free

Adaptor plug
... available on turbo squid, the world's leading provider of digital 3d models for visualization, films, television, and games.
turbosquid
$20

Male DFP adaptor
... available on turbo squid, the world's leading provider of digital 3d models for visualization, films, television, and games.
turbosquid
$20

Female VGA Adaptor
... available on turbo squid, the world's leading provider of digital 3d models for visualization, films, television, and games.
turbosquid
$20

Male VGA Adaptor
... available on turbo squid, the world's leading provider of digital 3d models for visualization, films, television, and games.
3d_export
$5

male union tee adaptor
...ame is male union tee adaptor , it is used in home and industrial area . if you want to get yhis parts blue print buy it from me
turbosquid
$20

Male M1 Digital Adaptor
... available on turbo squid, the world's leading provider of digital 3d models for visualization, films, television, and games.
turbosquid
$20

Male M1 Digital & Analog Adaptor
... available on turbo squid, the world's leading provider of digital 3d models for visualization, films, television, and games.
3d_export
$10
Samsung Travel Adapter 3D Model
...samsung travel adapter 3d model 3dexport charger white travel adaptor battery charging device samsung travel adapter 3d model g.lex...
3d_ocean
$5
Powerbank
...powerbank 3docean adaptor charger phone power powerbank powerbank phone charger. models: downloadable...
3d_export
$5
logitech g27-g29 quick release
...connector for the g27/g29 adaptor and the other wheel adaptor<br>files are in stl format, but if you want to...
Fpv
turbosquid
$1

FPV VTX Antenna
...e 3d model fpv vtx antenna for download as obj, fbx, and stl on turbosquid: 3d models for games, architecture, videos. (1230317)
3d_export
$9

Fpv logo 3D Model
...onogram vehicle part of auto transport 3d model logo emblem detailed high quality badge
fpv logo 3d model rmodeler 59628 3dexport
3d_export
$8
dji fpv battery slot holder
...er for 3 dji fpv batteries. holds perfectly without shaking. need 1 m3 countersunk head bolt. need to print 6 pin, 1 case, 1 cap.
3d_export
$10
fpv camera hd 700tvl
...aterials are logically named<br>the main format is in 3ds max 2009.<br>satisfcation garranteed..<br>thank you !
thingiverse
free
FpV Mount (SOPORTE FPV) by elborjas1987
...fpv mount (soporte fpv) by elborjas1987
thingiverse
this is a fpv mount with the same holes of naza base.
thingiverse
free
fpv by tbutera
...fpv by tbutera
thingiverse
fpv
thingiverse
free
fpv by tbutera
...fpv by tbutera
thingiverse
fpv
thingiverse
free
FPV DRONE ROOSTER DJI FPV PART
...fpv drone rooster dji fpv part
thingiverse
fpv drone rooster dji fpv install part
thingiverse
free
FPV monitor
...tml?rmmds=myorder&cur_warehouse=cn
link for download : https://cults3d.com/fr/mod%c3%a8le-3d/divers/fpv-monitor-ecran-fpv-faf
thingiverse
free
FPV receiver mount for FPV display by petrex
...eceiver mount for fpv display by petrex
thingiverse
aomway receiver mount for field view 777 fpv monitor. with small cable tray.
Gopro
3d_export
$5
gopro
...gopro
3dexport
turbosquid
$10

GOPRO
...
royalty free 3d model gopro for download as ma, obj, and fbx on turbosquid: 3d models for games, architecture, videos. (1702347)
turbosquid
$6

Gopro
...
royalty free 3d model gopro model for download as ma and obj on turbosquid: 3d models for games, architecture, videos. (1676751)
3d_export
$22
GoPro Hero2 Camera GoPro 3D Model
...waterproof hero kitesurf kiteboard surf sport adventures rc mini
gopro hero2 camera gopro 3d model raphaelwolfeye 51627 3dexport
3d_export
$49
gopro hero 9 black
...gopro hero 9 black
3dexport
gopro hero 9 black (eevee)
cg_studio
$149

GoPro HERO3+3d model
...amera
.max .obj .mb .lwo .fbx .c4d .3ds - gopro hero3+ 3d model, royalty free license available, instant download after purchase.
3d_export
$5

Magnetic GoPro Mount
...pro mount
3dexport
cool magnetic mount for gopro. allows you to mount the camera on flat metal surfaces and get exclusive shots.
3d_export
$149

GoPro HERO3 3D Model
...gopro hero3+ hero plus go pro hd shot photo camera photography digital lens optical
gopro hero3 3d model humster3d 95628 3dexport
turbosquid
$250

GoPro Hero4 camera
... 3d model gopro hero4 camera for download as ma, obj, and fbx on turbosquid: 3d models for games, architecture, videos. (1295092)
3d_ocean
$12

Drone phantom with gopro
...mount, mainly intended for aerial cinematography and photography applications . please rate this file if you downloaded it, th...
Lcd
turbosquid
$20

lcd
... available on turbo squid, the world's leading provider of digital 3d models for visualization, films, television, and games.
turbosquid
$15
LCD
... available on turbo squid, the world's leading provider of digital 3d models for visualization, films, television, and games.
turbosquid
$10

LCD
... available on turbo squid, the world's leading provider of digital 3d models for visualization, films, television, and games.
turbosquid
$2

lcd
... available on turbo squid, the world's leading provider of digital 3d models for visualization, films, television, and games.
turbosquid
$1
lcd
... available on turbo squid, the world's leading provider of digital 3d models for visualization, films, television, and games.
turbosquid
free
lcd
... available on turbo squid, the world's leading provider of digital 3d models for visualization, films, television, and games.
turbosquid
free

LCD
... available on turbo squid, the world's leading provider of digital 3d models for visualization, films, television, and games.
3ddd
$1
Noti Lcd Sofa
...noti lcd sofa
3ddd
noti , lcd
3d model of noti lcd sofa
3d_ocean
$7

Lcd tube wall
...hrome electronic electronic lcd tv videowall
lcd tube wall you can put in the lcd your own texture or movie in it and animate it.
turbosquid
$5
LCD Unit
...bosquid
royalty free 3d model lcd unit for download as blend on turbosquid: 3d models for games, architecture, videos. (1330577)
Screen
archibase_planet
free
Screen
...screen radiator screen radiator enclosure lattice
screen radiator n120315 - 3d model (*.gsm+*.3ds) for interior 3d visualization.
archibase_planet
free

Screen
...screen
archibase planet
screen group display
movie screen - 3d model for interior 3d visualization.
3ddd
$1
Screen
...screen
3ddd
screen
modern dressing wall partition
3d_ocean
$15

HP Screen
...test hp screen. it is has different object, so you can use it as a wall mounted screen or a stand on table. hope you all like it.
3d_export
$10
Accessories screen LCD screen 3D Model
...d screen 3d model
3dexport
accessories screen lcd 3d model interior
accessories screen lcd screen 3d model sunupcg 17831 3dexport
turbosquid
$25
SCREEN
... available on turbo squid, the world's leading provider of digital 3d models for visualization, films, television, and games.
turbosquid
$2
Screen
... available on turbo squid, the world's leading provider of digital 3d models for visualization, films, television, and games.
3d_export
$10
Screen metal screen microwave 3D Model
...ave 3d model
3dexport
screen metal microwave oven 3d model interior
screen metal screen microwave 3d model sunupcg 17847 3dexport
3d_ocean
$5
Projector Screen
...hat have presentations. the projector screen consists of an alluminum structure that holds the canvas up. this model can be us...
archive3d
free
Screen 3D Model
...rchive3d
screen folding screen
screen n020811 - 3d model (*.3ds) for interior 3d visualization.
Attachment
turbosquid
$20
M4A1 + Attachements
... available on turbo squid, the world's leading provider of digital 3d models for visualization, films, television, and games.
cg_studio
$75

Attached House3d model
...d model
cgstudio
.3ds .fbx .max .obj - attached house 3d model, royalty free license available, instant download after purchase.
turbosquid
$2
M416 AR with attachments
... model m416 ar with attachments for download as blend and fbx on turbosquid: 3d models for games, architecture, videos. (1614294)
turbosquid
$10

M16A2 with M203 Attachment
... available on turbo squid, the world's leading provider of digital 3d models for visualization, films, television, and games.
turbosquid
$3

bench attached to greenery
... available on turbo squid, the world's leading provider of digital 3d models for visualization, films, television, and games.
turbosquid
$3

Modern 1911 with Attachments
... available on turbo squid, the world's leading provider of digital 3d models for visualization, films, television, and games.
3d_export
$8
Mercedes Sprinter sun visor attachment
...mercedes sprinter sun visor attachment
3dexport
mercedes sprinter sun visor attachment
turbosquid
$14
Residential building with attached shop
...l residential building with attached shop for download as max on turbosquid: 3d models for games, architecture, videos. (1482935)
3d_ocean
$19

QNAP Network Attached Storage
...computer electronics internet pc qnap server storage
qnap network attached storage 3d model. included files: 3dsmax2010; obj; fbx
cg_studio
$45

House with Attached Garage 033d model
...o
.max .3ds .lwo .obj - house with attached garage 03 3d model, royalty free license available, instant download after purchase.