Thingiverse

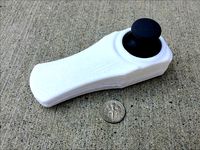
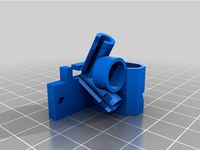
FPV Joystick Housing for RC Radio by Mochanic
by Thingiverse
Last crawled date: 3 years, 1 month ago
Designed for the Taranis radio but can be used on just about anything.
I spent a lot of time designing and fitting a housing to add a cheap PS2 joystick that will control the pan/tilt camera on my FPV airplanes. A selector switch is not necessary, but allows you to choose between the stock sliders and the rear joystick. If you do not use a selector switch the joystick and the sliders will counteract each other when both are not in their neutral position. I kinda prefer this option, it allows you to use a slider to put the camera in an exact position and leave it there until you move it. It also can act like a trim for the joystick.
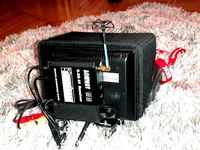
To wire them this way you simply take the power and ground from only 1 of the sliders and send it to the terminals on the joystick, then the signal wire from each slider will go to the X/Y terminal on the joystick. You choose which one you want to be X and Y and wire the signal wire accordingly. See the pictures for a better idea and to see where I soldered the wires to that come from the joystick. YOU DONT NEED TO CUT ANYTHING! Just solder to the back of the pins on the pcb then put some hot glue on them to help secure the wires. If you still need help, just post a comment below.
There are now 2 housing versions to choose from. V1 is the original version that has the 4 M3x10mm button head screws coming in from the outside of the housing and uses nylon nuts on the inside to sandwich the joystick to the radio housing. V2 eliminates the holes on the outside of the housing and now just uses 4 M3x6mm button head screws to pull the joystick housing down, so you will not need the 4 nylon nuts. ( I recommend tapping the holes just to get the threads started)
Print the included flat template and the joystick housing of your choice, then open your Taranis radio and separate the cases. Use the pictures to see where you want to locate the template. Basically it needs to be slightly above the PCB enough to clear the m3 nylon nuts (if using V1), and very slightly off center towards the outside edge between the raised areas on the back side of the rear case.
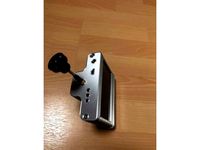
Use the printed joystick housing and place it on the back of the radio between the raised areas so that it is centered and not hitting either of the raised areas. When you are sure it's good, drill your 4 holes then place the flat template on the inside as seen in the picture and proceed to dremel away the material. When you get it close, use a square file and make all the corners nice and squared off.
For the PS2 joystick, I got mine from eBay for $.83! This one has black plastic rather than white plastic and it has the word "shield" in the title, I'm not sure it will matter, but since it was designed for this very specific joystick I would recommend that you stick to the one with the black plastic coming out of the metal housing. Use this link to find exactly the one I have:https://www.ebay.com/sch/i.html?_odkw=ps2+joystick&_osacat=0&_from=R40&_trksid=p2045573.m570.l1313.TR0.TRC0.H0.Xps2+joystick+shield.TRS1&_nkw=ps2+joystick+shield&_sacat=0
You will need to trim the bottom side of the thumb cap so that the total height does not exceed .500" (1/2") I used curved Lexan cutting scissors. If you do not trim the bottom skirt, it will hit the housing when moving the joystick.
I spent a lot of time designing and fitting a housing to add a cheap PS2 joystick that will control the pan/tilt camera on my FPV airplanes. A selector switch is not necessary, but allows you to choose between the stock sliders and the rear joystick. If you do not use a selector switch the joystick and the sliders will counteract each other when both are not in their neutral position. I kinda prefer this option, it allows you to use a slider to put the camera in an exact position and leave it there until you move it. It also can act like a trim for the joystick.
To wire them this way you simply take the power and ground from only 1 of the sliders and send it to the terminals on the joystick, then the signal wire from each slider will go to the X/Y terminal on the joystick. You choose which one you want to be X and Y and wire the signal wire accordingly. See the pictures for a better idea and to see where I soldered the wires to that come from the joystick. YOU DONT NEED TO CUT ANYTHING! Just solder to the back of the pins on the pcb then put some hot glue on them to help secure the wires. If you still need help, just post a comment below.
There are now 2 housing versions to choose from. V1 is the original version that has the 4 M3x10mm button head screws coming in from the outside of the housing and uses nylon nuts on the inside to sandwich the joystick to the radio housing. V2 eliminates the holes on the outside of the housing and now just uses 4 M3x6mm button head screws to pull the joystick housing down, so you will not need the 4 nylon nuts. ( I recommend tapping the holes just to get the threads started)
Print the included flat template and the joystick housing of your choice, then open your Taranis radio and separate the cases. Use the pictures to see where you want to locate the template. Basically it needs to be slightly above the PCB enough to clear the m3 nylon nuts (if using V1), and very slightly off center towards the outside edge between the raised areas on the back side of the rear case.
Use the printed joystick housing and place it on the back of the radio between the raised areas so that it is centered and not hitting either of the raised areas. When you are sure it's good, drill your 4 holes then place the flat template on the inside as seen in the picture and proceed to dremel away the material. When you get it close, use a square file and make all the corners nice and squared off.
For the PS2 joystick, I got mine from eBay for $.83! This one has black plastic rather than white plastic and it has the word "shield" in the title, I'm not sure it will matter, but since it was designed for this very specific joystick I would recommend that you stick to the one with the black plastic coming out of the metal housing. Use this link to find exactly the one I have:https://www.ebay.com/sch/i.html?_odkw=ps2+joystick&_osacat=0&_from=R40&_trksid=p2045573.m570.l1313.TR0.TRC0.H0.Xps2+joystick+shield.TRS1&_nkw=ps2+joystick+shield&_sacat=0
You will need to trim the bottom side of the thumb cap so that the total height does not exceed .500" (1/2") I used curved Lexan cutting scissors. If you do not trim the bottom skirt, it will hit the housing when moving the joystick.
Similar models
thingiverse
free

Gimbal M9 reduction ring for Taranis X9E by Destelant
...he taranis x9e. it will close the hole between the gimbal and the radio body when one want to fit this gimbal into the x9e radio.
thingiverse
free

Taranis QX7 18650 holder by ellow
...uble sided tape to secure the holder in your radio. the cover is quite a snug fit. you might need to print with .1mm layer hight.
thingiverse
free

Taranis third gimbal joystick enclosure by BoopidooDesigns
...mod here: http://openrcforums.com/forum/viewtopic.php?f=97&t=6238&p=87918&sid=e59f0da6b3ba5772127e9abd4edd48e6#p87918
3dwarehouse
free

Electrical Wire Nut
...te from the wire. with the selector tool you can select the nut and the end of the wire and adjust the length with the move tool.
thingiverse
free
Mini Joystick Housing by chetjohnston
...entary "on" by clicking straight onto the hat of the joystick. these outputs are very simple to use as arduino inputs.
thingiverse
free

Taranis Potentiometer Holder/Mount by milanteubel
...m twisting. i lost mine when i was taking the radio apart to paint it so i modeled this up and it works just like the stock one!
thingiverse
free

Single Din Radio Trim by skiinglab26
.... it fits single din slot and its dimensions are as follows
half slot
3.75" x 2.215"
whole slot
7.5" x 2.215"
thingiverse
free

FrSky Taranis Q X7 Battery Box by lincolngkp
...ed in the new one. if you are prepared to cut the standard battery box to get the wires out then there is no soldering required.
thingiverse
free

Taranis Switch Replacement by da_real_MarvFPV
...it with some hot glue from the inside.
should work with other transmitters too if they use the same switches.
photos will follow.
grabcad
free

PS2 Joystick Module
...ly use it for your own controller. otherwise your design may result in a bulky joystick.
this model is not completely detailed.
Mochanic
thingiverse
free

MTD Servo Housing by Mochanic
...o your mtd (my twin dream) or if you broke one in a crash.
exactly the same as the original.
recommend abs or petg
.20mm
supports
thingiverse
free

Prusa MK* LCD Knob by Mochanic
...pprox. .236" once printed. make sure you scrape the edge of the hole, most likely it will have a small lip (elephant foot).
thingiverse
free

Mini Talon Belly Cover by Mochanic
... to glue it on.
if you are looking to fit landing gear to the mini talon use this link: https://www.thingiverse.com/thing:2981809
thingiverse
free

Pitlab GPS Case by Mochanic
...es you to desolder the angled header pins from the gps sensor and resolder in new straight pins to the bottom side of the sensor.
thingiverse
free

MT Cradle iNav FC Mount by osgibson
...inav fc mount by osgibson thingiverse a remix of mochanic#39;s mini talon cradle for a standard 30.5mm fc stack...
thingiverse
free

My Twin Dream FC Mount by Mochanic
...l. (the mtd flies nose up about 2.3 degrees, so this was taken into account during design.)
all screw holes are for m3 hardware.
thingiverse
free

Mini Talon Flush Hatch Latch by Mochanic
...g anywhere, so i did not use additional rods on the rear plate)
my hatch will be spray painted all black once i get to that point
thingiverse
free

Mini Talon Flight Controller Mounts by Mochanic
...een uploaded at this time, but i am working on it)
let me know if you guys would like for me to add other mounting plate options.
thingiverse
free

My Twin Dream MTD Landing Gear by Mochanic
... use a grass runway.
please let me know if i missed anything... there is a lot going on to remember!
https://youtu.be/qjzglsqbhl0
Joystick
3d_export
$8

Joystick
...joystick
3dexport
joystick copy to ps4
turbosquid
$30

Joystick
... available on turbo squid, the world's leading provider of digital 3d models for visualization, films, television, and games.
turbosquid
$20

Joystick
... available on turbo squid, the world's leading provider of digital 3d models for visualization, films, television, and games.
turbosquid
$15

Joystick
... model joystick for download as 3ds, obj, fbx, blend, and dae on turbosquid: 3d models for games, architecture, videos. (1166950)
turbosquid
free
joystick
... available on turbo squid, the world's leading provider of digital 3d models for visualization, films, television, and games.
3d_export
$25

Joystick 3D Model
...joystick 3d model
3dexport
joystick game controller
joystick 3d model ailamvnn 69692 3dexport
archive3d
free
Joystick 3D Model
...tick 3d model
archive3d
joystick game device
joystick - 3d model for interior 3d visualization.
3d_export
$5

Joystick
...joystick
3dexport
atari joystick controller<br>pbr textures<br>fbx file<br>3ds max 2021 file<br>low poly
3d_export
$5
xbox 360 joystick
...xbox 360 joystick
3dexport
xbox 360 joystick
3d_export
free

joystick vintage
...joystick vintage
3dexport
Fpv
turbosquid
$1

FPV VTX Antenna
...e 3d model fpv vtx antenna for download as obj, fbx, and stl on turbosquid: 3d models for games, architecture, videos. (1230317)
3d_export
$9

Fpv logo 3D Model
...onogram vehicle part of auto transport 3d model logo emblem detailed high quality badge
fpv logo 3d model rmodeler 59628 3dexport
3d_export
$8
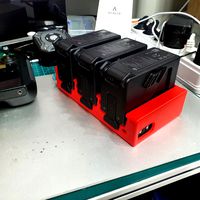
dji fpv battery slot holder
...er for 3 dji fpv batteries. holds perfectly without shaking. need 1 m3 countersunk head bolt. need to print 6 pin, 1 case, 1 cap.
3d_export
$10
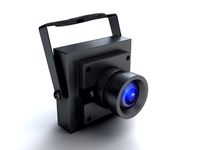
fpv camera hd 700tvl
...aterials are logically named<br>the main format is in 3ds max 2009.<br>satisfcation garranteed..<br>thank you !
thingiverse
free
FpV Mount (SOPORTE FPV) by elborjas1987
...fpv mount (soporte fpv) by elborjas1987
thingiverse
this is a fpv mount with the same holes of naza base.
thingiverse
free
fpv by tbutera
...fpv by tbutera
thingiverse
fpv
thingiverse
free

fpv by tbutera
...fpv by tbutera
thingiverse
fpv
thingiverse
free
FPV DRONE ROOSTER DJI FPV PART
...fpv drone rooster dji fpv part
thingiverse
fpv drone rooster dji fpv install part
thingiverse
free
FPV monitor
...tml?rmmds=myorder&cur_warehouse=cn
link for download : https://cults3d.com/fr/mod%c3%a8le-3d/divers/fpv-monitor-ecran-fpv-faf
thingiverse
free
FPV receiver mount for FPV display by petrex
...eceiver mount for fpv display by petrex
thingiverse
aomway receiver mount for field view 777 fpv monitor. with small cable tray.
Radio
archibase_planet
free
Radio
...radio
archibase planet
radio
radio - 3d model for interior 3d visualization.
archibase_planet
free
Radio
...radio
archibase planet
radio
radio - 3d model for interior 3d visualization.
3d_export
$10
radio
...radio
3dexport
radio 3d, ojb
archibase_planet
free

Radio
...radio
archibase planet
radio set wireless receiver wireless set
radio 2 - 3d model (*.gsm+*.3ds) for interior 3d visualization.
archibase_planet
free
Radio
...radio
archibase planet
radio set wireless receiver wireless set
radio 7 - 3d model (*.gsm+*.3ds) for interior 3d visualization.
archibase_planet
free

Radio
...radio
archibase planet
radio set wireless receiver wireless set
radio 10 - 3d model (*.gsm+*.3ds) for interior 3d visualization.
3d_ocean
$9
Vintage Radio
...vintage radio
3docean
old radio radio set vintage
this is a vintage radio modeled to help in interior design arrangements.
3d_ocean
$8
Radio Branu
...radio branu
3docean
detail radio vintage
vintage radio with detail
3d_export
$5

radio
...radio
3dexport
turbosquid
$25

Radio
...o
turbosquid
royalty free 3d model radio for download as max on turbosquid: 3d models for games, architecture, videos. (1203794)
Rc
3ddd
$1

RC Helicopter
...rc helicopter
3ddd
вертолет
mini rc helicopter
93.329 polys
3d_export
$7
rc helicopter model
...rc helicopter model
3dexport
rc helicopter model
3d_ocean
$25
RC F1
...rc f1
3docean
auto car control f1 formula race rc remote speed
remote control f1 car
turbosquid
$10
rc plane
...lane
turbosquid
free 3d model rc plane for download as blend on turbosquid: 3d models for games, architecture, videos. (1295828)
turbosquid
$100

RC Helicopter
...free 3d model rc helicopter for download as 3ds, max, and obj on turbosquid: 3d models for games, architecture, videos. (1298511)
turbosquid
$59
Drone with RC
...3d model drone with rc for download as 3ds, max, obj, and fbx on turbosquid: 3d models for games, architecture, videos. (1363601)
3d_export
$70
rc helicopter 3D Model
...rc helicopter 3d model
3dexport
rc helocopter
rc helicopter 3d model babay 10536 3dexport
turbosquid
$75
RC buggy
... available on turbo squid, the world's leading provider of digital 3d models for visualization, films, television, and games.
turbosquid
$39

RC Plane001
... available on turbo squid, the world's leading provider of digital 3d models for visualization, films, television, and games.
turbosquid
$30
RC Jet
... available on turbo squid, the world's leading provider of digital 3d models for visualization, films, television, and games.
Housing
archibase_planet
free

House
...t
house residential house private house wooden house
house wooden n290815 - 3d model (*.gsm+*.3ds) for exterior 3d visualization.
archibase_planet
free

House
...use residential house private house wooden house
house wood stone n140815 - 3d model (*.gsm+*.3ds) for exterior 3d visualization.
archibase_planet
free

House
...ibase planet
house residential house building private house
house n050615 - 3d model (*.gsm+*.3ds) for exterior 3d visualization.
archibase_planet
free

House
...ibase planet
house residential house building private house
house n030615 - 3d model (*.gsm+*.3ds) for exterior 3d visualization.
archibase_planet
free

House
...ibase planet
house residential house building private house
house n230715 - 3d model (*.gsm+*.3ds) for exterior 3d visualization.
archibase_planet
free

House
...ibase planet
house residential house building private house
house n240615 - 3d model (*.gsm+*.3ds) for exterior 3d visualization.
archibase_planet
free

House
...ibase planet
house residential house building private house
house n290815 - 3d model (*.gsm+*.3ds) for exterior 3d visualization.
archibase_planet
free

House
...ibase planet
house residential house building private house
house n110915 - 3d model (*.gsm+*.3ds) for exterior 3d visualization.
archibase_planet
free

House
...ibase planet
house residential house building private house
house n120915 - 3d model (*.gsm+*.3ds) for exterior 3d visualization.
archibase_planet
free

House
...ibase planet
house residential house building private house
house n210915 - 3d model (*.gsm+*.3ds) for exterior 3d visualization.