Thingiverse
Formicarium 150x150x22mm by Antspy
by Thingiverse
Last crawled date: 3 years ago
Here we go, my second take on an Ant Nest Module!
Please note:
As of 21.09.2018, the Main Frame STL file has been updated to MK2 - even sturdier around the connectors in case you have trouble with cracks in that area when not carefully putting the plugs in or if the print is not of the best quality... :)
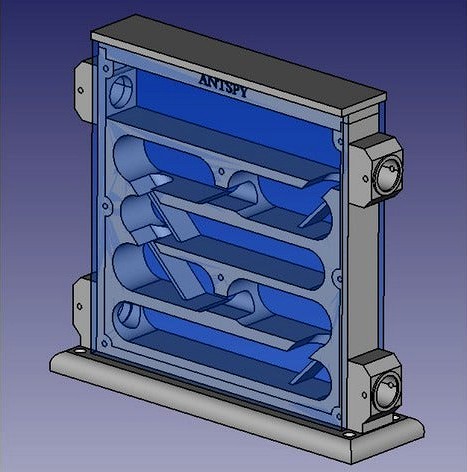
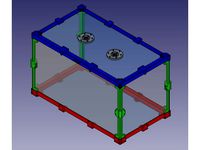
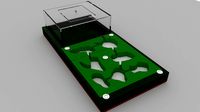
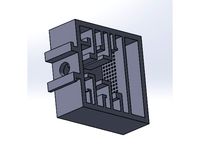
This is a Formicarium - Nest module for ants of small to medium size, with a total inner area of about 150x150mm (excluding base) and an inner wall distance of 22mm. It can be used either with the provided Nest Inlay which is a perfect fit and designed for medium sized ants (e.g. Camponotus nicobarensis) or filled with material for the ants to dig in.
Features
easy design, easy to assemble
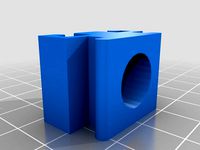
four access ports for 12mm (inner) tubes
supports small screws to prevent tubes slipping
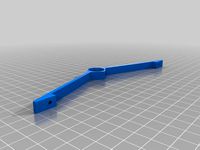
Comes with adapter to 10mm (inner) tube and plugs to close unused ports
The base can be screwed to a surface for better security (e.g. tube tension)
You will need:
6 pcs M3x35 or M3x40 Screws + Washers and Nuts
2 pcs Acrylic Glas 160x160x4mm
The STL files contain:
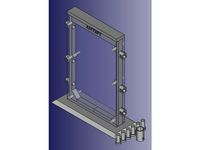
1 x Main Frame
1 x Top Part
1 x Bottom Plate
2 x plug and 2 x adapter + smaller plug (The set closes all four ports if needed)
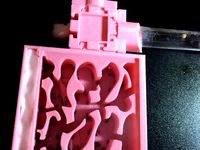
Optional Nest Inlay for medium ants
Alternative: Main Frame split in half, print twice to get the full frame. This has been added for those where the Main Frame in one piece is just outside the print range, or bad heat distribution on the glass causes deformations on the print.
Assembling
Decide if you want to use the Nest Inlay or not :) If so, putting in it should be quite self-explaining ;)
Align the acrylic glass plates to the frame and top part and drill the six holes. Make sure to be very exact on this step, as the mounting screws will go through the first plate, then the frame and the second plate before it is secured with a washer and a nut. If the holes are not in line with the pre-defined ones from the frame, things won't fit. Make sure the top closes tight, but not too tight.
Put the frame in the base, optionally add the Nest Inlay, put the glass plates on and tighten the screws carefully as acrylic glass tends to crack easily. Use plugs and adapters as desired, close the top with the top part.
That's it!
DISCLAIMER
This design is provided as-is, without any guarantee that it will work or meet your expectations. Use at your own risk. I can not be held responsible for yelling spouses because your kitchen is full of pet ants or any injuries that occur when assembling this. This should go without saying, but well... ;)
Please note:
As of 21.09.2018, the Main Frame STL file has been updated to MK2 - even sturdier around the connectors in case you have trouble with cracks in that area when not carefully putting the plugs in or if the print is not of the best quality... :)
This is a Formicarium - Nest module for ants of small to medium size, with a total inner area of about 150x150mm (excluding base) and an inner wall distance of 22mm. It can be used either with the provided Nest Inlay which is a perfect fit and designed for medium sized ants (e.g. Camponotus nicobarensis) or filled with material for the ants to dig in.
Features
easy design, easy to assemble
four access ports for 12mm (inner) tubes
supports small screws to prevent tubes slipping
Comes with adapter to 10mm (inner) tube and plugs to close unused ports
The base can be screwed to a surface for better security (e.g. tube tension)
You will need:
6 pcs M3x35 or M3x40 Screws + Washers and Nuts
2 pcs Acrylic Glas 160x160x4mm
The STL files contain:
1 x Main Frame
1 x Top Part
1 x Bottom Plate
2 x plug and 2 x adapter + smaller plug (The set closes all four ports if needed)
Optional Nest Inlay for medium ants
Alternative: Main Frame split in half, print twice to get the full frame. This has been added for those where the Main Frame in one piece is just outside the print range, or bad heat distribution on the glass causes deformations on the print.
Assembling
Decide if you want to use the Nest Inlay or not :) If so, putting in it should be quite self-explaining ;)
Align the acrylic glass plates to the frame and top part and drill the six holes. Make sure to be very exact on this step, as the mounting screws will go through the first plate, then the frame and the second plate before it is secured with a washer and a nut. If the holes are not in line with the pre-defined ones from the frame, things won't fit. Make sure the top closes tight, but not too tight.
Put the frame in the base, optionally add the Nest Inlay, put the glass plates on and tighten the screws carefully as acrylic glass tends to crack easily. Use plugs and adapters as desired, close the top with the top part.
That's it!
DISCLAIMER
This design is provided as-is, without any guarantee that it will work or meet your expectations. Use at your own risk. I can not be held responsible for yelling spouses because your kitchen is full of pet ants or any injuries that occur when assembling this. This should go without saying, but well... ;)
Similar models
thingiverse
free
Formicarium / Ant Nest - 150x100x8mm by Antspy
...e your kitchen is full of pet ants or any injuries that occur when assembling this. this should go without saying, but well... ;)
thingiverse
free

Ants Formicarium For 2 queens (Ant Nest) by dionlevi
...hose,
and a 12mm test tube
and a glass off 7,7 x 5,5cm
would appreciate it if you print this please let me know,,
happy printing,
thingiverse
free

Aquarium / Terrarium / Formicarium tube inlet by toxiccrack
...diameter of the thread is about 17mm. it is for tubes with an inner / outer diameter of 12/16mm.
the max. glass thickness is 4mm.
thingiverse
free

Ant Nest / Formicarium XL V1 by MikoM
...ents.
excuse my bad english. ;)
------side note------
more pictures will follow!
soon i will upload an arena and some accessoirs.
thingiverse
free
Expandable Ant Farm (Formicarium) by dantius
... cable. each nest is designed to fit a 3"x3" piece of glass on top. also included is the very useful test tube adapter.
3dwarehouse
free

Medium formicarium
...medium formicarium
3dwarehouse
second project #ant #farm #formicarium #formikarium #mrówki #nest
thingiverse
free
Ant Nest / Formicarium M V1 by MikoM
...st so it fits your requirements.
excuse my bad english. ;)
------side note------
soon i will upload an arena and some accessoirs.
thingiverse
free

Modular Formicarium for Ants by madmunki
...:2374970
adapters for connecting the other modular formicarium things found on this sitehttps://www.thingiverse.com/thing:2374978
thingiverse
free

Small Formicarium
...ers together)
some cotton (to fit inside the normal container or the simple one and fill with water)
a 8mm hose (for connections)
thingiverse
free

Micro Formicarium
...ers together)
some cotton (to fit inside the normal container or the simple one and fill with water)
a 8mm hose (for connections)
Antspy
thingiverse
free

Antspy Succulent Pot Type 2 by Antspy
...tion of the knowledge of those guys:
https://www.thingiverse.com/cgpena/
https://www.thingiverse.com/chaoticattractor/
thank you!
thingiverse
free

Wallmount Logitech K400+ Wireless by Antspy
...s and whistles. i mounted one to the side of my computer workbench so the keyboard isn't disappearing somewhere between uses.
thingiverse
free
CTC Anycube I3 Clone - Filament Guide by Antspy
...eady existing filament guides, but they all did not have the right distance between the screws (~15.8cm).
thus, here it comes :)
thingiverse
free

Seed Tray - 15x15mm Inlays by Antspy
...e material when working with the trays. the little compactor tool is probably only necessary if wearing thick gardening gloves ;)
thingiverse
free

IEC C-14 Protective Cover by Antspy
... easily.
i hope this cover will also work for other prusa clones and help making those more secure to prevent electric shocks :)
thingiverse
free

Ant Feeder with Granary module (Small, Medium, Large) by Antspy
...nto the arena :)
durability should be quite good, just make sure to use a bio-compatible, non-toxic filament (i'm using pla).
thingiverse
free
Formicarium / Ant Nest - 150x100x8mm by Antspy
...e your kitchen is full of pet ants or any injuries that occur when assembling this. this should go without saying, but well... ;)
thingiverse
free
Terrarium / Formicarium Arena 45x25x25cm by Antspy
...e held responsible for anything that happens because of the use of this design or the above instructions. use at your own risk ;)
Formicarium
3d_export
free
Formicarium Ant farm
...formicarium ant farm
3dexport
formicarium. ant farm.
thingiverse
free

Formicarium by Project_1209
...formicarium by project_1209
thingiverse
abs formicarium for small species
thingiverse
free

Formicarium by ODG3dPrinting
...formicarium by odg3dprinting
thingiverse
formicarium aka ant farm, currently being designed.
thingiverse
free

formicarium label by robinzx
...formicarium label by robinzx
thingiverse
a plate to add to your formicarium
thingiverse
free

Formicarium UnionFarm
...
it's a connectable modular ant farm (formicarium).
perview
all parts:
assembly:
support:
the business version on taobao.
thingiverse
free
Ant Formicarium Adapters for Modular Formicariums by madmunki
...:2374970
adapters for connecting the other modular formicarium things found on this sitehttps://www.thingiverse.com/thing:2374978
thingiverse
free
Ant Formicarium by HeroCosmo
...drinking area.
-water supports with cotton.
-supports other formicariums.
warning: dont use support.
recommended by printing pla.
thingiverse
free

formicarium logo with ant by robinzx
...formicarium logo with ant by robinzx
thingiverse
to be glued to ..a formicarium
thingiverse
free

formicarium v.2 by Xana2048
...formicarium v.2 by xana2048
thingiverse
this is a formicarium project.
thingiverse
free

module formicarium by Pitboy
...module formicarium by pitboy
thingiverse
the module ant formicarium 10x10cm. for arena was used the plastic paper box