Thingiverse
Ford Flex Lane-Keeping Assist / Auto-Highbeam Adapter by XirallicBolts
by Thingiverse
Last crawled date: 3 years, 4 months ago
Adapter to fit a lane-keeping mirror to 2013-2019 Ford Flex.
Requires a mirror from a 2013+ Ford Taurus, Ford Explorer, Lincoln MKS, or Lincoln MKT.
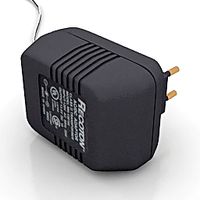
Two styles of mirror are available -- one is auto-highbeam only, the other is lane-keeping + auto highbeam. Do not rely on item descriptions -- sellers often mistakenly label an AHB mirror as LKA. Look for "AHBC/LA" or at the forward-facing sensor itself -- it should match the one in my picture.
Wiring and Forscan modifications are necessary.
Printing/Installation
1) Remove the original rearview mirror carefully. Check my other Things for a tool that may help.
2) Print VinylTemplate.stl (No supports necessary)
3) Cut a piece of Oracal 651 Matte Black Vinyl to the rough size of the template. Go a little big for the outside dimensions.
4) Cut the hole for the existing 'saddle mount', but not the trapezoid or outer edge.
5) Apply the vinyl to the inside of the windshield. Avoid bubbles and creases. Variations in the adhesive (from pulling/reapplying) will disappear after some time in the sun.
6) Using VinylTemplate and a scalpel, carefully cut the trapezoid shape. Use a laser level if available to ensure the trapezoid is vertical.
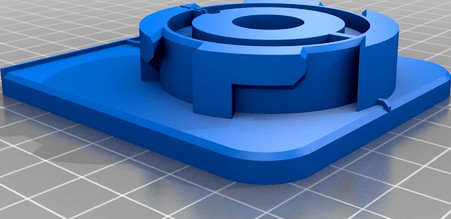
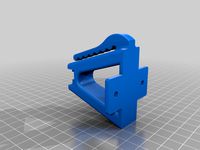
7) Print BasePlate.stl and BodyAdapter.stl (Print in PETG, ABS, or PC, with supports)
8) On the new rearview mirror, tap the two holes near the spring clip to 6-32 or similar.
9) Remove the metal spring clip from the new rearview mirror.
10) Attach the metal spring clip to BodyAdapter.stl using 10-32 or 1/4-20 screw/nut/washers.
11) Exercise the twist-action between BodyAdapter and BasePlate a few times to ensure everything feels good and get the initial groove worn in. Separate the two pieces when done.
12) Attach BodyAdapter.stl to the new mirror, using three screws (two previously-tapped screw holes + the original spring clip boss) Use washer and nuts as appropriate.
13) Superglue or JBweld BodyAdapter to the mirror aluminum to prevent minor vibrations.
Before JBwelding, you may want to test-fit everything using double-sided adhesive tape
14) Laying a towel to protect the dashboard, JBweld BasePlate to the vinyl using a laser level and VinylTemplate to help get it as close to vertical as possible. The top of BasePlate should be nearly flush with the headliner. Let cure overnight.
15) Twist on the mirror+BodyAdapter assembly. Use a coarse screw to lock the alignment.
16) Print TPUAdapter.stl (TPU, no supports necessary)
17) Attach the TPU adapter to the lower mirror cover for a Lincoln MKT (Part DE9Z-17D550-AB)
18) Attach the mirror cover + TPU to the rearview mirror.
19) Once aligned how you want it, use a scalpel to trim the outside edge of the vinyl to match the TPU/shroud.
Wiring Modifications
Four wires from the mirror's pigtail (+12v, Ground, HS-CAN+, HS-CAN-) must be connected to the car. I made a wiring harness that extended to behind the radio, connecting to an APIM extension cable.
To toggle Lane Assist on and off, I drilled a small hole in the mirror housing and glued a tactile pushbutton switch connecting the LKA Switch wire to ground when pressed.
Forscan Modifications
My original values are for a 2016 Flex Limited 303A (With Collision Warning)
IPC
720-01-02 xxxx 6Fxx xx (was 6E, collision warning only)
720-01-03 xxxx 54xx (was 50)
PSCM
730-02-01 xxxx x1xx xxxx (was 0)
When connecting, Forscan will ask if you have a Flex or MKT. You must select MKT for the rearview mirror (IPMA) to appear.
Requires a mirror from a 2013+ Ford Taurus, Ford Explorer, Lincoln MKS, or Lincoln MKT.
Two styles of mirror are available -- one is auto-highbeam only, the other is lane-keeping + auto highbeam. Do not rely on item descriptions -- sellers often mistakenly label an AHB mirror as LKA. Look for "AHBC/LA" or at the forward-facing sensor itself -- it should match the one in my picture.
Wiring and Forscan modifications are necessary.
Printing/Installation
1) Remove the original rearview mirror carefully. Check my other Things for a tool that may help.
2) Print VinylTemplate.stl (No supports necessary)
3) Cut a piece of Oracal 651 Matte Black Vinyl to the rough size of the template. Go a little big for the outside dimensions.
4) Cut the hole for the existing 'saddle mount', but not the trapezoid or outer edge.
5) Apply the vinyl to the inside of the windshield. Avoid bubbles and creases. Variations in the adhesive (from pulling/reapplying) will disappear after some time in the sun.
6) Using VinylTemplate and a scalpel, carefully cut the trapezoid shape. Use a laser level if available to ensure the trapezoid is vertical.
7) Print BasePlate.stl and BodyAdapter.stl (Print in PETG, ABS, or PC, with supports)
8) On the new rearview mirror, tap the two holes near the spring clip to 6-32 or similar.
9) Remove the metal spring clip from the new rearview mirror.
10) Attach the metal spring clip to BodyAdapter.stl using 10-32 or 1/4-20 screw/nut/washers.
11) Exercise the twist-action between BodyAdapter and BasePlate a few times to ensure everything feels good and get the initial groove worn in. Separate the two pieces when done.
12) Attach BodyAdapter.stl to the new mirror, using three screws (two previously-tapped screw holes + the original spring clip boss) Use washer and nuts as appropriate.
13) Superglue or JBweld BodyAdapter to the mirror aluminum to prevent minor vibrations.
Before JBwelding, you may want to test-fit everything using double-sided adhesive tape
14) Laying a towel to protect the dashboard, JBweld BasePlate to the vinyl using a laser level and VinylTemplate to help get it as close to vertical as possible. The top of BasePlate should be nearly flush with the headliner. Let cure overnight.
15) Twist on the mirror+BodyAdapter assembly. Use a coarse screw to lock the alignment.
16) Print TPUAdapter.stl (TPU, no supports necessary)
17) Attach the TPU adapter to the lower mirror cover for a Lincoln MKT (Part DE9Z-17D550-AB)
18) Attach the mirror cover + TPU to the rearview mirror.
19) Once aligned how you want it, use a scalpel to trim the outside edge of the vinyl to match the TPU/shroud.
Wiring Modifications
Four wires from the mirror's pigtail (+12v, Ground, HS-CAN+, HS-CAN-) must be connected to the car. I made a wiring harness that extended to behind the radio, connecting to an APIM extension cable.
To toggle Lane Assist on and off, I drilled a small hole in the mirror housing and glued a tactile pushbutton switch connecting the LKA Switch wire to ground when pressed.
Forscan Modifications
My original values are for a 2016 Flex Limited 303A (With Collision Warning)
IPC
720-01-02 xxxx 6Fxx xx (was 6E, collision warning only)
720-01-03 xxxx 54xx (was 50)
PSCM
730-02-01 xxxx x1xx xxxx (was 0)
When connecting, Forscan will ask if you have a Flex or MKT. You must select MKT for the rearview mirror (IPMA) to appear.
Similar models
thingiverse
free

Ford Flex Lane-Keeping Assist / Auto-Highbeam Adapter by XirallicBolts
...in the plastic! mirrors from the fusion/escape/etc look very similar but the body is longer and will not work...
thingiverse
free

Cubicle rearview mirror by zohargolan
...for $6)
note: you need to find a spring to fit in the holes in both the clip and the mirror base
enjoy,
zohar
www.gol-tec.com
thingiverse
free

YarisRearViewMirrorBlinkerAdapter
...nted for the left side rearview mirror.
i fastened the clip to the mirror using a 3mm cable clamp passed through the square hole.
3d_ocean
$89

Lincoln MKT 2013
...y, in real units of measurement, qualitatively and maximally close to the original. model formats: - *.max (3ds max 2008 scanl...
3d_ocean
$89

Lincoln MKT 2012
...y, in real units of measurement, qualitatively and maximally close to the original. model formats: - *.max (3ds max 2008 scanl...
thingiverse
free
Garmin Forerunner Charge Mount with HRM Clip and Screw Holes
...verse
just a remix from the original design, i just added a baseplate to screw it on instead of the attachment with power strips
3d_export
$99

Lincoln MKT 2012 3D Model
... 3d model
3dexport
lincoln mkt 2011 2012 2013 2014 2015 suv offroad 4x4 usa luxury
lincoln mkt 2012 3d model squir 50556 3dexport
thingiverse
free

Mirror Clip by -daniel-
...hingiverse
this is a clip to screw a mirror to the wall, or as i used it to attach winter plastic to the outside of the windows.
thingiverse
free

Glass clip customize by pelonicus
...ut at the end of the clip wire
step5- insert the wire into the holes to be able to open the clip
step6- install to hold the glass
3d_export
$99

Lincoln MKT 3D Model
...ncoln mkt 2009 2010 2011 2012 suv offroad kombi combi wagon estate avant 4x4 usa luxury
lincoln mkt 3d model squir 12969 3dexport
Xirallicbolts
thingiverse
free

Silverado Popsocket Mount by XirallicBolts
... your phone.
print as-is with supports touching buildplate. after printing, separate or cut where the print slides onto the vent.
thingiverse
free
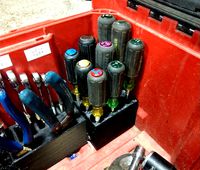
Milwaukee Packout Screwdriver Organizer by XirallicBolts
...(big -)
7.0mm (small -)
20.3mm (1/2)
17.7mm (7/16)
7.0mm (small +)
15.4mm (3/8)
14.2mm (5/16)
12.3mm (1/4)
thingiverse
free
Ford Flex Lane-Keeping Assist / Auto-Highbeam Adapter by XirallicBolts
...our vehicle centered in the lane, for 10 minutes.
after a few miles you should get lane markings on your left instrument cluster.
Highbeam
thingiverse
free

LED Sockel Drehzahlmesser Yamaha XT 250 by 3DMarco
...5mm - grün (neutral) 1 led 5mm - blau (highbeam 1 led 5mm - orange (blinker) 3 passende widerstände...
thingiverse
free
Ford Flex Lane-Keeping Assist / Auto-Highbeam Adapter by XirallicBolts
...our vehicle centered in the lane, for 10 minutes.
after a few miles you should get lane markings on your left instrument cluster.
grabcad
free

Powerfull e-bike headlight with daylight LED
...with daylight led grabcad 50w lensed main light with highbeam controlled by servomotor inside. led daylight looked like eyes...
cg_trader
$5

Marine Spotlight
...they can be 3d printed. light lighting spotlight ledlight highbeam lowbeam marine ship tugboat industry marineservice shipyards freightships containerships...
3dwarehouse
free

Scania R730 Modern Bullbar
..., #bullbar , #bullbars , #lights , #fog , #highbeam ...
Lane
3d_export
$10

Obstacle lane
...obstacle lane
3dexport
obstacle lane
3ddd
$1
Lane Furniture
...niture , журнальный
столик журнальный lane furniture
conrad coffee table текстуры внутри
3ddd
free

Книжный шкаф Lane
...книжный шкаф lane
3ddd
lane , сша
lane furniture возвращаясь до
3ddd
$1
Консоль Lane Furniture
...lane furniture , консоль
консоль lane furniture, сша, текстуры внутри
3ddd
$1

Lane tabouret T1
...lane tabouret t1
3ddd
lane tabouret t1
tabouret based on form of hyperboloid.
turbosquid
$5

Trade Lane
... available on turbo squid, the world's leading provider of digital 3d models for visualization, films, television, and games.
turbosquid
free

Trade Lane
... available on turbo squid, the world's leading provider of digital 3d models for visualization, films, television, and games.
3ddd
free

Roger Lane, серия пейзажей
...roger lane, серия пейзажей
3ddd
roger lane, серия пейзажей
3ddd
$1
lane chair 852.rar
...lane chair 852.rar
3ddd
hampton , lane
кресло hampton,текстуры есть
3d_export
$30
bowling lane
...e up render. - all parts and materials are logically named. other formats ================= - collada (.dae) - autodesk fbx - obj
Flex
3ddd
$1

Flex
...flex
3ddd
flex , конференц-зал
кресло для переговоров
3ddd
$1

Flex — I Laccati
... i laccati
3ddd
flex , дверь
двери межкомнатные, окрашенные. flex, коллекция «i laccati»
3ddd
free

Flex Seating 6032
... конференц-зал , flex
кресло модульное, модель flex seating 6032
3ddd
free
TechnoGym Flex Posterior
... flex , тренажер
3ds max 2012 (v-ray) + fbx
technogym flex posterior
3ddd
$1
Банкетка Flex Team
... , flex team
http://www.abitant.com/products/banketka-flex-team-2014-kilt-pouf
3ddd
free

FLEX , I Laccati
...cati
3ddd
flex , i laccati
flex , i laccati
модель p 14 q stucco fiorentino decoro gigli
3ddd
$1

Metal lux / FLEX
...metal lux / flex
3ddd
metal lux
люстра metal lux flex.
turbosquid
$11
Stool Flex
...ty free 3d model stool flex for download as max, obj, and fbx on turbosquid: 3d models for games, architecture, videos. (1673813)
3ddd
$1

Flex by Skandiform
...flex by skandiform
3ddd
skandiform , стул
enjoy
turbosquid
$7

Flex Chair
... available on turbo squid, the world's leading provider of digital 3d models for visualization, films, television, and games.
Assist
turbosquid
$120

Robot Assistant
...id
royalty free 3d model robot assistant for download as max on turbosquid: 3d models for games, architecture, videos. (1381212)
3d_export
$5

painting assistant
...painting assistant
3dexport
draw samples
3d_export
$5

assistive cane
...assistive cane
3dexport
aristocratic cane for characters
3d_export
$10

Assist bike 3D Model
...assist bike 3d model
3dexport
assist bike
assist bike 3d model modelix 59218 3dexport
turbosquid
$69

computer assistant character
... available on turbo squid, the world's leading provider of digital 3d models for visualization, films, television, and games.
turbosquid
$1

Robot Assistant
...d
royalty free 3d model 3d robot human for download as blend on turbosquid: 3d models for games, architecture, videos. (1599434)
turbosquid
$30

Galaxy Assistant's Stool
... available on turbo squid, the world's leading provider of digital 3d models for visualization, films, television, and games.
3d_export
$15

Prototype version of the robot assistant
...ersion of the robot assistant, designed to help a person in a variety of tasks, both in helping in the garden and in armed escort
turbosquid
$69

Droid Assistant
... robot guard for download as blend, dae, fbx, obj, stl, and x on turbosquid: 3d models for games, architecture, videos. (1624852)
turbosquid
free

Free Realistic Grass Assistant
...3d model free realistic grass assistant for download as blend on turbosquid: 3d models for games, architecture, videos. (1454100)
Ford
3ddd
$1

Ford A
...ford a
3ddd
ford
ford a.
длина: 4191 мм
ширина: 1702 мм
3ddd
$1
Ford Fusion
...ford fusion
3ddd
ford
ford fusion
3ddd
$1
Ford 32
...ford 32
3ddd
ford
ford 32 tuning
3ddd
$1

Ford Focus
...ford focus
3ddd
ford
двухместный ford focus
3ddd
$1

Ford focus
...ford focus
3ddd
ford focus
3d_export
$10

Ford-transit
...ford-transit
3dexport
ford-transit van
3d_export
$69

ford-mondeo ford-fusion
...vertisements or games corona render and materials all textures include in *.rar files lighting setup is not included in the file!
3d_ocean
$69

Ford Mustang
...n
car ford mustang speed wheel
ford mustang high poly with details and materials used materials are included /.3ds/.obj/.fbx/.skp
3d_export
$30

Ford 3D Model
...ford 3d model
3dexport
ford
ford 3d model afshin 37528 3dexport
3ddd
$1

Автосалон FORD
...он ford
3ddd
автосалон , здание
автосалон ford. выдерживает крупные ракурсы. всем удачи!
Auto
3d_export
$5

auto
...auto
3dexport
auto
3ddd
$1

auto
...auto
3ddd
max7
turbosquid
$69
AUTO
...to
turbosquid
royalty free 3d model auto for download as obj on turbosquid: 3d models for games, architecture, videos. (1453538)
3d_export
$10

Auto
...auto
3dexport
3d_export
free

auto
...auto
3dexport
3ddd
$1

Auto posters
...auto posters
3ddd
машина
auto posters
turbosquid
$50

auto
... available on turbo squid, the world's leading provider of digital 3d models for visualization, films, television, and games.
turbosquid
$28

Auto
... available on turbo squid, the world's leading provider of digital 3d models for visualization, films, television, and games.
turbosquid
$20
auto
... available on turbo squid, the world's leading provider of digital 3d models for visualization, films, television, and games.
turbosquid
$5
auto
... available on turbo squid, the world's leading provider of digital 3d models for visualization, films, television, and games.
Adapter
3d_export
$10
Adapter 3D Model
...adapter 3d model
3dexport
adapter
adapter 3d model mur 20260 3dexport
archive3d
free
Adapter socket 3D Model
...dapter socket adapter
adapter socket n090211 - 3d model (*.3ds) for interior 3d visualization.
turbosquid
$400

cell adaptation
...
royalty free 3d model cell adaptation for download as blend on turbosquid: 3d models for games, architecture, videos. (1701655)
archive3d
free
Adapter 3D Model
...ups pc equipment
adapter extron n180813 - 3d model (*.gsm+*.3ds) for interior 3d visualization.
turbosquid
$5

usb adapter
...royalty free 3d model usb adapter for download as ige and stl on turbosquid: 3d models for games, architecture, videos. (1582234)
turbosquid
$15
Power adapter
...free 3d model power adapter for download as max, obj, and fbx on turbosquid: 3d models for games, architecture, videos. (1510024)
turbosquid
$8
USB adapter
...e 3d model usb adapter for download as max, fbx, obj, and dwg on turbosquid: 3d models for games, architecture, videos. (1713542)
turbosquid
$30

adapter.3ds
... available on turbo squid, the world's leading provider of digital 3d models for visualization, films, television, and games.
turbosquid
$15
Nokia Adapter
... available on turbo squid, the world's leading provider of digital 3d models for visualization, films, television, and games.
turbosquid
$15
Universal adapter
... available on turbo squid, the world's leading provider of digital 3d models for visualization, films, television, and games.
Keeping
design_connected
$18

Keep
...keep
designconnected
decameron keep computer generated 3d model. designed by estúdio ninho.
turbosquid
free

Keep
... available on turbo squid, the world's leading provider of digital 3d models for visualization, films, television, and games.
turbosquid
$29

Keep Calm
...ree 3d model keep calm for download as 3ds, obj, c4d, and fbx on turbosquid: 3d models for games, architecture, videos. (1221338)
turbosquid
$20

Medieval Keep
... available on turbo squid, the world's leading provider of digital 3d models for visualization, films, television, and games.
turbosquid
$5

Castle Keep
... available on turbo squid, the world's leading provider of digital 3d models for visualization, films, television, and games.
3d_export
$25
Medieval Keep 3D Model
...medieval keep 3d model
3dexport
keep medieval castle architecture
medieval keep 3d model evilgit 76991 3dexport
3d_export
$5
Castle keep 3D Model
...castle keep 3d model
3dexport
castle keep stone medieval
castle keep 3d model seikto223169 39246 3dexport
turbosquid
free

Keep Right Sign
...rbosquid
free 3d model keep right sign for download as blend on turbosquid: 3d models for games, architecture, videos. (1522189)
turbosquid
$15

Medieval Castle Keep
... available on turbo squid, the world's leading provider of digital 3d models for visualization, films, television, and games.
turbosquid
$3

Compulsory Keep Left
...pulsory keep left for download as 3ds, obj, fbx, dae, and stl on turbosquid: 3d models for games, architecture, videos. (1490693)