Thingiverse
Folger Tech (Knock-Off) E3D V6 - Bowden to DIRECT Conversion Kit by Zurkeyon
by Thingiverse
Last crawled date: 3 years ago
Note: This is a Remix of a Remix of a Remix with a few Parts of my own thrown in there. Most of these parts are not my own, I am just redesigning them and recombining them to meet my needs. Much of this design is based off of the design found below: http://www.thingiverse.com/thing:147705
(Other Idler Bearing sizes and types Can be found here as well)
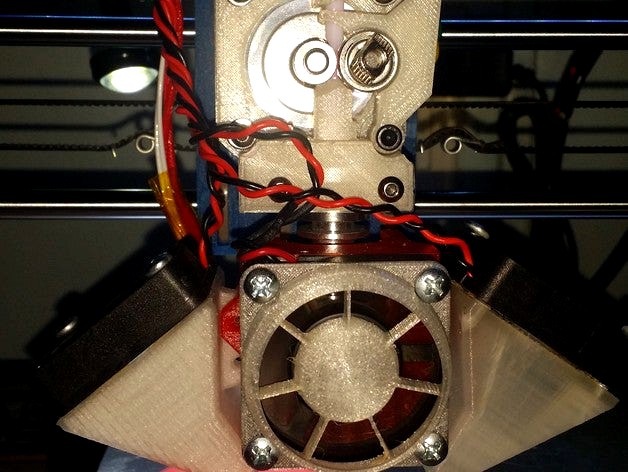
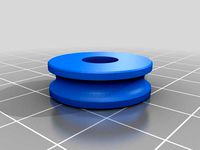
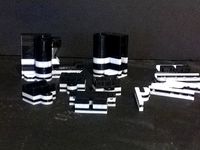
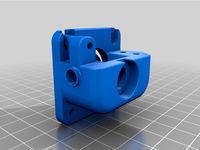
FOLGER TECH BOWDEN TO DIRECT DRIVE CONVERSION KIT - With Full PTFE Liner and INSERT!
This Kit Allows you to take the Folger Tech 1.75MM E3D V6
(Knock Off with 25 MM Cooling Fin Diameter)
And Convert it to a Direct Drive Capable of Lower Temp Flexible Filaments
(Under 220 Deg)https://folgertech.com/collections/hot-ends/products/bowden-all-metal-hotend-for-abs-for-e3d-or-j-head-type-filament-extruder-1-75mm-1
Thus, allowing you to take an UNDER 15$ hot end, and get BOTH direct drive and bowden Mounts/Extruders for it, with a universal MK8 Gear, and Choice of 30MM or 40MM Dual Part Cooling Fans!
BOWDEN VERSION = http://www.thingiverse.com/thing:1689850
This also means that you DO NOT have to change your eSteps Per MM, when swapping from Bowden to Direct.
Both Units Were Made to fit together with the LEAST amount of Hardware.
If you have M3/4 Hardware, General Small Self Tapping Screws (For Fans), and Either a 608 or 624ZZ Bearing, You should have everything you need to make these.
Instructions:
Print at 100% for BEST results.
Take the Stainless Steel Heat Break OUT of the E3D and replace it with a PTFE lined Heat Break. (Unless printing Materials at Greater than 220c, then swap BACK to the SS Heat Break. as the PTFE will Melt and Cause Toxic Fumes. This setup is for PLA, Low Temp Flexibles, and Low Temp ABS. But it Can Print Others... Just change setup.)
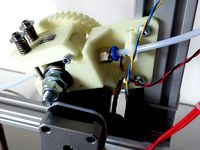
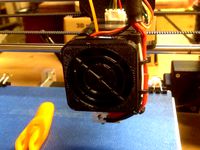
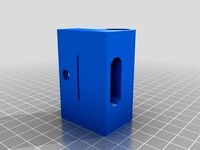
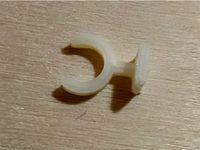
Print out the Extruder Base, Insert, Idler, and Clamp. (And Fans/Mount if Needed)
CLEAN the Filament Path of Both the Extruder Base, AND the Insert with a 5/32 Drill Bit until PTFE tube can be fed into it. Work it SLOW and test it, rinse and repeat. You want SOME tension as the PTFE tube is inserted, but you will be inserting it DEEP into the top of the E3D so it must be just clean enough to get it worked all the way to the bottom.
Take the Insert and Clean it up GOOD, making sure it threads EASILY, almost loose, into the top of the Folger Tech E3D.
Gently thread it down until it stops. Leaving about 1.5MM Sticking out of the top of the E3D.
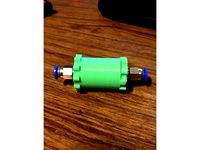
Check the Fitment of the E3D into the Extruder Base. Press it in with a C-Clamp and Cardboard if needed to seat it ALL THE WAY in.
Take a section of 4MM OD / 2MM ID PTFE tubing, about 5-6 inches long, and Sharpen one end with a Pencil Sharpener, until it has a cone shape. This will allow it to seat down into the inlet of the E3D without being able to move around. The Insert also makes certain it is perfectly lined up with the hole at the top of the E3Ds inlet.
Start from the Top of the Extruder Base, and push the PTFE all the way through until it bottoms out, hopefully at the Base of the Inlet on Your E3D, and through the Insert. Making sure not to pinch it or crush it, as this will make the filament drag on the inner walls.
Cut the PTFE Tubing to match the curves at the Bottom of the Extruder Base. Keep the leftover Section Aside for use on the Top portion of the Extruder Base.
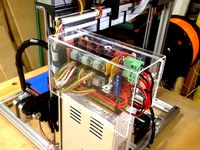
Assemble the unit as pictured, and Check that the Bearing and Gear DO NOT hit the PTFE Tubing. If they do, use an Exacto to trim it, until they do not, But TRY to keep the " ^ " Bevel.
You may need to Trim the Ends out of the Idler, and Run the Drill But Through it as well to make a U Shaped section for the PTFE tube to seat into when the Idler is closed and Latched to the Spring. Rather than a closed loop.
" v " Bevel the Edge of the PTFE Tube that Remains to Match the Gear and Bearing Curves. Now insert about 1-2" of this trimmed PTFE into the TOP of the Extruder Base. This is the Filament inlet.
Secure the Idler with a Spring and M4 20-25MM Bolt and Retaining Nut. Increase the tension until you feel it gripping tightly and can push filament in and out, at decent force and speed, without the gear slipping. Each stroke Carries the motor with it and forces it to turn with ZERO slipping. if its cutting a groove into the filament, that is OK, as long as it is not so tight that it flattens out the filament. As this will cause jams for sure.
That is it, you are done!
Re-Calibrate your Z EndStop, and Level Your Bed, Load Filament of your choice, and You are Off to the Races.
I have NOT fully tested this with the Flexibles, but there is no reason why it should not work. There are NO kink-spots or bind points left for the filament to go into. Its a Straight shot all the Way down, with a PTFE guide top and bottom with ZERO gap.
So now, Go Enjoy Your MULTIPURPOSE, Sub 15$ E3D Hot End!
Feel Free to Hit me up with any Questions.
(Other Idler Bearing sizes and types Can be found here as well)
FOLGER TECH BOWDEN TO DIRECT DRIVE CONVERSION KIT - With Full PTFE Liner and INSERT!
This Kit Allows you to take the Folger Tech 1.75MM E3D V6
(Knock Off with 25 MM Cooling Fin Diameter)
And Convert it to a Direct Drive Capable of Lower Temp Flexible Filaments
(Under 220 Deg)https://folgertech.com/collections/hot-ends/products/bowden-all-metal-hotend-for-abs-for-e3d-or-j-head-type-filament-extruder-1-75mm-1
Thus, allowing you to take an UNDER 15$ hot end, and get BOTH direct drive and bowden Mounts/Extruders for it, with a universal MK8 Gear, and Choice of 30MM or 40MM Dual Part Cooling Fans!
BOWDEN VERSION = http://www.thingiverse.com/thing:1689850
This also means that you DO NOT have to change your eSteps Per MM, when swapping from Bowden to Direct.
Both Units Were Made to fit together with the LEAST amount of Hardware.
If you have M3/4 Hardware, General Small Self Tapping Screws (For Fans), and Either a 608 or 624ZZ Bearing, You should have everything you need to make these.
Instructions:
Print at 100% for BEST results.
Take the Stainless Steel Heat Break OUT of the E3D and replace it with a PTFE lined Heat Break. (Unless printing Materials at Greater than 220c, then swap BACK to the SS Heat Break. as the PTFE will Melt and Cause Toxic Fumes. This setup is for PLA, Low Temp Flexibles, and Low Temp ABS. But it Can Print Others... Just change setup.)
Print out the Extruder Base, Insert, Idler, and Clamp. (And Fans/Mount if Needed)
CLEAN the Filament Path of Both the Extruder Base, AND the Insert with a 5/32 Drill Bit until PTFE tube can be fed into it. Work it SLOW and test it, rinse and repeat. You want SOME tension as the PTFE tube is inserted, but you will be inserting it DEEP into the top of the E3D so it must be just clean enough to get it worked all the way to the bottom.
Take the Insert and Clean it up GOOD, making sure it threads EASILY, almost loose, into the top of the Folger Tech E3D.
Gently thread it down until it stops. Leaving about 1.5MM Sticking out of the top of the E3D.
Check the Fitment of the E3D into the Extruder Base. Press it in with a C-Clamp and Cardboard if needed to seat it ALL THE WAY in.
Take a section of 4MM OD / 2MM ID PTFE tubing, about 5-6 inches long, and Sharpen one end with a Pencil Sharpener, until it has a cone shape. This will allow it to seat down into the inlet of the E3D without being able to move around. The Insert also makes certain it is perfectly lined up with the hole at the top of the E3Ds inlet.
Start from the Top of the Extruder Base, and push the PTFE all the way through until it bottoms out, hopefully at the Base of the Inlet on Your E3D, and through the Insert. Making sure not to pinch it or crush it, as this will make the filament drag on the inner walls.
Cut the PTFE Tubing to match the curves at the Bottom of the Extruder Base. Keep the leftover Section Aside for use on the Top portion of the Extruder Base.
Assemble the unit as pictured, and Check that the Bearing and Gear DO NOT hit the PTFE Tubing. If they do, use an Exacto to trim it, until they do not, But TRY to keep the " ^ " Bevel.
You may need to Trim the Ends out of the Idler, and Run the Drill But Through it as well to make a U Shaped section for the PTFE tube to seat into when the Idler is closed and Latched to the Spring. Rather than a closed loop.
" v " Bevel the Edge of the PTFE Tube that Remains to Match the Gear and Bearing Curves. Now insert about 1-2" of this trimmed PTFE into the TOP of the Extruder Base. This is the Filament inlet.
Secure the Idler with a Spring and M4 20-25MM Bolt and Retaining Nut. Increase the tension until you feel it gripping tightly and can push filament in and out, at decent force and speed, without the gear slipping. Each stroke Carries the motor with it and forces it to turn with ZERO slipping. if its cutting a groove into the filament, that is OK, as long as it is not so tight that it flattens out the filament. As this will cause jams for sure.
That is it, you are done!
Re-Calibrate your Z EndStop, and Level Your Bed, Load Filament of your choice, and You are Off to the Races.
I have NOT fully tested this with the Flexibles, but there is no reason why it should not work. There are NO kink-spots or bind points left for the filament to go into. Its a Straight shot all the Way down, with a PTFE guide top and bottom with ZERO gap.
So now, Go Enjoy Your MULTIPURPOSE, Sub 15$ E3D Hot End!
Feel Free to Hit me up with any Questions.
Similar models
thingiverse
free
Bowden Extruder Hypercube by szaman89
...d spring,
608 bearing,
1x m5x8mm
3x m3x14mm screw,
1x m3x25mm screw
1x m3x25mm full threaded screw for spring tension.
ptfe tube.
thingiverse
free

Compact direct drive bowden extruder 3mm filament by puvijain
...fied the inlet section in the scad to house push fit for od 6mm ptfe tube.
inlet and outlet section have interchanged functions.
thingiverse
free
A bowden geared extruder for Rostock - based on Gregs by RichRap
...extruder for rostock and other printers, it uses 1.75mm filament and 4mm pneumatic fittings for ptfe tubes as the bowden element.
thingiverse
free

BondTech Mini Extruder with dual PC4-M10, dual Embedded Collet, or Single Slip by goopyplastic
...ul if you are mounting the extruder in direct drive and have the hotend ptfe inserted into the extruder just as a filament guide.
thingiverse
free

Flexible filament guide (w/ PTFE Bowden Tubing) for MP Select Mini w/Anycubic Mk8 extruder modified w/OEM gear & flat bearing by rumpstrudel
...to the idler/extruder gear.
thanks dtew for the guide i used it to print the tires for: https://www.thingiverse.com/thing:1193309
thingiverse
free

Bear Extruder Bowden Filament Lid Conversion for Push to Fit PTFE Tube Connector by JBieri
...ire a bowden style bear extruder, or run into issues with filament that is out of spec and causes issues with the bondtech gears.
thingiverse
free

Ez3D Phoenix mount for E3D V6 Hot-End by rkroetch
...e-drill the filament guide to allow the ptfe tube to extend through the guide and into the hot-end direct from the extruder gear.
thingiverse
free

E3D Direct Drive Hot End V5 Bowden Kossel Mount Remix by
...iverse
if you have a e3d direct drive hot end v5 and the bsp type ptfe bowden tube fitting you can use this assembly.
*pics soon
thingiverse
free
Compact Bowden Extruder, direct drive 1.75mm (Flexible Filament inlay) 4mm Tube, M5 pushfit by sobo84
...ment. works great for me.
maybe you have to cut it a little bit.
idler:
i glued anwasher with epoxid on it. it is just perfect!
thingiverse
free
Robo3D R1 Hobbed bolt Idler for E3D v6 upgrade by NorCAL3D
...us cut in the replacement still applies tension to the ptfe and filament, but doesnt deform the ptfe and create unwanted friction
Zurkeyon
thingiverse
free
Magnetic Container Rack by Zurkeyon
...gth.
1/4" x 1/4" x 1"https://www.kjmagnetics.com/proddetail.asp?prod=b44x0
can hold about 4-5 lbs. (approx)
enjoy!
thingiverse
free

Graphics Card Brace by Zurkeyon
...odify to your liking.
i have included the sketchup files for tweaking and adjustments.
make whatever use of it you can.
enjoy!
thingiverse
free

PC504XS Camera Mount (Supercircuits) by Zurkeyon
...4.6 as the enclosure walls are very thin.
but i'm sure someone will be a bit more perfectionist and correct this :-)
enjoy!
thingiverse
free

140MM Dia Blower Fan Wheel by Zurkeyon
... the apparatus to perform the balancing.
http://whiteglovefans.com/blog/2013/9/22/static-balancing-blades
balancing info (manual)
thingiverse
free

Odroid-VU7 and VU7+ Screen Frame by Zurkeyon
...ught i would include.
enjoy!
(current version should hide the screen edges better than in the pics, if not its easy to modify.)
thingiverse
free
Laptop HDD Hot Swap Cage by Zurkeyon
...of screw holes on the end of the drive for mounting a handle to.
glue them together for unlimited sata storage upgrades!
enjoy!
thingiverse
free
SoC ExoSkeleton DevTop by Zurkeyon
...most a necessity. with enough flexibility to make it truly useful!
a place for everything, everything in its place!
:-p
enjoy!
z
thingiverse
free
NanoDrives Time Machine by Zurkeyon
...g your customers 3000$! :-d
enjoy!
-z-
full instructable available also.http://www.instructables.com/id/nanodrives-time-machine
thingiverse
free

PiCade Light Frames - RetroPi - Pac Man by ChrisMayhew
...some alternative light frames for the picade designed by zurkeyon retropi text with pacman logo. for the transparent part,...
thingiverse
free

SoC ExoSkeleton DevTop 2.0 by Zurkeyon
...ost a necessity. with enough flexibility to make it truly useful!
a place for everything, everything in its place!
:-p
enjoy!
-z-
Folger
thingiverse
free

Folger Tech FT-5 Logos by GladstonesThingi
...folger tech ft-5 logos by gladstonesthingi
thingiverse
cut the folger tech logo out of my lithophanes with meshmixer.
thingiverse
free

LCD bracket for Folger 2020 by animoose
...ips to 2020 aluminium such as the frame of the folger 2020 and allows you to attach a reprapdiscount smart controller (20x4 lcd).
thingiverse
free

Folger Tech FT-5 Logo Lithophanes by GladstonesThingi
...ft-5 logo lithophanes by gladstonesthingi
thingiverse
used 3dp.rocks/lithophane to make a 3d image of the folger tech ft-5 logo.
thingiverse
free

Folger Tech Leadscrew with cable chain mounts by cmenchion
...ounts by cmenchion
thingiverse
folger tech leadscrew with cable chain mounts. cable chain available at http://www.folgertech.com
thingiverse
free
Extruder Fan Guard for a Folger RepRap 2020 Prusa i3 by JohnDiamond
...020 prusa i3 by johndiamond
thingiverse
finger guard for the fan on the extruder of a folger technologies reprap 2020 prusa i3.
thingiverse
free
Folger Tech Leadscrew with cable chain mounts by cmenchion
... set. the idler is just leadscrew, the motor and carriage have been moddem for cable chain available at http://www.folgertech.com
thingiverse
free
Folger Tech FT-5 Reverse Bowden Bracket by 2019tylernewcomb
...giverse
this is a bracket to add a reverse bowden tube to a folger tech ft-5 or any other printer with 20x20 aluminum extrusion.
thingiverse
free

Fan shroud for Folger Tech FT-5 3d Printer by cptnAWESOME
...tech ft-5 3d printer by cptnawesome
thingiverse
this is a fan shroud for folger tech ft-5 printers. it uses a 5015s blower fan.
thingiverse
free
Folger Tech Reprap 2020 I3 plastic Parts by CHRIS817
...lastic parts by chris817
thingiverse
folger tech reprap 2020 i3 plastic parts i needed new parts got these thought id share them
thingiverse
free
Controller cover for a Folger RepRap 2020 Prusa i3 by JohnDiamond
... cover and mounting kit for the arduino mega 2560 and ramps 1.4 controller boards on a folger technologies reprap 2020 prusa i3.
Knock
turbosquid
free

PLEASE KNOCK DOOR HANGER
...oyalty free 3d model please knock for download as ige and stl on turbosquid: 3d models for games, architecture, videos. (1368138)
3ddd
free
Лестница KNOCK WOOD
...лестница knock wood
3ddd
производитель rintal s.p.a (италия). лестница на деревянном модульном косоуре.
3d_export
$5

repair sleeve for manual transmission handle bmw
...repair sleeve for manual transmission handle b.m.w.<br>the sleeve is knockd out. i drilled a hole coaxially with the bore...
3ddd
$1

KARE
...(white club) material: mdf lacquered, handles: steel chromed, delivery: knockd down size: 0,76 x 1,5 x 0,7...
3d_ocean
$19

3D Emoticons
...venom wolverine this 3d emoticon package is sure to knock your socks off. this highly designed suite of 3d...
3d_ocean
$15

Low poly ninja Jack - animated
...animated 3docean animated assassin character game hit jack japan knock out low poly max ninja normalmap polygon quality rigged...
3d_export
$10

exotic ombrelloni
...– custom-finishing available: yes – custom-size available: yes – knockng down item – no. of pcs in one package:...
3d_export
$15

de havilland mosquito
...the nazis' seizure of power, a morning mosquito attack knockd out the main berlin broadcasting station while hermann göring...
thingiverse
free

NISSAN Knock-knock-CatsProject by Hiroaking_BC5
...magnet seats.
what's "nissan knock-knock cats project"?
see --> http://www2.nissan.co.jp/social/camp/nekobanban/
thingiverse
free

knock loudly by awelshman
...knock loudly by awelshman
thingiverse
just a bit of fun
knock loudly plaque
Bowden
turbosquid
$199
Vintage Ben Bowden Spacelander bike
... available on turbo squid, the world's leading provider of digital 3d models for visualization, films, television, and games.
3ddd
$1

Manooi Artica
...and pendants in various sizes and forms. suspension: galvanized bowden - dia. 1,5 mm. bulb: max 60 w -...
thingiverse
free
Remix Compact Bowden extruder - m6 bowden couplers and bowden tube pass-through
...ouplers and bowden tube pass-through
thingiverse
remix compact bowden extruder - m6 bowden couplers and bowden tube pass-through
thingiverse
free

Bowden Extruder
...bowden extruder
thingiverse
i have created bowden extruder for flsun delta 3d printer.
thingiverse
free

bowden 3mm by spee_D
...bowden 3mm by spee_d
thingiverse
for bowden 3mm
thingiverse
free
Bowden Tube Cutter
...bowden tube cutter
thingiverse
bowden tube cutter
thingiverse
free
Customizable Bowden Clip
...customizable bowden clip
thingiverse
customizable bowden clip
thingiverse
free
Bowden Oiler by fcheshire
...bowden oiler by fcheshire
thingiverse
inline bowden oiler
thingiverse
free

Bowden adapter by helkaroui
...bowden adapter by helkaroui
thingiverse
this is a fixed bowden adapter
thingiverse
free

Adventure3 Bowden Clip
...adventure3 bowden clip
thingiverse
adventure3 bowden clip
E3D
turbosquid
$23

E3D - Google Home
... 3d model e3d - google home for download as max, obj, and c4d on turbosquid: 3d models for games, architecture, videos. (1192509)
cg_studio
free

e3d model
...e3d model
cgstudio
- e 3d model, royalty free license available, instant download after purchase.
turbosquid
$2

Syringe C4D (E3D Ready)
...lty free 3d model syringe c4d (e3d ready) for download as c4d on turbosquid: 3d models for games, architecture, videos. (1336720)
turbosquid
$12

Microphone USB E3D and C4D
...ree 3d model microphone usb e3d & c4d for download as c4d on turbosquid: 3d models for games, architecture, videos. (1568216)
turbosquid
$29

E3D - OnePlus 6 Black
...model e3d - oneplus 6 black for download as max, obj, and c4d on turbosquid: 3d models for games, architecture, videos. (1358534)
turbosquid
$29

E3D - Motorola One 2018
...del e3d - motorola one 2018 for download as max, obj, and c4d on turbosquid: 3d models for games, architecture, videos. (1358533)
turbosquid
$29

E3D - Disney MagicBands 2
...l e3d - disney magicbands 2 for download as max, obj, and c4d on turbosquid: 3d models for games, architecture, videos. (1355515)
turbosquid
$29

E3D - Samsung Z4 Smartphone
...e3d - samsung z4 smartphone for download as max, obj, and c4d on turbosquid: 3d models for games, architecture, videos. (1182179)
turbosquid
$23

E3D - Razer Phone model
...del e3d - razer phone model for download as max, obj, and c4d on turbosquid: 3d models for games, architecture, videos. (1231207)
turbosquid
$23

E3D - Alcatel Idol 5
... model e3d - alcatel idol 5 for download as max, obj, and c4d on turbosquid: 3d models for games, architecture, videos. (1212799)
V6
3d_export
$100

v6 engine
...engine
3dexport
complete v6 engine modeled on solidworks 2017 along with .stl, .sldprt and .sldasm of all th parts and assembly.
3d_export
$10

V6 engine
... the first v6 engines were designed and produced independently by marmon motor car company, deutz gasmotoren fabrik and delahaye.
3d_export
$35

v6 engine
...s a complete model of a v6 engine containing over 400 components. you can contact me for a video of all the components assembling
3d_export
$10

v6 engine
...v6 engine
3dexport
turbosquid
$25

Bed1001-v6
... available on turbo squid, the world's leading provider of digital 3d models for visualization, films, television, and games.
turbosquid
$22

Chair2-v6
... available on turbo squid, the world's leading provider of digital 3d models for visualization, films, television, and games.
turbosquid
$20

V6.mb
... available on turbo squid, the world's leading provider of digital 3d models for visualization, films, television, and games.
3d_export
$20

V6 engine
...rovided in this package is all the parts in sldprt format and assembly in sldasm format. i can also convert the format on demand.
3ddd
$1

Стол V6
...6" в стиле дизельпанк изготовлен из блока двигателя, 4х поршней и 4х шатунов.
столешница изготовлена из стекла толщиной 8мм.
cg_studio
$199

V6 VVTi3d model
...v6 vvti3d model
cgstudio
.3ds - v6 vvti 3d model, royalty free license available, instant download after purchase.
Tech
design_connected
$13

Tech
...tech
designconnected
alivar tech computer generated 3d model. designed by scandola, matteo.
design_connected
$16

Hi Tech
...hi tech
designconnected
living divani hi tech computer generated 3d model. designed by lissoni, piero.
3d_ocean
$15
Tech Light
...diomax 9 or above includes the .3ds and .obj files includes maps other features to note: the main light is grouped and the piv...
turbosquid
$60
Tech Commander
...uid
royalty free 3d model tech commander for download as fbx on turbosquid: 3d models for games, architecture, videos. (1209942)
turbosquid
$3

Tech Heart
...squid
royalty free 3d model tech heart for download as blend on turbosquid: 3d models for games, architecture, videos. (1480511)
3ddd
$1

Кресло Hi-Tech
...кресло hi-tech
3ddd
hi-tech
современное хромированное кресло
3ddd
$1
luster hi tech
...luster hi tech
3ddd
luster hi tech для офиса))
turbosquid
$10

Tech pokeball
...yalty free 3d model tech pokeball for download as obj and fbx on turbosquid: 3d models for games, architecture, videos. (1418339)
3ddd
$1
Стол hi-tech.
...стол hi-tech.
3ddd
стол hi-tech.
материалы, освещение, рендер.
turbosquid
$7
Shisha Tech
...ty free 3d model shisha 3d tech for download as sldas and ige on turbosquid: 3d models for games, architecture, videos. (1670897)
Conversion
3ddd
$1

Conversation Seat
...шетка
the conversation seat made in englandhttp://www.squintlimited.com/products/the_conversation_seat/gold
+ max 2011
3d_export
$10

Converse 3D Model
...converse 3d model
3dexport
converse shoe pc unix mac
converse 3d model electropainter17075 38067 3dexport
turbosquid
$100

converse-shoe
...quid
royalty free 3d model converse-shoe for download as c4d on turbosquid: 3d models for games, architecture, videos. (1398427)
turbosquid
$10

Conversation Furniture
... available on turbo squid, the world's leading provider of digital 3d models for visualization, films, television, and games.
turbosquid
$7

Converse Allstars
... available on turbo squid, the world's leading provider of digital 3d models for visualization, films, television, and games.
design_connected
$16

Conversation Club Chair
...conversation club chair
designconnected
donghia conversation club chair chairs computer generated 3d model. designed by n/a.
design_connected
$27

Hemicycle Conversation Chair
...rsation chair
designconnected
ligne roset hemicycle conversation chair computer generated 3d model. designed by nigro, philippe.
3d_export
$24

Converse keds 3D Model
...converse keds 3d model
3dexport
converse all star ked shoe clothes sports
converse keds 3d model vermi1ion 26201 3dexport
3ddd
$1

Converse All-Star Shoes
...converse all-star shoes
3ddd
кеды , обувь
converse all-star shoes
design_connected
$18

CONVERSE Jack Purcell Sneakers
...converse jack purcell sneakers
designconnected
converse jack purcell sneakers computer generated 3d model.
Direct
design_connected
free
Compas Direction
...compas direction
designconnected
free 3d model of compas direction by vitra designed by prouvé, jean.
design_connected
$18
Direction Pivotant
...direction pivotant
designconnected
vitra direction pivotant computer generated 3d model. designed by prouvé, jean.
turbosquid
$6
not direct the front
...oyalty free 3d model not direct the front for download as max on turbosquid: 3d models for games, architecture, videos. (1213034)
turbosquid
$10

Rails Direct
... available on turbo squid, the world's leading provider of digital 3d models for visualization, films, television, and games.
3d_export
$5

Picto toilet directions
...lude 3d files next to rhino6: x3dv, step, igus, obj and stl. double-sided, flipping changes the gender directions to the toilets.
3ddd
$1
fauteuli direction
...d
chair , vitra , fauteuli
fauteuli vitra chair
design_connected
$18

Fauteuil Direction, 1951
...fauteuil direction, 1951
designconnected
vitra fauteuil direction, 1951 computer generated 3d model. designed by prouvé, jean.
3d_export
$5
Directional tactile 3D Model
...tactile 3d model
3dexport
directional tactile braille tile flooring interior
directional tactile 3d model renob000 71068 3dexport
turbosquid
$26

Radio direction finder A
...ty free 3d model radio direction finder a for download as fbx on turbosquid: 3d models for games, architecture, videos. (1212490)
turbosquid
$7

Wooden direction signage
...ty free 3d model wooden direction signage for download as max on turbosquid: 3d models for games, architecture, videos. (1453747)
Kit
turbosquid
$3

Bathroom Kit Baño kit
... available on turbo squid, the world's leading provider of digital 3d models for visualization, films, television, and games.
turbosquid
$19

Kit
... available on turbo squid, the world's leading provider of digital 3d models for visualization, films, television, and games.
3d_export
$20

Drift Kit
...drift kit
3dexport
turbosquid
$40

BitCoin Kit
...urbosquid
royalty free 3d model bitcoin kit for download as on turbosquid: 3d models for games, architecture, videos. (1519068)
turbosquid
$9

Industrial kit
...osquid
royalty free 3d model industrial kit for download as on turbosquid: 3d models for games, architecture, videos. (1144117)
turbosquid
$6

Kit Vases
...
turbosquid
royalty free 3d model kit vases for download as on turbosquid: 3d models for games, architecture, videos. (1285114)
turbosquid
free

Survival Kit
...rbosquid
royalty free 3d model survival kit for download as on turbosquid: 3d models for games, architecture, videos. (1637721)
turbosquid
$50

Ninja Kit
...rbosquid
royalty free 3d model ninja kit for download as fbx on turbosquid: 3d models for games, architecture, videos. (1672364)
turbosquid
$35

Brushes Kit
...osquid
royalty free 3d model brushes kit for download as max on turbosquid: 3d models for games, architecture, videos. (1216721)
turbosquid
$19
Medical kit
...osquid
royalty free 3d model medical kit for download as fbx on turbosquid: 3d models for games, architecture, videos. (1486089)