Thingiverse
FlyingBear Ghost 4S Dual Extruder
by Thingiverse
Last crawled date: 4 years, 2 months ago
Working in Progress !!! Feel free to help if you want
FlyingBear Ghost 4S Dual Extruder DIY Instructions :
This is not an official trademark guide, everything you do is at you own risks. You may understand what you are doing.
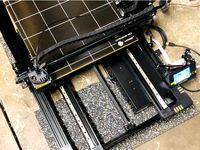
The mainboard is a FlyingBear version of the Makerbase "MKS Robin Nano" (same hardware and pinout)
You can find a lot of informations on their GitHub page.
I'm working on : 1. The 3D model of print head, 2. BLTouch leveling implement, 3. A prettier interface, 4. Wifi function (unstable for now)
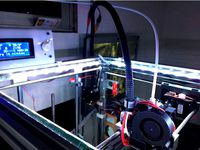
Read the "HowToDo.txt" and "HowToWire.jpg" first
You will need some spare cables and parts before starting :
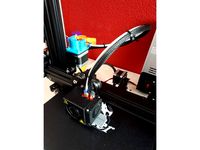
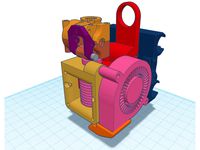
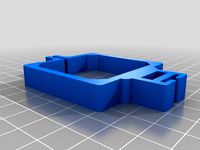
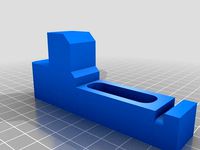
A 3d printed in ABS or PETG dual hotend PrintHead.
You can design yourself and share ! Print it before starting !
1x "2-pin JST male-male" 20cm cable.
1x "2-pin JST male-female" 150cm cable. (for the printing cooling fan)
1x "4-pin JST male to 6-pin stepper motor plug" 50 cm.
(plug depends of your motor, lenght depends of where you mount the second extruder, generaly included with motor)
You can buy only the plugs and made your cables by wire soldering. /!\ Respect standard polarities.
1x Stepper Driver (you can either buy only one stock A4988, 2x TMC 2208 to upgrade X and Y axis, or 5x 2208 for all axis "silent")
1x Motor and extruder.
1x Filament end sensor for the second extruder (if wanted, only take it from Aliexpress FB store)
1x HotEnd,of course (I pick up the same one that is on the printer from Aliexpress FB store)
1x NTC 100k temp sensor with 1m cable
1x Teflon tube for 1.75mm filament
Some zip ties for cable management
Power off and unplug the printer.
/!\ Do NEVER repower ON until complete all steps
You may break your mainboard if you change cables positions and start the machine with the stock firmware
I did it and had to replace some CMS components on mainboard, I can tell its not a pleasure ;)
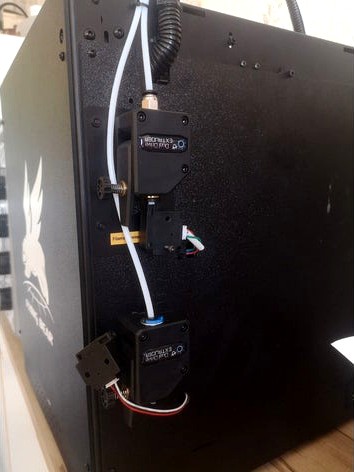
Plug cables as showed on the "HowToWire.jpg" file :
Don't try to invert cables, it may cause short circuits !
The only things you can modify is to not use the "Base PCB" changes and wire things directly to the mainboard.
a. Connect permanent +24V plug from mainboard to the "yellow" top right of "Base PCB" plug with the included green cable.
It will turn on the print head and mainboard cooling fans when printer is on.
b. Connect the second Heater wire from mainboard to "green" top right of "Base PCB" plug with the included yellow cable.
For being able to plug the second hotend heater on the "Print Head PCB".
c. Connect the second Temp sensor plug from mainboard to the unused 2-pin of top "Base PCB" plug with the 20cm new cable.
Connect the second Temp sensor to the unused 2-pin of the printer side of "Base PCB" (Where the big cables are plugged).
d. Connect the long 150cm cable to the right side of mainboard "green" fan plug and the fan to the extender.
(Thats the printing cooling fan, you can upgrade it with one or two 24V 4020 turbo fans, or whatever you want, or not)
Put the Fan extender and the Temp sensor cables into the big black sleeve.
e. Connect the second Filament sensor to the just above "yellow" plug on mainboard left side.
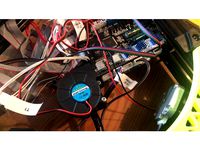
f. Mount your missing driver on the bottom of mainboard (or upgrade with new ones)
You can find some well instructions on how to adjust them on the internet.
g. Assemble and mount your second extruder and motor, plug the motor to the bottom-left side unused "Extruder 2" plug of mainboard.
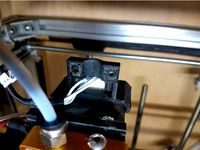
h. Replace the stock print head with the new dualhead printed. Assemble everything you need
i. Connect the second hotend heater to the "red" plug of "Print head PCB".
j. Do not touch other cables they are well placed where they are :)
Verify everything is plugged at the right place two or three times to be 100% sure
Firmware upgrade time !
a. Take a MicroSD card and format it in FAT32 (That will erase all on it)
b. Extract the archive and copy all the files from the archive on it.
c. If you got the stock A4988 drivers skip this step.
If you got upgraded X and Y axis TMC 2208 stepper drivers :
Remove "robin_nano35_cfg.txt" and "robin_nano35_cfgALL.txt".
Rename the "robin_nano35_cfgXY.txt" to "robin_nano35_cfg.txt"
If you got upgraded by all five axis TMC 2208 stepper drivers :
Remove "robin_nano35_cfg.txt" and "robin_nano35_cfgXY.txt".
Rename the "robin_nano35_cfgALL.txt" to "robin_nano35_cfg.txt"
d. Put the card in the printer port.
e. Plug in the printer and power it on !
f. The screen should display the firmware upgrading progression, if not unplug immediately and verify the card files
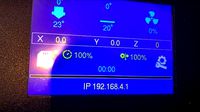
g. When update is finished move the print head and bed to the center of axis and verify it moves in the right directions
In "Tools" menu and "Move". If not go back to step c,rebuilt the SD card and edit the "***cfg.txt" file :
Example if X inverted : at line 155 you will find ">INVERT_X_DIR 0" and modify to ">INVERT_X_DIR 1" .
EVERYTHING IS DONE ! ENJOY !
If you want to downgrade to single extruder and stock firmware
a. Replug the cables as indicated in the original manual
b. Put the stock firmware on SD card and upload it
FlyingBear Ghost 4S Dual Extruder DIY Instructions :
This is not an official trademark guide, everything you do is at you own risks. You may understand what you are doing.
The mainboard is a FlyingBear version of the Makerbase "MKS Robin Nano" (same hardware and pinout)
You can find a lot of informations on their GitHub page.
I'm working on : 1. The 3D model of print head, 2. BLTouch leveling implement, 3. A prettier interface, 4. Wifi function (unstable for now)
Read the "HowToDo.txt" and "HowToWire.jpg" first
You will need some spare cables and parts before starting :
A 3d printed in ABS or PETG dual hotend PrintHead.
You can design yourself and share ! Print it before starting !
1x "2-pin JST male-male" 20cm cable.
1x "2-pin JST male-female" 150cm cable. (for the printing cooling fan)
1x "4-pin JST male to 6-pin stepper motor plug" 50 cm.
(plug depends of your motor, lenght depends of where you mount the second extruder, generaly included with motor)
You can buy only the plugs and made your cables by wire soldering. /!\ Respect standard polarities.
1x Stepper Driver (you can either buy only one stock A4988, 2x TMC 2208 to upgrade X and Y axis, or 5x 2208 for all axis "silent")
1x Motor and extruder.
1x Filament end sensor for the second extruder (if wanted, only take it from Aliexpress FB store)
1x HotEnd,of course (I pick up the same one that is on the printer from Aliexpress FB store)
1x NTC 100k temp sensor with 1m cable
1x Teflon tube for 1.75mm filament
Some zip ties for cable management
Power off and unplug the printer.
/!\ Do NEVER repower ON until complete all steps
You may break your mainboard if you change cables positions and start the machine with the stock firmware
I did it and had to replace some CMS components on mainboard, I can tell its not a pleasure ;)
Plug cables as showed on the "HowToWire.jpg" file :
Don't try to invert cables, it may cause short circuits !
The only things you can modify is to not use the "Base PCB" changes and wire things directly to the mainboard.
a. Connect permanent +24V plug from mainboard to the "yellow" top right of "Base PCB" plug with the included green cable.
It will turn on the print head and mainboard cooling fans when printer is on.
b. Connect the second Heater wire from mainboard to "green" top right of "Base PCB" plug with the included yellow cable.
For being able to plug the second hotend heater on the "Print Head PCB".
c. Connect the second Temp sensor plug from mainboard to the unused 2-pin of top "Base PCB" plug with the 20cm new cable.
Connect the second Temp sensor to the unused 2-pin of the printer side of "Base PCB" (Where the big cables are plugged).
d. Connect the long 150cm cable to the right side of mainboard "green" fan plug and the fan to the extender.
(Thats the printing cooling fan, you can upgrade it with one or two 24V 4020 turbo fans, or whatever you want, or not)
Put the Fan extender and the Temp sensor cables into the big black sleeve.
e. Connect the second Filament sensor to the just above "yellow" plug on mainboard left side.
f. Mount your missing driver on the bottom of mainboard (or upgrade with new ones)
You can find some well instructions on how to adjust them on the internet.
g. Assemble and mount your second extruder and motor, plug the motor to the bottom-left side unused "Extruder 2" plug of mainboard.
h. Replace the stock print head with the new dualhead printed. Assemble everything you need
i. Connect the second hotend heater to the "red" plug of "Print head PCB".
j. Do not touch other cables they are well placed where they are :)
Verify everything is plugged at the right place two or three times to be 100% sure
Firmware upgrade time !
a. Take a MicroSD card and format it in FAT32 (That will erase all on it)
b. Extract the archive and copy all the files from the archive on it.
c. If you got the stock A4988 drivers skip this step.
If you got upgraded X and Y axis TMC 2208 stepper drivers :
Remove "robin_nano35_cfg.txt" and "robin_nano35_cfgALL.txt".
Rename the "robin_nano35_cfgXY.txt" to "robin_nano35_cfg.txt"
If you got upgraded by all five axis TMC 2208 stepper drivers :
Remove "robin_nano35_cfg.txt" and "robin_nano35_cfgXY.txt".
Rename the "robin_nano35_cfgALL.txt" to "robin_nano35_cfg.txt"
d. Put the card in the printer port.
e. Plug in the printer and power it on !
f. The screen should display the firmware upgrading progression, if not unplug immediately and verify the card files
g. When update is finished move the print head and bed to the center of axis and verify it moves in the right directions
In "Tools" menu and "Move". If not go back to step c,rebuilt the SD card and edit the "***cfg.txt" file :
Example if X inverted : at line 155 you will find ">INVERT_X_DIR 0" and modify to ">INVERT_X_DIR 1" .
EVERYTHING IS DONE ! ENJOY !
If you want to downgrade to single extruder and stock firmware
a. Replug the cables as indicated in the original manual
b. Put the stock firmware on SD card and upload it
Similar models
thingiverse
free
Flyingbear Ghost 5 Marlin by PcGrande87
...a4988
version 3 englisch
4x tmc 2208
version 4 englisch
stock firmware ( x-y tmc 2208 / z-e a4988
rename the .stl file to .zip
thingiverse
free
MY Ender 3 Extruder by Sjekkie
...motor in de firmware.
extruder gear most flip up.
2x scruw m3x40
3x m3x10
1x m3x35
2x m3 nuts
1x bearing 608
2x ballpoint springs
thingiverse
free
Anycubic Kossel stepper cooling bracket by vdwel
...7
connected the fan to fan1 and reduced the speed of the fan to 180 in the firmware:
configuration_adv.h:
controllerfan_speed 180
thingiverse
free
Cable Guide Extruder FlyingBear P902 by dhanny
...ure sensor and the two fans. is designed for mk8 extruder, also fit on other models of printers, my printer is a flyingbear p902.
thingiverse
free
ANYCUBIC CHIRON Marlin 1.1.9 TMC2208/A4988 LOW JERK/ACCEL
...ompiled version.
latest official firmware provided in case of restoration needed. official autoleveling gcode provided if needed.
thingiverse
free

Flyingbear Ghost 4S Stock Head #2 by BASS_TECHNOLOGIES
...erse
second part of head.
print - 103 %
my fan - https://www.thingiverse.com/thing:4199639
source in archive.
@basstechnologies
thingiverse
free

Anet A6 X-Carriage Upgrades by wayneindustries
...verse
you'll need a
1x 40mm fan for the large cooler
4x 10mm neodymium disc magnet for the extruder fan
1x auto-level sensor
thingiverse
free

Ender 3 Z Motor Cable Holder by Cidelogic
...ender 3 z motor cable holder by cidelogic
thingiverse
cable holder for when upgrading the stock extruder .
thingiverse
free
Flyingbear p902 Cable holder ( motor mount ) by mapa3m1
...flyingbear p902 cable holder ( motor mount ) by mapa3m1
thingiverse
this thing for cable mount to the extruder motor
thingiverse
free
Hypercube evolution - remote direct drive head
...
14 - part cooling fan -
i have added archives for both original things, but i recommend getting fresh version from source links.
Flyingbear
thingiverse
free
keychain Flyingbear by Boria069
...keychain flyingbear by boria069
thingiverse
flyingbear
thingiverse
free
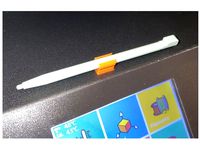
Stylus Holder Flyingbear by Piratax
...stylus holder flyingbear by piratax
thingiverse
stylus holder for flyingbear
thingiverse
free

Foot for FlyingBear Ghost by Shiyaku
...foot for flyingbear ghost by shiyaku
thingiverse
foot for flyingbear ghost
thingiverse
free

Flyingbear-P902 backlight by xplp
...flyingbear-p902 backlight by xplp
thingiverse
flyingbear-p902 backlight
use led strip 5050
thingiverse
free

Flyingbear bed knob by Matute
...flyingbear bed knob by matute
thingiverse
simple extended knob for flyingbear bed, just need 1 m3 nut
thingiverse
free
Z Limit for Flyingbear p905 by groundhogday
...z limit for flyingbear p905 by groundhogday
thingiverse
z limit for flyingbear p905
thingiverse
free
Cable Holder for Flyingbear p905 by groundhogday
...cable holder for flyingbear p905 by groundhogday
thingiverse
cable holder for flyingbear p905
thingiverse
free

Filament cleaner for Flyingbear p905 by groundhogday
...filament cleaner for flyingbear p905 by groundhogday
thingiverse
filament cleaner for flyingbear p905
thingiverse
free

Belt Clip for Flyingbear p905 by groundhogday
...belt clip for flyingbear p905 by groundhogday
thingiverse
belt clip for flyingbear p905
thingiverse
free
Spool holder for Flyingbear p905 by groundhogday
...spool holder for flyingbear p905 by groundhogday
thingiverse
spool holder for flyingbear p905
4S
3ddd
$1

Iphone 4S
..., телефон
3d model of apple mobile, iphone 4s. with all textures and materials for vray.
turbosquid
$6

iPhone 4s
...e 3d model iphone 4s for download as blend, dae, fbx, and obj on turbosquid: 3d models for games, architecture, videos. (1697245)
turbosquid
$50

Iphone 4s
... available on turbo squid, the world's leading provider of digital 3d models for visualization, films, television, and games.
turbosquid
$39

iPhone 4s
... available on turbo squid, the world's leading provider of digital 3d models for visualization, films, television, and games.
turbosquid
$20

iPhone 4S
... available on turbo squid, the world's leading provider of digital 3d models for visualization, films, television, and games.
turbosquid
$19

iPhone 4S
... available on turbo squid, the world's leading provider of digital 3d models for visualization, films, television, and games.
turbosquid
$15

iPhone 4s
... available on turbo squid, the world's leading provider of digital 3d models for visualization, films, television, and games.
turbosquid
$2

Iphone 4S
... available on turbo squid, the world's leading provider of digital 3d models for visualization, films, television, and games.
3d_export
$45

Iphone 4s 3D Model
...iphone 4s 3d model
3dexport
iphone phone 4s mobile cell cellular
iphone 4s 3d model maikeru86 59122 3dexport
3d_export
$10

IPhone 4S 3D Model
...iphone 4s 3d model
3dexport
3d model iphone 4s cell phone
iphone 4s 3d model islam3alnet 57370 3dexport
Ghost
3d_export
$5

ghost
...ghost
3dexport
ghost for halloween
3ddd
$1

Ghost Chair
...ghost chair
3ddd
ghost chair , ghost
ghost chair
3d_export
$5

Ghost
...loped using a single modifier and precise projection. the ghost can be used both for 3d printing and for use as a game character.
3d_export
$5

Ghost
...loped using a single modifier and precise projection. the ghost can be used both for 3d printing and for use as a game character.
3d_export
$10

Ghost baby
...ghost baby
3dexport
ghost
turbosquid
$40
Ghost
...t
turbosquid
royalty free 3d model ghost for download as fbx on turbosquid: 3d models for games, architecture, videos. (1172836)
3d_ocean
$3

pacman ghosts
...pacman ghosts
3docean
3d ghost low poly pacman texture
low poly pacman ghosts
turbosquid
$50

Ghost
...lty free 3d model ghost for download as ma, max, obj, and fbx on turbosquid: 3d models for games, architecture, videos. (1161653)
turbosquid
$100

Ghost
... available on turbo squid, the world's leading provider of digital 3d models for visualization, films, television, and games.
turbosquid
$15

Ghost
...ee 3d model ghost for download as max, fbx, 3ds, dae, and obj on turbosquid: 3d models for games, architecture, videos. (1627481)
Dual
turbosquid
free

Dual Pistols
...ls
turbosquid
free 3d model dual pistols for download as fbx on turbosquid: 3d models for games, architecture, videos. (1320360)
turbosquid
$2

Dual Axe
...urbosquid
royalty free 3d model dual axe for download as fbx on turbosquid: 3d models for games, architecture, videos. (1332372)
turbosquid
$10

Dual Lesaths
... available on turbo squid, the world's leading provider of digital 3d models for visualization, films, television, and games.
3ddd
$1

плитка Dual Bianco (Испания)
...й плитки venis dual (испания). технические качества: устойчивость к стирания, отличная геометрия, отсутствие проблем при укладке.
turbosquid
$35

Dual Mesh Fonts
...ree 3d model dual mesh fonts for download as ma, obj, and fbx on turbosquid: 3d models for games, architecture, videos. (1352989)
turbosquid
$29

Dual Flask with Bungs
...del dual flask with bungs for download as obj, fbx, and blend on turbosquid: 3d models for games, architecture, videos. (1210512)
turbosquid
$19

Dual Socket Plug
...3d model dual socket plug for download as obj, fbx, and blend on turbosquid: 3d models for games, architecture, videos. (1303912)
turbosquid
$13

Dual Adjustable Pulley
... available on turbo squid, the world's leading provider of digital 3d models for visualization, films, television, and games.
turbosquid
$10

Amoi N809 Dual
... available on turbo squid, the world's leading provider of digital 3d models for visualization, films, television, and games.
turbosquid
$5

Dual Turret Tank
... available on turbo squid, the world's leading provider of digital 3d models for visualization, films, television, and games.
Extruder
3ddd
$1

Extruded Chair
...extruded chair
3ddd
extruded , tom dixon
inspired by tom dixon extruded chair
turbosquid
$15

Extruded Table
... extruded table for download as blend, dae, fbx, obj, and stl on turbosquid: 3d models for games, architecture, videos. (1634137)
turbosquid
$2

3D Printer Extruder
...d
royalty free 3d model 3d printer extruder for download as on turbosquid: 3d models for games, architecture, videos. (1537359)
turbosquid
$1

Zombie extruded text
...oyalty free 3d model zombie extruded text for download as obj on turbosquid: 3d models for games, architecture, videos. (1322198)
turbosquid
$4

Extruder conical screw
...el extruder conical screw for download as sldpr, ige, and stl on turbosquid: 3d models for games, architecture, videos. (1524433)
turbosquid
$50

3d PRINTER - Extruder
... available on turbo squid, the world's leading provider of digital 3d models for visualization, films, television, and games.
turbosquid
$15

Extruded Table 2
...xtruded table 2 for download as blend, dae, fbx, obj, and stl on turbosquid: 3d models for games, architecture, videos. (1621846)
turbosquid
$10

Maya Extrude Tool
... available on turbo squid, the world's leading provider of digital 3d models for visualization, films, television, and games.
3d_export
$5

world earth extrude map
...world earth extrude map
3dexport
3ddd
$1

Simply Elegant Extruded Tree Coffee Table Design
...ble by link studios. the silhouette of a tree is visible at one angle, extruded from the surface to create the support structure.