Thingiverse
Flexion Dual Extruder Mount for Tevo Black Widow by musicsurf
by Thingiverse
Last crawled date: 3 years ago
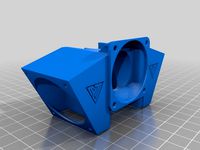
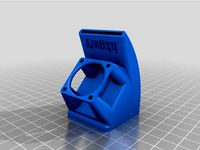
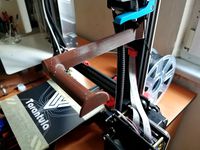
So you want dual extrusion on your Tevo Black Widow, huh? AND you want it to be high quality extruders that can handle from the softest, floppiest filament you can get your hands on, to the stuff the takes the heat of the sun to melt and extrude? Well, this is your setup then.
I thought through several possible ways to do this, but settled on the most obvious way of actually getting it done. I wanted the weight to be somewhat evenly distributed on both the gantry plate, as well as the mounting block and steppers. So a cradle was born!!! This was printed in Taulman Bluprint, but the first one was printed in ABS and worked fine. It doesn't seem like the heat is too bad on the mounting block as the fans do a good job of dissipating the heat from the fins in front of the hotend.
Things you are going to need in order to get this done:
I HIGHLY RECOMMEND USING HARDWARE WITH INTERNAL HEX VS PHILLIPS OR FLATHEAD
The following parts were sourced from Amazon, Openbuilds, and any Hardware Store
Flexion Dual Extruder Kit... Duh!
Attaching the Bracket to the Gantry Plate:
-6x M5 nuts (good ol' off the shelf local hardware store nuts will do)
-6x low profile M5 x 10mm bolts - I bought a bag from Openbuilds and they are perfect. You'll likely be replacing the wheels on the Black Widow anyways so save on shipping!
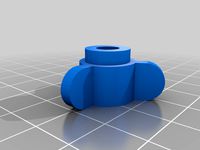
Mounting Block to Steppers:
-4x M3 x 18mm bolts (I had M3 x 20 laying around, which work perfectly with washers)
Mounting Block to Extruder Bracket:
-4x M3 x 8mm for the Sides
-2x M3 x 5mm for the Bottom
Cooling Fan to Duct:
-4x M3 x 25 Sheet Metal Screws (I used #6 x 1" because America (just kidding))
Cooling Fan Duct to Cooling Fan Bracket:
-1x M4 Nut
-1x M4 x 15mm Bolt
Stepper Motors:
-I tried both 1.5A and 2A Stepper Motors and settled on 2A since the DRV8825 Stepper Drivers that come stock with the machine can handle those currents pretty easily. Be sure to adjust the VRef on the Stepper Drivers accordingly depending on how much current you need. You will want NEMA 17 Stepper Motors with a 40mm Body Length
Stepper/Extruder Cooling Fans:
-2x 40mm x 10mm fans (24V if wired in Parallel or 12V if in Series)
Part Cooling Fan:
-Reuse Tevo Fan or 40mm x whatever you want
Heater Cartridge:
-2x the Heater Cartridges for 2x the Extruders!!! But seriously, you might as well order more than one rather than reusing the one you have. It never hurts to have extras! I used 6mm since the Flexion has a sleeve for them. They can also take .25" sans sleeve.
Thermistors:
-The heater block has provisions for either screw in M3 type thermistors or the same kind the Tevo takes. I used the screw in M3, which was a slightly different type and needed to be adjusted for in the FW.
Wire, Connectors, Etc.:
-You are going to need 2 and 4 pin JST-XH connectors for the board. The Motor takes 4 pin and the Thermistor 2.
-If you want to follow the same method as Tevo regarding connectors (I did) you are going to want JST-SM connectors.
-You'll need wire. 24AWG is what you want and you'll have to decide colors, length, etc.
-Both of the above are going to require cutting and stripping wire, and crimping on the connector pins. Be sure you have appropriate tools or prepare to suffer!!! Good tools make a world of difference!
Installation:
The following is the way I put everything together and is probably the simplest way to do it:
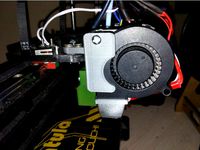
1. Stepper/Extruder Cooling Fans, Cooling Duct Bracket, Main Bracket:
Attach the Stepper/Extruder Cooling Fans to the thin Part Cooling Fan Bracket and Main Bracket with M3 bolts and nuts. The nuts set into the recesses in the Main Bracket and the bolts go through the front of the Cooling Fans.
2. Attach the Main Bracket to the Gantry Plate:
There are recesses to fit over the bolts that are already in the Gantry Plate for the wheels and belt bracket. The easiest way to get this done is to place the 6 M5 nuts into the recesses in the Main Bracket, then one by one put the bolts on the hex driver and, while keeping the nut side of the main bracket faced up, insert the bolts and screw them down loosely. Once that's done, make sure the alignment is correct and tighten everything down. The second bracket I made had no warp, so I aligned the bottom edge to the bottom of the gantry plate, which is the way it was designed. If you have warp (like I did on the last one I printed due to too high of infill), you can align the top edge visually to the row of holes above it.
3. Stepper/Extruder:
Flexion has some excellent documentation regarding putting their assembly together. Head over to their site and check it out!
4. Stepper/Extruder Assemblies to Mounting Block:
Using the M3 x 18 (or 20 with washers) bolts, assemble the Mounting Block to the Stepper Motors. In my case, it was the upper holes in the mounting block that the bolts went through.
5. Entire Extruder Assembly to Main Bracket:
The bracket is slightly larger than the assembly to allow for variations in size. As such, you will want to use the M3 x 8 bolts on the sides but don't tighten them all the way. Do one side and visually center the assembly side to side. Don't overtighten the bolts as it'll pull in the sides of the bracket and could cause it to crack. The two bottom holes and M3 x 5 are there to cinch everything down tight.
6. Part Cooling Fan to Duct:
Using the M3 x 25 Sheet Metal Screws, attach the Fan to the Duct
7. Part Cooler to Bracket:
Slip the M4 nut into the recess of the Duct, slide the Clevis over the provision on the Bracket between the other two cooling fans. Insert the M4 x 15 bolt and tighten. Again, we're dealing with plastic here so don't go crazy with the tightening.
8. Attach the Hotends:
There is enough space below the Stepper/Extruder Cooling Fans to fit a hex driver into the bolts that tighten the hotends into place. Slide the Hotend(s) through the hole in the bottom of the Mounting Block. Try to get it all the way in there, but obviously don't grab a hammer or something to do so! You will likely have to do some adjusting to get the nozzles the same height, but this is done when you're setting your Z-offset.
9. Connect all the Wiring
So, now you're ready to start ripping of some prints... oh, wait, no you're not... Firmware!!!
Setting up the Firmware for Dual Extrusion:
As far as what firmware to use, I'm using the BugFix version of the BLTouch Marlin RC7 firmware located on the Black Widow Facebook Group Page. I also had it running with the RC7 version made available by Antclabs here on Thingiverse. If you don't have BLTouch, you will just ignore the probe offset stuff. It's possible I missed something and it's also possible there are a couple things I didn't need to do. Everything is working though, so I'm happy with it!
Those that are tackling this challenge will likely already know the life-and-sanity-saving shortcut of CTRL-F for find, but if you don't know of it, use it. Searching through line after line of code is no fun.
Ignore the quotation marks when changing values. They are just there to highlight what the values are and what they need to be.
1. define MOTHERBOARD from "BOARD_RAMPS_13" to "BOARD_MKS_13"
MKS_13 is essentially the same mapped pins as RAMPS_13 plus the addition of the extra hotend. If you weren't to change it you could have two hotends, but at the cost of either the heated bed or the software controllable (Part Cooling) fan.
2. define EXTRUDERS from "1" to "2"
I did not enter the extruder offset in the firmware. In Simplify3D it causes the whole assembly to shift when using the control panel to change between active toolheads. I didn't like that, so I just entered the offset in the slicing software to let it handle the task.
4. define INVERT_E1_DIR from "false" to "true"
Since the second extruder is essentially a mirror of the first, the Drive Roller needs to turn the opposite way to feed the filament correctly.
5.define TEMP_SENSOR_0 from "11" to "1"
define TEMP_SENSOR_1 from "0" to "1"
The second number on both of these is going to be dependent on the specific thermistor you are using. The list above this code tells you what number corresponds to which thermistor.
6. define HEATER_0_MAX_TEMP from "275" to "245"
To eliminate the possibility of turning the wrong hotend up to high.
define HEATER_1_MAX_TEMP from "275" to "280"
Yay High Temp!
7. define X_PROBE_OFFSET_FROM_EXTRUDER set to "79"
define Y_PROBE_OFFSET_FROM_EXTRUDER set to "16"
define Z_PROBE_OFFSET_FROM_EXTUDER set to "-2"
8. define LEFT_PROBE_BED_POSITION set to "85"
define RIGHT_PROBE_BED_POSITION set to "345"
define FRONT_PROBE_BED_POSITION set to "30"
define BACK_PROBE_BED_POSITION set to "175"
9. Comment Z_SAFE_HOMING
From what I've heard this doesn't have to be done in the BugFix version of RC7. I did it anyways since I located the probe in a manner that it shouldn't matter. Just remember, if the probe isn't over the build plate, don't home just the Z axis. A regular G28 will bring you back to the front corner so it won't matter.
Final Thoughts
E steps... since you aren't using a geared motor anymore and the ratio is pretty close to 1:1, the stock setting for E steps is going to be way too high. Start with a value of 200 and adjust from there.
You should now be ready to fine tune these bad boys and get off to the races. Have fun, be safe, and keep on printin'!!!
PS. It's entirely possible there are typos in here. I didn't really proofread, so if there is something that doesn't make sense, feel free to point it out and I will clarify, and if need be change it.
I thought through several possible ways to do this, but settled on the most obvious way of actually getting it done. I wanted the weight to be somewhat evenly distributed on both the gantry plate, as well as the mounting block and steppers. So a cradle was born!!! This was printed in Taulman Bluprint, but the first one was printed in ABS and worked fine. It doesn't seem like the heat is too bad on the mounting block as the fans do a good job of dissipating the heat from the fins in front of the hotend.
Things you are going to need in order to get this done:
I HIGHLY RECOMMEND USING HARDWARE WITH INTERNAL HEX VS PHILLIPS OR FLATHEAD
The following parts were sourced from Amazon, Openbuilds, and any Hardware Store
Flexion Dual Extruder Kit... Duh!
Attaching the Bracket to the Gantry Plate:
-6x M5 nuts (good ol' off the shelf local hardware store nuts will do)
-6x low profile M5 x 10mm bolts - I bought a bag from Openbuilds and they are perfect. You'll likely be replacing the wheels on the Black Widow anyways so save on shipping!
Mounting Block to Steppers:
-4x M3 x 18mm bolts (I had M3 x 20 laying around, which work perfectly with washers)
Mounting Block to Extruder Bracket:
-4x M3 x 8mm for the Sides
-2x M3 x 5mm for the Bottom
Cooling Fan to Duct:
-4x M3 x 25 Sheet Metal Screws (I used #6 x 1" because America (just kidding))
Cooling Fan Duct to Cooling Fan Bracket:
-1x M4 Nut
-1x M4 x 15mm Bolt
Stepper Motors:
-I tried both 1.5A and 2A Stepper Motors and settled on 2A since the DRV8825 Stepper Drivers that come stock with the machine can handle those currents pretty easily. Be sure to adjust the VRef on the Stepper Drivers accordingly depending on how much current you need. You will want NEMA 17 Stepper Motors with a 40mm Body Length
Stepper/Extruder Cooling Fans:
-2x 40mm x 10mm fans (24V if wired in Parallel or 12V if in Series)
Part Cooling Fan:
-Reuse Tevo Fan or 40mm x whatever you want
Heater Cartridge:
-2x the Heater Cartridges for 2x the Extruders!!! But seriously, you might as well order more than one rather than reusing the one you have. It never hurts to have extras! I used 6mm since the Flexion has a sleeve for them. They can also take .25" sans sleeve.
Thermistors:
-The heater block has provisions for either screw in M3 type thermistors or the same kind the Tevo takes. I used the screw in M3, which was a slightly different type and needed to be adjusted for in the FW.
Wire, Connectors, Etc.:
-You are going to need 2 and 4 pin JST-XH connectors for the board. The Motor takes 4 pin and the Thermistor 2.
-If you want to follow the same method as Tevo regarding connectors (I did) you are going to want JST-SM connectors.
-You'll need wire. 24AWG is what you want and you'll have to decide colors, length, etc.
-Both of the above are going to require cutting and stripping wire, and crimping on the connector pins. Be sure you have appropriate tools or prepare to suffer!!! Good tools make a world of difference!
Installation:
The following is the way I put everything together and is probably the simplest way to do it:
1. Stepper/Extruder Cooling Fans, Cooling Duct Bracket, Main Bracket:
Attach the Stepper/Extruder Cooling Fans to the thin Part Cooling Fan Bracket and Main Bracket with M3 bolts and nuts. The nuts set into the recesses in the Main Bracket and the bolts go through the front of the Cooling Fans.
2. Attach the Main Bracket to the Gantry Plate:
There are recesses to fit over the bolts that are already in the Gantry Plate for the wheels and belt bracket. The easiest way to get this done is to place the 6 M5 nuts into the recesses in the Main Bracket, then one by one put the bolts on the hex driver and, while keeping the nut side of the main bracket faced up, insert the bolts and screw them down loosely. Once that's done, make sure the alignment is correct and tighten everything down. The second bracket I made had no warp, so I aligned the bottom edge to the bottom of the gantry plate, which is the way it was designed. If you have warp (like I did on the last one I printed due to too high of infill), you can align the top edge visually to the row of holes above it.
3. Stepper/Extruder:
Flexion has some excellent documentation regarding putting their assembly together. Head over to their site and check it out!
4. Stepper/Extruder Assemblies to Mounting Block:
Using the M3 x 18 (or 20 with washers) bolts, assemble the Mounting Block to the Stepper Motors. In my case, it was the upper holes in the mounting block that the bolts went through.
5. Entire Extruder Assembly to Main Bracket:
The bracket is slightly larger than the assembly to allow for variations in size. As such, you will want to use the M3 x 8 bolts on the sides but don't tighten them all the way. Do one side and visually center the assembly side to side. Don't overtighten the bolts as it'll pull in the sides of the bracket and could cause it to crack. The two bottom holes and M3 x 5 are there to cinch everything down tight.
6. Part Cooling Fan to Duct:
Using the M3 x 25 Sheet Metal Screws, attach the Fan to the Duct
7. Part Cooler to Bracket:
Slip the M4 nut into the recess of the Duct, slide the Clevis over the provision on the Bracket between the other two cooling fans. Insert the M4 x 15 bolt and tighten. Again, we're dealing with plastic here so don't go crazy with the tightening.
8. Attach the Hotends:
There is enough space below the Stepper/Extruder Cooling Fans to fit a hex driver into the bolts that tighten the hotends into place. Slide the Hotend(s) through the hole in the bottom of the Mounting Block. Try to get it all the way in there, but obviously don't grab a hammer or something to do so! You will likely have to do some adjusting to get the nozzles the same height, but this is done when you're setting your Z-offset.
9. Connect all the Wiring
So, now you're ready to start ripping of some prints... oh, wait, no you're not... Firmware!!!
Setting up the Firmware for Dual Extrusion:
As far as what firmware to use, I'm using the BugFix version of the BLTouch Marlin RC7 firmware located on the Black Widow Facebook Group Page. I also had it running with the RC7 version made available by Antclabs here on Thingiverse. If you don't have BLTouch, you will just ignore the probe offset stuff. It's possible I missed something and it's also possible there are a couple things I didn't need to do. Everything is working though, so I'm happy with it!
Those that are tackling this challenge will likely already know the life-and-sanity-saving shortcut of CTRL-F for find, but if you don't know of it, use it. Searching through line after line of code is no fun.
Ignore the quotation marks when changing values. They are just there to highlight what the values are and what they need to be.
1. define MOTHERBOARD from "BOARD_RAMPS_13" to "BOARD_MKS_13"
MKS_13 is essentially the same mapped pins as RAMPS_13 plus the addition of the extra hotend. If you weren't to change it you could have two hotends, but at the cost of either the heated bed or the software controllable (Part Cooling) fan.
2. define EXTRUDERS from "1" to "2"
I did not enter the extruder offset in the firmware. In Simplify3D it causes the whole assembly to shift when using the control panel to change between active toolheads. I didn't like that, so I just entered the offset in the slicing software to let it handle the task.
4. define INVERT_E1_DIR from "false" to "true"
Since the second extruder is essentially a mirror of the first, the Drive Roller needs to turn the opposite way to feed the filament correctly.
5.define TEMP_SENSOR_0 from "11" to "1"
define TEMP_SENSOR_1 from "0" to "1"
The second number on both of these is going to be dependent on the specific thermistor you are using. The list above this code tells you what number corresponds to which thermistor.
6. define HEATER_0_MAX_TEMP from "275" to "245"
To eliminate the possibility of turning the wrong hotend up to high.
define HEATER_1_MAX_TEMP from "275" to "280"
Yay High Temp!
7. define X_PROBE_OFFSET_FROM_EXTRUDER set to "79"
define Y_PROBE_OFFSET_FROM_EXTRUDER set to "16"
define Z_PROBE_OFFSET_FROM_EXTUDER set to "-2"
8. define LEFT_PROBE_BED_POSITION set to "85"
define RIGHT_PROBE_BED_POSITION set to "345"
define FRONT_PROBE_BED_POSITION set to "30"
define BACK_PROBE_BED_POSITION set to "175"
9. Comment Z_SAFE_HOMING
From what I've heard this doesn't have to be done in the BugFix version of RC7. I did it anyways since I located the probe in a manner that it shouldn't matter. Just remember, if the probe isn't over the build plate, don't home just the Z axis. A regular G28 will bring you back to the front corner so it won't matter.
Final Thoughts
E steps... since you aren't using a geared motor anymore and the ratio is pretty close to 1:1, the stock setting for E steps is going to be way too high. Start with a value of 200 and adjust from there.
You should now be ready to fine tune these bad boys and get off to the races. Have fun, be safe, and keep on printin'!!!
PS. It's entirely possible there are typos in here. I didn't really proofread, so if there is something that doesn't make sense, feel free to point it out and I will clarify, and if need be change it.
Similar models
thingiverse
free

Flexion Direct Extruder Mount V2 for CR-10 by bratan
...ion_e3d_mount_best_fit" designed by shanewymore. this part is untested by me because i don't have bltouch on my printer.
thingiverse
free

Active cooling fan duct alternative mount by Sam_E
...ound here http://www.thingiverse.com/thing:295317
instead of the m3 x 70mm bolts, items required are:
2x m3x12 bolts
2x m3 nuts
thingiverse
free

Mendel90 x-carriage hotend fan duct (always on, for hexagon hotend) by Stemer114
...the fan duct (towards the hotend) is for the extruder mounting to still be accessible when the duct is mounted (see 3rd picture).
thingiverse
free

TAZ Fan Duct Mk2 by devzero
...e print. unlike other taz ducts i've seen, this one is several layers thick, so it is much easier to print airtight versions.
thingiverse
free

Black Widow Back Stepper Mount, Titan Extruder, Bltouch, Active Cooling by rtimberman52
...xtruder 0
define z_probe_offset_from_extruder -1.7
you will have to reverse the stepper direction on e0
define invert_e0_dir true
thingiverse
free

Anet A8 Flexion Extruder Direct Extrusion Mount For Flexible Filaments Also Compatible with Similar Prusa I3 Clone Variants by RLDesign
...ct into the 50mm blower and attach with hot melt adhesive if necessary.
solidworks files are included and remixes are encouraged.
thingiverse
free

Cooling fan duct for 60mm fan by morxw
...10mm countersink screws.
if the small mount brackets should be too tight or too loose try to scale them up or down in the z axis.
thingiverse
free

FLSun Cube Part Cooling Fan
... doing it, i recommend you to make sure that thermal_protection_hotends and thermal_protection_bed are enabled in configuration.h
thingiverse
free

Tevo Tornado Twin 5015 Fang by DemolitionX
... the hole slightly smaller so an 4 20 x m4 bolts will just screw in , you will also need 4 14 x m3 bolts as well for the 40mm fan
thingiverse
free

Fan duct for Dual Bowden rework E3Dv6 by GuruX
...se this, make sure that you do not heat your hotends, without the fans running. if you do that, you will easily clog your hotend.
Musicsurf
thingiverse
free

LaForge V2 Fatshark Doors by musicsurf
...se some caution there. i intend putting in a heat shield or some other form of heat blocking to protect the area the cable is in.
thingiverse
free
Quanum HB5808 Fatshark Dominator Doors (Trinity compatible) by Renegat3
...renegat3 thingiverse remixed from laforge v2 fatshark doors by musicsurf to fit the quanum hb5808 diversity. make sure to...
Flexion
thingiverse
free
Ender 3 - Flexion by danielroibert
...ender 3 - flexion by danielroibert
thingiverse
adapter for flexion on a ender 3
thingiverse
free
Palm Flexion by JayJo
...onger linkages together
makes a specifically oriented palm plate
for finger flexion attachment
twin grip pads fit in each linkage
thingiverse
free

Flexion Extruder Fanduct by huge11
...flexion extruder fanduct by huge11
thingiverse
later more
thingiverse
free

Flexion HT Spare head holder by KaTZWorld
...xion ht spare nozzles and tools for the monoprice maker select
designed in fusion 360 printed in petg with the flexion ht nozzle
thingiverse
free

Box for Flexion Extruder by rdsail
...box for flexion extruder by rdsail
thingiverse
printed .2 in petg
thingiverse
free

BLTouch Mount for Flexion E3D by zanthor
...d work with pretty much anything.
offsets are roughly as below:
x_probe_offset_from_extruder -25
y_probe_offset_from_extruder -29
thingiverse
free

Flexion single Extruder box insert by shadowflee
...r + 2 nozzle holes
v1.1 now allows you to close the box :) and takes less filament
bitcoin: 1eo4b4bqp8ctutk8rfqxzgyrljjstuzywz
thingiverse
free

Flexion PTFE Tube Mount by EyeWolfDesign
...to hold the ptfe tubing there is two sizes are available m10 and m6. to screw the flexion mount to the assembly use a m3 x 8mm.
thingiverse
free

FT-5 Flexion Extruder Part Cooling Fan by Cbarkie
...ft-5 flexion extruder part cooling fan by cbarkie
thingiverse
part cooling fan for flexion extruder on the ft-5
thingiverse
free

CR-10 Flexion bracket by Cero_
... on the ptfe tube that goes against the flexion drive unit. it should be pushed against the nip point with the cam on position 4.
Widow
turbosquid
$19

widows
...
turbosquid
royalty free 3d model widows for download as max on turbosquid: 3d models for games, architecture, videos. (1203233)
3ddd
$1

Henge Black Widow
...henge black widow
3ddd
henge , black widow
henge black widow
3d_ocean
$6

Black Widow
...pider venon widow
elegant,realistic and high quality black widow 3d model. perfect for cartoon scenes, animations or still image.
3ddd
$1

black Widow
...black widow
3ddd
мебель для ванной комнаты «black widow» моделил по фото.
форматы: max 2012, fbx с материалами и текстурами.
turbosquid
$10

Widow Voxel
...ee 3d model widow voxel for download as ma, max, obj, and fbx on turbosquid: 3d models for games, architecture, videos. (1362423)
turbosquid
$18

Black Widow
...del black widow for download as 3ds, fbx, blend, dae, and stl on turbosquid: 3d models for games, architecture, videos. (1318971)
turbosquid
$79

Northern Black Widow
...oyalty free 3d model northern black widow for download as max on turbosquid: 3d models for games, architecture, videos. (1232214)
3d_export
$80

black widow monster
... rigged verts:568731 polygons:852965 created in blender and rendered in cycles comes in blend 3ds max collada fbx and obj formats
turbosquid
$45

Spider- Black-Widow
... available on turbo squid, the world's leading provider of digital 3d models for visualization, films, television, and games.
turbosquid
$20
Black Widow Spider
... available on turbo squid, the world's leading provider of digital 3d models for visualization, films, television, and games.
Tevo
thingiverse
free

TEVO Logo by limwenyao
...verse
tevo logo - for customizing your builds to look cooler with the tevo logo! pdf version is editable with adobe illustrator.
thingiverse
free
Tevo Tornado e3d Tevo Flash Style fan Mount by DemolitionX
...an mount by demolitionx
thingiverse
just messing around and made a tevo flash style fan mount for the e3d v6 on the tevo tornado
thingiverse
free
BODEN TUBE CLAMP FOR TEVO TARANTULA PRO AND TEVO TORNADO
... and tevo tornado
thingiverse
bodwen tube clamp. printable adjustable tension clamp for tevo tarantula pro and tornado extruder.
thingiverse
free
TEVO Tornado Model by JMDesigns
...tevo tornado model by jmdesigns
thingiverse
tevo tornado model
thingiverse
free
Tevo Tarantula FanDuct by hkgary_g
...tevo tarantula fanduct by hkgary_g
thingiverse
fanduct for tevo tarantula
thingiverse
free
FAN TEVO TARANTULA by llprokall
...fan tevo tarantula by llprokall
thingiverse
fan tevo tarantula
thingiverse
free
Tevo Tarantula filament by Xbertus
...tevo tarantula filament by xbertus
thingiverse
suport for filamente tevo tarantula
thingiverse
free
TEVO Top Brackets by _Godoy_
...tevo top brackets by _godoy_
thingiverse
top brackets for tevo tarantula
thingiverse
free
Tevo Tarantula Spool Holder
...tevo tarantula spool holder
thingiverse
strong spool holder for tevo tarantula
thingiverse
free

tevo tarantula spacer by poundskinnyboy
...tevo tarantula spacer by poundskinnyboy
thingiverse
it's a tevo tarantula spacer
Dual
turbosquid
free

Dual Pistols
...ls
turbosquid
free 3d model dual pistols for download as fbx on turbosquid: 3d models for games, architecture, videos. (1320360)
turbosquid
$2

Dual Axe
...urbosquid
royalty free 3d model dual axe for download as fbx on turbosquid: 3d models for games, architecture, videos. (1332372)
turbosquid
$10

Dual Lesaths
... available on turbo squid, the world's leading provider of digital 3d models for visualization, films, television, and games.
3ddd
$1

плитка Dual Bianco (Испания)
...й плитки venis dual (испания). технические качества: устойчивость к стирания, отличная геометрия, отсутствие проблем при укладке.
turbosquid
$35

Dual Mesh Fonts
...ree 3d model dual mesh fonts for download as ma, obj, and fbx on turbosquid: 3d models for games, architecture, videos. (1352989)
turbosquid
$29

Dual Flask with Bungs
...del dual flask with bungs for download as obj, fbx, and blend on turbosquid: 3d models for games, architecture, videos. (1210512)
turbosquid
$19

Dual Socket Plug
...3d model dual socket plug for download as obj, fbx, and blend on turbosquid: 3d models for games, architecture, videos. (1303912)
turbosquid
$13

Dual Adjustable Pulley
... available on turbo squid, the world's leading provider of digital 3d models for visualization, films, television, and games.
turbosquid
$10

Amoi N809 Dual
... available on turbo squid, the world's leading provider of digital 3d models for visualization, films, television, and games.
turbosquid
$5

Dual Turret Tank
... available on turbo squid, the world's leading provider of digital 3d models for visualization, films, television, and games.
Extruder
3ddd
$1

Extruded Chair
...extruded chair
3ddd
extruded , tom dixon
inspired by tom dixon extruded chair
turbosquid
$15

Extruded Table
... extruded table for download as blend, dae, fbx, obj, and stl on turbosquid: 3d models for games, architecture, videos. (1634137)
turbosquid
$2

3D Printer Extruder
...d
royalty free 3d model 3d printer extruder for download as on turbosquid: 3d models for games, architecture, videos. (1537359)
turbosquid
$1

Zombie extruded text
...oyalty free 3d model zombie extruded text for download as obj on turbosquid: 3d models for games, architecture, videos. (1322198)
turbosquid
$4

Extruder conical screw
...el extruder conical screw for download as sldpr, ige, and stl on turbosquid: 3d models for games, architecture, videos. (1524433)
turbosquid
$50

3d PRINTER - Extruder
... available on turbo squid, the world's leading provider of digital 3d models for visualization, films, television, and games.
turbosquid
$15

Extruded Table 2
...xtruded table 2 for download as blend, dae, fbx, obj, and stl on turbosquid: 3d models for games, architecture, videos. (1621846)
turbosquid
$10

Maya Extrude Tool
... available on turbo squid, the world's leading provider of digital 3d models for visualization, films, television, and games.
3d_export
$5

world earth extrude map
...world earth extrude map
3dexport
3ddd
$1

Simply Elegant Extruded Tree Coffee Table Design
...ble by link studios. the silhouette of a tree is visible at one angle, extruded from the surface to create the support structure.
Black
turbosquid
$25

Black Mamba black snake
...ck mamba black snake for download as blend, stl, fbx, and obj on turbosquid: 3d models for games, architecture, videos. (1672843)
turbosquid
$3

Black
...turbosquid
royalty free 3d model black for download as blend on turbosquid: 3d models for games, architecture, videos. (1278842)
3d_export
$5

Black Piano
...black piano
3dexport
black piano
3d_export
$5

Black Oven
...black oven
3dexport
black oven
3ddd
$1

Black curtain
...black curtain
3ddd
black curtain
3d_export
$5

Black coffe
...black coffe
3dexport
sweet black coffe
3d_export
$5
Black Sofa
...black sofa
3dexport
black velvet sofa
3d_export
$5
Black Chair
...black chair
3dexport
black velvet chair
3d_export
free
black desk
...black desk
3dexport
black desk for bedroom
3d_export
free

Black Chair
...black chair
3dexport
black velvet chair
Mount
3d_export
free

mounting bracket
...mounting plate is the portion of a hinge that attaches to the wood. mounting plates can be used indoors, cabinetry and furniture.
turbosquid
$2

MOUNTING
... available on turbo squid, the world's leading provider of digital 3d models for visualization, films, television, and games.
turbosquid
free

Mounts
... available on turbo squid, the world's leading provider of digital 3d models for visualization, films, television, and games.
turbosquid
free

Mount Fuji
...fuji
turbosquid
free 3d model mount fuji for download as obj on turbosquid: 3d models for games, architecture, videos. (1579977)
3d_export
$5

Headphone mount LR
...headphone mount lr
3dexport
headphone mount l+r
turbosquid
$39

Mount rainier
...quid
royalty free 3d model mount rainier for download as fbx on turbosquid: 3d models for games, architecture, videos. (1492586)
turbosquid
$5

pipe mounting
...quid
royalty free 3d model pipe mounting for download as obj on turbosquid: 3d models for games, architecture, videos. (1293744)
turbosquid
$3

Mounting Tires
...uid
royalty free 3d model mounting tires for download as fbx on turbosquid: 3d models for games, architecture, videos. (1708511)
3d_export
$5

Magnetic GoPro Mount
...pro mount
3dexport
cool magnetic mount for gopro. allows you to mount the camera on flat metal surfaces and get exclusive shots.
turbosquid
$5

Stone Mount
...ty free 3d model stone mount for download as ma, obj, and fbx on turbosquid: 3d models for games, architecture, videos. (1370306)