Thingiverse
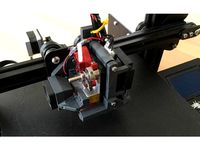
Flexion Direct Extruder Mount V2 for CR-10 by bratan
by Thingiverse
Last crawled date: 3 years, 1 month ago
See it in action! https://youtu.be/BYDGu5f8Zuo
Flexion is one of the most advanced extruders on the market. It's been specifically designed to print very flexible filaments like TPUs, Cheetah, Ninjaflex and even X60. But it can also print any other filaments out there. See this Youtube video for more info.
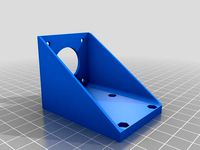
I decided to design a mount for my CR-10 as these did not exist. Well there's one design, but it uses flexion as bowden extruder replacement, which kind of defeats the purpose because you need to have direct drive setup to print flexible filaments well...
I designed this mount to easy to print and easy to attach. It's very rigid and strong, even when printed at 50% infill. You won't need supports, but it's better if you use high heat materials like PETG or ABS (mine was printed with eSun black PETG ).
Warning: This mode requires you to do some rewiring and use of E3D V6 hotend.
Update: 12/21/2017:
Re-uploaded STL models (not sure why they dissapeared). After struggling with this extruder and almost giving up, I was finally able to solve issues I was having and dial in settings for most materials. Biggest improvement came from adding dual-z upgrade to my CR-10. This fixed all inaccuracy issues I was having.
Also as I discovered you need to adjust tension screw for each material until it starts extruding, but doesn't make "squeaking" sound.
Included Simplify3D profiles for following filaments:
PLA (tested, works great!)
Ninjaflex (works great)
Cheetah (prints amazingly at 50 mm/s, didn't test it at higher speed)
PETG (prints ok, but didn't test extensively)
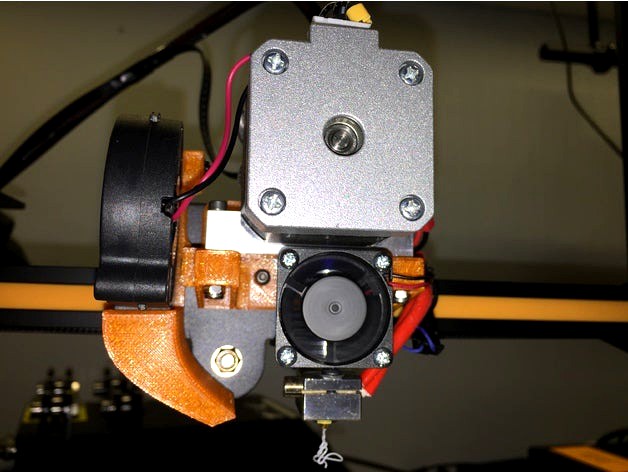
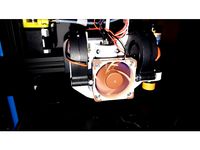
About Version 2:
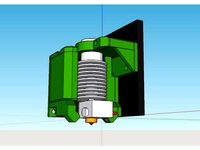
As of 10/27/2017 I completely redesigned Flexion mount. Main reason was, pancake style stepper motor didn't have sufficient torque and was causing skips. Now mount uses full size Nema 17 motor, in fact you will just re-use extruder motor that came with CR-10! So no more rewiring required.
Another improvement is that you no longer loose any printable surface, as hotend is now located closer to the X rail. Mount has better wire management and part cooling fan has been moved to the left side.
The only negatives about this design is that it's now heavier and slightly more difficult to assemble.
Parts you will need:
For Main Mount:
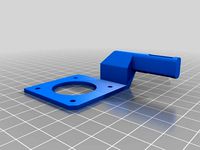
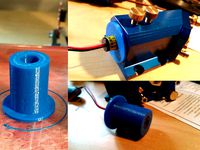
This printed mount and spacer
E3D V6 Hotend
Flexion Extruder
4x 25mm M3 screws
4x M3 nylock nuts
2x 8mm M3 screws
For Part Cooling Fan Mount:
5015 12 V Fan (50mm x 15mm)
22-25mm M3 Screw
10 mm M3 screw
M3 nylock nut
M3 nut (regular)
Assembly Instructions.
Print mount and spacer.
Remove original hotend, metal cage and cut fan wires
Disconnect and remove extruder stepper as well as extruder
Prepare extruder motor wire by slicing braided wiring sleeve that holds Z stepper and Extruder stepper wires. You will need extruder wires to move freely with X carriage
Assemble and wire E3D Hotend
I recommend reusing CR-10 40W heater cartridge but using E3D thermistor. Splice it to the old thermistor wire and update firmware to use
define TEMP_SENSOR_0 5
Splice or use terminal connector for E3D fan
Leave part cooling fan wire unconnected for now. I'm working on adding mount for this
Assemble Flexion extruder to the stepper
Finally attach printed bracket to the X carriage. It's held by two 8mm M3 screws (use spring washers) and 3rd longer M3 screw. For the longer screw please use spacer behind the bracket (other screw holes already have standoffs built in).
Before you install Flexion, slide M3 nut into right nut slot (this will hold part cooling fan)
Insert Flexion and E3D assmelby, carefully guide hotend wires to the right side and attach flexion to the bracket using 4x25mm screws and nylock nuts.
Connect extruder stepper wire.
Attach 5015 fan bracket to the extruder mount using 10mm M3 screw (screw it to the M3 nut you placed in nut hole previously.
Attach 5015 fan to the fan bracket using M3 Nylock nut and 22mm M3 (or longer) screw.
Guide wires thru the bracket "ring" on the left side and up to vertical wire guide rail. Attach wires to the rail with zip-ties.
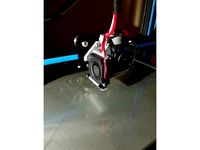
E3D hotend should be at aproximately same level from the bed as old microswiss hotend. Just re-level your bed and you should be set.
Simplify 3D profile for Ninjatek Cheetah is included. Tweak it for your own flexible material...
Final thoughts and considerations
I've tested this bracket and it works very well. However you need to keep some things in mind.
Some kind of wire management needs to be implemented. CR-10 was not designed for it's extruder motor wire to be moving...
If you are printing materials like ninjaflex, you're probably should place filament spool above printer. I'm using this remix of Prusa i3 bracket
Finally correct slicing settings have to be dialed in for new direct extruder. Most likely acceleration and jerk values have to be changed (slower)
If you replacing thermistor you will have to update firmware. In order to do that you'll have to enable bootloader on the controller board.
I didn't get good results printing PLA. I keep getting holes and defects no matter what :(
Let me know if you have any questions.
Update: 02/22/2019
Added "BLTouch_Ender_3_Flexion_E3D_Mount_Best_Fit" designed by shanewymore. This part is untested by me because I don't have BLTouch on my printer.
Flexion is one of the most advanced extruders on the market. It's been specifically designed to print very flexible filaments like TPUs, Cheetah, Ninjaflex and even X60. But it can also print any other filaments out there. See this Youtube video for more info.
I decided to design a mount for my CR-10 as these did not exist. Well there's one design, but it uses flexion as bowden extruder replacement, which kind of defeats the purpose because you need to have direct drive setup to print flexible filaments well...
I designed this mount to easy to print and easy to attach. It's very rigid and strong, even when printed at 50% infill. You won't need supports, but it's better if you use high heat materials like PETG or ABS (mine was printed with eSun black PETG ).
Warning: This mode requires you to do some rewiring and use of E3D V6 hotend.
Update: 12/21/2017:
Re-uploaded STL models (not sure why they dissapeared). After struggling with this extruder and almost giving up, I was finally able to solve issues I was having and dial in settings for most materials. Biggest improvement came from adding dual-z upgrade to my CR-10. This fixed all inaccuracy issues I was having.
Also as I discovered you need to adjust tension screw for each material until it starts extruding, but doesn't make "squeaking" sound.
Included Simplify3D profiles for following filaments:
PLA (tested, works great!)
Ninjaflex (works great)
Cheetah (prints amazingly at 50 mm/s, didn't test it at higher speed)
PETG (prints ok, but didn't test extensively)
About Version 2:
As of 10/27/2017 I completely redesigned Flexion mount. Main reason was, pancake style stepper motor didn't have sufficient torque and was causing skips. Now mount uses full size Nema 17 motor, in fact you will just re-use extruder motor that came with CR-10! So no more rewiring required.
Another improvement is that you no longer loose any printable surface, as hotend is now located closer to the X rail. Mount has better wire management and part cooling fan has been moved to the left side.
The only negatives about this design is that it's now heavier and slightly more difficult to assemble.
Parts you will need:
For Main Mount:
This printed mount and spacer
E3D V6 Hotend
Flexion Extruder
4x 25mm M3 screws
4x M3 nylock nuts
2x 8mm M3 screws
For Part Cooling Fan Mount:
5015 12 V Fan (50mm x 15mm)
22-25mm M3 Screw
10 mm M3 screw
M3 nylock nut
M3 nut (regular)
Assembly Instructions.
Print mount and spacer.
Remove original hotend, metal cage and cut fan wires
Disconnect and remove extruder stepper as well as extruder
Prepare extruder motor wire by slicing braided wiring sleeve that holds Z stepper and Extruder stepper wires. You will need extruder wires to move freely with X carriage
Assemble and wire E3D Hotend
I recommend reusing CR-10 40W heater cartridge but using E3D thermistor. Splice it to the old thermistor wire and update firmware to use
define TEMP_SENSOR_0 5
Splice or use terminal connector for E3D fan
Leave part cooling fan wire unconnected for now. I'm working on adding mount for this
Assemble Flexion extruder to the stepper
Finally attach printed bracket to the X carriage. It's held by two 8mm M3 screws (use spring washers) and 3rd longer M3 screw. For the longer screw please use spacer behind the bracket (other screw holes already have standoffs built in).
Before you install Flexion, slide M3 nut into right nut slot (this will hold part cooling fan)
Insert Flexion and E3D assmelby, carefully guide hotend wires to the right side and attach flexion to the bracket using 4x25mm screws and nylock nuts.
Connect extruder stepper wire.
Attach 5015 fan bracket to the extruder mount using 10mm M3 screw (screw it to the M3 nut you placed in nut hole previously.
Attach 5015 fan to the fan bracket using M3 Nylock nut and 22mm M3 (or longer) screw.
Guide wires thru the bracket "ring" on the left side and up to vertical wire guide rail. Attach wires to the rail with zip-ties.
E3D hotend should be at aproximately same level from the bed as old microswiss hotend. Just re-level your bed and you should be set.
Simplify 3D profile for Ninjatek Cheetah is included. Tweak it for your own flexible material...
Final thoughts and considerations
I've tested this bracket and it works very well. However you need to keep some things in mind.
Some kind of wire management needs to be implemented. CR-10 was not designed for it's extruder motor wire to be moving...
If you are printing materials like ninjaflex, you're probably should place filament spool above printer. I'm using this remix of Prusa i3 bracket
Finally correct slicing settings have to be dialed in for new direct extruder. Most likely acceleration and jerk values have to be changed (slower)
If you replacing thermistor you will have to update firmware. In order to do that you'll have to enable bootloader on the controller board.
I didn't get good results printing PLA. I keep getting holes and defects no matter what :(
Let me know if you have any questions.
Update: 02/22/2019
Added "BLTouch_Ender_3_Flexion_E3D_Mount_Best_Fit" designed by shanewymore. This part is untested by me because I don't have BLTouch on my printer.
Similar models
thingiverse
free

Flexion E3D Volcano BLTouch Bracket by charlesj5
...olcano hotend. lay the part on it's side for printing.
required hardware:
2x m3x16mm screws
2x m3x8mm screws
4x m3 nyloc nuts
thingiverse
free
CR-10 E3D V6 mount Dual FAN Mesh by chips777
... socket head bolts (please use treadlock glue for the extruder carrier)
2x m4 socket head bolts
2x m4 washers
2x m4 x 20mm screws
thingiverse
free
E3D Titan Mount for Volcano hotend with 40mm fan duct by gyrex
...is. let me know if it works.
requires 4xm3 screws for mounting the fan
1xm3 screw & m3 nut for attaching the fan to the mount
thingiverse
free
CR-10 Fan Mount for Hannoc E3D Mount by Draggon
...s needed.
see below for how to finish the part.
you can find hannocs volcano mount here:https://www.thingiverse.com/thing:2169052
thingiverse
free
Creality CR-10 E3D Titan Extruder Mount (59Ncm) by WorstCat
...ed to use (just like lucashayes original) 4x m3 nuts, and 4x m3 x 6mm, or m3 x 8mm machine screws for this mount to work for you.
thingiverse
free
E3D Hotend mount for CTC Prusa i3 DIY with 40mm fan and filament cooling by MartinHoffmann
...xisting screw holes in the ctc diy where the extruder was mounted.
for mounting you need six 15 mm m3 screws and six square nuts.
thingiverse
free

CR-10 E3D V6 dual Extruder mount Mesh by chips777
...3 nut (in my oppinion nylon nuts are the best)
4x metal screws for the top mount brackets
8x m3 x 40mm for the two hotend coolers
thingiverse
free

BQ Prusa i3 E3D Bowden by orangefurball
...he fan cables to the 30mm and 40mm fans to make installation easier.
that should be it, if anyone has any questions let me know!
thingiverse
free

CR-10 E3D V6 Hotend Mount Design by VRMAKER
...fans. to install the rail support you need 4 screws of 3mm diameter and 8mm long. the fans are installed with the original screws
thingiverse
free

Hephestos frame mount for nema17 stepper by hackele
...rame after i installed e3d chimera dual hotend and converted extruder into bowden.
you need a couple of m3x10 screws and m3 nuts.
Bratan
thingiverse
free
Mount for laser beam combiner by bratan
... light object's 25mm beam combiner mount to the sh-g350d laser cutter.
detailed guide can be found here: http://goo.gl/tfdjrx
thingiverse
free
Autel EVO 2 Galaxy Tab 10 Holder by bratan
...2 galaxy tab 10 holder by bratan
thingiverse
redesigned this to work with galaxy tab a 10" tablet with slim protective case
thingiverse
free
Aeon Labs Minimote wall mount by bratan
... (z-wave remote). can be mounted with 2 screws or double-sided tape.
i only tested it with v1 remote, not sure if it will fit v2.
thingiverse
free
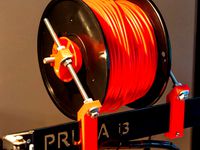
Prusa i3 Spool Mount for 3mm Frame by bratan
...inner (3mm) steel frame (like one sold by replikeo) and also made mount longer with holes at the bottom to secure it with screws.
thingiverse
free
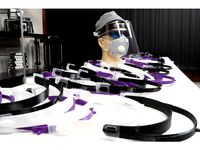
COVID-19 Face Shield by bratan
...n! no chin reinforcement. no logo.
demo: https://youtu.be/xrxesdebrmq
assembly video: https://www.youtube.com/watch?v=d00mecaeyru
thingiverse
free

Filament Spool Enlarger by bratan
...ds both sides together (you can also use threaded rod).
if you don't have access to laser cutter, you can print rims as well.
thingiverse
free
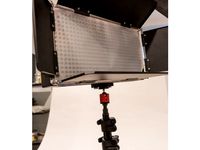
LED Panel Mount by bratan
...hat has standard 1/4" thread. i've mounted lights on mini ball-heads that's capable of holding the weight (barely).
thingiverse
free

Dewalt DW715 Miter Saw vacuum exhaust adapter by bratan
...n the vacuum end. you might want to make it longer too if your printer doesn't have layer separation issue on large objects.
thingiverse
free

E3D V6 Clone Direct Drive Adapter Insert by bratan
...imple one. it screws in using large flat head screwdriver into top of hotend and then you just insert correctly cut ptfe tube...
thingiverse
free

Micromake Delta Printer lasercut Spool Mount by bratan
...ws. speaking of screws, i used three 4-40 1/2" machine screws with nylock nuts, but feel free to use 3m screws/nuts as well.
Flexion
thingiverse
free
Ender 3 - Flexion by danielroibert
...ender 3 - flexion by danielroibert
thingiverse
adapter for flexion on a ender 3
thingiverse
free
Palm Flexion by JayJo
...onger linkages together
makes a specifically oriented palm plate
for finger flexion attachment
twin grip pads fit in each linkage
thingiverse
free

Flexion Extruder Fanduct by huge11
...flexion extruder fanduct by huge11
thingiverse
later more
thingiverse
free

Flexion HT Spare head holder by KaTZWorld
...xion ht spare nozzles and tools for the monoprice maker select
designed in fusion 360 printed in petg with the flexion ht nozzle
thingiverse
free

Box for Flexion Extruder by rdsail
...box for flexion extruder by rdsail
thingiverse
printed .2 in petg
thingiverse
free

BLTouch Mount for Flexion E3D by zanthor
...d work with pretty much anything.
offsets are roughly as below:
x_probe_offset_from_extruder -25
y_probe_offset_from_extruder -29
thingiverse
free

Flexion single Extruder box insert by shadowflee
...r + 2 nozzle holes
v1.1 now allows you to close the box :) and takes less filament
bitcoin: 1eo4b4bqp8ctutk8rfqxzgyrljjstuzywz
thingiverse
free

Flexion PTFE Tube Mount by EyeWolfDesign
...to hold the ptfe tubing there is two sizes are available m10 and m6. to screw the flexion mount to the assembly use a m3 x 8mm.
thingiverse
free

FT-5 Flexion Extruder Part Cooling Fan by Cbarkie
...ft-5 flexion extruder part cooling fan by cbarkie
thingiverse
part cooling fan for flexion extruder on the ft-5
thingiverse
free

CR-10 Flexion bracket by Cero_
... on the ptfe tube that goes against the flexion drive unit. it should be pushed against the nip point with the cam on position 4.
Cr
turbosquid
$15
Creazioni CR-673 CR-4461
... available on turbo squid, the world's leading provider of digital 3d models for visualization, films, television, and games.
3ddd
$1
Ravak CR 055.00
...ravak cr 055.00
3ddd
ravak , смеситель
ravak cr 055.00
turbosquid
$100
CR-002
...
turbosquid
royalty free 3d model cr-002 for download as stl on turbosquid: 3d models for games, architecture, videos. (1686037)
3ddd
$1

Ravak CR 012.00
...ravak cr 012.00
3ddd
ravak , смеситель
смеситель ravak cr 012.00
3ddd
free
Консоль CR Currin
...ь , cr currin
консоль cr currin
ширина - 1675 мм
глубина - 510 мм
общая высота - 810 мм
3ddd
$1
CR 39444
...0
диаметр: 100
тип патрона: gu5,3 gu10
количество ламп: 1
мощность: 35w
цвет: золото хрусталь
материал: металл хрусталь exclusive
3d_ocean
$89

Honda CR-Z
...www.youtube.com/watch?v=rrbb4d4lypk ` he honda cr-z‘s exterior styling is formed around a “one-motion wedge” concept with a lo...
3ddd
$1

Creazoni / STEFY CR-8901
...creazoni / stefy cr-8901
3ddd
creazoni
creazioni stefy cr-8901
turbosquid
$60
Chain-CR-001
...squid
royalty free 3d model chain-cr-001 for download as stl on turbosquid: 3d models for games, architecture, videos. (1680536)
turbosquid
$99

Honda CR-Z
... available on turbo squid, the world's leading provider of digital 3d models for visualization, films, television, and games.
Direct
design_connected
free
Compas Direction
...compas direction
designconnected
free 3d model of compas direction by vitra designed by prouvé, jean.
design_connected
$18
Direction Pivotant
...direction pivotant
designconnected
vitra direction pivotant computer generated 3d model. designed by prouvé, jean.
turbosquid
$6
not direct the front
...oyalty free 3d model not direct the front for download as max on turbosquid: 3d models for games, architecture, videos. (1213034)
turbosquid
$10

Rails Direct
... available on turbo squid, the world's leading provider of digital 3d models for visualization, films, television, and games.
3d_export
$5

Picto toilet directions
...lude 3d files next to rhino6: x3dv, step, igus, obj and stl. double-sided, flipping changes the gender directions to the toilets.
3ddd
$1
fauteuli direction
...d
chair , vitra , fauteuli
fauteuli vitra chair
design_connected
$18
Fauteuil Direction, 1951
...fauteuil direction, 1951
designconnected
vitra fauteuil direction, 1951 computer generated 3d model. designed by prouvé, jean.
3d_export
$5
Directional tactile 3D Model
...tactile 3d model
3dexport
directional tactile braille tile flooring interior
directional tactile 3d model renob000 71068 3dexport
turbosquid
$26

Radio direction finder A
...ty free 3d model radio direction finder a for download as fbx on turbosquid: 3d models for games, architecture, videos. (1212490)
turbosquid
$7

Wooden direction signage
...ty free 3d model wooden direction signage for download as max on turbosquid: 3d models for games, architecture, videos. (1453747)
V2
3d_export
free

Lamp v2
...lamp v2
3dexport
lamp v2 with solar panel
3d_export
$5

hammerhead v2
...hammerhead v2
3dexport
razer hammerhead v2 headphones, modeled in cinema 4d, render in corona
3d_export
$5

manometer v2
...manometer v2
3dexport
3d_export
$5

potato v2
...potato v2
3dexport
turbosquid
$52

Lifebuoys v2
...squid
royalty free 3d model lifebuoys v2 for download as fbx on turbosquid: 3d models for games, architecture, videos. (1560870)
turbosquid
$2

Mask v2
...turbosquid
royalty free 3d model mask v2 for download as stl on turbosquid: 3d models for games, architecture, videos. (1527741)
turbosquid
free

Flashlight V2
...d
free 3d model flashlight v2 for download as , obj, and fbx on turbosquid: 3d models for games, architecture, videos. (1663559)
turbosquid
$29

Thanos v2
...
royalty free 3d model thanos v2 for download as ztl and obj on turbosquid: 3d models for games, architecture, videos. (1651077)
turbosquid
$29

Titan v2
...d
royalty free 3d model titan v2 for download as ztl and obj on turbosquid: 3d models for games, architecture, videos. (1540228)
turbosquid
$29

Frieza v2
...
royalty free 3d model frieza v2 for download as ztl and obj on turbosquid: 3d models for games, architecture, videos. (1701238)
Extruder
3ddd
$1

Extruded Chair
...extruded chair
3ddd
extruded , tom dixon
inspired by tom dixon extruded chair
turbosquid
$15

Extruded Table
... extruded table for download as blend, dae, fbx, obj, and stl on turbosquid: 3d models for games, architecture, videos. (1634137)
turbosquid
$2

3D Printer Extruder
...d
royalty free 3d model 3d printer extruder for download as on turbosquid: 3d models for games, architecture, videos. (1537359)
turbosquid
$1

Zombie extruded text
...oyalty free 3d model zombie extruded text for download as obj on turbosquid: 3d models for games, architecture, videos. (1322198)
turbosquid
$4

Extruder conical screw
...el extruder conical screw for download as sldpr, ige, and stl on turbosquid: 3d models for games, architecture, videos. (1524433)
turbosquid
$50

3d PRINTER - Extruder
... available on turbo squid, the world's leading provider of digital 3d models for visualization, films, television, and games.
turbosquid
$15

Extruded Table 2
...xtruded table 2 for download as blend, dae, fbx, obj, and stl on turbosquid: 3d models for games, architecture, videos. (1621846)
turbosquid
$10

Maya Extrude Tool
... available on turbo squid, the world's leading provider of digital 3d models for visualization, films, television, and games.
3d_export
$5

world earth extrude map
...world earth extrude map
3dexport
3ddd
$1

Simply Elegant Extruded Tree Coffee Table Design
...ble by link studios. the silhouette of a tree is visible at one angle, extruded from the surface to create the support structure.
10
turbosquid
$25

10
... available on turbo squid, the world's leading provider of digital 3d models for visualization, films, television, and games.
turbosquid
$10

a-10
... available on turbo squid, the world's leading provider of digital 3d models for visualization, films, television, and games.
3ddd
$1

EX 10
...ex 10
3ddd
samsung , фотоаппарат
ex 10
3ddd
$1

Bed 10
...bed 10
3ddd
постельное белье
bed 10
evermotion
$25

Scene 10 Archinteriors vol. 10
...dering design interior
take a look at textured and shadered visualization scene ready to be rendered.. evermotion 3d models shop.
3ddd
$1

Curtains 10
...curtains 10
3ddd
curtains 10
3ds max 2011,fbx + textures
polys: 100355
3ddd
free

PLANTS 10
...plants 10
3ddd
цветок , горшок
plants 10,, with 3 different color planter boxes
turbosquid
$24

Chandelier MD 89310-10+10 Osgona
... chandelier md 89310-10+10 osgona for download as max and fbx on turbosquid: 3d models for games, architecture, videos. (1218762)
design_connected
$29

Nuvola 10
...nuvola 10
designconnected
gervasoni nuvola 10 computer generated 3d model. designed by navone, paola.
design_connected
$22

Kilt 10
...kilt 10
designconnected
zanotta kilt 10 computer generated 3d model. designed by progetti, emaf.
Mount
3d_export
free

mounting bracket
...mounting plate is the portion of a hinge that attaches to the wood. mounting plates can be used indoors, cabinetry and furniture.
turbosquid
$2

MOUNTING
... available on turbo squid, the world's leading provider of digital 3d models for visualization, films, television, and games.
turbosquid
free

Mounts
... available on turbo squid, the world's leading provider of digital 3d models for visualization, films, television, and games.
turbosquid
free

Mount Fuji
...fuji
turbosquid
free 3d model mount fuji for download as obj on turbosquid: 3d models for games, architecture, videos. (1579977)
3d_export
$5

Headphone mount LR
...headphone mount lr
3dexport
headphone mount l+r
turbosquid
$39

Mount rainier
...quid
royalty free 3d model mount rainier for download as fbx on turbosquid: 3d models for games, architecture, videos. (1492586)
turbosquid
$5

pipe mounting
...quid
royalty free 3d model pipe mounting for download as obj on turbosquid: 3d models for games, architecture, videos. (1293744)
turbosquid
$3

Mounting Tires
...uid
royalty free 3d model mounting tires for download as fbx on turbosquid: 3d models for games, architecture, videos. (1708511)
3d_export
$5

Magnetic GoPro Mount
...pro mount
3dexport
cool magnetic mount for gopro. allows you to mount the camera on flat metal surfaces and get exclusive shots.
turbosquid
$5

Stone Mount
...ty free 3d model stone mount for download as ma, obj, and fbx on turbosquid: 3d models for games, architecture, videos. (1370306)