Thingiverse
Flex Plate Cam-Lock Lever Extension Assy by DPs_Designs
by Thingiverse
Last crawled date: 3 years ago
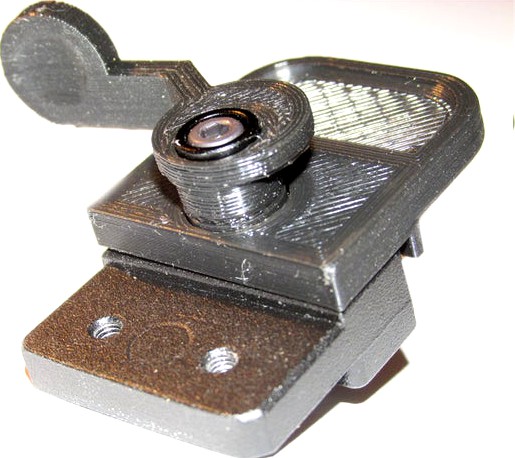
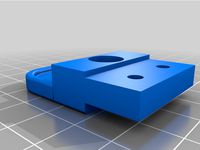
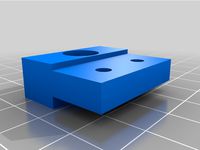
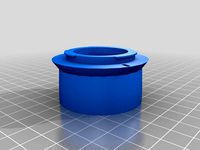
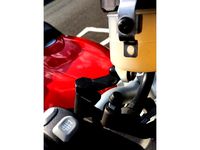
These are for doing a build plate with a flex plate on the bottom of the stock glass plate for a CR6-SE. Plus or minus .351 inches total build plate thickness including aluminum, glass, magnetic base, and flex plate. I also have included printable stock replacement Cam-Lock Levers and Rear Clips. My original idea for the extensions was to drill a hole on each side of the Cam-Lock Lever and into the stock tab which would be tapped for countersunk screws. But for now I just added a short stop plate on the bottom to keep them from turning. The Cam-Lock Lever Extensions are just small discs that go into the stock tab to hold up the Cam-Lock Levers. I designed it this way so that you could use either version of the Cam-Lock Levers with just the Extensions (without the pull tabs). And speaking of the Extensions, They are just that with no Pull Tabs attached to them. So if you don't want the tabs or plan on printing some pull tabs that go underneath the stock plate tab, then they're the ones you want to print.
This will also help fix the bed shorting problem, at least for the rear clips. I believe it also the cam-lock levers that need to be insulated also and I still used the main part of that, that bolts to the build plate. Although I did put some electrical tape on them to help for now. I do have plans to probably do a whole new one piece design that can still use the original cam-lock levers. So keep a lookout for those in the future.
I also have a set of printable stock replacement Cam-Lock Levers and Rear Clips if you happen to break any of your original ones and need replacements. Also have this in a one piece full printable replacement of the mount. You can find them here along more of my designs - https://www.thingiverse.com/dps_designs/designs
HARDWARE:
(2) 3Mx25mm bolts for the front extensions
(4) 3Mx10mm bolts for the rear clips.
Make sure to get the same type of head as the stock bolts.
Use the OME mount, spring, and the pin that holds the bolt inside the spring.
PRINTING NOTES:
Material: ABS
Infill: 50
Speed:50-75
Adhesion: Skirt
Supports: Yes (on Arms and Tab Extensions only)
PRINTING POSITIONS:
Extensions - Rotate 180 degrees so top is down.
Tab Extensions - Rotate 180 degrees so top is down with supports. Or rotate 90 degrees on side w/o supports if you not as worried about structural strength. Either way should work just fine for this.
Cam-Lock Lever Extensions - Just print them.
Cam-Lock Levers - These could be rotated 90 degrees so they lay on the side of the arm for a little less support needed, but I find that printing straight upright gives just a slightly better result. Plus I had one of test prints fill the dip on the end of the arm with support, which was a pain to get out.
Clips - Rotate 90 degrees so they are on there sides.
Stock Replacement Parts - I haven't printed and tested yet. The Clips should be able to print the as the ones above since they're just a lower profile. The Cam-Lock Levers could probably be rotated 180 degrees so top is down without supports. If you happen to print these and they don't quick work, let me know and I'll see about adjusting them.
HAPPY PRINTING!
Similar models
thingiverse
free
Stock Cam-Lock Lever Assy with Pull Tab by DPs_Designs
... end of the arm with support, which was a pain to get out.
clips - rotate 90 degrees so they are on there sides.
happy printing!
thingiverse
free
Stock Cam-Lock Lever Assy by DPs_Designs
...e end of the arm with support, which was a pain to get out.
clips - rotate 90 degrees so they are on there sides.
happy printing!
thingiverse
free

Cam-Lock Lever Extension for Flex Plate by DPs_Designs
...ght w/ supports. either way should work just fine for this.
clips - rotate 90 degrees so they are on there sides.
happy printing!
grabcad
free

Spring Plunger cam type 3/4-10
... cam type 3/4-10
grabcad
rotate the lever 180 degrees to retract the tip of the spring plunger to retract and lock in one motion
thingiverse
free
Fuji X mount revised extension tube by jimfoo
...o lock it into place. i rotated the orientation that he had it in by 180 degrees, so the only support needed is for the top tabs.
thingiverse
free

HICTOP CableTie Cam Clip UPDATED(3/3/2017) by chaoren
...r fright to remove the fill material from the zip tie holes. http://www.harborfreight.com/56-piece-precision-knife-set-36410.html
thingiverse
free

Adventure Force Nexus Pro Stock Lockout by haphazardlynamed
...you can just buy a higher quality airsoft stock)
print in orientations as provided, clip-on, no hardware.
petg, so clips can flex
thingiverse
free

Rotating Brackets by Mindless
...pain in the ass for the 3d printer so this was a more viable solution,,,,,
sketchup file is included for mod work,,,
-=mindless=-
thingiverse
free

Fightlite SCR Sporter Rifle Stock Extension
...sit flat against the stock if your bed has any warps in it.
note stls were uploaded upside down. rotate them 180 before printing.
thingiverse
free
Mirror replacement bolt for BMW S1000R by Gaugeforever
...apon from the subreddit https://www.reddit.com/r/motorcycles/ he was the one that designed the bolt, i merely printed and tested.
Assy
3d_export
$70

SINK ASSY
...sink assy
3dexport
3d_export
$70

SINK ASSY
...sink assy
3dexport
3d_export
$70

SINK ASSY
...sink assy
3dexport
3d_export
$200
VACUUM BOWL assy
...vacuum bowl assy
3dexport
3d_export
$69
Seat assy 3D Model
...tamping spare parts car frame suructure assembly chair vray max model seat assy
seat assy 3d model sunshineweilian 98209 3dexport
3d_export
$500
Detailed PILOT SEAT assy
...detailed pilot seat assy
3dexport
3d_export
$500

Detailed PILOT SEAT assy
...detailed pilot seat assy
3dexport
3d_export
$270
DETAILED TRIPLE SEAT assy
...detailed triple seat assy
3dexport
3d_export
$190
Detailed STOWAGE BIN assy
...detailed stowage bin assy
3dexport
3d_export
$35
Detailed FIRE EXTINGUISHER assy
...detailed fire extinguisher assy
3dexport
Dps
3ddd
$1
DP 119 Led + DP 118 R7s
...romehttp://www.slvlightingdirect.com/shop-office-lighting/display-lights/slv-146782-dp-118-r7s-mirror-light-chrome.html
turbosquid
$40

DP-28
...royalty free 3d model dp-28 for download as 3ds, max, and obj on turbosquid: 3d models for games, architecture, videos. (1301599)
turbosquid
$20

DP 28
...yalty free 3d model dp 28 for download as blend, obj, and fbx on turbosquid: 3d models for games, architecture, videos. (1571923)
3d_export
$20
Accuphase DP-450
...accuphase dp-450
3dexport
turbosquid
$60

GunShip DP-20
...yalty free 3d model gunship dp-20 for download as max and fbx on turbosquid: 3d models for games, architecture, videos. (1195768)
3d_ocean
$5

Airplane DP interior
...0/0/0/0/mtv360/www/dp/index.html 360 degree view,texture,3ds cube box, interior, texture:psd, texture:png (transparent)!!!, 6/...
3d_export
$105
DP 28 3D Model
...
dp 28 russian 762 gun firearm world war ii machine automatic textured low poly game ready
dp 28 3d model plutonius 3754 3dexport
3ddd
$1
Люстра Sylcom 1386/DP
...тра sylcom 1386/dp
3ddd
sylcom
http://www.sylcomsrl.com/index_en.html
люстра sylcom 1386/dp.
высота 70см, диаметр 78см.
cg_studio
$50
DP-28 Textured3d model
... textured3d model
cgstudio
.3ds .max - dp-28 textured 3d model, royalty free license available, instant download after purchase.
turbosquid
$15

ExeGate DP-AVR 1000VA
...lty free 3d model exegate dp-avr 1000va for download as blend on turbosquid: 3d models for games, architecture, videos. (1279401)
Flex
3ddd
$1

Flex
...flex
3ddd
flex , конференц-зал
кресло для переговоров
3ddd
$1

Flex — I Laccati
... i laccati
3ddd
flex , дверь
двери межкомнатные, окрашенные. flex, коллекция «i laccati»
3ddd
free
Flex Seating 6032
... конференц-зал , flex
кресло модульное, модель flex seating 6032
3ddd
free
TechnoGym Flex Posterior
... flex , тренажер
3ds max 2012 (v-ray) + fbx
technogym flex posterior
3ddd
$1
Банкетка Flex Team
... , flex team
http://www.abitant.com/products/banketka-flex-team-2014-kilt-pouf
3ddd
free

FLEX , I Laccati
...cati
3ddd
flex , i laccati
flex , i laccati
модель p 14 q stucco fiorentino decoro gigli
3ddd
$1

Metal lux / FLEX
...metal lux / flex
3ddd
metal lux
люстра metal lux flex.
turbosquid
$11
Stool Flex
...ty free 3d model stool flex for download as max, obj, and fbx on turbosquid: 3d models for games, architecture, videos. (1673813)
3ddd
$1
Flex by Skandiform
...flex by skandiform
3ddd
skandiform , стул
enjoy
turbosquid
$7
Flex Chair
... available on turbo squid, the world's leading provider of digital 3d models for visualization, films, television, and games.
Lever
turbosquid
$1

Lever
... available on turbo squid, the world's leading provider of digital 3d models for visualization, films, television, and games.
turbosquid
$26

Stopper lever
...quid
royalty free 3d model stopper lever for download as fbx on turbosquid: 3d models for games, architecture, videos. (1255553)
3ddd
$1

Kwikset / SmartCode Lever
...kwikset / smartcode lever
3ddd
дверная ручка
kwikset smartcode lever
3d_ocean
$28

Lever Gym Machine
...equipement gym gymnastic indoor lever machine pull sport workout yellow
3d model of black lever gym machine with yellow elements.
turbosquid
$15

Clutch lever
... available on turbo squid, the world's leading provider of digital 3d models for visualization, films, television, and games.
turbosquid
free
LEVER TEST.max
... available on turbo squid, the world's leading provider of digital 3d models for visualization, films, television, and games.
turbosquid
$129
Lever Action Rifle
...
royalty free 3d model lever action rifle for download as obj on turbosquid: 3d models for games, architecture, videos. (1327623)
turbosquid
$59

Winchester Lever Rifle
...alty free 3d model winchester lever rifle for download as fbx on turbosquid: 3d models for games, architecture, videos. (1244383)
turbosquid
$3
DOOR LEVER ADA
...uid
royalty free 3d model door lever ada for download as max on turbosquid: 3d models for games, architecture, videos. (1178553)
turbosquid
$10

Door Lever Square
...door lever square for download as c4d, 3ds, dae, dxf, and obj on turbosquid: 3d models for games, architecture, videos. (1553862)
Cam
archibase_planet
free

Cam
...cam
archibase planet
tv camera equipment
cam dolly - 3d model (*.gsm+*.3ds) for interior 3d visualization.
3d_export
$8

Cam and Follower
...ry to linear (reciprocating) motion. as the cam rotates, the follower rises and falls in a process known as reciprocating motion.
3d_ocean
$15
Studio Cam
...p. made in 3ds max 2013 1- 3dsmax with vray render included material and light 2- obj file 3- fbx file hope you like it please...
3d_export
$37

thermal cam
...thermal cam
3dexport
turbosquid
$19
Security cam
...oyalty free 3d model security cam for download as ige and obj on turbosquid: 3d models for games, architecture, videos. (1331128)
turbosquid
$40
Security Cam
...y free 3d model security cam for download as ma, fbx, and obj on turbosquid: 3d models for games, architecture, videos. (1601103)
3d_export
$40
security cam
...security cam
3dexport
home security camera
turbosquid
$280

cam-bot
... available on turbo squid, the world's leading provider of digital 3d models for visualization, films, television, and games.
turbosquid
$33

AT_minivan_(CAM)
... available on turbo squid, the world's leading provider of digital 3d models for visualization, films, television, and games.
turbosquid
$10
video cam
... available on turbo squid, the world's leading provider of digital 3d models for visualization, films, television, and games.
Extension
3d_export
$5
extension plug - extension socket
...model. low poly and game ready. with blender files and texture (.png).<br>verts: 424<br>faces: 364<br>tris: 808
3ddd
$1

Moooi, Extension Chair
... стул , вешалка
стулья фирмы moooi, коллекция extension
turbosquid
$300

Bedroom Extension
...
royalty free 3d model bedroom extension for download as skp on turbosquid: 3d models for games, architecture, videos. (1682078)
3d_export
$5
palo extensible
...palo extensible
3dexport
turbosquid
$39
Leg Extension
...ee 3d model leg extension for download as obj, fbx, and blend on turbosquid: 3d models for games, architecture, videos. (1276776)
3d_export
$5

lampe extensible architecte
...lampe extensible architecte
3dexport
lampe extensible architecte maisons du monde
turbosquid
$20

Leg Extension
... available on turbo squid, the world's leading provider of digital 3d models for visualization, films, television, and games.
turbosquid
$2

Garage Extension
... available on turbo squid, the world's leading provider of digital 3d models for visualization, films, television, and games.
turbosquid
free

Extension cable
... available on turbo squid, the world's leading provider of digital 3d models for visualization, films, television, and games.
3ddd
$1

Moooi Extension Chair
...moooi extension chair
3ddd
moooi
http://www.moooi.com/products/extension-chair
Lock
turbosquid
$1

Lock
...ck
turbosquid
royalty free 3d model lock for download as fbx on turbosquid: 3d models for games, architecture, videos. (1286851)
3d_export
$5

lock handle
...lock handle
3dexport
lock handle
3d_export
$5
hinged lock
...hinged lock
3dexport
hinged lock
turbosquid
$1
Lock Box with combination lock
...ee 3d model lock box for download as 3ds, obj, fbx, and blend on turbosquid: 3d models for games, architecture, videos. (1215494)
turbosquid
$2
Lock
...
royalty free 3d model lock for download as max, obj, and fbx on turbosquid: 3d models for games, architecture, videos. (1452660)
turbosquid
$35

Lock
... available on turbo squid, the world's leading provider of digital 3d models for visualization, films, television, and games.
turbosquid
$24

lock
... available on turbo squid, the world's leading provider of digital 3d models for visualization, films, television, and games.
turbosquid
$10

Lock
... available on turbo squid, the world's leading provider of digital 3d models for visualization, films, television, and games.
turbosquid
$6

Lock
... available on turbo squid, the world's leading provider of digital 3d models for visualization, films, television, and games.
turbosquid
$4
Lock
... available on turbo squid, the world's leading provider of digital 3d models for visualization, films, television, and games.
Plate
archibase_planet
free
Plates
...plates
archibase planet
plates and dishes plate
plates - 3d model (*.gsm+*.3ds) for interior 3d visualization.
3d_export
$5

plate
...plate
3dexport
plate
archibase_planet
free
Plates
...plates
archibase planet
plates and dishes plate kitchen ware
plates - 3d model (*.gsm+*.3ds) for interior 3d visualization.
archibase_planet
free
Plates
...plates
archibase planet
plate plates and dishes crockery
plates 2 - 3d model (*.gsm+*.3ds) for interior 3d visualization.
archibase_planet
free
Plate
...plate
archibase planet
dinner-plate plate kitchen ware
plate n070808 - 3d model (*.gsm+*.3ds) for interior 3d visualization.
3d_export
$6

plate
...plate
3dexport
design of plate
3d_export
$5
plate
...plate
3dexport
plate lowpoly
archibase_planet
free
Plates
...plates
archibase planet
plate dish kitchen-ware
plate - 3d model for interior 3d visualization.
3ddd
$1
Plates
...plates
3ddd
полка , тарелка
african plates
archibase_planet
free
Plate
...plate
archibase planet
plate kitchen ware
plate - 3d model (*.gsm+*.3ds) for interior 3d visualization.
Designs
3ddd
$1
LINE DESIGN (Doors Design)
...line design (doors design)
3ddd
дверь
modern doors design - line design concept
turbosquid
$5

designer
...alty free 3d model designer for download as max, obj, and fbx on turbosquid: 3d models for games, architecture, videos. (1422665)
3ddd
$1
VER DESIGN
...ver design
3ddd
ver design
кресло ver design
3ddd
$1
VER DESIGN
...ver design
3ddd
ver design
диван ver design
3ddd
$1
Bagno design
...bagno design
3ddd
bagno design , унитаз
санитария bagno design
3ddd
free
VER DESIGN
...ver design
3ddd
ver design , стеллаж
полка ver design
3ddd
$1
VER DESIGN
...ver design , лежак , шезлонг
шезлонг ver design
3d_export
free

designer
..., trees and much more. the model has 3 types of parts: - 4 cells - 6 cells - 8 cells the *.max file contains 5 colored materials.
3d_export
$19

level design
...level design
3dexport
you can use this design (level design) in your own game.
3d_export
$7
Crusher design
...crusher design
3dexport
crusher design