Thingiverse
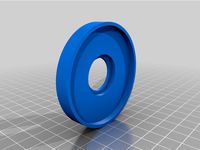
FlashForge New Creator Pro - Bed Extender - Sized for 8 x 10 Plexiglass by Timetoprint00
by Thingiverse
Last crawled date: 3 years, 1 month ago
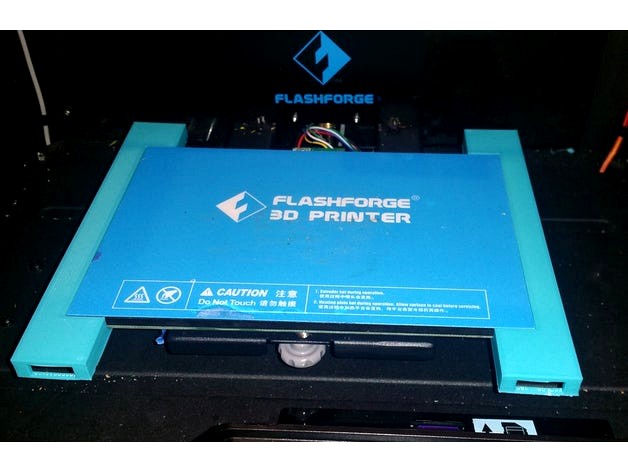
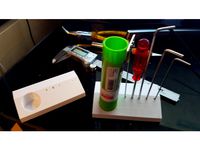
I find that on the FlashForge NEW Creator Pro (received November-2016) that parts with large surface areas are difficult to remove from the bed plate. For example the first time I printed out the orange bird house (thingi1351023), I did so on a glass plate, that I clipped to the FlashForge Bed. Because this bird house has such a large contact surface area to the bed, I found it to be very difficult to remove. In the end the glass plate shattered, and in fear of cutting my fingers from the shards of glass, I simply threw the bird house into the garbage.
To remedy, I decided to use plexi-glass, so that I could flex the plate to create a separation between it and the 3d printed object. Locally (at HD) thin plexi-glass can be purchased in 8” x 10” sheets for approximately $4 USD. These sheet are approximately 2mm thick. Then to avoid having to cut the plexi-glass to size, I designed the bed extensions to accommodate the 8 x 10 plexi-glass sheet.
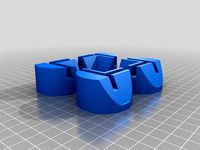
The Bed extensions are small enough to be able to be printed out on top of the original FlashForge Bed. They Bed Extentions are secured into place by using 3mm Wing-Nuts, one for each corner, so a total of 4. From the picture you can see I have the "NEW" Creator Pro Logo is silver/chrome. Therefore this is the 2016 "NEW" Creator Pro. The Bed Extenders accommodate the position of the corner bolts for this model. I do not know, but I would expect that the bed bolt positions are the same for the previous Creator Pro.
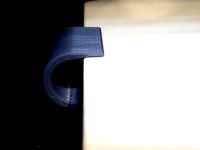
To help hold the plexi-glass in position on the bed when printing, small clips are used for clamping. There are 5 slots on each bed extender. The wire clips in the picture are from Dollar Tree; you can purchase a pack of 6 of them for $1. When clamped in place the clips remain outside where the nozzle moves; there is about 10mm clearance. Note: I use Simply3D to slice the parts I print. Therefore starting position of the nozzle is at the front right-hand corner of the bed. If you are using Slic3r or ReplicatorG, the nozzle’s starting position is at the front Left-Hand corner; In this case the wire clip may interfere with the starting position of the nozzle (depending where you place it), you may need to put the clip into a different slot.
As a result I can now print out much larger objects. When I originally printed out the bird house with a glass plate (that shattered), I had scaled it down to 90%, because it came so close to the edge of the FlashForge bed, and I wanted a rim printed. However, with the plexi-glass bed, I was able to print it full size with no worries of hitting the wire clips. It is so nice to be able to print larger objects.
Two other quick notes, I use blue painters tape on the top surface of the plexi-glass, and then liberally apply glue stick to the top of the blue tape. Parts, especially PLA, adhere very well.
Enjoy!
To remedy, I decided to use plexi-glass, so that I could flex the plate to create a separation between it and the 3d printed object. Locally (at HD) thin plexi-glass can be purchased in 8” x 10” sheets for approximately $4 USD. These sheet are approximately 2mm thick. Then to avoid having to cut the plexi-glass to size, I designed the bed extensions to accommodate the 8 x 10 plexi-glass sheet.
The Bed extensions are small enough to be able to be printed out on top of the original FlashForge Bed. They Bed Extentions are secured into place by using 3mm Wing-Nuts, one for each corner, so a total of 4. From the picture you can see I have the "NEW" Creator Pro Logo is silver/chrome. Therefore this is the 2016 "NEW" Creator Pro. The Bed Extenders accommodate the position of the corner bolts for this model. I do not know, but I would expect that the bed bolt positions are the same for the previous Creator Pro.
To help hold the plexi-glass in position on the bed when printing, small clips are used for clamping. There are 5 slots on each bed extender. The wire clips in the picture are from Dollar Tree; you can purchase a pack of 6 of them for $1. When clamped in place the clips remain outside where the nozzle moves; there is about 10mm clearance. Note: I use Simply3D to slice the parts I print. Therefore starting position of the nozzle is at the front right-hand corner of the bed. If you are using Slic3r or ReplicatorG, the nozzle’s starting position is at the front Left-Hand corner; In this case the wire clip may interfere with the starting position of the nozzle (depending where you place it), you may need to put the clip into a different slot.
As a result I can now print out much larger objects. When I originally printed out the bird house with a glass plate (that shattered), I had scaled it down to 90%, because it came so close to the edge of the FlashForge bed, and I wanted a rim printed. However, with the plexi-glass bed, I was able to print it full size with no worries of hitting the wire clips. It is so nice to be able to print larger objects.
Two other quick notes, I use blue painters tape on the top surface of the plexi-glass, and then liberally apply glue stick to the top of the blue tape. Parts, especially PLA, adhere very well.
Enjoy!
Similar models
thingiverse
free

FlashForge Creator Pro by Rafatpanah
... out a new glass plate on top of the printing bed so i made some easily removable clips. you can use 2 or 4 to secure your plate.
thingiverse
free

FlashForge Creator Pro - Corner Glass Clips +3mm by thelab_ms
...r the original corner clips to get a good grip on the glass.
we extended the part of the clip that holds that glass by about 3mm.
thingiverse
free

FlashForge Creator Pro - Corner Glass clips by jherridge
...ip by harlique:http://www.thingiverse.com/thing:537595
wing nut cover by legreatmagnet:http://www.thingiverse.com/thing:604579
thingiverse
free
Flashforge Creator Pro Glass Bed Corner That works by Tjp2579
...ed every corner file on here and thy did not work for one reason or the other so i made one. increase size 3% if printing in abs.
thingiverse
free

Flashforge Creator Pro 180x240 glass holder by helste
...s where they don't get hit by the nozzle.
the 3rd foto shows a setup, where i do not have problems with nozzle hitting clips.
thingiverse
free

Micro Binder clip 16mm for FlashForge Creator Pro 2016 by LaurentRueil
....thingiverse.com/thing:2070108
the micro binder clip 16mm was too small to be used, so i created that to use them.
printer in abs
thingiverse
free
Flashforge Creator Pro - Bed Clip for Zebra Plate by FunFunBoy
...lashforge creator pro heated bed but it's suitable for any system with 12.5 mm whole plate thickness.
print set of 4 clips.
thingiverse
free

FlashForge Creator Pro Glass Clips by jherridge
.... i made my clips with abs filament. i wanted an alternative to steel binder clips that were easier to put on and remove. enjoy!
thingiverse
free

FlashForge Creator Pro - Corner Glass clips
... to hold it in place. i also used the spare thumb nut that came with the printer for the front corner for easy glass bed removal.
thingiverse
free

Extended Glass Mount for Flashforge Creator Pro by Bassna
..., be careful.
shoutout to maker111 for the original model, and eagleseven for doing the measurements for the larger glass plate.
Timetoprint00
thingiverse
free

Elephant Magnet - w reinforced trunk by Timetoprint00
...ut in half and added a magnet. sized for a cheap 20mm magnet. same magnet style as sold at hobby lobby, comes in a 50 piece pack.
thingiverse
free
Elephant - Reinforced Trunk by Timetoprint00
...so i reinforce it by placing a half circle within it. i did so using tinkercad. it so sooooo much stronger and still looks good.
thingiverse
free

Bird Magnet Matthew 6:26 by Timetoprint00
... to children that god cares for the birds, and yet god values people more than them. i handed these out for jr. church on sunday.
thingiverse
free

Apple Android Refrigerator Magnet by Timetoprint00
... speed; hasn't been a problem yet).
altered design using tinkercad.
gorilla glue to attach magnet
this is a remix of 1290514
thingiverse
free
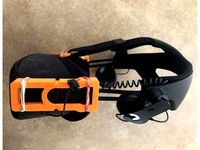
Oculus Quest Vive Adapter DAS by Timetoprint00
... thinner if petg were used for the material. however, petg clogs my nozzels after each print, so i don't use petg very often.
thingiverse
free

Jellyfish Mod Resized for ease of Assembly by Timetoprint00
...ei cut to size and glued down to the original bed. it becomes tacky as the bed heats up, and pla and petg sticky very well to it.
thingiverse
free

UDI Holystone U818A Cover with Camera Stand and storage for separate battery pack by Timetoprint00
...e lower section of a motor is simply an extended antenna. this did not seem to help the distance for control that much if at all.
thingiverse
free

WinBook TW700 Tablet Cooling Stand by Timetoprint00
...uld be diminished.
monoprice tablet 12 x 9: http://www.monoprice.com/product?p_id=6815 (an excellent tablet for just under $100).
thingiverse
free
UDI U818A - Stand Alone - Camera Mount & Battery Storage by Timetoprint00
... housing, then see my alternate design of a dome with camera mount .... thingi 2816084.
https://www.thingiverse.com/thing:2816084
Plexiglass
turbosquid
free

Plexiglass Lamp
...turbosquid
free 3d model plexiglass lamp for download as 3ds on turbosquid: 3d models for games, architecture, videos. (1144847)
turbosquid
$35

plexiglass chair
... available on turbo squid, the world's leading provider of digital 3d models for visualization, films, television, and games.
3d_export
$5

eiffel tower
...eiffel tower 3dexport eiffel tower interior design<br>plexiglass ...
3d_export
$5

Type chair Philippe Starck 3D Model
...type chair philippe starck 3d model 3dexport plexiglass chair philippe starck type chair philippe starck 3d model...
3d_export
$10
Glass Table 09 3D Model
...3d model 3dexport glass table contemporary modern furniture materials plexiglass detailed photoreal vray glass table 09 3d model alekrazum...
3d_export
$10

Glass Table 05 3D Model
...3d model 3dexport glass table contemporary modern furniture materials plexiglass detailed photoreal vray glass table 05 3d model alekrazum...
3d_export
$10
Glass Table 08 3D Model
...3d model 3dexport glass table contemporary modern furniture materials plexiglass detailed photoreal vray glass table 08 3d model alekrazum...
3d_export
$10

Glass Table 07 3D Model
...3d model 3dexport glass table contemporary modern furniture materials plexiglass detailed photoreal vray glass table 07 3d model alekrazum...
3d_export
$10

Glass Table 06 3D Model
...3d model 3dexport glass table contemporary modern furniture materials plexiglass detailed photoreal vray glass table 06 3d model alekrazum...
3d_export
$10

Glass Table 03 3D Model
...3d model 3dexport glass table contemporary modern furniture materials plexiglass detailed photoreal vray glass table 03 3d model alekrazum...
Flashforge
thingiverse
free

Flashforge Logo
...flashforge logo
thingiverse
flashforge logo
thingiverse
free

flashforge logo by morive3d
...flashforge logo by morive3d
thingiverse
this is a flashforge stamphttps://www.youtube.com/channel/ucu6ge9qrju9cpgg6wrlxkqw
thingiverse
free

Flashforge Glass Bed by olo2000pm
...flashforge glass bed by olo2000pm
thingiverse
flashforge glass bed
thingiverse
free
Toolbox for FlashForge Finder by Gringo1970
...toolbox for flashforge finder by gringo1970
thingiverse
smal toolbox for flashforge finder
thingiverse
free
Flashforge / Dremel lid by Disco_Rob
...flashforge / dremel lid by disco_rob
thingiverse
lid extension for the flashforge dreamer
thingiverse
free

Flashforge Dreamer Filamentguide by PeterS1
...de for flashforge dreamer / dremel idea. you need also flashforge dreamer lid spacer (http://www.thingiverse.com/thing:1219953)
thingiverse
free
Flashforge creator legs by cybadigitals
...flashforge creator legs by cybadigitals
thingiverse
these legs gives a clearance of 25mm for flashforge creator series
thingiverse
free
Flashforge Inventor/Dreamer by Iprintr7
...orge inventor/dreamer by iprintr7
thingiverse
this is my first thingiverse project and is a model of the flashforge 3d printer
thingiverse
free

Flashforge Filiment Guide by russellscanlan
...flashforge filiment guide by russellscanlan
thingiverse
my design to feed filament through the door on a flashforge adventure 3
thingiverse
free
Flashforge Winder Adapter by newky2k
...winder adapter by newky2k
thingiverse
adapters for the flashforge 0.5 kg spools to the for the filament spool winder by ssinnott
Creator
3ddd
$1

CREATOR
... молдавия
круглая кровать молдавской мастерской creator.диаметр спального места - 1900мм,материалы настроены.
turbosquid
$75

Creators Realm
... available on turbo squid, the world's leading provider of digital 3d models for visualization, films, television, and games.
3ddd
$1
LEGO Creator Part 2
...
lego , конструктор , машина
lego creator №6753
turbosquid
free

Game Creator Pack
... available on turbo squid, the world's leading provider of digital 3d models for visualization, films, television, and games.
3ddd
$1
LEGO Creator №6753 Part 3
...
lego , конструктор , машина
lego creator №6753
3ddd
$1

LEGO Creator №6753 Part 1
...
lego , конструктор , машина
lego creator №6753
turbosquid
$29

Train Track Creator Pro
... available on turbo squid, the world's leading provider of digital 3d models for visualization, films, television, and games.
3d_ocean
$39

Train Track Creator Pro
...n tracks, for video game or rendering in a matter of minutes. all the models in this pack are low poly with high resolution te...
turbosquid
$7

FPS Creator Reloaded Rock Pack 1
... available on turbo squid, the world's leading provider of digital 3d models for visualization, films, television, and games.
3ddd
$1
Декоративные элементы BV Decor CREATOR III часть
...ментов и декорирования стен.
множество вариантов для вашей фантазии.https://bvdecor.com/es/category/list/cat/creator-es
Extender
turbosquid
$39
Extending table
...id
royalty free 3d model extending table for download as max on turbosquid: 3d models for games, architecture, videos. (1290552)
turbosquid
$5
Extend Table
...squid
royalty free 3d model extend table for download as skp on turbosquid: 3d models for games, architecture, videos. (1372508)
turbosquid
$40
Engine Extended
... available on turbo squid, the world's leading provider of digital 3d models for visualization, films, television, and games.
turbosquid
$12

Triple extender
... available on turbo squid, the world's leading provider of digital 3d models for visualization, films, television, and games.
turbosquid
$99
Monica (Extended Pack)
... available on turbo squid, the world's leading provider of digital 3d models for visualization, films, television, and games.
turbosquid
$19
Berlino Extendable Table
... available on turbo squid, the world's leading provider of digital 3d models for visualization, films, television, and games.
turbosquid
$3
Extendable Modern Table
... available on turbo squid, the world's leading provider of digital 3d models for visualization, films, television, and games.
3d_export
$32

KC10 Extender 3D Model
...c 10 aircraft jet fighter bomber close support interceptor spy attacker plane
kc10 extender 3d model martialartist 24527 3dexport
3d_export
$50
Extended Range Trailer 3D Model
...railer 3d model
3dexport
extended range trailer military patrol equipment
extended range trailer 3d model dougmavs 75684 3dexport
design_connected
$13

Big Dining Tables Extended
...ining tables extended
designconnected
bonaldo big dining tables extended computer generated 3d model. designed by gilles, alain.
Pro
turbosquid
$29

Pro
...ree 3d model mac pro for download as obj, c4d, fbx, and blend on turbosquid: 3d models for games, architecture, videos. (1505782)
turbosquid
$15

Apple Mac Pro and Pro Display
...ee 3d model apple mac pro and pro display for download as max on turbosquid: 3d models for games, architecture, videos. (1417078)
3d_export
$5

iphone 13 pro max and pro
...3 pro max and 13 pro the model is made in four colors (graphite, gold, silver, and blue), all of which are attached in the files.
3d_export
free

sapphire pro
...sapphire pro
3dexport
sapphire pro 3d printer head mask
3d_export
$4

macbook pro
...macbook pro
3dexport
macbook pro 13" inch 2020 years model
3ddd
free

GentleLase Pro
... syneron , candela
gentlelase pro аппарат для лазерной эпиляции
turbosquid
$25

PRO frame
...rbosquid
royalty free 3d model pro frame for download as max on turbosquid: 3d models for games, architecture, videos. (1148329)
turbosquid
$5

Alien pro
...osquid
royalty free 3d model alien pro for download as blend on turbosquid: 3d models for games, architecture, videos. (1678446)
turbosquid
$5

iphone11 pro
...uid
royalty free 3d model iphone11 pro for download as blend on turbosquid: 3d models for games, architecture, videos. (1562707)
3ddd
$1

Mac Pro (appel)
...mac pro (appel)
3ddd
компьютер , apple
mac pro
Bed
3ddd
$1

bed
...bed
3ddd
bed , постельное белье
bed
3ddd
$1

bed
...bed
3ddd
bed , постельное белье
bed
3ddd
$1

bed
...bed
3ddd
bed , постельное белье
bed
3ddd
$1

bed
...bed
3ddd
bed , постельное белье
bed
3ddd
$1

bed
...bed
3ddd
bed , постельное белье
bed
3ddd
$1

bed
...bed
3ddd
bed , постельное белье
bed
3ddd
free

bed
...bed
3ddd
bed , постельное белье
bed
3ddd
free

bed
...bed
3ddd
bed , постельное белье
bed
3ddd
$1

Bed
...bed
3ddd
bed , постельное белье , постель
bed
3d_export
$7

bed adairs bed
...rs bed
3dexport
bed adairs bed in modern style. if you want a smoother surface, please turn on turbosmooth in the modifier list.
10
turbosquid
$25

10
... available on turbo squid, the world's leading provider of digital 3d models for visualization, films, television, and games.
turbosquid
$10

a-10
... available on turbo squid, the world's leading provider of digital 3d models for visualization, films, television, and games.
3ddd
$1

EX 10
...ex 10
3ddd
samsung , фотоаппарат
ex 10
3ddd
$1

Bed 10
...bed 10
3ddd
постельное белье
bed 10
evermotion
$25

Scene 10 Archinteriors vol. 10
...dering design interior
take a look at textured and shadered visualization scene ready to be rendered.. evermotion 3d models shop.
3ddd
$1

Curtains 10
...curtains 10
3ddd
curtains 10
3ds max 2011,fbx + textures
polys: 100355
3ddd
free

PLANTS 10
...plants 10
3ddd
цветок , горшок
plants 10,, with 3 different color planter boxes
turbosquid
$24

Chandelier MD 89310-10+10 Osgona
... chandelier md 89310-10+10 osgona for download as max and fbx on turbosquid: 3d models for games, architecture, videos. (1218762)
design_connected
$29

Nuvola 10
...nuvola 10
designconnected
gervasoni nuvola 10 computer generated 3d model. designed by navone, paola.
design_connected
$22

Kilt 10
...kilt 10
designconnected
zanotta kilt 10 computer generated 3d model. designed by progetti, emaf.
8
turbosquid
$6

Rock 8-8
...urbosquid
royalty free 3d model rock 8-8 for download as obj on turbosquid: 3d models for games, architecture, videos. (1659393)
3ddd
$1
Italamp 387/8+8
...italamp 387/8+8
3ddd
italamp
люстра italamp 387/8+8
размеры 92x71h
3ddd
$1
8 марта
...8 марта
3ddd
8 марта
кресло 8 марта
design_connected
$16
No 8
...nected
photo-realistic 3d models of the sibast no 8 armchair from sibast for 3d architectural and interior design presentations.
3d_export
$5
hinge 8
...hinge 8
3dexport
hinge 8
3d_export
$5

iphone 8
...iphone 8
3dexport
iphone 8
turbosquid
$69

iPhone 8 and iPhone 8 Plus
... free 3d model iphone 8 and iphone 8 plus for download as max on turbosquid: 3d models for games, architecture, videos. (1202442)
turbosquid
$12

Calligraphic Digit 8 Number 8
...hic digit 8 number 8 for download as max, obj, fbx, and blend on turbosquid: 3d models for games, architecture, videos. (1389341)
3ddd
free

PLANTS 8
...plants 8
3ddd
цветок , горшок
plant 8,,, hope u all like it
3ddd
$1
8 Марта / Amadey
...8 марта / amadey
3ddd
8 марта
8 marta amadey
New
turbosquid
$119

New New Beetle
... available on turbo squid, the world's leading provider of digital 3d models for visualization, films, television, and games.
3d_export
$5

New-feather
...new-feather
3dexport
new-feather
3d_export
$6
new style
...new style
3dexport
new style room
3ddd
free
New Items
...ew items
3ddd
new items , барный
барный стул от китайского производителя фирмы new items
3d_export
$6

Logo new
...logo new
3dexport
new american style logo
3d_export
$10
New jersey
...new jersey
3dexport
new jersey stp and stl format
design_connected
$20
New Deal
...new deal
designconnected
new deal computer generated 3d model.
3d_ocean
$15
New bed
... for this bed all this file format include in zip file 3ds,obj,max,zip file change material and re-size very easy very for render
3ddd
free
Sofa-New Classic
...sofa-new classic
3ddd
new classic
sofa,new classic
design_connected
$13
New Antiques
...new antiques
designconnected
cappellini new antiques computer generated 3d model. designed by wanders, marcel.
Sized
3d_export
$7
shoes size from 5 inch size to 11 inch
...shoes size from 5 inch size to 11 inch
3dexport
shoes design women model sizing from 5 inch to 11 inch
turbosquid
$15

Closet-small size
...
royalty free 3d model closet-small size for download as max on turbosquid: 3d models for games, architecture, videos. (1186088)
turbosquid
$5
Full size Futon
...id
royalty free 3d model full size futon for download as max on turbosquid: 3d models for games, architecture, videos. (1339638)
turbosquid
$4

mid size sword
...d
royalty free 3d model mid size sword for download as blend on turbosquid: 3d models for games, architecture, videos. (1160246)
turbosquid
$3

Mid size hammer
...
royalty free 3d model mid size hammer for download as blend on turbosquid: 3d models for games, architecture, videos. (1160647)
turbosquid
$19
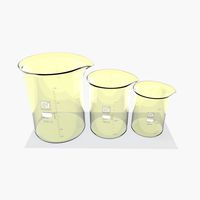
Beaker 3 Sizes
...yalty free 3d model beaker 3 sizes for download as ma and obj on turbosquid: 3d models for games, architecture, videos. (1645955)
turbosquid
$20
Full Sized Bed
...d model full sized bed for download as max, 3ds, fbx, and obj on turbosquid: 3d models for games, architecture, videos. (1547542)
turbosquid
$45
King Size Bed
... available on turbo squid, the world's leading provider of digital 3d models for visualization, films, television, and games.
turbosquid
$15

Queen size bed
... available on turbo squid, the world's leading provider of digital 3d models for visualization, films, television, and games.
turbosquid
$14

Bed - Full Size
... available on turbo squid, the world's leading provider of digital 3d models for visualization, films, television, and games.