Thingiverse
Filawinder improved wall mounted sensor
by Thingiverse
Last crawled date: 6 years, 1 month ago
Additional hardware required:
# 8 wood screw (2pc) for mounting
M3 x 3mm heatset threaded inserts (3pc)
M3 X 8mm screw (2pc) to mount sensor to back of unit
M3 X 20mm screw (4pc) optional - to attach PTFE guides to bottom.
E6000 adhesive (optional) - for PTFE guides
4mm OD PTFE tubing
paper / pencil.
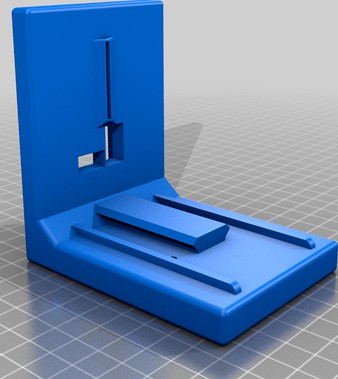
A redesign of the filastruder sensor holder to make it less likely to snag, more adjustable, and easily wall mountable.
Uses keyhole screw mounts designed for a #8 wood screw. For easy locating of mounting hole positions, stretch a piece of paper across the mounting holes on the back, rub with a pencil to mark the hole locations, then use paper as a template for drilling holes.
I needed to extend the wires on the laser to make this work - it was relatively easy to unscrew the laser barrel and solder longer wires to the laser's board. There would also be room to splice onto the wires and put the splices inside the laser barrel.
Thread the laser wiring through the hole provided, connect it to the board, then mount the board to the base unit.
There is a hole provided in the bottom of the base for adding an M3 screw to fix the slider in position and prevent it from coming apart accidentally.
To reduce friction, 4mm OD PTFE guides can be screwed and/or glued into the vertical vanes.
# 8 wood screw (2pc) for mounting
M3 x 3mm heatset threaded inserts (3pc)
M3 X 8mm screw (2pc) to mount sensor to back of unit
M3 X 20mm screw (4pc) optional - to attach PTFE guides to bottom.
E6000 adhesive (optional) - for PTFE guides
4mm OD PTFE tubing
paper / pencil.
A redesign of the filastruder sensor holder to make it less likely to snag, more adjustable, and easily wall mountable.
Uses keyhole screw mounts designed for a #8 wood screw. For easy locating of mounting hole positions, stretch a piece of paper across the mounting holes on the back, rub with a pencil to mark the hole locations, then use paper as a template for drilling holes.
I needed to extend the wires on the laser to make this work - it was relatively easy to unscrew the laser barrel and solder longer wires to the laser's board. There would also be room to splice onto the wires and put the splices inside the laser barrel.
Thread the laser wiring through the hole provided, connect it to the board, then mount the board to the base unit.
There is a hole provided in the bottom of the base for adding an M3 screw to fix the slider in position and prevent it from coming apart accidentally.
To reduce friction, 4mm OD PTFE guides can be screwed and/or glued into the vertical vanes.