Thingiverse

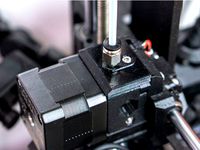
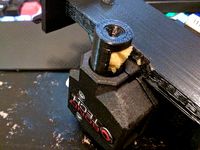
Filament sensor for Prusa i3 mk3, mk3s and Bondtech mod by rosch8
by Thingiverse
Last crawled date: 3 years, 5 months ago
Update 20.10.2020:
After testing i have to change spring. plastic one goes weak in enclosure in higher temperatures.
So I updated design with spring from common office ball pen. It works well i tested it.
So please download newer version v2 of the lever and sensor body. Cover remains the same.
I have enough of false signals from my several Prusa mk3. Mk3s is better but still any 5 stars reliability.
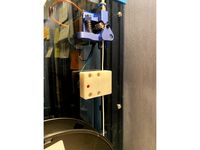
I designed this sensor with just one focus, reliability. It is not pretty, but it works without any false signal.
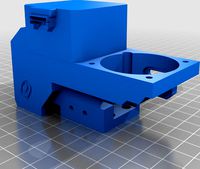
Printing is easy, just lever needs some 2 - 3 mm brim to be printed well.
0,1 mm layer, classic PETG.
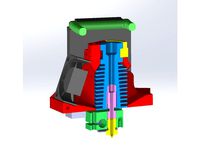
It needs one small ball bearing MR63 (3 x 6 x 2,5 mm) on M3 screw 10- 15 mm.
Then one small piece of bicycle spoke 2 mm diameter for lever hinge.
OMRON SS5GL2 or substitution with 2x M2 x 10 mm screws.
and tapped head screws for cover
2x M3x 6-8 mm.
PTFE tube as filament guide. You need to cut the U shape cut out. Just follow the shape of the sensor body.
Then need some wirings. Connect sided legs of microswitch to the black (GND) and the white (signal out) wire. And 10 k resistor for pull up the output for Rambo input to define HIGH level when switch not triggered.
On the other side, just unplug the connector from Rambo board and move white wire from position 4 to position 5 in DuPont black connector body.
Plug it back to LOWER! row.
Then last step is flash mk3s firmware.
Yes printer give you message on display, that you changed printer type. But you do not worry, everything will work fine.
After testing i have to change spring. plastic one goes weak in enclosure in higher temperatures.
So I updated design with spring from common office ball pen. It works well i tested it.
So please download newer version v2 of the lever and sensor body. Cover remains the same.
I have enough of false signals from my several Prusa mk3. Mk3s is better but still any 5 stars reliability.
I designed this sensor with just one focus, reliability. It is not pretty, but it works without any false signal.
Printing is easy, just lever needs some 2 - 3 mm brim to be printed well.
0,1 mm layer, classic PETG.
It needs one small ball bearing MR63 (3 x 6 x 2,5 mm) on M3 screw 10- 15 mm.
Then one small piece of bicycle spoke 2 mm diameter for lever hinge.
OMRON SS5GL2 or substitution with 2x M2 x 10 mm screws.
and tapped head screws for cover
2x M3x 6-8 mm.
PTFE tube as filament guide. You need to cut the U shape cut out. Just follow the shape of the sensor body.
Then need some wirings. Connect sided legs of microswitch to the black (GND) and the white (signal out) wire. And 10 k resistor for pull up the output for Rambo input to define HIGH level when switch not triggered.
On the other side, just unplug the connector from Rambo board and move white wire from position 4 to position 5 in DuPont black connector body.
Plug it back to LOWER! row.
Then last step is flash mk3s firmware.
Yes printer give you message on display, that you changed printer type. But you do not worry, everything will work fine.
Similar models
thingiverse
free

Prusa MK3S Filament Sensor Lever Upgrade by reelpilot
...ting download all results in a 404 error. in order to download you must select thing files and then download the individual file.
thingiverse
free
Prusa i3 MK3S Bowden Fitting Filament Sensor Cover by Yoonpyo
...k3s that you can screw in a pc4-m5/6/10 fitting. i use this to guide filament from the dry box to the extruder through ptfe tube.
thingiverse
free

Bondtech Prusa MMU2 Sensor and Filament Input
...nt(filing) needed.
update
v2 lever still had a little dragging in the sensor. v3 lever does not have any dragging at this point.
thingiverse
free

Prusa FS-Cover MK3S+ (reworked) by Trierscheid
...or appropriate once you unload the filament. do not let it as it is once it comes out. you will run into troubles, if you do not.
thingiverse
free

Improved Prusa Mk3S MMU2S filament sensor mount by 01chevyguy
...rning the screw. once the adjustment is correct, tighten the fs-cover mounting screw on top.
edit: added photographs of assembly.
thingiverse
free

Prusa MMU2S Bondtech Extruder Adapter by schneian
...nt sensor upside down and mount the adapter on top of it.
you will also need a m3x30 screw and a steel spring of a ballpoint pen.
grabcad
free

Prusa MK3S filament sensor cover
...prusa mk3s filament sensor cover
grabcad
prusa mk3s filament sensor cover bowden m8
thingiverse
free
Ender 6 filament detector by snebragd
...t you need to break off the lever from your original switch. the positive would be that you don't need to do any electronics.
thingiverse
free

CR-10 Filament Sensor for bowden
...de.
you can use the screws of the original creality housing.
you only need a m6 nut to screw the creality m6 pneumatic connector.
thingiverse
free

Geeetech A10 Filament Guide With Ball Bearings 608 by Estep
...rew m4 x 20 mm
3x self-locking nuts m4
6x washers m4
2x screw m3 x 20 mm
2x self-locking nut m3
4x washers m3
3x ball bearing 608
Rosch8
thingiverse
free

Small wind turbine model by rosch8
...ind turbine. it turns in a wind, but not as generator of the electricity. just for fun and to see the wind direction and speed...
thingiverse
free

CR-10 mod cable holder for HOTEND STOCK FAN by rosch8
...h is glued on the top of the hotend fang and holds cables tight with fang.
note: yes, the free end of the strips i already cut...
thingiverse
free

Anti-tangle spool holder remix by rosch8
...y.
and i cut some volume of the cross beam to be able to print it laying down on bed instead of printing it at standing position.
thingiverse
free

Effector for Anycubic Predator with e3d V6 (Volcano too) hotend and 5015 blower by rosch8
...tor:https://www.thingiverse.com/thing:4329200
the best is to print it from asa or abs or pc or any other heat resistant material.
thingiverse
free

Precise filament guide for IKEA LACK enclosure Prusa by rosch8
...al petg.
for installation you need to cut 64 mm (2 1/2 " ) hole on top of the ikea lack table above middle path of filament.
thingiverse
free

Small wind turbine MK2 Remix 2 V tail fin by Stuart800
...oder v-leitwerk. with single or v-tail fin. danke an rosch8 für das tolle windrad! das windrad ist durchdacht konstruiert,...
thingiverse
free

Small wind turbine MK2 windmill by rosch8
...t new design parts. layer 0,16 mm, 6x perimeter. 30% infill. support only wall with angle 15°.
now it has to resist any storm...
thingiverse
free

easy tool for nyloc nut mod for prusa for mk2,5s mk3s, mk3s+ by rosch8
... the bed to one distance . that way your bed will be perfectly flat. i was able to set it in range 0,02 mm. i think it is enough.
thingiverse
free
Anycubic Kossel Linear Plus upgrade hotend E3D V6 effector by rosch8
...ows faster and better prints due to less mass, and more stiff hotend holde, it has better cooling and wires are kept in safe way
Bondtech
thingiverse
free

x5s bondtech
...x5s bondtech
thingiverse
this allow using a bondtech dual drive on x5s machines
thingiverse
free

Bondtech mount by Nicoande99
...bondtech mount by nicoande99
thingiverse
custom bondtech mount for my velleman k8200 3d printer.
thingiverse
free

Trex2+ Bondtech adpter by fong504
...trex2+ bondtech adpter by fong504
thingiverse
bondtech makerbot 2 clone adapter for the trex2+.
thingiverse
free

Bondtech PTFE tube Holder
...bondtech ptfe tube holder
thingiverse
adjusted a bit to fit my bondtech clone.
thingiverse
free
Bondtech DDX by sebbzor
...of the ddx incase you want to build adapters for it. original stepfile can be found on bondtechs website, all credits go to them.
thingiverse
free

Support BONDTECH Anet_A8 By SergioFPV by SergioFPV
...support bondtech anet_a8 by sergiofpv by sergiofpv
thingiverse
support bondtech anet_a8
thingiverse
free

CR-10S-Bondtech-Mosquito_Mount_Bl_Touch by enoblk
...cr-10s-bondtech-mosquito_mount_bl_touch by enoblk
thingiverse
cr-10s-bondtech-mosquitomount-_bl_touch
thingiverse
free

Bondtech Flying mount by Yakandu
...du
thingiverse
lightweight flying extruder mount for the bondtech bmg with design centred around filament path.
this is a remix.
thingiverse
free
Bondtech Oiler by bamhm182
...t a piece of sponge and put it in the hole. oil it up and you're good to go! been using it for a few months with no problems.
thingiverse
free

RatRig V-Core Pro Bondtech Carriage (Prusa MK3S Bondtech Extruder)
...dtech can be mounted 1:1 :)
i have the mk3s with bondtech and mosquito magnum. i'll try out if my ratrig arrives...
have fun!
Mk3S
turbosquid
$50

cention mk3
...ty free 3d model cention mk3 for download as ma, obj, and fbx on turbosquid: 3d models for games, architecture, videos. (1454148)
turbosquid
$129

MK3 Tank
... available on turbo squid, the world's leading provider of digital 3d models for visualization, films, television, and games.
turbosquid
$100

Toyota Supra MK3
... available on turbo squid, the world's leading provider of digital 3d models for visualization, films, television, and games.
turbosquid
$44

cention mk3 low poly
...d model cention mk3 low poly for download as ma, obj, and fbx on turbosquid: 3d models for games, architecture, videos. (1454666)
turbosquid
$30

Challenger I Mk3 Falcon
... available on turbo squid, the world's leading provider of digital 3d models for visualization, films, television, and games.
turbosquid
$10

American Frag hand grenade MK3
...free 3d model american frag hand grenade mk3 for download as on turbosquid: 3d models for games, architecture, videos. (1393624)
turbosquid
$20

Mk3 US Navy Combat Knife
...ty free 3d model mk3 us navy combat knife for download as fbx on turbosquid: 3d models for games, architecture, videos. (1172791)
3d_export
$29

Ford Fiesta MK3 Modified 3D Model
...7 tumerfx mtumer mehmet t?mer 1993 1995 1996 wrc special modifed modifiye
ford fiesta mk3 modified 3d model mtumer 30698 3dexport
3d_export
$99

Toyota Supra Mk3 19861993 3D Model
...ort fast coupe japan 1986 1987 1988 1989 1990 1991 1992 1993 tuning turbo
toyota supra mk3 19861993 3d model squir 62530 3dexport
turbosquid
$5

Timothy Oulton Mars Chair MK3
...on mars chair mk3 for download as 3ds, max, obj, fbx, and dae on turbosquid: 3d models for games, architecture, videos. (1209782)
Mk3
turbosquid
$50
cention mk3
...ty free 3d model cention mk3 for download as ma, obj, and fbx on turbosquid: 3d models for games, architecture, videos. (1454148)
turbosquid
$129
MK3 Tank
... available on turbo squid, the world's leading provider of digital 3d models for visualization, films, television, and games.
turbosquid
$100
Toyota Supra MK3
... available on turbo squid, the world's leading provider of digital 3d models for visualization, films, television, and games.
turbosquid
$44
cention mk3 low poly
...d model cention mk3 low poly for download as ma, obj, and fbx on turbosquid: 3d models for games, architecture, videos. (1454666)
turbosquid
$30
Challenger I Mk3 Falcon
... available on turbo squid, the world's leading provider of digital 3d models for visualization, films, television, and games.
turbosquid
$10
American Frag hand grenade MK3
...free 3d model american frag hand grenade mk3 for download as on turbosquid: 3d models for games, architecture, videos. (1393624)
turbosquid
$20
Mk3 US Navy Combat Knife
...ty free 3d model mk3 us navy combat knife for download as fbx on turbosquid: 3d models for games, architecture, videos. (1172791)
3d_export
$29
Ford Fiesta MK3 Modified 3D Model
...7 tumerfx mtumer mehmet t?mer 1993 1995 1996 wrc special modifed modifiye
ford fiesta mk3 modified 3d model mtumer 30698 3dexport
3d_export
$99
Toyota Supra Mk3 19861993 3D Model
...ort fast coupe japan 1986 1987 1988 1989 1990 1991 1992 1993 tuning turbo
toyota supra mk3 19861993 3d model squir 62530 3dexport
turbosquid
$5
Timothy Oulton Mars Chair MK3
...on mars chair mk3 for download as 3ds, max, obj, fbx, and dae on turbosquid: 3d models for games, architecture, videos. (1209782)
I3
3d_export
$10

suv i3
...suv i3
3dexport
suv i3 2013 series
3d_ocean
$89

BMW i3 2012
...y, in real units of measurement, qualitatively and maximally close to the original. model formats: - *.max (3ds max 2008 scanl...
cg_studio
$99

BMW i3 20143d model
...
cgstudio
.3ds .c4d .fbx .lwo .max .obj - bmw i3 2014 3d model, royalty free license available, instant download after purchase.
cg_studio
$99

BMW i3 20123d model
...tudio
.3ds .c4d .fbx .lwo .max .mb .obj - bmw i3 2012 3d model, royalty free license available, instant download after purchase.
cg_studio
$99

BMW i3 20143d model
...tudio
.3ds .c4d .fbx .lwo .max .mb .obj - bmw i3 2014 3d model, royalty free license available, instant download after purchase.
humster3d
$75

3D model of BMW i3 2014
...
buy a detailed 3d model of bmw i3 2014 in various file formats. all our 3d models were created maximally close to the original.
humster3d
$40

3D model of Kitchen Set I3
...uy a detailed 3d model of kitchen set i3 in various file formats. all our 3d models were created maximally close to the original.
3d_ocean
$30

Kitchen set i3
...ensils oven plates shelves sink table ware
kitchen set i3 include 3d models: cooker, oven, sink, cupboards, table, chair, plates.
3d_ocean
$89

BMW i3 2014
...y, in real units of measurement, qualitatively and maximally close to the original. model formats: - *.max (3ds max 2008 scanl...
cg_studio
$99

BMW i3 Concept 20113d model
...i3
.3ds .c4d .fbx .lwo .max .obj - bmw i3 concept 2011 3d model, royalty free license available, instant download after purchase.
Prusa
turbosquid
$2

Frame Filament Guide Clip-On for Prusa Mk3
...rame filament guide clip-on for prusa mk3 for download as stl on turbosquid: 3d models for games, architecture, videos. (1634730)
3d_export
free

prusa i3 mk3s laser mount for opt lasers
...to learn more about the blue laser technology that conceived the cutting and engraving laser heads from opt lasers, please visit:
turbosquid
free

Prusa small printer adapter holder
...er for download as ipt, skp, dwg, dxf, fbx, ige, obj, and stl on turbosquid: 3d models for games, architecture, videos. (1642936)
3d_export
$30

geisha by jonathan adler
...** i did a 3d printing test in the prusa software, you can find it among the attached images.<br>exchange:<br>.blend...
thingiverse
free

Prusa without Prusa (rc2) by madless
...prusa without prusa (rc2) by madless
thingiverse
just the main part of prusa rc2 faceshield, without writing.
enjoy :)
thingiverse
free

Prusa by acejbc
...prusa by acejbc
thingiverse
prusa knob info
m3 8mm screw
thingiverse
free

Prusa house
...prusa house
thingiverse
how prusa house could look like...
thingiverse
free

Prusa Mk2 "Fake Prusa" LCD cover by anraf1001
...r by anraf1001
thingiverse
version of prusa's lcd cover with "fake prusa" instead of "original prusa"
thingiverse
free

Prusa stabilizator by gutiueugen
...prusa stabilizator by gutiueugen
thingiverse
prusa stabilizator
thingiverse
free

Keychain Prusa by rbarbalho
...keychain prusa by rbarbalho
thingiverse
keychain with text prusa.
Sensor
3d_export
free

parking sensor
...parking sensor
3dexport
car parking sensor
turbosquid
$1

Sensor
... available on turbo squid, the world's leading provider of digital 3d models for visualization, films, television, and games.
3d_export
$5

Smoke sensor
...port
smoke sensor, can be an impressive element for your projects. easy to use, realistic image, low polygon, quality materials.
3d_export
$5

Air Quality Sensor v1
...air quality sensor v1
3dexport
air quality sensor v1
3d_export
$15

float sensor
...e up render. - all parts and materials are logically named. other formats ================= - collada (.dae) - autodesk fbx - obj
turbosquid
$26

Wind sensor C
...free 3d model wind sensor c for download as 3ds, obj, and fbx on turbosquid: 3d models for games, architecture, videos. (1328943)
turbosquid
$26

Wind sensor B
...free 3d model wind sensor b for download as 3ds, obj, and fbx on turbosquid: 3d models for games, architecture, videos. (1328168)
3d_export
$5

ultrasound sensor
...ivers convert ultrasound into electrical signals, and transceivers can both transmit and receive ultrasound. export in: -obj -fbx
3ddd
free

Вытяжка Shindo pallada sensor
... вытяжка
вытяжка shindo pallada sensor. в двух размерах - 600 и 900. текстуры в комплекте.
turbosquid
$52

Wind sensor A B C
...
royalty free 3d model wind sensor a b c for download as fbx on turbosquid: 3d models for games, architecture, videos. (1408406)
Mod
design_connected
$13

MOD. 4233 - MOD. 4234 Table Lamp
...mod. 4233 - mod. 4234 table lamp
designconnected
arcahorn mod. 4233 - mod. 4234 table lamp computer generated 3d model.
design_connected
$11

MOD.1095
...mod.1095
designconnected
mod.1095 computer generated 3d model. designed by sarfatti, gino.
3ddd
$1

fireplaces mod Spec
...fireplaces mod spec
3ddd
камин
fireplaces mod spec 180x90x125h
3ddd
free

Flos Mod. 2129
... mod
фабрика: flos
модель: mod. 2129
описание: подвесной светильник, металл, белый, черный.
сайт: www.flos.com
turbosquid
$34
Mod Lamp.c4d
... available on turbo squid, the world's leading provider of digital 3d models for visualization, films, television, and games.
turbosquid
$32

MOD A 001
... available on turbo squid, the world's leading provider of digital 3d models for visualization, films, television, and games.
turbosquid
$29

Maars Mod
... available on turbo squid, the world's leading provider of digital 3d models for visualization, films, television, and games.
turbosquid
$15

Mod 70..
... available on turbo squid, the world's leading provider of digital 3d models for visualization, films, television, and games.
turbosquid
$10

MOD Sofa
... available on turbo squid, the world's leading provider of digital 3d models for visualization, films, television, and games.
turbosquid
$1

Mod-Lite
... available on turbo squid, the world's leading provider of digital 3d models for visualization, films, television, and games.
Filament
3ddd
$1

Filament Cage
...filament cage
3ddd
лофт , filament cage
модель бра, делалась по фото!
turbosquid
$3

FILAMENT COUNTER
...d
royalty free 3d model filament counter for download as stl on turbosquid: 3d models for games, architecture, videos. (1563049)
3d_export
$5

Filament lamp 3D Model
...filament lamp 3d model
3dexport
filament lamp 3d model kevin 54161 3dexport
3d_export
$5

Filament bulb candle 3D Model
...filament bulb candle 3d model
3dexport
filament bulb-candle
filament bulb candle 3d model kevin 54163 3dexport
3d_export
$5

Filament led light bulb
...filament led light bulb
3dexport
realistic 3d model of filament light bulb with v-ray materials.
3d_export
$5

Filament led light bulb
...filament led light bulb
3dexport
realistic 3d model of filament light bulb with v-ray materials.
3d_export
$5

Filament led light bulb
...filament led light bulb
3dexport
realistic 3d model of filament light bulb with v-ray materials.
3d_export
$5

Filament led light bulb
...filament led light bulb
3dexport
realistic 3d model of filament light bulb with v-ray materials.
3d_export
$5

Filament led light bulb
...filament led light bulb
3dexport
realistic 3d model of filament light bulb with v-ray materials.
3ddd
$1

Factory filament metal shade
...factory filament metal shade
3ddd
restoration hardware
restoration hardware. 20th c. factory filament metal shade.