Thingiverse

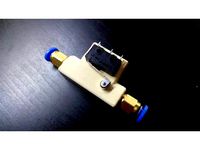
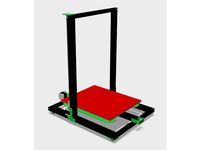
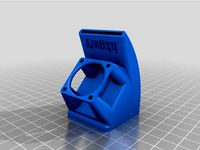
Filament runout sensor for Tevo Tarantula (and others) by corruptfile
by Thingiverse
Last crawled date: 3 years, 1 month ago
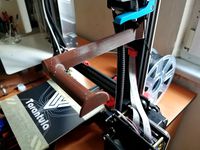
Quick and dirty filament runout sensor. I will be leveraging a RPi3 for this, but there are tutorials on how to wire a runout sensor to the MKS board. This is for 1.75mm filaments only.
For this, you will need:
Raspberry Pi running Octoprint
I am running Marlin 1.1.5. YMMV if you are running something else...
2x M4x10 socket head cap screws
2 M4 T-nuts (like the ones the printer came with) -OR-
2 M4 threaded inserts (I used McMaster-Carr P/N 94510A040
A microswitch. I used an OMRON SS-5GL2T (https://www.amazon.com/ELECTRONIC-COMPONENTS-SS-5GL2T-MICROSWITCH-ROLLER/dp/B011N9VGV8)
2 pieces of 1.75mm filament cut to ~20mm
2 conductor cable
Heatshrink
Female jumper or some other connector to hook up to the GPIO pins
(optional) 2 t-nuts to direct mount this to the frame if desired.
(optional) some sort of connectors for quick disconnection of the cable.
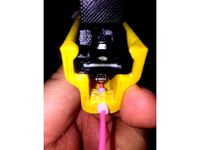
The physical assembly should be straight forward for the assembly. If you are not using the press inserts, you just drop the tnuts in the back of the rear clamshell and tighten up. Might be a good idea to do this before mounting to the printer to allow you to tighten the nut in and have it swage into the plastic. I never used that method so I'm not sure!
Solder one conductor of your cable to the relay COM/GND. The other should be soldered to the NO terminal (you can use the NC terminal too, and just change it in Octoprint). Use heatshrink to protect your connections and offer some strain relief. Place the switch in the housing and use the 2 pieces of filament to secure the switch. Depending on your printer performance, you may need to drill (use a 5/64" bit) it out a tad.
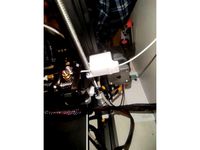
After the assembly is done, you will need to wire it to your RPi. I am using the RPi for remote on/off as well, so I opted to build an enclosure for the relay to live. Also, I used a breadboard with a GPIO extension board for ease of wiring. This is totally optional and you can get away with wiring directly to the GPIO header on the RPi. Connect one conductor (doesn't matter which) to your switching pin (I used Pin 24 (BCM8/CE0) for signal) and the other to a ground pin (pin 20 or 25, for example). Congrats, now you are wired.
In Octoprint, download and install the "Filament Sensor Reloaded" plugin. After it is installed, change the pin to 24 (or whatever one you used), leave debounce at 250ms, leave switch type to Normally Open (unless you wired your switch NC!), select board mode, and deselect "Pause print when out of filament". In custom g-code, add the following:
M600 X0 Y0 Z5
This will start the filament change process (M600) and send the print head to home. Follow the prompts on your LCD to complete the filament change.
No more partial rolls!
For this, you will need:
Raspberry Pi running Octoprint
I am running Marlin 1.1.5. YMMV if you are running something else...
2x M4x10 socket head cap screws
2 M4 T-nuts (like the ones the printer came with) -OR-
2 M4 threaded inserts (I used McMaster-Carr P/N 94510A040
A microswitch. I used an OMRON SS-5GL2T (https://www.amazon.com/ELECTRONIC-COMPONENTS-SS-5GL2T-MICROSWITCH-ROLLER/dp/B011N9VGV8)
2 pieces of 1.75mm filament cut to ~20mm
2 conductor cable
Heatshrink
Female jumper or some other connector to hook up to the GPIO pins
(optional) 2 t-nuts to direct mount this to the frame if desired.
(optional) some sort of connectors for quick disconnection of the cable.
The physical assembly should be straight forward for the assembly. If you are not using the press inserts, you just drop the tnuts in the back of the rear clamshell and tighten up. Might be a good idea to do this before mounting to the printer to allow you to tighten the nut in and have it swage into the plastic. I never used that method so I'm not sure!
Solder one conductor of your cable to the relay COM/GND. The other should be soldered to the NO terminal (you can use the NC terminal too, and just change it in Octoprint). Use heatshrink to protect your connections and offer some strain relief. Place the switch in the housing and use the 2 pieces of filament to secure the switch. Depending on your printer performance, you may need to drill (use a 5/64" bit) it out a tad.
After the assembly is done, you will need to wire it to your RPi. I am using the RPi for remote on/off as well, so I opted to build an enclosure for the relay to live. Also, I used a breadboard with a GPIO extension board for ease of wiring. This is totally optional and you can get away with wiring directly to the GPIO header on the RPi. Connect one conductor (doesn't matter which) to your switching pin (I used Pin 24 (BCM8/CE0) for signal) and the other to a ground pin (pin 20 or 25, for example). Congrats, now you are wired.
In Octoprint, download and install the "Filament Sensor Reloaded" plugin. After it is installed, change the pin to 24 (or whatever one you used), leave debounce at 250ms, leave switch type to Normally Open (unless you wired your switch NC!), select board mode, and deselect "Pause print when out of filament". In custom g-code, add the following:
M600 X0 Y0 Z5
This will start the filament change process (M600) and send the print head to home. Follow the prompts on your LCD to complete the filament change.
No more partial rolls!
Similar models
thingiverse
free
Filament runout sensor for UP Plus 2 by BogdanKecman
...up provided auto bed leveling sensor this part will don't work for you (the actual piece holding microswitch will be missing)
thingiverse
free

Filament Sensor optical sensor Runout Sensor by nosbiker
...up for the plugin.
works with all 1.75 mm filament (you should be able to drill it up to work with 3mm), except transparent ones.
thingiverse
free

Sigma3d Extruder With Filament Runout Sensor by serkanc
...pin
19 for z max pin
in configuration.h enable the filament_runout_sensor, uncomment the first line,
fil_runout_inverting = false
thingiverse
free

Fillament run out sensor by fragmen52
...wden(1.75mm filament) and m3 nut and bolts
using this plugin for octoprint https://github.com/kontakt/octoprint-filament-reloaded
thingiverse
free

Filament runout housing by didymus
...sed with the filament sensor reloaded plugin for octoprint available here: https://github.com/kontakt/octoprint-filament-reloaded
thingiverse
free

Filament runout sensor for CR-10 by HobbitBen
...round to pin 9
octoprint setup
install plug-in "filament sensor reloaded"
set up the plug-in as per the attached image.
thingiverse
free

1.75mm filament runuot switch holder by ffejrxx
...h with arm and no roller
wire switch, print 2 halves, adjust arm to sense filament and smash together around switch
may need glue
thingiverse
free

Filament run out sensor manual switch octoprint plugin filter by brotherchris
...: http://plugins.octoprint.org/plugins/filament_sensor/
new plugin:http://plugins.octoprint.org/plugins/filament_sensor_reloaded/
thingiverse
free

Ender 2 Filament Runout Sensor by DataMouse
...nder 2 with original-board.
the sensor is connected on pin 29 (marlin 1.1.9) which is on the board labled with "check".
thingiverse
free

Direct Drive DIY Filament Runout Sensor (Ender 3 / 3 Pro) by YorkieOl
... sensor' for information on your paticular board..
anyway, i hope this is helpful for otheres and so share it with you here..
Corruptfile
thingiverse
free

Hanging Spool Holder by corruptfile
...thingiverse
print 2 of these to make a hanging spool holder. made for 3/4" pvc pipe (or a ~27mm dia shaft of your choosing.
thingiverse
free

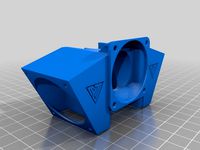
Tevo Tarantula Titan Extruder Riser by corruptfile
...this will bed them in the plastic, securing them). next attach the riser to your frame. lastly, attach the extruder to the riser.
Runout
3d_export
$6
clamping mechanism of heavy workpiece
...load<br>the inertia force at the maximum acceleration of horizontal runout is less than the retraction side thrust of cylinder.<br>selection...
thingiverse
free
Filament runout sensor by TA1AUB
...filament runout sensor by ta1aub
thingiverse
filament runout sensor
thingiverse
free
Runout filament sensor by davidix68
...runout filament sensor by davidix68
thingiverse
ender 3 runout sensor microswitch case
thingiverse
free
runout sensor -bowden by chroja
...runout sensor -bowden by chroja
thingiverse
runout sensor -bowden
v5 optimalize design
thingiverse
free

Filament runout sensor by jos
.../webshop/cartesio-shop/electronics/filament-runout-sensor
for assembly :http://mauk.cc/mediawiki/index.php/filament_runout_sensor
thingiverse
free

Filament runout by pochetto
...y pochetto
thingiverse
easy filament runout.
1 endstop
1 led
nel firmware attivare la funzione di fine filo e assegnare un pin.
thingiverse
free

Filament runout sensor support by 100s99s
...filament runout sensor support by 100s99s
thingiverse
support for filament runout sensor of direct drive.
thingiverse
free

Swivel mount runout sensor by notnyt
...swivel mount runout sensor by notnyt
thingiverse
608 bearing mounted filament runout sensor
thingiverse
free

Filament runout sensor fastener by Cherepok
...filament runout sensor fastener by cherepok
thingiverse
movable adjustable mount for bigtreetech filament runout sensor.
thingiverse
free

Runout gauge for pulley by tom4cad
...runout gauge for pulley by tom4cad
thingiverse
20t pulley with 5 mm bore. measured runout 0,07 mm
edit
tool with 8mm hole added
Tarantula
turbosquid
$5

tarantula
...rbosquid
royalty free 3d model tarantula for download as c4d on turbosquid: 3d models for games, architecture, videos. (1690032)
3d_ocean
$8
Tarantula
...rantula 3d model. perfect for animations or still image. textures psd and jpeg files included. modelled using autodesk maya 2011.
turbosquid
$50

tarantula
... available on turbo squid, the world's leading provider of digital 3d models for visualization, films, television, and games.
turbosquid
$45

Tarantula
... available on turbo squid, the world's leading provider of digital 3d models for visualization, films, television, and games.
turbosquid
$12

Spider black widow tarantula tarantula Insects
... black widow tarantula tarantula insects for download as max on turbosquid: 3d models for games, architecture, videos. (1582101)
3ddd
$1

Журнальный столик - tarantula
... бионика , tarantula
журнальный столик tarantula
h=600
d=2000
3d_export
$35

Tarantula
...: zbrush 3ds max ztool obj fbx dae 3ds stl properties : 20*20*8 production time : 23 hours 328 gram models are drawn with zbrush.
3d_ocean
$20

Tarantula spider
...igged, animated, uv textured. particle system for the fur. very easy to animate. a 250 frames animation is available in the pack.
turbosquid
$45

Tarantula Spider
... available on turbo squid, the world's leading provider of digital 3d models for visualization, films, television, and games.
3d_export
$5

spider tarantula
...spider tarantula
3dexport
3d model of a steppe spider for your ideas and projects.
Tevo
thingiverse
free

TEVO Logo by limwenyao
...verse
tevo logo - for customizing your builds to look cooler with the tevo logo! pdf version is editable with adobe illustrator.
thingiverse
free
Tevo Tornado e3d Tevo Flash Style fan Mount by DemolitionX
...an mount by demolitionx
thingiverse
just messing around and made a tevo flash style fan mount for the e3d v6 on the tevo tornado
thingiverse
free
BODEN TUBE CLAMP FOR TEVO TARANTULA PRO AND TEVO TORNADO
... and tevo tornado
thingiverse
bodwen tube clamp. printable adjustable tension clamp for tevo tarantula pro and tornado extruder.
thingiverse
free
TEVO Tornado Model by JMDesigns
...tevo tornado model by jmdesigns
thingiverse
tevo tornado model
thingiverse
free
Tevo Tarantula FanDuct by hkgary_g
...tevo tarantula fanduct by hkgary_g
thingiverse
fanduct for tevo tarantula
thingiverse
free
FAN TEVO TARANTULA by llprokall
...fan tevo tarantula by llprokall
thingiverse
fan tevo tarantula
thingiverse
free

Tevo Tarantula filament by Xbertus
...tevo tarantula filament by xbertus
thingiverse
suport for filamente tevo tarantula
thingiverse
free
TEVO Top Brackets by _Godoy_
...tevo top brackets by _godoy_
thingiverse
top brackets for tevo tarantula
thingiverse
free
Tevo Tarantula Spool Holder
...tevo tarantula spool holder
thingiverse
strong spool holder for tevo tarantula
thingiverse
free

tevo tarantula spacer by poundskinnyboy
...tevo tarantula spacer by poundskinnyboy
thingiverse
it's a tevo tarantula spacer
Sensor
3d_export
free

parking sensor
...parking sensor
3dexport
car parking sensor
turbosquid
$1

Sensor
... available on turbo squid, the world's leading provider of digital 3d models for visualization, films, television, and games.
3d_export
$5

Smoke sensor
...port
smoke sensor, can be an impressive element for your projects. easy to use, realistic image, low polygon, quality materials.
3d_export
$5

Air Quality Sensor v1
...air quality sensor v1
3dexport
air quality sensor v1
3d_export
$15

float sensor
...e up render. - all parts and materials are logically named. other formats ================= - collada (.dae) - autodesk fbx - obj
turbosquid
$26

Wind sensor C
...free 3d model wind sensor c for download as 3ds, obj, and fbx on turbosquid: 3d models for games, architecture, videos. (1328943)
turbosquid
$26

Wind sensor B
...free 3d model wind sensor b for download as 3ds, obj, and fbx on turbosquid: 3d models for games, architecture, videos. (1328168)
3d_export
$5

ultrasound sensor
...ivers convert ultrasound into electrical signals, and transceivers can both transmit and receive ultrasound. export in: -obj -fbx
3ddd
free

Вытяжка Shindo pallada sensor
... вытяжка
вытяжка shindo pallada sensor. в двух размерах - 600 и 900. текстуры в комплекте.
turbosquid
$52

Wind sensor A B C
...
royalty free 3d model wind sensor a b c for download as fbx on turbosquid: 3d models for games, architecture, videos. (1408406)
Filament
3ddd
$1

Filament Cage
...filament cage
3ddd
лофт , filament cage
модель бра, делалась по фото!
turbosquid
$3

FILAMENT COUNTER
...d
royalty free 3d model filament counter for download as stl on turbosquid: 3d models for games, architecture, videos. (1563049)
3d_export
$5

Filament lamp 3D Model
...filament lamp 3d model
3dexport
filament lamp 3d model kevin 54161 3dexport
3d_export
$5

Filament bulb candle 3D Model
...filament bulb candle 3d model
3dexport
filament bulb-candle
filament bulb candle 3d model kevin 54163 3dexport
3d_export
$5

Filament led light bulb
...filament led light bulb
3dexport
realistic 3d model of filament light bulb with v-ray materials.
3d_export
$5

Filament led light bulb
...filament led light bulb
3dexport
realistic 3d model of filament light bulb with v-ray materials.
3d_export
$5

Filament led light bulb
...filament led light bulb
3dexport
realistic 3d model of filament light bulb with v-ray materials.
3d_export
$5

Filament led light bulb
...filament led light bulb
3dexport
realistic 3d model of filament light bulb with v-ray materials.
3d_export
$5

Filament led light bulb
...filament led light bulb
3dexport
realistic 3d model of filament light bulb with v-ray materials.
3ddd
$1

Factory filament metal shade
...factory filament metal shade
3ddd
restoration hardware
restoration hardware. 20th c. factory filament metal shade.
Others
design_connected
$16

ST12 Other
...signconnected
photo-realistic 3d models of the st12 other stool from e15 for 3d architectural and interior design presentations.
turbosquid
$26

Oar and Other
...quid
royalty free 3d model oar and other for download as fbx on turbosquid: 3d models for games, architecture, videos. (1473409)
turbosquid
$5

chair with other
...id
royalty free 3d model chair with other for download as ma on turbosquid: 3d models for games, architecture, videos. (1171468)
3ddd
$1

parfume and other
...parfume and other
3ddd
тумбочка
create by sametyuzer
turbosquid
$79

The Others Collection
...others collection for download as 3ds, max, obj, fbx, and dae on turbosquid: 3d models for games, architecture, videos. (1480228)
turbosquid
$25

Other Man
... available on turbo squid, the world's leading provider of digital 3d models for visualization, films, television, and games.
turbosquid
$15

other car.max
... available on turbo squid, the world's leading provider of digital 3d models for visualization, films, television, and games.
turbosquid
$2
Other Mothers Hand
... 3d model other mothers hand for download as ma, fbx, and obj on turbosquid: 3d models for games, architecture, videos. (1663825)
turbosquid
$8

other sport wheel
... available on turbo squid, the world's leading provider of digital 3d models for visualization, films, television, and games.
turbosquid
$2

pool and other elements
... available on turbo squid, the world's leading provider of digital 3d models for visualization, films, television, and games.