Thingiverse
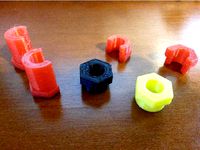
Filament Guide with Jam Sensor by anhtien
by Thingiverse
Last crawled date: 3 years, 1 month ago
There are two annoying situations that can ruin your prints: one is when the filament ran out and the other is when the filament gets jammed up and knotted to the spool. For the first issue, we have the filament out sensor thingy https://www.thingiverse.com/thing:2533511
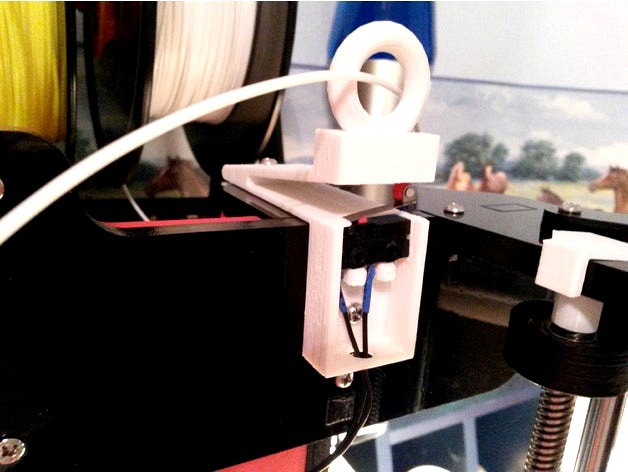
Introducing a new filament guide that can detect jam and act on it. It resources to the roller type stop switch and wiring pi GPIO 2 off the Raspberry Pi as hardware solution.
The Octoprint uses the “Filament Sensor Reloaded” plugin to graciously pause the print to let you change filament but it only supports one sensor. If you only use the Filament Jam sensor (and not the Filament Out sensor), you can read the instruction from the plugin and done.
If you want to use both the Filament Out sensor (GPIO-0) and Filament Jam Sensor (GPI-2) then the solution (while waiting for the new plugin) is to use Raspberry shell script to detect the Filament Jam condition and turn off the printer when it occurs. The script "checkForFilamentJam.sh" was uploaded, all you need to do is download it to the Raspberry Pi. There is a catch, that is how to make the Raspberry Pi turning the printer off? Well, the solution lies in the "Power Supply, Raspberry Pi, Relay Module, Fan Case" thingy https://www.thingiverse.com/thing:2480530, which uses GPIO-1 to turn off / on the printer via a relay module.
YouTube video (https://youtu.be/eZ3a8W54gvE) recorded over 4 minute showing the Filament Jam Sensor in action (sorry I didn't know exactly when it got jammed). It turned the printer off when filament was deliberately jammed by a paper clip. Just skip to about the last minute to see how the Pi handled it.
The video shows the stop switch being "clicked" few times before it "aligned" with the script's 5 second check to turn the printer off. It means the printer was turned off Only when the check at the 5 second interval detected the switch being pressed in that split second (literally). This is to give the RPi few chances to make sure the filament is really jammed before turning the printer off. You can set the check timer down to sleep 1s (for 1 second) if you want the printer off within the first or second click, but the Pi might suffer some performance hit. This Guide can also be used as an extra On/Off switch if you manually hold it down few seconds, no need to reach to the back to turn it off.
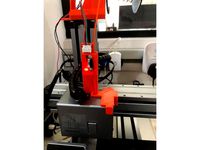
Caution: try the clip approach to make sure your installation works but I am not responsible for any damages to your printer or anything. You can see that the extruder can pull the filament quite hard and dragged the 5 lbs spool holder until it hit the frame. This test was pretty brutal but it reflected the real scenario.
Wiring:
Connect the NO (Normally Open) middle pin of the stop switch to Raspberry Pi pin header 13 (which is GPIO-2 for WiringPi or BCM GPIO-27) if you have the Raspberry Pi Rev B. If you have other version, you can find out which pin header for GPIO-2 or modify the shell script accordingly. Connect the second wire to the C (COM) pin on the stop switch to any ground pin on the Raspberry Pi.
Software:
Download the checkForFilamentJam.sh script to the main /home/pi folder when you login to the Raspberry Pi and enter the following command after it boots:
./checkForFilamentJam.sh &
The script will run in the background and check for the filament jam condition every 5 seconds. If the script does not start, it might be because the copying back and forth make it not executable. If it's the case, just issue the command "chmod +x checkForFilamentJam.sh". When the script detects the jam from GPIO-2, it sends signal to GPIO-1 to turn off printer and exits. You need to resend the command next time around.
Installation:
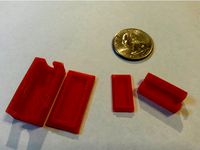
You can reuse the side M3 screw and change the top screw to M3-21mm to attach the filament guide to the top left or top right of the Anet A8 printer.
Printing:
Rotate X axis 270deg to print it upside down, use 50mms speed and 30% infill with support generation.
Introducing a new filament guide that can detect jam and act on it. It resources to the roller type stop switch and wiring pi GPIO 2 off the Raspberry Pi as hardware solution.
The Octoprint uses the “Filament Sensor Reloaded” plugin to graciously pause the print to let you change filament but it only supports one sensor. If you only use the Filament Jam sensor (and not the Filament Out sensor), you can read the instruction from the plugin and done.
If you want to use both the Filament Out sensor (GPIO-0) and Filament Jam Sensor (GPI-2) then the solution (while waiting for the new plugin) is to use Raspberry shell script to detect the Filament Jam condition and turn off the printer when it occurs. The script "checkForFilamentJam.sh" was uploaded, all you need to do is download it to the Raspberry Pi. There is a catch, that is how to make the Raspberry Pi turning the printer off? Well, the solution lies in the "Power Supply, Raspberry Pi, Relay Module, Fan Case" thingy https://www.thingiverse.com/thing:2480530, which uses GPIO-1 to turn off / on the printer via a relay module.
YouTube video (https://youtu.be/eZ3a8W54gvE) recorded over 4 minute showing the Filament Jam Sensor in action (sorry I didn't know exactly when it got jammed). It turned the printer off when filament was deliberately jammed by a paper clip. Just skip to about the last minute to see how the Pi handled it.
The video shows the stop switch being "clicked" few times before it "aligned" with the script's 5 second check to turn the printer off. It means the printer was turned off Only when the check at the 5 second interval detected the switch being pressed in that split second (literally). This is to give the RPi few chances to make sure the filament is really jammed before turning the printer off. You can set the check timer down to sleep 1s (for 1 second) if you want the printer off within the first or second click, but the Pi might suffer some performance hit. This Guide can also be used as an extra On/Off switch if you manually hold it down few seconds, no need to reach to the back to turn it off.
Caution: try the clip approach to make sure your installation works but I am not responsible for any damages to your printer or anything. You can see that the extruder can pull the filament quite hard and dragged the 5 lbs spool holder until it hit the frame. This test was pretty brutal but it reflected the real scenario.
Wiring:
Connect the NO (Normally Open) middle pin of the stop switch to Raspberry Pi pin header 13 (which is GPIO-2 for WiringPi or BCM GPIO-27) if you have the Raspberry Pi Rev B. If you have other version, you can find out which pin header for GPIO-2 or modify the shell script accordingly. Connect the second wire to the C (COM) pin on the stop switch to any ground pin on the Raspberry Pi.
Software:
Download the checkForFilamentJam.sh script to the main /home/pi folder when you login to the Raspberry Pi and enter the following command after it boots:
./checkForFilamentJam.sh &
The script will run in the background and check for the filament jam condition every 5 seconds. If the script does not start, it might be because the copying back and forth make it not executable. If it's the case, just issue the command "chmod +x checkForFilamentJam.sh". When the script detects the jam from GPIO-2, it sends signal to GPIO-1 to turn off printer and exits. You need to resend the command next time around.
Installation:
You can reuse the side M3 screw and change the top screw to M3-21mm to attach the filament guide to the top left or top right of the Anet A8 printer.
Printing:
Rotate X axis 270deg to print it upside down, use 50mms speed and 30% infill with support generation.
Similar models
thingiverse
free

On/Off Button mount for Makerselect v2/wanhao duplicator. by mkanoap
... &
now enjoy turning your printer on and off with the press of a button, while still being able to control it from octoprint.
thingiverse
free
Craftbot filament sensor by rocker_bbert
...aftbot and resume the print on command.
part 3 needs to be clued on part 1. part2 (just a cover) can be scewed with the switches.
thingiverse
free

Cheap and Easy Filament Out Sensor box by anhtien
...is used as example but the clip type is similar first attach the r2l box to the x-carriage adapter...
thingiverse
free
Snapmaker Filament Sensor (makerbot endstop) by Slyph
... "close"
helpful in cases when filament is running low and it might get stuck in the extruder if you leave it running!
thingiverse
free

Runout Sensor Housing by 78tgu271
...of an upper filament guide from swisstoy (https://www.thingiverse.com/thing:3765501/remixes) to fit the runout sensor dimensions.
thingiverse
free

Filament Sensor optical sensor Runout Sensor by nosbiker
...up for the plugin.
works with all 1.75 mm filament (you should be able to drill it up to work with 3mm), except transparent ones.
thingiverse
free

Filament runout sensor for CR-10 by HobbitBen
...round to pin 9
octoprint setup
install plug-in "filament sensor reloaded"
set up the plug-in as per the attached image.
thingiverse
free

Ender 3 / Pro Filament Runout Sensor using Limit Switch by nandogommez
...nterruption to my prints.
note: i recommend that you print in abs.
if you liked my work, maybe you might want to buy me a coffee
thingiverse
free

Filament runout sensor for Ender3 by rdalen
...e from the octoprint mqtt plugin triggers via nodered a sonoff socket to switch off the power of the printer
see demo on youtube
thingiverse
free

Filament run out sensor manual switch octoprint plugin filter by brotherchris
...: http://plugins.octoprint.org/plugins/filament_sensor/
new plugin:http://plugins.octoprint.org/plugins/filament_sensor_reloaded/
Anhtien
thingiverse
free

Tabletop 40mm Fan by anhtien
...y anhtien
thingiverse
this simple 40mm fan frame design comes with 2 flavors, nothing fancy. just clip it to the 12vdc adapter.
thingiverse
free

Android / iPhone stand by anhtien
...t a generic smart phone stand, the slot's width is 19mm. print with 50mms speed and 30% infill, support generation required.
thingiverse
free

Calibration Dice by anhtien
...e roman numerals version.
i printed it using the repetier default setup (60mms speed, 20% infill), 200deg extruder 50deg hot bed.
thingiverse
free

Spaceship Filament / Cable Guide by anhtien
...nt to be another filament guide but i made it large enough to be used as my usb cable guide. it kinda looks like a spaceship :-)
thingiverse
free

Screw Washers / Spacers by anhtien
...u just print the sizes you need.
add a brim of 5mm when printing if required
update1: added v1 with more clearance between copies
thingiverse
free

Big mouth Funnels by anhtien
...to the flask. one is 33mm wide, the other 43mm wide.
they were designed thin to save on filament.
update 1: added a 50mm funnel.
thingiverse
free
Teeny Tiny Boxes by anhtien
... for tight fit, once snapped in you might need a knife or flat screw driver to take those off. they certainly won't fly away.
thingiverse
free

Rod Support for the Spool Holder by anhtien
...erse.com/thing:2512609). this is probably more useful for the long rod holding many spools which might bend due to heavy weight.
thingiverse
free

360w 12vdc Power Supply Cover by anhtien
...upply. the screw holes are for m4 screws but i have #6-32 3/8 screws and nuts and they fit too (5 screws and 2 nuts are needed).
thingiverse
free
T8 threaded rod spacers by anhtien
...s good to snap in the middle of the rod, also comes with the extra long version. the full nut version is for the end of the rod.
Jam
turbosquid
$39

Jam Bottle
...
royalty free 3d model jam bottle for download as ma and obj on turbosquid: 3d models for games, architecture, videos. (1238108)
3d_export
$10

Tostadas and jam
...tostadas and jam
3dexport
turbosquid
$40

Jam Fusion
...lty free 3d model jam fusion for download as ma, obj, and fbx on turbosquid: 3d models for games, architecture, videos. (1472140)
turbosquid
$10

Jam Chairs
... available on turbo squid, the world's leading provider of digital 3d models for visualization, films, television, and games.
turbosquid
free

Log Jam
... available on turbo squid, the world's leading provider of digital 3d models for visualization, films, television, and games.
3d_export
free

pot of jam
...pot of jam
3dexport
subscribe to my youtube channel:
3ddd
$1

Calligaris Jam Stool
... барный
calligaris jam barstool, 3d max file with vray setting, materials included in the scene.
turbosquid
$15

Realistic Jam Tart
...
royalty free 3d model realistic jam tart for download as max on turbosquid: 3d models for games, architecture, videos. (1187021)
3d_ocean
$19

Baked roll with jam
...obj photorealistic roll scanned sweet vray
scanned 3d model of baked roll with jam and white icing. placed on white square plate.
turbosquid
$6

Infographic Traffic Jam
... 3d model infographic traffic jam for download as obj and c4d on turbosquid: 3d models for games, architecture, videos. (1486633)
Sensor
3d_export
free

parking sensor
...parking sensor
3dexport
car parking sensor
turbosquid
$1

Sensor
... available on turbo squid, the world's leading provider of digital 3d models for visualization, films, television, and games.
3d_export
$5

Smoke sensor
...port
smoke sensor, can be an impressive element for your projects. easy to use, realistic image, low polygon, quality materials.
3d_export
$5

Air Quality Sensor v1
...air quality sensor v1
3dexport
air quality sensor v1
3d_export
$15

float sensor
...e up render. - all parts and materials are logically named. other formats ================= - collada (.dae) - autodesk fbx - obj
turbosquid
$26

Wind sensor C
...free 3d model wind sensor c for download as 3ds, obj, and fbx on turbosquid: 3d models for games, architecture, videos. (1328943)
turbosquid
$26

Wind sensor B
...free 3d model wind sensor b for download as 3ds, obj, and fbx on turbosquid: 3d models for games, architecture, videos. (1328168)
3d_export
$5

ultrasound sensor
...ivers convert ultrasound into electrical signals, and transceivers can both transmit and receive ultrasound. export in: -obj -fbx
3ddd
free

Вытяжка Shindo pallada sensor
... вытяжка
вытяжка shindo pallada sensor. в двух размерах - 600 и 900. текстуры в комплекте.
turbosquid
$52

Wind sensor A B C
...
royalty free 3d model wind sensor a b c for download as fbx on turbosquid: 3d models for games, architecture, videos. (1408406)
Guide
turbosquid
$15

Guide drawer
...squid
royalty free 3d model guide drawer for download as dwg on turbosquid: 3d models for games, architecture, videos. (1261387)
turbosquid
$1
Road Guide
... available on turbo squid, the world's leading provider of digital 3d models for visualization, films, television, and games.
archive3d
free

Guide-board 3D Model
...ion sign guide sign
guide-board n170112 - 3d model (*.gsm+*.3ds) for exterior 3d visualization.
turbosquid
$2

soap cutter guide
...
royalty free 3d model soap cutter guide for download as stl on turbosquid: 3d models for games, architecture, videos. (1694030)
turbosquid
$15

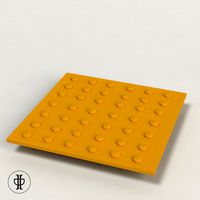
Blind Guiding tiles
...free 3d model blind guiding tiles for download as 3dm and dae on turbosquid: 3d models for games, architecture, videos. (1156598)
turbosquid
$69

Japanese Tour Guide
...d model japanese tour guide for download as max, fbx, and obj on turbosquid: 3d models for games, architecture, videos. (1614288)
turbosquid
$10
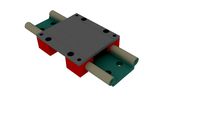
CNC Linear Guide
... available on turbo squid, the world's leading provider of digital 3d models for visualization, films, television, and games.
turbosquid
$1

Tank Model Guide
... available on turbo squid, the world's leading provider of digital 3d models for visualization, films, television, and games.
turbosquid
$1
Road Guide 2
... available on turbo squid, the world's leading provider of digital 3d models for visualization, films, television, and games.
3d_ocean
$9

Guide Books 3
...sformed separately and each have unique texture map on front and back cover. to make your work easier this model comes in thre...
Filament
3ddd
$1

Filament Cage
...filament cage
3ddd
лофт , filament cage
модель бра, делалась по фото!
turbosquid
$3

FILAMENT COUNTER
...d
royalty free 3d model filament counter for download as stl on turbosquid: 3d models for games, architecture, videos. (1563049)
3d_export
$5

Filament lamp 3D Model
...filament lamp 3d model
3dexport
filament lamp 3d model kevin 54161 3dexport
3d_export
$5

Filament bulb candle 3D Model
...filament bulb candle 3d model
3dexport
filament bulb-candle
filament bulb candle 3d model kevin 54163 3dexport
3d_export
$5

Filament led light bulb
...filament led light bulb
3dexport
realistic 3d model of filament light bulb with v-ray materials.
3d_export
$5

Filament led light bulb
...filament led light bulb
3dexport
realistic 3d model of filament light bulb with v-ray materials.
3d_export
$5

Filament led light bulb
...filament led light bulb
3dexport
realistic 3d model of filament light bulb with v-ray materials.
3d_export
$5

Filament led light bulb
...filament led light bulb
3dexport
realistic 3d model of filament light bulb with v-ray materials.
3d_export
$5

Filament led light bulb
...filament led light bulb
3dexport
realistic 3d model of filament light bulb with v-ray materials.
3ddd
$1

Factory filament metal shade
...factory filament metal shade
3ddd
restoration hardware
restoration hardware. 20th c. factory filament metal shade.