Thingiverse

FD-626 - Filament Driver by 3Dmaker4U
by Thingiverse
Last crawled date: 3 years ago
When I received my very first 3D printer kit, which was a RepRapPro Huxley and became Huxy 1 (now you may got a glue of where the name of Huxy is coming from), I was very happy and amazed of various things in the pack. The most exciting was the "extruder driver" - well, I prefer to call it "filament driver", cause that it is :) A very nice piece of engineering, with tiny 623 bearings, though very compact.
After assembling everything and get the first prints the problem appeared. The driver was designed to be mounted on the side of the printer, hence the filament spool would have to stay somewhere on the left of the printer, but there was no way to attach it (the spool) to the printer frame.
So, I thought something has to be done and this was two fold:
place the driver on top of the printer;
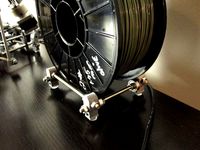
create a spool holder and attach it to the frame, somehow on the backside.
However, while building Huxy 2 and 3, another problem appeared. 623 bearing are not so common, at least here in Romania. So, I decided to compromise a bit the compactness, and went for 626. It was also that the M3 screw that implemented the driving spindle, was somehow too little for such a big duty, and signs of wear appeared at the free end of the thread (due to friction with the inner ring of the bearing.
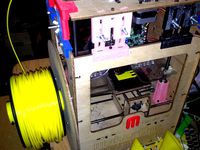
So, this is how FD-626 was born. It's the revision C that you could see in the picture (there is also the spool holder visible, but this will be another thingy story).
Differentiating characteristics:
compactness (there is no significant increase in size due to changing the bearing type)
easy to source parts (particularly 626 is much easier to find than 623, and cheaper most of the times)
more robust driving spindle (M6)
same gear ratio as the original (actually same gear parameter values, except that I preferred exterior teeth for the large gear, so that I can have better grip when having to manually rotate the gear) hence you can directly replace the original without calibrating the feed rate (well, there could be differences produced by the hobbed piece)
directly attachable on the upper transversal rods (the design is for Huxley, but could be easily adapted for other A-framed RepRaps)
easily disengagement of the filament - there are no screws to adjust pressure or to hold the idler, you just press the tensioner and the filament can be pushed of pulled freely (one hand operation of the driver, so the other one can take care of the filament)
NEMA 14 stepper motor, as in the original design; well, not so easy to find a good one, but by far more compact than NEMA 17, you know that ;)
There is one issue I know, but I didn't find it very disturbing: you have to dismantle the driving axle to reach 2 of the 4 motor mounting screws.
Well, that's all coming to my mind for now :)
After assembling everything and get the first prints the problem appeared. The driver was designed to be mounted on the side of the printer, hence the filament spool would have to stay somewhere on the left of the printer, but there was no way to attach it (the spool) to the printer frame.
So, I thought something has to be done and this was two fold:
place the driver on top of the printer;
create a spool holder and attach it to the frame, somehow on the backside.
However, while building Huxy 2 and 3, another problem appeared. 623 bearing are not so common, at least here in Romania. So, I decided to compromise a bit the compactness, and went for 626. It was also that the M3 screw that implemented the driving spindle, was somehow too little for such a big duty, and signs of wear appeared at the free end of the thread (due to friction with the inner ring of the bearing.
So, this is how FD-626 was born. It's the revision C that you could see in the picture (there is also the spool holder visible, but this will be another thingy story).
Differentiating characteristics:
compactness (there is no significant increase in size due to changing the bearing type)
easy to source parts (particularly 626 is much easier to find than 623, and cheaper most of the times)
more robust driving spindle (M6)
same gear ratio as the original (actually same gear parameter values, except that I preferred exterior teeth for the large gear, so that I can have better grip when having to manually rotate the gear) hence you can directly replace the original without calibrating the feed rate (well, there could be differences produced by the hobbed piece)
directly attachable on the upper transversal rods (the design is for Huxley, but could be easily adapted for other A-framed RepRaps)
easily disengagement of the filament - there are no screws to adjust pressure or to hold the idler, you just press the tensioner and the filament can be pushed of pulled freely (one hand operation of the driver, so the other one can take care of the filament)
NEMA 14 stepper motor, as in the original design; well, not so easy to find a good one, but by far more compact than NEMA 17, you know that ;)
There is one issue I know, but I didn't find it very disturbing: you have to dismantle the driving axle to reach 2 of the 4 motor mounting screws.
Well, that's all coming to my mind for now :)
Similar models
thingiverse
free

Huxley Filament Hat by mahtt
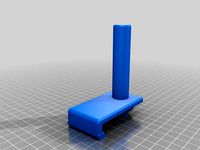
... designed for my reprap huxley. it allows you to sit a spool of filament on top of the z axis motor for a compact spool solution.
thingiverse
free

filament spool holder with 608/623/624/625/626/688zz ball bearing
...pool holder with 608/623/624/625/626/688zz ball bearing
thingiverse
it is a remix of: https://www.thingiverse.com/thing:3459522
thingiverse
free

Filament Roller Support by southbaygsr
...t;roller" that doesn't spin that matches the supports. without bearings, a 1kg spool is dispensed at a reasonable rate.
thingiverse
free
Spindle for Voxel Factory filament spool by techknight
...ide of my printer, and so far it seems to work pretty well.
you'll need some m3 bolts (four of short-ish length) and m3 nuts.
grabcad
free

Dremel 3D Printer Filament Spool Stand
...mple stand for my dremel filaments for storage. the spools spin freely, so the stand could be used to feed the filament as well.
thingiverse
free

Stable Filament Spool Spindle by ottovdv
...rian, part of http://www.thingiverse.com/thing:20968
the zip file contains the stable-spindle scad+ all of the included scad….
thingiverse
free

eMAKER Huxley Extruder Drive by rhys-jones
...ff the hobbed bolt/bearing during a print. this modification supports the filament for longer and hopefully stops this happening.
thingiverse
free

Spinning Filament Spool Holder by andrewchoy
...recommend printing the standard bearing first thing:2883933
only once you get that printed and working should you print the rest.
thingiverse
free
Huxley Spool Holder by bwevans
...r.
this thing operates on the same principle as other four bearing spool holders and is sized for makerbot sized filament spools.
thingiverse
free
Filament spool spindle by bobc896
...n 1lb spools, the spindle should be able to support a 1 kg roll though may require removal of the built in spindle for clearance.
3Dmaker4U
thingiverse
free

Iceman by 3Dmaker4U
...ures:
the great snowflake designed by jonmonaghan
another thing i designed and print for this year end, the stared christmas tree
thingiverse
free

Christmas Tree Bookmark by 3Dmaker4U
...uot; christmas tree bookmark, 6 cm tall, 1 mm thick, that prints well with 0.5 mm nozzle (extrusion width) and 0.25 layer height.
thingiverse
free

Parametric head generator by 3Dmaker4U
...c modelling), and then all the 3d printing stuff (and, of course, finishing and painting!)
now, let's move to instructions!
thingiverse
free

Star Christmas Tree by 3Dmaker4U
...shown also features:
the great snowflake designed by jonmonaghan
another thing i designed and print for this year end, the iceman
thingiverse
free
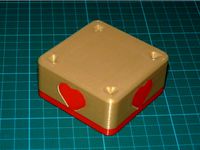
Valentine's Secret Box by 3Dmaker4U
... of whatever metal, 3 mm in diameter and 10 mm long to lock.
sorry, no magnet provided, so be careful not to loose the lockers :)
thingiverse
free

The Huxies Dance by 3Dmaker4U
... http://youtu.be/k-b0hrvgdnm.
it would be nice to see some more printers dancing. maybe we can setup a dancing club for them :)
thingiverse
free

Huxy Pi by 3Dmaker4U
...3 parts (base, mid and top) and needs a pair of spacers, a few screws and some double-sided adhesive tape to assemble everything.
thingiverse
free

Minitronics and fan support by 3Dmaker4U
...dependently attach the minitronics board and the cooling fan to the rods of your reprap, provided the frame is made of 6 mm rods.
thingiverse
free

Wire management clam by 3Dmaker4U
... one wire only!)
you will get quickly in love with this clam thingy. it is designed for 6 mm rods, 'cause that i needed :)
thingiverse
free

Huxy Tab Mx by 3Dmaker4U
...ign of their huxley models, reprappro (the source i used) and emaker, respectively.
i just added 2 clams to support the device.
626
3d_export
$60

Architecture 626 3D Model
...lege campus max street landscape commercial building medical hospital offices
architecture 626 3d model lotusmodel 48763 3dexport
3d_ocean
$89

Mazda 626 (GF) sedan 1998
...y, in real units of measurement, qualitatively and maximally close to the original. model formats: - *.max (3ds max 2008 scanl...
3d_export
$160

3d building 626 3D Model
...metropolis street block detailed definition realistic skyscraper huge collection
3d building 626 3d model kanhtart 44687 3dexport
3d_export
$99

Mazda 626 GF sedan 1998 3D Model
...1997 1998 1999 2000 2001 2002 4-door sedan saloon family japan japanese
mazda 626 gf sedan 1998 3d model humster3d 78372 3dexport
3ddd
$1

LAGUNA cremasco. 626. 2 AP - BRSF
...laguna cremasco. 626. 2 ap - brsf
3ddd
cremasco
code 626 / 2ap - brsf
size l 43 x h 25,5 x sp. 22 cm
e14 2 x 60w
3d_export
$50

3D Home 626 3D Model
... chair furniture texture table lamp apartment rug carpet restaurant hotel sitting
3d home 626 3d model richard3015 46701 3dexport
cg_studio
$99

Mazda 626 (GF) sedan 19983d model
...4d .fbx .lwo .max .mb .obj - mazda 626 (gf) sedan 1998 3d model, royalty free license available, instant download after purchase.
humster3d
$75

3D model of Mazda 626 (GF) sedan 1998
...ed 3d model of mazda 626 (gf) sedan 1998 in various file formats. all our 3d models were created maximally close to the original.
humster3d
$40

3D model of HTC Desire 626 Blue Lagoon
...d 3d model of htc desire 626 blue lagoon in various file formats. all our 3d models were created maximally close to the original.
humster3d
$40

3D model of HTC Desire 626 Purple Fire
...d 3d model of htc desire 626 purple fire in various file formats. all our 3d models were created maximally close to the original.
Fd
3ddd
$1

FD collection
...fd collection
3ddd
dolfi , капитоне
кровать fd collection с материалами и текстурами
3ddd
$1
Sylcom FD AMB
...sylcom fd amb
3ddd
sylcom
классическое бра sylcom fd amb
turbosquid
$125

fd-20
...quid
royalty free 3d model fd-20 for download as max and fbx on turbosquid: 3d models for games, architecture, videos. (1218626)
3ddd
free

Sylcom FD AMB
...sylcom fd amb
3ddd
prrofi , sylcom
классическая люстра sylcom 401/9 fd amb
3d_export
$5

Wheel FD 3D Model
...wheel fd 3d model
3dexport
wheel car-wheel hi-poly disk
wheel fd 3d model felldonya 86165 3dexport
turbosquid
$10

FD Mag Sconce Light
... available on turbo squid, the world's leading provider of digital 3d models for visualization, films, television, and games.
turbosquid
$10

Connubia CB4805-FD 120 Yo Table
... 3d model connubia cb4805-fd 120 yo table for download as max on turbosquid: 3d models for games, architecture, videos. (1650991)
3d_export
$10

fd 109 easy chair
...t;scene units in mm<br>formats: 3ds max 2013, obj, fbx<br>renderer: vray<br>folders with textures and previews
3ddd
$1

Кресло-мешок HENRYTIMI FD 201
... кресло мешок
пуф мешок, дизайн federico delrosso
в сценке 2 одинаковые модели с разными матами.
~ 25000 поликов на кресло.
humster3d
$75
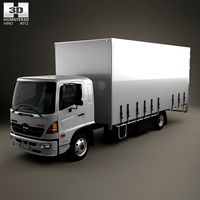
3D model of Hino 500 FD (1027) Load Ace Box Truck 2008
...no 500 fd (1027) load ace box truck 2008 in various file formats. all our 3d models were created maximally close to the original.
Driver
archibase_planet
free

At-At driver
...er
archibase planet
at-at driver pilot soldier imperial army
at-at driver - 3d model (*.gsm+*.3ds) for interior 3d visualization.
3d_export
$5

screw driver
...screw driver
3dexport
small sized screw driver
3d_ocean
$5
Screw Driver
...river industrial machine mechanical screw tool
detailed model of screw driver. all materials are included. model is render ready.
archive3d
free

At-At driver 3D Model
...ilot soldier imperial army
at-at driver - 3d model (*.gsm+*.3ds) for interior 3d visualization.
turbosquid
$60

Street Drivers
...uid
royalty free 3d model street drivers for download as fbx on turbosquid: 3d models for games, architecture, videos. (1211321)
turbosquid
$25

SCREW DRIVERS
...quid
royalty free 3d model screw drivers for download as max on turbosquid: 3d models for games, architecture, videos. (1560558)
turbosquid
$15

DVD driver
...osquid
royalty free 3d model dvd driver for download as max on turbosquid: 3d models for games, architecture, videos. (1237955)
turbosquid
$2
Screw Driver
...squid
royalty free 3d model screw driver for download as max on turbosquid: 3d models for games, architecture, videos. (1208607)
turbosquid
free

Screw driver
...ree 3d model screw driver for download as blend, fbx, and obj on turbosquid: 3d models for games, architecture, videos. (1598537)
turbosquid
$118

Driver Seat
... available on turbo squid, the world's leading provider of digital 3d models for visualization, films, television, and games.
Filament
3ddd
$1

Filament Cage
...filament cage
3ddd
лофт , filament cage
модель бра, делалась по фото!
turbosquid
$3

FILAMENT COUNTER
...d
royalty free 3d model filament counter for download as stl on turbosquid: 3d models for games, architecture, videos. (1563049)
3d_export
$5

Filament lamp 3D Model
...filament lamp 3d model
3dexport
filament lamp 3d model kevin 54161 3dexport
3d_export
$5

Filament bulb candle 3D Model
...filament bulb candle 3d model
3dexport
filament bulb-candle
filament bulb candle 3d model kevin 54163 3dexport
3d_export
$5

Filament led light bulb
...filament led light bulb
3dexport
realistic 3d model of filament light bulb with v-ray materials.
3d_export
$5

Filament led light bulb
...filament led light bulb
3dexport
realistic 3d model of filament light bulb with v-ray materials.
3d_export
$5

Filament led light bulb
...filament led light bulb
3dexport
realistic 3d model of filament light bulb with v-ray materials.
3d_export
$5

Filament led light bulb
...filament led light bulb
3dexport
realistic 3d model of filament light bulb with v-ray materials.
3d_export
$5

Filament led light bulb
...filament led light bulb
3dexport
realistic 3d model of filament light bulb with v-ray materials.
3ddd
$1

Factory filament metal shade
...factory filament metal shade
3ddd
restoration hardware
restoration hardware. 20th c. factory filament metal shade.