Thingiverse
Fast Action Photo Sight by GeoDave
by Thingiverse
Last crawled date: 3 years, 1 month ago
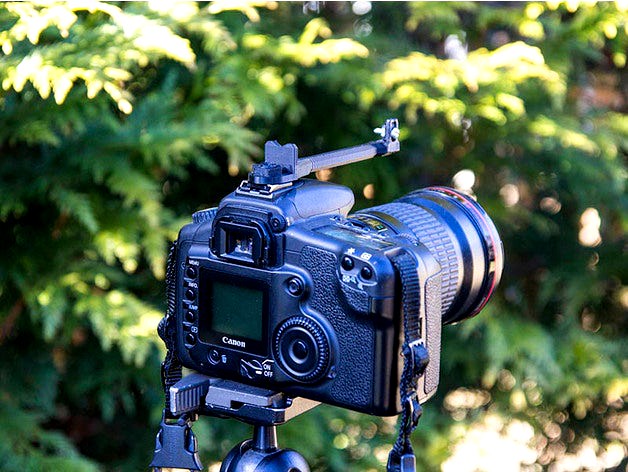
This idea came to me a few years ago when I was taking a lot of photos of birds in flight. While thinking of a better way to follow fast flying birds, I was remembering my teenage years of hunting birds with a shotgun. The idea is borrowed from the open sights on guns. It is a lot easier to follow motion with an open sight rather than a scope which is what the viewfinder on SLR cameras is similar to.
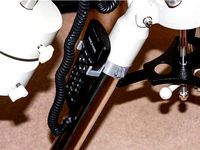
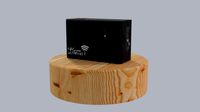
I am using the flash Hot Shoe mount on the camera to mount this sight, so you will not be able to attach a flash to that hot shoe or use a popup flash that SLR's like my Canon 60D have. I measure a 68mm offset between the center line of the lens & the bottom of the attached V-Sight.
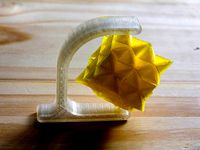
There are basically 3 parts to create this sight, and take 1 to 1.5 hours to print depending on the configuration you print.
The camera mount that slides in the flash Hot Shoe mount
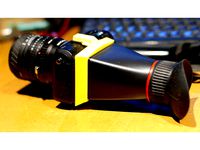
The Barrel with front & rear sights
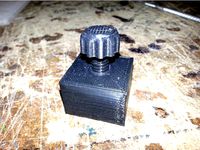
The tightening Nut to tighten the sight down.
Optional: 15mm plastic Wrench to tighten the nut onto the camera mount
(You might still need to use an adjustable wrench to initially get the nut threaded on the camera mount)
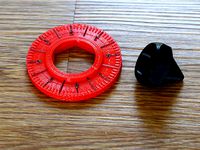
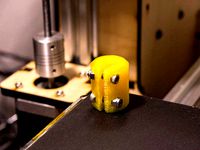
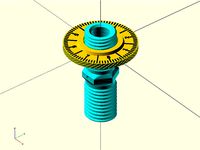
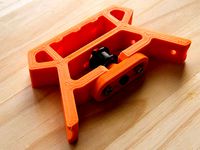
CameraMountAndTightenNut_rev22.scad is the file to create the Camera Mount & tightening Nut. I initially used the Standard M10 screw thread pitch of 1.5, but found 2.5 pitch worked better for my finished print. I used the threads.scad module from http://dkprojects.net/openscad-threads/ to generate the threads. For the tightening nut I scaled it up 15% (1.15) in the X & Y to get the best fit for my printer. I painted the little orange dots using this indoor/outdoor multisurface paint from Walmart. https://www.plaidonline.com/apple-barrel-multi-surface-satin-acrylic-paints-ou/209/21961E/product.htm
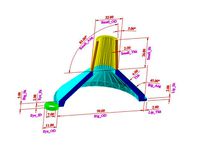
V_Sight_Rev39.scad is the file to create the sighting barrel. This has quite a few variables you can change. The 2 variables that will affect your sighting distance the most which are V_HT (Height of Rear Sight) & Len (Length of Barrel).
There are 3 different Sight types.
SightType = 0; //Simple Bead on the Front of the Sight
SightType = 1; //Drilled for using an inserted sight of your choice. The file FrontSights_Rev1.scad creates sights for this. I print about 12 at a time & choose the best one as some print better than others on my printer. You could also use a piece of 3mm filament if you have it, an M3 screw, cutoff a piece of a nozzle from an air can which is 3mm. There are probably a lot of other things you could find to use. The setscrew I used is a M2.5x10mm, but 8mm length will work.
SightType = 2; //Adjustable Front Side sight. This was my latest idea for the front sight and probably easier to adjust than type 1. You use a machine screw mounted thru the slotted hole & put a jam nut, nut or locknut to hold it at the level you want. If you are using metric hardware, M3 or M2.5 screws with a length of 12mm or more. For imperial sizes, #6x1/2" is probably the easiest to find. #5 or #4 will work if you can find them. The photo shown has a #6x1/2" machine screw and regular nut.
To initially adjust the sight, I would put your camera on a tripod with a lens attached. Attach this V_Sight to your flash shoe, but leave loose enough if you need to rotate it a little left or right. I think the sight should work the same with whatever lens you use. Look thru your viewfinder & the V_Sight to see how close they look & adjust accordingly.
I have included the openscad source files & some sample STL file models. The main V_Sight openscad file I made customizable for 10 of the variables, but there are a few other variables you can change if using the openscad file on your computer.
It might take a little getting use to, but with some practice I think this sight holds promise for getting better fast action shots.
I am using the flash Hot Shoe mount on the camera to mount this sight, so you will not be able to attach a flash to that hot shoe or use a popup flash that SLR's like my Canon 60D have. I measure a 68mm offset between the center line of the lens & the bottom of the attached V-Sight.
There are basically 3 parts to create this sight, and take 1 to 1.5 hours to print depending on the configuration you print.
The camera mount that slides in the flash Hot Shoe mount
The Barrel with front & rear sights
The tightening Nut to tighten the sight down.
Optional: 15mm plastic Wrench to tighten the nut onto the camera mount
(You might still need to use an adjustable wrench to initially get the nut threaded on the camera mount)
CameraMountAndTightenNut_rev22.scad is the file to create the Camera Mount & tightening Nut. I initially used the Standard M10 screw thread pitch of 1.5, but found 2.5 pitch worked better for my finished print. I used the threads.scad module from http://dkprojects.net/openscad-threads/ to generate the threads. For the tightening nut I scaled it up 15% (1.15) in the X & Y to get the best fit for my printer. I painted the little orange dots using this indoor/outdoor multisurface paint from Walmart. https://www.plaidonline.com/apple-barrel-multi-surface-satin-acrylic-paints-ou/209/21961E/product.htm
V_Sight_Rev39.scad is the file to create the sighting barrel. This has quite a few variables you can change. The 2 variables that will affect your sighting distance the most which are V_HT (Height of Rear Sight) & Len (Length of Barrel).
There are 3 different Sight types.
SightType = 0; //Simple Bead on the Front of the Sight
SightType = 1; //Drilled for using an inserted sight of your choice. The file FrontSights_Rev1.scad creates sights for this. I print about 12 at a time & choose the best one as some print better than others on my printer. You could also use a piece of 3mm filament if you have it, an M3 screw, cutoff a piece of a nozzle from an air can which is 3mm. There are probably a lot of other things you could find to use. The setscrew I used is a M2.5x10mm, but 8mm length will work.
SightType = 2; //Adjustable Front Side sight. This was my latest idea for the front sight and probably easier to adjust than type 1. You use a machine screw mounted thru the slotted hole & put a jam nut, nut or locknut to hold it at the level you want. If you are using metric hardware, M3 or M2.5 screws with a length of 12mm or more. For imperial sizes, #6x1/2" is probably the easiest to find. #5 or #4 will work if you can find them. The photo shown has a #6x1/2" machine screw and regular nut.
To initially adjust the sight, I would put your camera on a tripod with a lens attached. Attach this V_Sight to your flash shoe, but leave loose enough if you need to rotate it a little left or right. I think the sight should work the same with whatever lens you use. Look thru your viewfinder & the V_Sight to see how close they look & adjust accordingly.
I have included the openscad source files & some sample STL file models. The main V_Sight openscad file I made customizable for 10 of the variables, but there are a few other variables you can change if using the openscad file on your computer.
It might take a little getting use to, but with some practice I think this sight holds promise for getting better fast action shots.
Similar models
thingiverse
free

iphone camera mount for Makergear M2 - Lockable ball & socket by SCHMENKE
...ed flexibility.
the threads were generated using threads.scad by dan kirshner http://dkprojects.net/openscad-threads/threads.scad
thingiverse
free

Quadcopter camera mount by ericmoritz
...unting tape
files:
cammount.stl: the camera mount
janky.scad: the scad file that contains the models that i use on my quadcopter.
thingiverse
free

Universal flashlight mount - tripod / camera hot shoe by Amatulic
...ns: nuts&bolt baby dexterity toy for the iso screw threads, and camera hot shoe adapter base / cover for the hotshoe adapter.
thingiverse
free
Bolt with knob on top by 63alfred
...m giving the scad file here also so that others can modify as they like.
threads based on http://dkprojects.net/openscad-threads/
thingiverse
free

Adjustable Fpv Camera Mount by MimarFPV
...era mount holes. you can adjust camera angle easily, and tighten with using frame's m2 screw and nut.
my frame is geprc x215
thingiverse
free

Camera Utility Shoe Mounts by Empiricus
... mounts with an m2 screw to secure the microphone/light/flash to the mount.
three versions:
1/4 screw
1/4-20 thread
3/8-16 thread
thingiverse
free
Canon EOS M viewfinder adapter 60x45mm by chunguita
...sily adjusted to other viewfinder sizes.
it uses the flash show mount and tripod screw (screw can be bought for pennies on ebay).
thingiverse
free

Strix AWK210 & RMRC Hellbender Camera Lens Adapter by ProjectBlueFalcon
...hold it in place the camera wont tilt at an angle and will protect the lens threads from being bent. i glue the ring on the lens.
thingiverse
free

Flash Hot Shoe Adapter 90° Tripod by CaptainRoot
...4 screw hole to hot shoe or cold shoe
i use this for mounting my zoom h1 to my video camera in oder to see the display an the led
thingiverse
free

Hot Shoe Flash Mount by ccvh
...sh mount by ccvh
thingiverse
hot shoe flash mount for use with 3mm screws. use this to attach the flash on top of my photobooth.
Geodave
thingiverse
free
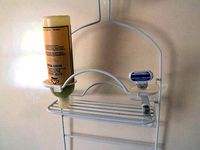
Shower Caddy accessory holder by GeoDave
... upside down on out shower caddy. i did this a few months back, but changed the design recently to make it stay in place better.
thingiverse
free

Wood Bracket with Wire Clip by GeoDave
...be either at 0 or 90 degrees to wood bracket. i included the openscad & dxf files if you want to adjust this to other sizes.
thingiverse
free
Gimbal Spinner by GeoDave
...elow 24mm for the inside width clearance distance or below 54mm for the gimbal distance. i will take a look at fixing that soon.
thingiverse
free
Spinning Top with Thumbwheel by GeoDave
... works.
https://youtu.be/fpaissfvmqm
here is the openscad source file for the thumbwheelhttps://www.thingiverse.com/thing:2407027
thingiverse
free
Parametric Shaft Coupler by GeoDave
... - m3x14mm bolts & locknuts for the 5mm to 5mm that is shown printed in yellow petg.
you can also open this in the customizer
thingiverse
free
Thumbwheel for a Jack Screw by GeoDave
...ese parts, i realized this might make a good spinning top. here is a link to that top. https://www.thingiverse.com/thing:2407034
thingiverse
free
Remix of Meade Autostar holder for LXD75/LX90 mount by GeoDave
... added 1mm extra around the holes.
i used 2 - m3x16mm screws with locknuts & printed at 40% infill with esun silver pla pro.
thingiverse
free
Parametric Tapered Spacer by GeoDave
... the larger diameter against the wheels & they did not roll at all. the 2nd & 3rd photo should show what i mean by this.
thingiverse
free
A Very Customizable Funnel by GeoDave
...gs in the openscad script.
i changed the hook_xx variable names to a more appropriate eye_xx names after a friend mentioned this.
thingiverse
free
Parametric Honeycomb containers by GeoDave
...file to varie the size of them based on 8 variables. since making this, i have made a number of containers for various purposes.
Sight
3d_export
$10

Sight
...sight
3dexport
sight
3d_ocean
$5
Optic Sight
...t sighting device vision
3d model optic sight by alexrazum vray max materials. higtpoly – max,obj,fbx. lowpoly – max,3ds,obj,fbx.
turbosquid
$3

Sight
... available on turbo squid, the world's leading provider of digital 3d models for visualization, films, television, and games.
turbosquid
$1

sight
... available on turbo squid, the world's leading provider of digital 3d models for visualization, films, television, and games.
3d_export
$5
Sight 3D Model
...sight 3d model
3dexport
sight
sight 3d model strelok00000 59460 3dexport
turbosquid
$10

Sighting scopes
...id
royalty free 3d model sighting scopes for download as dae on turbosquid: 3d models for games, architecture, videos. (1504230)
turbosquid
$1

Sight Glass
...quid
royalty free 3d model sight glass for download as sldpr on turbosquid: 3d models for games, architecture, videos. (1274472)
turbosquid
$9

weapon sight
...ree 3d model weapon sight for download as blend, obj, and fbx on turbosquid: 3d models for games, architecture, videos. (1709288)
turbosquid
$13

Sighting Telescope
...del sighting telescope for download as 3ds, obj, c4d, and fbx on turbosquid: 3d models for games, architecture, videos. (1189172)
turbosquid
$1

Reflex sight
... 3d model reflex sight for download as 3ds, max, obj, and fbx on turbosquid: 3d models for games, architecture, videos. (1315574)
Action
turbosquid
$5

Action Camera
...id
royalty free 3d model action camera for download as blend on turbosquid: 3d models for games, architecture, videos. (1673223)
turbosquid
$30

Action Hero
...royalty free 3d model action hero for download as obj and fbx on turbosquid: 3d models for games, architecture, videos. (1181694)
turbosquid
$6
Action Game
... available on turbo squid, the world's leading provider of digital 3d models for visualization, films, television, and games.
3ddd
free
triple action carabineer 2
...er 2
3ddd
triple action carabineer , карабин
triple action carabineer for safe climbing.
3d_export
$5
action camera
...els. but in general, the model is not bad enough, and if you use it correctly, then i'm sure your models will be very cool :)
3d_export
$5

300 bolt action rifle
...300 bolt action rifle
3dexport
300 bolt action rifle
3d_export
$7

woodstranding action figurine
...woodstranding action figurine
3dexport
turbosquid
$129
Lever Action Rifle
...
royalty free 3d model lever action rifle for download as obj on turbosquid: 3d models for games, architecture, videos. (1327623)
turbosquid
$10

Ricoh action camera
...royalty free 3d model ricoh action camera for download as fbx on turbosquid: 3d models for games, architecture, videos. (1421494)
turbosquid
$7
Pump Action Shotgun
...royalty free 3d model pump action shotgun for download as fbx on turbosquid: 3d models for games, architecture, videos. (1419882)
Fast
3d_export
$5

toilet fast
...toilet fast
3dexport
fast model toilet.<br>verts 21472<br>faces 21616
turbosquid
$13

fast food
...royalty free 3d model fast food for download as blend and fbx on turbosquid: 3d models for games, architecture, videos. (1685616)
3ddd
free

rosenthal / Fast vase
...rosenthal / fast vase
3ddd
rosenthal
rosenthal fast vase
turbosquid
$20
Fast Food
...free 3d model fast food for download as ma, max, obj, and fbx on turbosquid: 3d models for games, architecture, videos. (1427379)
turbosquid
$65
table(fast)
... available on turbo squid, the world's leading provider of digital 3d models for visualization, films, television, and games.
turbosquid
$30

Fast Food
... available on turbo squid, the world's leading provider of digital 3d models for visualization, films, television, and games.
turbosquid
$20

fast food
... available on turbo squid, the world's leading provider of digital 3d models for visualization, films, television, and games.
turbosquid
$2
Fast Food
... available on turbo squid, the world's leading provider of digital 3d models for visualization, films, television, and games.
3d_export
$15
Fast table 3D Model
...fast table 3d model
3dexport
fast table
fast table 3d model modelix 59114 3dexport
turbosquid
free

Fast Food Cup
...turbosquid
free 3d model fast food cup for download as blend on turbosquid: 3d models for games, architecture, videos. (1206378)
Photo
3ddd
$1

photo frame
...photo frame
3ddd
photo frame
3ddd
$1

Photo Frame
...photo frame
3ddd
рисунок
photo frame
3d_export
$5

photo frame
...or photos, pictures. you can put shes anywhere. in the kitchen, on the table in the bedroom, on the shelf in the hall, and so on.
archive3d
free
Photos 3D Model
...tos photo photos set
set photos n160216 - 3d model (*.gsm+*.3ds) for interior 3d visualization.
3d_export
$5
Photo 3D Model
...photo 3d model
3dexport
photo
photo 3d model max140588 62242 3dexport
3d_export
$14

photo printer
...g projects, and was originally modeled in 3ds max 2012 and rendered with v-ray. renders have no postprocessing. hope you like it!
turbosquid
$10

photo frame
...osquid
royalty free 3d model photo frame for download as obj on turbosquid: 3d models for games, architecture, videos. (1404417)
turbosquid
$9

Photo studio
...uid
royalty free 3d model photo studio for download as blend on turbosquid: 3d models for games, architecture, videos. (1498830)
turbosquid
$5

Photo Frame
...royalty free 3d model photo frame for download as fbx and upk on turbosquid: 3d models for games, architecture, videos. (1163533)
turbosquid
$2

Photo Frame
...royalty free 3d model photo frame for download as max and fbx on turbosquid: 3d models for games, architecture, videos. (1352878)