Thingiverse

Fanduct Delta Printer by Junior_Designs
by Thingiverse
Last crawled date: 3 years, 1 month ago
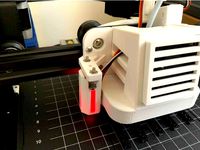
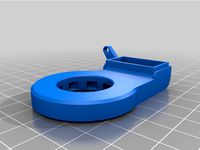
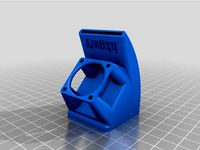
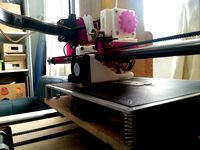
This is a fanduct for Delta Printers, it is compact yet still gets enough airflow to the printing area. All of the designs are for the volcano hotend. As I bought alu parts for my printer to convert all plastic molded parts I came to a hold when I didn't find a compact fanduct that would be easy to mount on the alu parts without getting in the way of the travelling area. I still wanted or atleast was trying to find a fanduct that would blow air around 360° so I came up with my own design. As I use a BLTouch I made a copy with the appropriate mount for it as wel. (One that can be adjusted and one that can't)
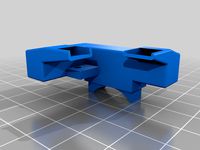
There are 3 designs :
-360° fanduct with regular 404010mm fan
-360° fanduct with 404010mm turbo fan
-Fang fanduct with 404010mm turbo fan
Best use Noctua Fans for the regular fanducts, for the turbo fan I used is this one : https://www.aliexpress.com/item/Gdstime-40mm-x-40mm-x-10mm-4cm-DC-12V-2Pin-Brushless-Turbo-Blower-Fan-For-3D/32800602260.html?spm=2114.01010208.3.84.0m912B&ws_ab_test=searchweb0_0,searchweb201602_5_10152_10065_10151_10068_436_10136_10137_10157_10060_10138_10155_10062_10156_10154_10056_10055_10054_10059_10099_10103_10102_10096_10147_10052_10053_10142_10107_10050_10051_10084_10083_10080_10082_10081_10177_10110_10111_10112_10113_10114_10181_10183_10182_10185_10078_10079_10073_10070_10123,searchweb201603_2,ppcSwitch_5&btsid=c33daa72-ec75-4b4a-b957-a20736f3d14f&algo_expid=91aec55e-e0d7-4015-ad02-891773214216-11&algo_pvid=91aec55e-e0d7-4015-ad02-891773214216
The bridges of the part will need supports, however DO NOT USE supports inside the fanduct. You won't be able to get them cleaned up and the fanduct won't be effective anymore then.
The Adjustable BLTouch Mounts work with springs, for the Turbofan I used one big spring and a long M3 Bolt. The M3 Bolt head goes in the slot between the pillars for the BLTouch mount with the threads facing up, the spring goes on the M3 Bolt. Then slide the mount on the bolt and put a nut on top to keep it in place and to adjust height. Pictures on how it's assembled will follow shortly once I have mine all set up.
Little sidenote : I suggest you slow down your printing speed and make sure to either lower extruding temperature a bit or decent part cooling. The fanduct has small surfaces to print in it and not having any cooling, printing to fast or extruding temperature to hot might result in the small surfaces not sticking well and they will end up draging around with the hotend instead of actually sticking together. (This was a lesson I learned after trying a few times)
The Fan Intake is mainly used to create more air suction for the turbo fan. As I noticed it increases a lot of the air comming out of the fanduct compared to without the fan intake.
I print all my printer parts with 40% infill because my printed is in a heated enclosure, therefore I want as much strenght in my parts as possible. But I tested it with 10% and it works just fine to.
Similar models
thingiverse
free

E3D v6 fanduct with 40x40 hotend fan by vdwel
...t for the bltouch sensor.
the x carriage in this design is for the tevo tarantula, but the fanduct is universal for all printers.
thingiverse
free

Titan Extruder mount for V-Slot mini Gantry by ssombra
...crews to attach the fan mount and the extruder lid (m3 35mm). regarding the bltouch mount, i used m3 screws and m3 brass inserts.
thingiverse
free

Delta dual extruder mount and platform by Bigfella
...ve it fully functional on my printer. i will be making some mods in the future. like hotend adjustment and fan for cooling print.
thingiverse
free

Tevo Tarantula fanDuct by hafidz
...nd.
bullduct 06 have large gap on the 30 mm fan intake
sorry if you print older version and can't cutoff the 30 mm fan intake
thingiverse
free

BLtouch mount for DBot CoreXY by robohead456
...djust the spacing between the nozzle and the bed, tighten the bolts. this forces the washer to deform the printed piece slightly.
thingiverse
free

Hotend Bracket for E3D Volcano and BLTouch (to suit Geeetech printers & Clones) by Celcius1
...y laid out to print in the center of the bed, in abs. and with the correct print settings.
have fun with the new hot end bracket
thingiverse
free
BLTouch mount for Satsana Duct by giahuy2201
... my satsana duct, so i designed this extension to mount my bltouch.
i used a spare m3 bolt from the stock fan shroud to mount it.
thingiverse
free

Sapphire Plus E3D Volcano hotend upgrade kit by auroratechchannel
...part cooling fans)
m3*8mm x2 (bltouch adjustable height plate)
m3 hex nuts x6
aurora tech channelhttp://youtube.com/c/auroratech
thingiverse
free

BLTouch mount for Anycubic i3 Ultrabase by hamop
...e bltouch. i printed mine in abs as it's quite near to the hotend.
on my printer, z offset it around -2.3 mm with this mount.
thingiverse
free

40mm E3Dv6 Clone Intake by alieneila
...sed by the air intake doesn't go towards the hot bed.
am using an anet a8 with an e3dv6 clone hotend and the stock 40mm fan.
Fanduct
thingiverse
free
jgmaker magic fanduct
...jgmaker magic fanduct
thingiverse
jgmaker magic fanduct
thingiverse
free
Ultimaker fanduct by Gijs
...ultimaker fanduct by gijs
thingiverse
replacement fanduct for ultimaker stock fan.
thingiverse
free

50mm Fanduct by NitroXpress
...50mm fanduct by nitroxpress
thingiverse
fanduct for 50mm fan.
85mm long
print without support.
thingiverse
free

Minimalist Fanduct
...esigned this new fanduct to be more minimalist.
also i'm using this fanguard:https://www.thingiverse.com/thing:1691426
thanks
thingiverse
free

BigBooster FanDuct by PHROZENOne
...bigbooster fanduct by phrozenone
thingiverse
big booster fanduct for 35x35 radial part fans and 40x40 hotendfan
thingiverse
free
Fanduct for chimera by StikkaDesign
...thingiverse
a simply fanduct for chimera (configuration with the rotating heating blocks - resistance and thermistor in lateral)
thingiverse
free
Geeetech A10 Fanduct by stefan177gr
...geeetech a10 fanduct by stefan177gr
thingiverse
fanduct for geeetech a10
thingiverse
free
Tevo Tarantula FanDuct by hkgary_g
...tevo tarantula fanduct by hkgary_g
thingiverse
fanduct for tevo tarantula
thingiverse
free
Mendel90 40mm Fanduct by sivar2311
...mendel90 40mm fanduct by sivar2311
thingiverse
40mm fanduct for mendel90.
thingiverse
free
Artillery Genius Hotend Fanduct
...artillery genius hotend fanduct
thingiverse
it is a fanduct for the artillery genius.
Junior
3ddd
$1

Scandia Junior
...scandia junior
3ddd
scandia , junior
scandia junior
design_connected
$13

Scandia Junior
...scandia junior
designconnected
fjordfiesta.furniture scandia junior computer generated 3d model. designed by brattrud, hans.
3ddd
$1
ARRI 150 Junior
... junior
высокополигональная модель источника света arri 150 junior, студийное освещение.
3ddd
free

Leander / Junior bed
... дания
кровать junior bed, leander (дания)
размеры, мм: 1500х700х495http://www.leander.com/produkter/junior-bed
turbosquid
$12
Deathwing (Junior)
...3d model deathwing (junior) for download as obj, c4d, and fbx on turbosquid: 3d models for games, architecture, videos. (1259098)
3d_export
free

disney junior cartoon text
...disney junior cartoon text
3dexport
maya model disney junior cartoon text
turbosquid
$30

Belle Epoque Junior
...royalty free 3d model belle epoque junior for download as skp on turbosquid: 3d models for games, architecture, videos. (1475562)
3ddd
free
Alfa Romeo GT 1300 Junior
... gt , junior , машина
alfa romeo gt 1300 junior
turbosquid
$20

Junior with skateboard 0795
...h skateboard 0795 for download as max, fbx, wrl, obj, and stl on turbosquid: 3d models for games, architecture, videos. (1709242)
turbosquid
$16

Leander Junior Bed
... available on turbo squid, the world's leading provider of digital 3d models for visualization, films, television, and games.
Delta
design_connected
$16

Delta
...delta
designconnected
arflex international spa delta computer generated 3d model. designed by koivisto, eero.
design_connected
$16

Delta
...delta
designconnected
lj lamps delta computer generated 3d model. designed by janowski-lenhart, sasha.
design_connected
$13

Delta
...delta
designconnected
emu group delta armchairs computer generated 3d model. designed by marin chiaramonte .
3ddd
$1

Delta Light
...delta light
3ddd
delta light , you-turn reo 3033
точечний светильник delta light
3ddd
$1
Blanco / delta
...blanco / delta
3ddd
blanco , мойка
мойка blanco delta со смесителем
3ddd
$1
Delta Light Spot
...delta light spot
3ddd
delta light
светильник фирмы delta light
3ddd
free
Bianchi Delta LVMDLT200100
...i delta lvmdlt200100
3ddd
bianchi delta , смеситель
смеситель bianchi delta lvmdlt200100
design_connected
free

Delta 190
...delta 190
designconnected
free 3d model of delta 190 by zanotta designed by progetti, emaf.
design_connected
$27
Delta 211
...delta 211
designconnected
zanotta delta 211 computer generated 3d model. designed by progetti, emaf.
design_connected
$27

Delta 234
...delta 234
designconnected
zanotta delta 234 computer generated 3d model. designed by progetti, emaf.
Printer
archibase_planet
free

Printer
...inter
archibase planet
printer laser printer pc equipment
printer n120614 - 3d model (*.gsm+*.3ds) for interior 3d visualization.
archibase_planet
free

Printer
...rchibase planet
laser printer office equipment computer equipment
printer - 3d model (*.gsm+*.3ds) for interior 3d visualization.
turbosquid
$100

Printer
...er
turbosquid
royalty free 3d model printer for download as on turbosquid: 3d models for games, architecture, videos. (1487819)
turbosquid
$3

Printer
...turbosquid
royalty free 3d model printer for download as max on turbosquid: 3d models for games, architecture, videos. (1670230)
turbosquid
$1

printer
...turbosquid
royalty free 3d model printer for download as max on turbosquid: 3d models for games, architecture, videos. (1595546)
turbosquid
$1

printer
...turbosquid
royalty free 3d model printer for download as max on turbosquid: 3d models for games, architecture, videos. (1595105)
turbosquid
$10

Printer
...id
royalty free 3d model printer for download as max and 3dm on turbosquid: 3d models for games, architecture, videos. (1607146)
turbosquid
$7

Printer
...royalty free 3d model printer for download as ma, ma, and obj on turbosquid: 3d models for games, architecture, videos. (1644580)
turbosquid
$30

Printer
... available on turbo squid, the world's leading provider of digital 3d models for visualization, films, television, and games.
turbosquid
$20

Printer
... available on turbo squid, the world's leading provider of digital 3d models for visualization, films, television, and games.
Designs
3ddd
$1
LINE DESIGN (Doors Design)
...line design (doors design)
3ddd
дверь
modern doors design - line design concept
turbosquid
$5

designer
...alty free 3d model designer for download as max, obj, and fbx on turbosquid: 3d models for games, architecture, videos. (1422665)
3ddd
$1

VER DESIGN
...ver design
3ddd
ver design
кресло ver design
3ddd
$1

VER DESIGN
...ver design
3ddd
ver design
диван ver design
3ddd
$1
Bagno design
...bagno design
3ddd
bagno design , унитаз
санитария bagno design
3ddd
free
VER DESIGN
...ver design
3ddd
ver design , стеллаж
полка ver design
3ddd
$1
VER DESIGN
...ver design , лежак , шезлонг
шезлонг ver design
3d_export
free

designer
..., trees and much more. the model has 3 types of parts: - 4 cells - 6 cells - 8 cells the *.max file contains 5 colored materials.
3d_export
$19

level design
...level design
3dexport
you can use this design (level design) in your own game.
3d_export
$7
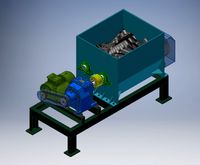
Crusher design
...crusher design
3dexport
crusher design