Thingiverse
Fan Shroud for MicroSwiss Direct Drive Extruder on Ender 5 Plus by GiulianoM
by Thingiverse
Last crawled date: 3 years, 3 months ago
Summary
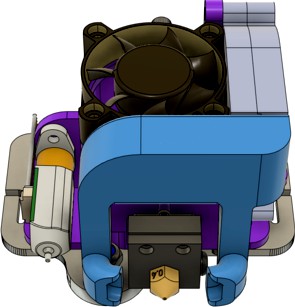
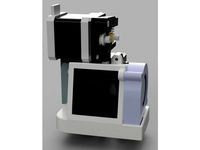
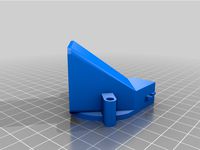
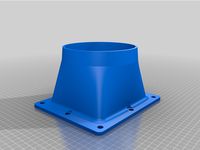
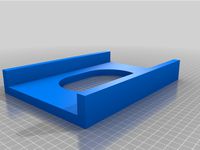
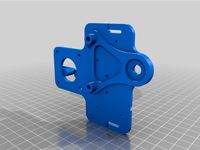
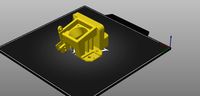
This is a fan shroud housing to fit the new MicroSwiss Direct Drive Extruder plate for the Ender 5 Plus.
It is designed to fit the MicroSwiss Direct Drive plate for the Ender 5 Plus, as shown in this model:
https://www.thingiverse.com/thing:4563691
You might be able to fit it on the narrower original MicroSwiss Direct Drive plate, but it's shaped differently and may cause problems.
Holds:
1 x 4010 Fan for Hotend Cooling
1 x 5015 Blower Fan for Parts Cooling
1 x BLTouch
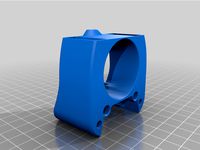
1 x Dual-Port Parts Cooling Fan Duct
Hardware required:
2 x M3 10mm screws. for the screws in the left side of the plate.
3 x M3 6mm screws, for the screws in the right side of the plate.
2 x M4 20mm screw for the 5015 fan holes.
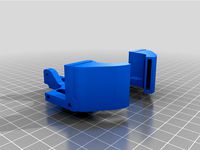
Both the fan shroud and parts cooling duct are complete.
The parts cooling duct is probably best printed out of ABS due to its higher temperature resistance.
I printed it out earlier in PETG which did work, but it warped from the heat over time.
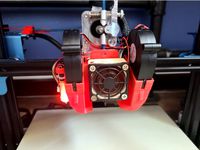
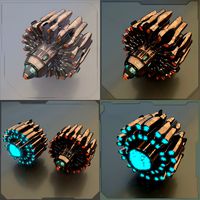
The blue version in the pictures was the PETG, the red version is in ABS.
The Fan Shroud can be printed out of PLA or PETG or ABS.
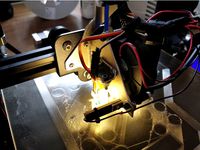
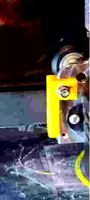
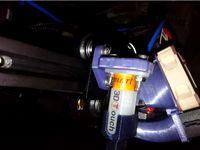
To best fit the wires around the parts cooling duct, gently bend them up in a Z-fold fashion as shown in the last few pictures.
They should fit fine in between the blower fan and the parts cooling duct's arm.
BLTouch Probe Offset:
X -32.000 mm
Y -8.495 mm
The tip of the probe when not deployed is 3.381 mm above the nozzle, you will have to adjust and find the new Z offset yourself as it can vary.
NOTE ON THE FAN SHROUD
The center hole in the fan shroud has a thin 0
2mm bridge layer built in, to print without supports.
It is not a mistake!
Print it out and then cut out the hole with a knife.
Update 8/13/2020
Updated the Parts Cooling Duct to clear the locknut for the lower wheel.
Update 8/15/2020
Both parts have been updated with minor modifications, to fix the fit of the 5015 fan and the fit of the parts cooling duct into the fan.
Parts cooling duct now has a sturdier mounting flange, and matching reinforced holes to screw M3 screws into.
Update 8/20/2020, Part 1
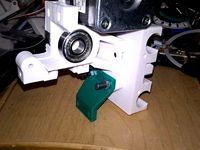
Added pictures of the shroud in place, with the parts fan cooling duct installed.
Discovered that the parts cooling duct nozzles are right up against the heat block, making them a bit soft if the blower fan is off.
I tested with the hotend at 250C, and the PETG plastic around the nozzles was soft, but firmed up if the parts cooling blower fan was on.
I will adjust the angle and length of the ducts to compensate.
Also, the grub screw in the heatsink is blocked by the lower edge of the fan shroud.
I will also make adjustments there so the grub screw can be accessed from underneath.
Update 8/20/2020, Part 2
Both the shroud and the parts cooling duct parts have been updated.
Shroud now has a thicker wire retention tab, with slots for zip ties.
Parts cooling fan now has curved nozzles to clear the hot end block.
Update 8/20/2020, Part 3
Adjusted the height of the mounting flange on the Fan Shroud for the BLTouch, found it to be too high, causing the nozzle to touch the plate.
Increased the thickness by 3mm.
Update 8/21/2020
Shortened the height of the nozzles on the parts cooling duct by about 0.5mm, they were too tall and hit the Z-column rod brackets.
If you've already printed it, just carve off a little bit off the bottom of the nozzle to clear the bracket on the right side.
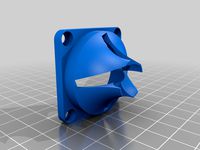
Update 8/29/2020
I updated the design of the Fan Shroud part so that it can be printed without supports!
The fan holes in the front now have a 0.2mm bridge to support the holes, just cut them out with a knife.
This requires good bridging capability, but otherwise should be fine.
Update 8/30/2020
Printing the fan shroud, I encountered an issue with the nozzle colliding with the part at 40mm height, or layer 201, where it goes to do the bridge layer across the top.
If you run into this, the setting that will fix this issue is called "Avoid crossing perimeters" in Print Settings, Layers and Perimiters in PrusaSlicer. Cura probably has something like it as well.
Also, under Infill, I recommend setting the Bridging Angle to be 180 so that the bridge goes horizontally across the X axis.
Otherwise the fan shroud printed great in PLA.
This is a fan shroud housing to fit the new MicroSwiss Direct Drive Extruder plate for the Ender 5 Plus.
It is designed to fit the MicroSwiss Direct Drive plate for the Ender 5 Plus, as shown in this model:
https://www.thingiverse.com/thing:4563691
You might be able to fit it on the narrower original MicroSwiss Direct Drive plate, but it's shaped differently and may cause problems.
Holds:
1 x 4010 Fan for Hotend Cooling
1 x 5015 Blower Fan for Parts Cooling
1 x BLTouch
1 x Dual-Port Parts Cooling Fan Duct
Hardware required:
2 x M3 10mm screws. for the screws in the left side of the plate.
3 x M3 6mm screws, for the screws in the right side of the plate.
2 x M4 20mm screw for the 5015 fan holes.
Both the fan shroud and parts cooling duct are complete.
The parts cooling duct is probably best printed out of ABS due to its higher temperature resistance.
I printed it out earlier in PETG which did work, but it warped from the heat over time.
The blue version in the pictures was the PETG, the red version is in ABS.
The Fan Shroud can be printed out of PLA or PETG or ABS.
To best fit the wires around the parts cooling duct, gently bend them up in a Z-fold fashion as shown in the last few pictures.
They should fit fine in between the blower fan and the parts cooling duct's arm.
BLTouch Probe Offset:
X -32.000 mm
Y -8.495 mm
The tip of the probe when not deployed is 3.381 mm above the nozzle, you will have to adjust and find the new Z offset yourself as it can vary.
NOTE ON THE FAN SHROUD
The center hole in the fan shroud has a thin 0
2mm bridge layer built in, to print without supports.
It is not a mistake!
Print it out and then cut out the hole with a knife.
Update 8/13/2020
Updated the Parts Cooling Duct to clear the locknut for the lower wheel.
Update 8/15/2020
Both parts have been updated with minor modifications, to fix the fit of the 5015 fan and the fit of the parts cooling duct into the fan.
Parts cooling duct now has a sturdier mounting flange, and matching reinforced holes to screw M3 screws into.
Update 8/20/2020, Part 1
Added pictures of the shroud in place, with the parts fan cooling duct installed.
Discovered that the parts cooling duct nozzles are right up against the heat block, making them a bit soft if the blower fan is off.
I tested with the hotend at 250C, and the PETG plastic around the nozzles was soft, but firmed up if the parts cooling blower fan was on.
I will adjust the angle and length of the ducts to compensate.
Also, the grub screw in the heatsink is blocked by the lower edge of the fan shroud.
I will also make adjustments there so the grub screw can be accessed from underneath.
Update 8/20/2020, Part 2
Both the shroud and the parts cooling duct parts have been updated.
Shroud now has a thicker wire retention tab, with slots for zip ties.
Parts cooling fan now has curved nozzles to clear the hot end block.
Update 8/20/2020, Part 3
Adjusted the height of the mounting flange on the Fan Shroud for the BLTouch, found it to be too high, causing the nozzle to touch the plate.
Increased the thickness by 3mm.
Update 8/21/2020
Shortened the height of the nozzles on the parts cooling duct by about 0.5mm, they were too tall and hit the Z-column rod brackets.
If you've already printed it, just carve off a little bit off the bottom of the nozzle to clear the bracket on the right side.
Update 8/29/2020
I updated the design of the Fan Shroud part so that it can be printed without supports!
The fan holes in the front now have a 0.2mm bridge to support the holes, just cut them out with a knife.
This requires good bridging capability, but otherwise should be fine.
Update 8/30/2020
Printing the fan shroud, I encountered an issue with the nozzle colliding with the part at 40mm height, or layer 201, where it goes to do the bridge layer across the top.
If you run into this, the setting that will fix this issue is called "Avoid crossing perimeters" in Print Settings, Layers and Perimiters in PrusaSlicer. Cura probably has something like it as well.
Also, under Infill, I recommend setting the Bridging Angle to be 180 so that the bridge goes horizontally across the X axis.
Otherwise the fan shroud printed great in PLA.
Similar models
thingiverse
free

AM8/E3D Hemera Rear Mount Part 5015 Cooling Fan - Mount and Duct
...hat doesn't block the fan.
the pillow block will likely need to be tapped to fit the screw that you use. i used an m4 screw.
thingiverse
free

Satsana Duct 5015/4010 with support to BLTouch and Pinda inductive probes by clait
...tps://ko-fi.com/clait
tags: satsana fan duct microswiss microswiss direct drive msdd ender 3 bltouch pinda inductive probe m8 m12
thingiverse
free
CR-10 FANG dual 5015 and BLtouch for MicroSwiss direct drive by bogdi1988
...g plate to move the probe 8mm more to the left.
the new probe offsets should be x-48, y-10 which can be set via the m851 command.
thingiverse
free
CR-10 50 x 15 Double Blower Fan Fang Mount remix with BLTouch by ratherbe_flyin
...r changed let me know and i can either do it or post a step file
i print all parts that go on my x carriage with 3dxtech cf nylon
grabcad
free

ENDER 3 OR CR10 CARRIAGE.
...s a duct i found on thingiverse but its been so heavily modified i'm not sure any of the original is left. v6 updated 6-03-19
thingiverse
free
Satsana Ender 3V2 with Direct Drive Conversion by bgyen
...
parts: 4020 fan (screws for fan), 5015 blower fan (screw for fan), 1xm3 8mm screw to attach fan duct to the direct drive bracket
thingiverse
free
Ender 3 shroud by Kaar3l
...bign on thingiverse: https://www.thingiverse.com/thing:4019570https://www.thingiverse.com/thing:2784911 bltouch model by j_hodgie
thingiverse
free
50mm part fan conversion by mechracer84
...hould fit your existing cooling nozzles and mounting hardware. the 40mm fan is mounted to the duct using 2mm coarse thread screws
thingiverse
free

5015 Fan Duct / Shroud Snap Fit by gausnes
... gausnes
thingiverse
this is a fan duct for the 5015s blower. the duct is based off of the design in the original prusa i3 mk2.
thingiverse
free

Zonestar D805SR2 (Z5R2) Centrifugal Blower Layer Fan Mount and Duct by jingaku
... the mount is rather small and fragile as it is, and the duct is still sub-optimal. i may update this with better designed parts.
Giulianom
thingiverse
free

Lumia 640 Mount by GiulianoM
...l shrink to the correct size. abs will also more likely resist high temperatures in a car, so i wouldn't recommend using pla.
thingiverse
free
Dust Collector Blower to 6" Duct by GiulianoM
...l fit in sdr pipes of slightly varying diameters.
used for venting the blower outside or otherwise into some other 6" input.
thingiverse
free
4" x 6" Oval Hole Template by GiulianoM
... 7", and the distance between the two walls is 6.04".
clamp it down over a 6" board and the oval will be centered.
thingiverse
free
MicroSwiss Ender 5 Plus Direct Drive Plate by GiulianoM
...ve-extruder-for-creality-ender-5
i am using the stl to design a cooling shroud since there are extra mounting holes on the plate.
thingiverse
free

Dial Indicator Mount for MGN12H Linear Block by GiulianoM
...m3 10mm screws for mounting the adapter block to the mgn12h carriage.
1 x m3 screw, 10-15mm long for securing the dial indicator.
thingiverse
free

Arducam 5MP OV5647 Camera Mount by GiulianoM
...e should come with the camera kit.
if not, you'll need 4 x m2 15mm screws and 4 x m2 nuts.
m2 - 2mm screws, not m2.5 - 2.5mm.
thingiverse
free

LM8LUU Bearing Blocks for Prusa Y-Axis by GiulianoM
...the blocks to the y-carriage. 20mm are long enough if your plate is threaded - use 25-30mm with nuts if yours is drilled through.
thingiverse
free

i3 Z-Ends for LM8LUU and 8mm Anti-Backlash Nut by GiulianoM
...44
these are the z-end parts that correspond with the x-ends i designed:http://www.thingiverse.com/thing:1060956
work in progress
thingiverse
free
Mini Height Differential IR Sensor Board Mount for E3D v6 / Prusa i3 Rework by GiulianoM
...t onto the bottom two m4 bolts for the "e3d v6 compact extruder for i3 rework":
http://www.thingiverse.com/thing:725082
thingiverse
free

Dual Melzi Box for RepRapPro Tricolor Mendel by GiulianoM
...clips on the top piece snapped off really easily, so i modified the top to make the clip walls a little thicker (2.0mm vs 1.5mm).
Microswiss
thingiverse
free

Microswiss Ender 3 by Joferval
...microswiss ender 3 by joferval
thingiverse
microswiss direct drive adapter for ender 3
thingiverse
free

Precision Piezo Orion Microswiss clamp by Moriquendi
...nted parts required to use the orion with a microswiss hotend.
i have not personally tested these parts with a microswiss hotend.
thingiverse
free
VORON printhead for MicroSwiss hotend by phil245
...3d v6 hotend but i do have the microswiss so i set to making it fit.
i hope this helps someone, if it does please post a make.
thingiverse
free

BLTouch adjuster for Ender 3 with MicroSwiss hotend
... adjuster for ender 3 with microswiss hotend
thingiverse
bl touch (creality version) adjuster for ender 3 with microswiss hotend
thingiverse
free
Microswiss X Axis Endstop for DirectDrive by ericthetazman
... by ericthetazman
thingiverse
i made this to account for new position of x endstop with microswiss direct drive on my longer lk4
thingiverse
free

microswiss dd cr10s pro by deshi
...thingiverse
modified for the ender 3 microswiss dd to fit cr10s pro.
had to raise bed 5mm set x axis off set to -35 and y to -25
thingiverse
free

CR-10S fan nozzle for microswiss hotendf by jfmvoers
...hotendf by jfmvoers
thingiverse
cooling nozzle for a creality cr10s with microswiss hotend.also fits on other creality printers.
thingiverse
free
Satsana Ender 3 v2 MicroSwiss 5010 by Annikamint
...giverse.com/thing:4787797/files
and
https://www.thingiverse.com/thing:4647053 to fit on ender 3 v2 with microswiss and 5010 fan
thingiverse
free
ender 3 v2 bltouch microswiss by Mampo112
...sured 1.4mm shorter than creality stock hotend.
use m3 screws to fit it.
thats my first post in thingiverse
sorry my poor english
thingiverse
free

CR10 / Ender2 Microswiss Fang by 2bedom
...all metall 300°c microswiss hotend.
(https://store.micro-swiss.com/products/all-metal-hotend-kit-for-cr-10)
the fang fits good ..
Shroud
3d_export
$500

Centrifugal pump volute casing with impeller
...casing with impeller 3dexport volute casing with impeller and shroud ...
3d_export
$35

The Holy Face base relief 3D Model
...the holy face base relief 3d model 3dexport shroud turin veronica veronica's veil gospel ikon jesus holy face...
3d_export
$20
present car cloth presentation transport transportation shape concepts show celebration cover showro
...transportation shape concepts show celebration cover showroom covered revealin shroudd cover covering tarp draped fabric cloth showroom reveal revealing...
3d_export
$5

Lockheed F-117 Nighthawk lowpoly stealth bomber
...initial operating capability status in 1983. the aircraft was shroudd in secrecy until it was revealed to the public...
3d_export
$49

kriss vector gen 2 sub-d
...rear flip sight.<br>- vector ejection port.<br>- vector crb square shroud / 16"" sliencer.<br>- ds150 stock.<br>- .ma (maya 2020 ascii)<br>-...
3d_export
$10

vichy dining table
...in oak, sycamore and walnut marquetry.<br>even if the restaurant shroud the vichy in a long table cloth, two slender...
3d_export
$500

us navy pcu sterett ddg-104 arleigh burke class destroyer flight iia max
...the position has been shifted.<br>q. where are the exhaust shroud for the stacks?<br>a. since ddg-89, the exhaust system was...
thingiverse
free

shroud by samshay317
...shroud by samshay317
thingiverse
shroud
thingiverse
free

Fan Shroud
...fan shroud
thingiverse
this is a fan shroud for a 140mm fan
thingiverse
free
40mm fan shroud
...40mm fan shroud
thingiverse
40mm fan shroud
Ender
3ddd
$1

Enders / Elegance
...enders / elegance
3ddd
обогреватель
уличный газовый обогреватель enders elegance
высота: 2200 мм
3d_export
free

ender 3 frame cavity covers
... of the creality ender 3 - makes it look a bit more attractive it just slides into the open channels of the aluminium framework
turbosquid
$1

pen support for ender 3
...y free 3d model pen support for ender 3 for download as blend on turbosquid: 3d models for games, architecture, videos. (1611282)
3d_ocean
$9

Ender Dragon Minecraft
...ojang obj poly videogames
ender dragon minecraft created with cinema 4d r15 formats included: max 2013 – fbx 2012 – c4d r15 – obj
3d_export
free

Creality ender enclosure webcam mount
...e creality enclosure. sure is better than a tripod. change it up if it helps. i printed pla with 50% infill on my dd ender 3 pro.
3d_export
free

ender 3 enclosure corners
...er corners and 4 upper corners, using 25mmx25mm angled aluminium pieces that gets covered on inside of the frame with plexiglass
3d_export
free

ender 3 3d print bed clips
...ed + normal aluminium bed frame of the creality ender 3 = 6mm (b) these clips are designed for glass plate + aluminium bed = 4mm
3d_export
$5

GRUMPY CAT
...grumpy cat 3dexport grumpy cat to print in ender ...
3d_export
$5

Logs fire
...with one multi material for corona and vray r ender. albedo, normal, uvmap, roughness format jpg 4096x4096 models:...
3d_export
$42

excavator
...is the original size. 0.12 mm printing surface creality ender5 ...
Direct
design_connected
free
Compas Direction
...compas direction
designconnected
free 3d model of compas direction by vitra designed by prouvé, jean.
design_connected
$18

Direction Pivotant
...direction pivotant
designconnected
vitra direction pivotant computer generated 3d model. designed by prouvé, jean.
turbosquid
$6
not direct the front
...oyalty free 3d model not direct the front for download as max on turbosquid: 3d models for games, architecture, videos. (1213034)
turbosquid
$10

Rails Direct
... available on turbo squid, the world's leading provider of digital 3d models for visualization, films, television, and games.
3d_export
$5

Picto toilet directions
...lude 3d files next to rhino6: x3dv, step, igus, obj and stl. double-sided, flipping changes the gender directions to the toilets.
3ddd
$1
fauteuli direction
...d
chair , vitra , fauteuli
fauteuli vitra chair
design_connected
$18

Fauteuil Direction, 1951
...fauteuil direction, 1951
designconnected
vitra fauteuil direction, 1951 computer generated 3d model. designed by prouvé, jean.
3d_export
$5
Directional tactile 3D Model
...tactile 3d model
3dexport
directional tactile braille tile flooring interior
directional tactile 3d model renob000 71068 3dexport
turbosquid
$26

Radio direction finder A
...ty free 3d model radio direction finder a for download as fbx on turbosquid: 3d models for games, architecture, videos. (1212490)
turbosquid
$7

Wooden direction signage
...ty free 3d model wooden direction signage for download as max on turbosquid: 3d models for games, architecture, videos. (1453747)
Plus
turbosquid
$2
plus-plus puzzle and lego
...d model plus-plus puzzle and lego for download as stl and obj on turbosquid: 3d models for games, architecture, videos. (1662633)
3ddd
$1
Стенка Plus
...стенка plus
3ddd
plus , модная мебель
фабрика "модная мебель", модель plus
3ddd
$1

Спальня METIS plus
... hulsta , metis , спальня
спальня metis plus
design_connected
$11

be plus B+
...be plus b+
designconnected
blå station be plus b+ chairs computer generated 3d model. designed by börge lindau.
design_connected
$11
Bank Plus
...bank plus
designconnected
röthlisberger kollektion bank plus coffee tables computer generated 3d model. designed by atelier oi.
3ddd
$1

elos Plus
... candela
elos plus — мультифункциональный аппарат для проведения лазерного и ipl лечений
3ddd
$1
Calligaris Even Plus
...calligaris even plus
3ddd
calligaris
calligaris_chair_even plus
design_connected
$29

Basket Plus
...nconnected
photo-realistic 3d models of the basket plus bed from bonaldo for 3d architectural and interior design presentations.
3ddd
free
Artpole Faktum Plus
... артполе , панель
artpole faktum plus
размеры:
высота 625мм
ширина 800мм
глубина 17мм
3ddd
$1
Мария / Jazz Plus
...мария / jazz plus
3ddd
мария
кухня фабрики мария модель__jazz plus
Drive
turbosquid
$90
Drive
...turbosquid
royalty free 3d model drive for download as blend on turbosquid: 3d models for games, architecture, videos. (1654393)
3d_export
$10

cycloidal drive
...cycloidal drive
3dexport
cycloidal drive
3d_ocean
$5

Flash Drive
...h drive included : – materials – scene ( lighs / room ) – .c4d + .obj for any questions please feel free to contact me thank you.
3d_ocean
$5

Usb drive
...s shaders and a lighting setup. it also has a small animation of it going in and out. i saved it out as both a .blend file and...
3d_ocean
$5

Pen Drive
...est computer drive game model good low poly new pen pen drive textured unwrapped uv very low poly
a very beautiful low poly model
3d_ocean
$10

External hard drive
... is a detailed model of a trekstor external hard drive. you can easily modify the label on the top. simply edit the text objects.
turbosquid
$60

Star Drive
...squid
royalty free 3d model star drive for download as blend on turbosquid: 3d models for games, architecture, videos. (1254314)
turbosquid
$50

Star Drive
...squid
royalty free 3d model star drive for download as blend on turbosquid: 3d models for games, architecture, videos. (1263524)
turbosquid
$45

Star Drive
...squid
royalty free 3d model star drive for download as blend on turbosquid: 3d models for games, architecture, videos. (1287060)
turbosquid
$40
Star Drive
...squid
royalty free 3d model star drive for download as blend on turbosquid: 3d models for games, architecture, videos. (1261902)
Extruder
3ddd
$1

Extruded Chair
...extruded chair
3ddd
extruded , tom dixon
inspired by tom dixon extruded chair
turbosquid
$15

Extruded Table
... extruded table for download as blend, dae, fbx, obj, and stl on turbosquid: 3d models for games, architecture, videos. (1634137)
turbosquid
$2

3D Printer Extruder
...d
royalty free 3d model 3d printer extruder for download as on turbosquid: 3d models for games, architecture, videos. (1537359)
turbosquid
$1

Zombie extruded text
...oyalty free 3d model zombie extruded text for download as obj on turbosquid: 3d models for games, architecture, videos. (1322198)
turbosquid
$4

Extruder conical screw
...el extruder conical screw for download as sldpr, ige, and stl on turbosquid: 3d models for games, architecture, videos. (1524433)
turbosquid
$50

3d PRINTER - Extruder
... available on turbo squid, the world's leading provider of digital 3d models for visualization, films, television, and games.
turbosquid
$15

Extruded Table 2
...xtruded table 2 for download as blend, dae, fbx, obj, and stl on turbosquid: 3d models for games, architecture, videos. (1621846)
turbosquid
$10

Maya Extrude Tool
... available on turbo squid, the world's leading provider of digital 3d models for visualization, films, television, and games.
3d_export
$5

world earth extrude map
...world earth extrude map
3dexport
3ddd
$1

Simply Elegant Extruded Tree Coffee Table Design
...ble by link studios. the silhouette of a tree is visible at one angle, extruded from the surface to create the support structure.
Fan
3d_export
$5

fan
...fan
3dexport
fan 3d model, table fan, fan, electric fan, ventilator
archibase_planet
free

Fan
...fan
archibase planet
fan large fan
fan out n260707 - 3d model for interior 3d visualization.
archibase_planet
free

Fan
...fan
archibase planet
fan ceiling fan ventilator
fan stealth n300615 - 3d model (*.gsm+*.3ds) for interior 3d visualization.
3d_export
$15

fan
...fan
3dexport
is an ancient fan
3ddd
$1

Fan-C-Fan by marco gallegos
...n-c-fan by marco gallegos
3ddd
вентилятор , marco gallegos
fan-c-fan by marco gallegos
3d_export
$10

fan
...fan
3dexport
a detailed fan designed for home or space blowing is now available for only 19.99!
turbosquid
$1

Fan
...fan
turbosquid
free 3d model fan for download as on turbosquid: 3d models for games, architecture, videos. (1427865)
turbosquid
$14

Fan
...fan
turbosquid
royalty free 3d model fan for download as on turbosquid: 3d models for games, architecture, videos. (1415642)
3ddd
$1

Светильник Fan
...светильник fan
3ddd
fan , italamp
светильник fan, производитель italamp
turbosquid
$25

Fan
...fan
turbosquid
royalty free 3d model fan for download as c4d on turbosquid: 3d models for games, architecture, videos. (1483246)
5
turbosquid
$6

Rock 5-5
...urbosquid
royalty free 3d model rock 5-5 for download as obj on turbosquid: 3d models for games, architecture, videos. (1639063)
3d_export
$5

hinge 5
...hinge 5
3dexport
hinge 5
turbosquid
$10

A-5
... available on turbo squid, the world's leading provider of digital 3d models for visualization, films, television, and games.
turbosquid
$2

A-5
... available on turbo squid, the world's leading provider of digital 3d models for visualization, films, television, and games.
turbosquid
$12

Calligraphic Digit 5 Number 5
...hic digit 5 number 5 for download as max, obj, fbx, and blend on turbosquid: 3d models for games, architecture, videos. (1389333)
3ddd
$1

5 роз
...5 роз
3ddd
5 роз в стеклянной вазе
design_connected
$11

iPhone 5
...iphone 5
designconnected
apple iphone 5 computer generated 3d model.
3ddd
$1

Lola 5
...lola 5
3ddd
miniforms
lola 5 miniforms 300*65*134
3ddd
$1

Nexus 5
...dd
nexus , phone , телефон
google nexus 5 phone
3d_ocean
$15

iPhone 5
...iphone 5
3docean
3d 4d apple cinema iphone model modeling phone screen texture
iphone 5 3d model and texture realistic iphone 5.