Thingiverse

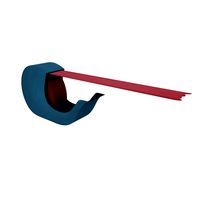
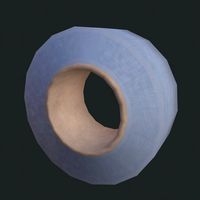
Fan duct for ZoneStar P802Q with J-Head hotend by Zuikkis
by Thingiverse
Last crawled date: 3 years, 1 month ago
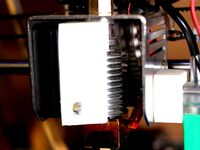
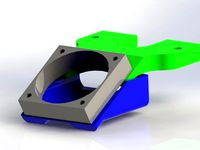
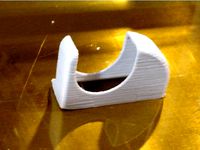
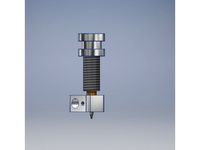
I have a Zonestar P802Q, fitted with chinese J-Head hotend. I had problems printing PLA, after a few hours it jammed always.. No problems with ABS, though! But I figured PLA problem must be because of inadequate cooling, because the whole heat sink part was filled with melted PLA.
I found here one air duct made by widddo, but it was for the stock hotend. J-Head has slightly larger heat sink: 25mm diameter and 50mm length. Especially the length is a problem, the 40mm fan is mounted flush with the top of the heat sink, so lower 10mm of heat sink is not really cooled at all. And that is the hottest part that would benefit most from the cooling. This air duct has a guide to direct at least some air to the lower part as well.
This is not really a remix of widddo's work, as I did not use the original source code. But I did print his part before I realized it would not work. :) I used it as a reference for some measurements.
Installation:
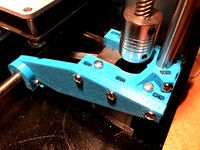
Remove the cooling fan and the hotend fan. Hotend fan has M3 nuts, take them out and install to air duct. Lower nut is a bit difficult to install from inside of the part. Use M3 screw to initially tighten the nuts in place, so they will be at exactly correct position.
Remove the teflon tube screw, and clip the hotend heat sink to the air duct. Then loosely tighten the fan screws so the part is roughly in right position. Reinstall the teflon tube screw. It might be difficult because the hole might not align perfectly, that's why the fan screws must be loose at this point. Finally tighten the fan screws and reinstall cooling fan as well.
I found here one air duct made by widddo, but it was for the stock hotend. J-Head has slightly larger heat sink: 25mm diameter and 50mm length. Especially the length is a problem, the 40mm fan is mounted flush with the top of the heat sink, so lower 10mm of heat sink is not really cooled at all. And that is the hottest part that would benefit most from the cooling. This air duct has a guide to direct at least some air to the lower part as well.
This is not really a remix of widddo's work, as I did not use the original source code. But I did print his part before I realized it would not work. :) I used it as a reference for some measurements.
Installation:
Remove the cooling fan and the hotend fan. Hotend fan has M3 nuts, take them out and install to air duct. Lower nut is a bit difficult to install from inside of the part. Use M3 screw to initially tighten the nuts in place, so they will be at exactly correct position.
Remove the teflon tube screw, and clip the hotend heat sink to the air duct. Then loosely tighten the fan screws so the part is roughly in right position. Reinstall the teflon tube screw. It might be difficult because the hole might not align perfectly, that's why the fan screws must be loose at this point. Finally tighten the fan screws and reinstall cooling fan as well.
Similar models
thingiverse
free
Hot End Heat Sink Fan Duct for Zonestar P802Q (Prusa i3) by widddo
...hten the fan screws.
optional: you can use some super glue to fix the m3 nut on the fan duct (might facilitate the installation).
thingiverse
free
Zonestar P802Q Fan Duct by ioquatix
... the genius of the francis turbine).
for latest parts and more details visit https://github.com/ioquatix/zonestar-p802q-fan-duct.
thingiverse
free
Filament Guide for Zonestar P802Q by widddo
...feeding i designed this filament guide. it will be installed with two m3 screws at the stepper motor of the feeder (see picture).
thingiverse
free
Wade extruder J-head fan mount by Dainis
...n.
added air duct that cools the upper part of hot end (cold end). it makes it really cool, if you use additional radiators...
thingiverse
free

40mm Fan Duct for 3DR Simple J-Head End Effector by Apru
...if you need a different thickness. my tridprinting.com j-head groove is thinner, for instance and will not work with this design.
thingiverse
free

Ormerod 1 part cooling duct by ChristofSchwiening
...t solve someone's problem!
14/6/2017 i have updated the part to a better design with more air going to the end of the nozzle.
thingiverse
free

Cooling Fan Intake for ANYCUBIC 4MaxPro
...p; parts cooling duct set
for anyycubic 4maxpro
more cool air far from heat bed for heat-sink.
more high flow for parts cooling.
thingiverse
free

Fan Duct for ZONESTAR 3D printer by HallyZhong
...fan duct for zonestar 3d printer by hallyzhong
thingiverse
fan duct for zonestar 3d printer, p802q, p802n, z5, z8, z9, z10, etc.
thingiverse
free
Prusa I4 Throat Fan Duct by munive
...mm in diameter no shorter than 10 mm from the base to the hotend. make sure to leave at least 2mm between the hotend and the duct
thingiverse
free

40mm fan air duct for Geeetech All Metal J-head hotend by IvanFjodorovich
...thingiverse
40mm fan air duct for geeetech all metal j-head hotend
it works! use it =)
added fixed model, for better ptinting.

P802Q
thingiverse
free
Zonestar P802Q Bracing by ioquatix
...the zonestar p802q/p802qa 3d printer.
for latest parts and more details visit https://github.com/ioquatix/zonestar-p802q-bracing.
thingiverse
free

P802N P802Q Z-axis Slider by HallyZhong
...p802n p802q z-axis slider by hallyzhong
thingiverse
z-axis slider module for zonestar p802m p802n and p802q
thingiverse
free

Zonestar P802Q bed level gauge holder by TheHamster
...zonestar p802q bed level gauge holder by thehamster
thingiverse
remixed to fit over the fan on a zonestar p802q
thingiverse
free
Zonestar P802Q Fan Duct by ioquatix
... the genius of the francis turbine).
for latest parts and more details visit https://github.com/ioquatix/zonestar-p802q-fan-duct.
thingiverse
free
Mounting Blocks for Zonestar P802Q by widddo
...original:
two cable ties
completely redesigned for zonestar p802q, which has an other height between the m8 rods and the ground.
thingiverse
free
Filament Guide for Zonestar P802Q by widddo
...feeding i designed this filament guide. it will be installed with two m3 screws at the stepper motor of the feeder (see picture).
thingiverse
free
Mounting Block for Zonestar P802QS (flat head) by jlaraujo1
...block for zonestar p802qs, but removed the extra head lenght, to eliminate the problem of the bed thumbscrew hitting the support.
thingiverse
free

Zonestar P802Q X Belt Tensioner by kmikze
...) with nuts, and the original m5x20 screw + nut + bearing. the belt needs to be changed to a longer one for this upgrade, though.
thingiverse
free

Plaque with Zonestar logo to replace P802Q's character display by LoermansA
...rapdiscount full graphic controller and created this plaque as a nice looking logo for the empty space the old display occupied.
thingiverse
free
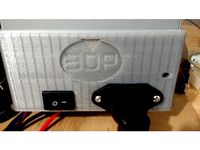
PSU enclosure for Zonestar P802Q printer by 3DesignPrint
...ling the screw, remember, the screws that hold the psu can brake through the isolation on the psu pcb. use short screws m3 x 8mm.
Zonestar
thingiverse
free

Zonestar Blower by juliocfranco
...zonestar blower by juliocfranco
thingiverse
beter eficience blower for dual extruder zonestar 805
thingiverse
free
Zonestar Z5 by Cinefil001
...zonestar z5 by cinefil001
thingiverse
pièces pour zonestar z5 fourni dans la carte sd
thingiverse
free
hotted container zonestar
...metal plank for the zonestar z5mr2 (p802qr2)
este adaptador fue hecho para colocarse en la placa de metal original de la zonestar
thingiverse
free

Zonestar Power Adapter by ReePlay
...zonestar power adapter by reeplay
thingiverse
for my new zonestar printer
reeplay
thingiverse
free

Zonestar P802n mounting by Ashley1973
...zonestar p802n mounting by ashley1973
thingiverse
zonestar p802n mounting shorter to suit the 802n
thingiverse
free

Damper for Zonestar P802M by Bengelen
...damper for zonestar p802m by bengelen
thingiverse
made the mount 1 mm smaller to fit my zonestar p802m
thingiverse
free

Cable chain for Zonestar Z6FB by wmon
...cable chain for zonestar z6fb by wmon
thingiverse
cable chain for zonestar z6fb
thingiverse
free
Zonestar P802Q Bracing by ioquatix
...the zonestar p802q/p802qa 3d printer.
for latest parts and more details visit https://github.com/ioquatix/zonestar-p802q-bracing.
thingiverse
free

ZoneStar Lower Filament Guide by JKCreate
...zonestar lower filament guide by jkcreate
thingiverse
a lower filament guide for the zonestar p802qr2.
thingiverse
free
Zonestar Z6 - Z axis stabilizer
...zonestar z6 - z axis stabilizer
thingiverse
zonestar z6 - z axis stabilizer
Hotend
thingiverse
free
hotend by fablab_lueneburg
...hotend by fablab_lueneburg
thingiverse
hotend model
thingiverse
free
Hotend for Graber
...hotend for graber
thingiverse
hotend complement pastes for graber printerhttps://youtu.be/0koxhnsuhdy
thingiverse
free
Hotend adapter by antaviana
...hotend adapter by antaviana
thingiverse
hotend adapter
thingiverse
free
hotend fan by mming1106
...hotend fan by mming1106
thingiverse
hotend fan
thingiverse
free

Hotend schema by ione
...hotend schema by ione
thingiverse
hotend project schema
thingiverse
free
Fabtotum XY Hotend holder for E3D Hotend
...s with integrated supports.
more for the project you can see here: https://kf-designs.com/2019/09/07/fabtotum-printer-conversion/
thingiverse
free
HotEnd Stand by onepointdiy
...tend, when you make your new hotend or repair your j-head or mg-plus hotend.
the hole of 16mm, please adjust using a reamer, etc.
thingiverse
free

fast magnetic hotend changer for Chimera Hotend by Draman
...chimera hotend !
and new basis (the hole from original is to small)
it is a remix form skimmy's fast magnetic hotend changer
thingiverse
free

Hotend Fan Adapter for MicroSwiss All Metal Hotend by jo_schi_man
...
thingiverse
little change for the hotend fan adapter to hold the microswiss all metal hotend (slightly longer and sharp edges).
thingiverse
free
Merlin Hotend by Alejanson
...merlin hotend by alejanson
thingiverse
this is a 1:1 drawing of the classic merlin hotend.
Duct
turbosquid
$19
Duct Set
...d
royalty free 3d model duct set for download as max and fbx on turbosquid: 3d models for games, architecture, videos. (1145038)
turbosquid
$10
Duct Tape
...id
royalty free 3d model duct tape for download as ma and ma on turbosquid: 3d models for games, architecture, videos. (1580351)
turbosquid
free
Duct Tape
...
free 3d model duct tape for download as obj, fbx, and blend on turbosquid: 3d models for games, architecture, videos. (1486518)
3d_ocean
$7
Air-duct
... ventilation
high quality industrial air duct ventilation model. created in cinema 4d but comes in various other formats as well.
turbosquid
$20
Air ducts
...lty free 3d model air ducts for download as max, obj, and fbx on turbosquid: 3d models for games, architecture, videos. (1262476)
3d_export
$10

Supply air duct
...supply air duct
3dexport
supply air duct with two axial fans and hangers
turbosquid
$2
Duct Tape
...e 3d model duct tape for download as obj, fbx, blend, and dae on turbosquid: 3d models for games, architecture, videos. (1473972)
turbosquid
free

Duct Tape
... available on turbo squid, the world's leading provider of digital 3d models for visualization, films, television, and games.
3d_ocean
$3
Duct tape
...polys. includes: cinema 4d project. model in 3 formats (obj, fbx, 3ds). 6 .tga texture maps (albedo, ambient occlusion, diffus...
turbosquid
$40
Ventilation Duct PACK
...tion duct pack for download as ma, obj, fbx, and unitypackage on turbosquid: 3d models for games, architecture, videos. (1287068)
J
3d_export
$17

J-7mg
...j-7mg
3dexport
j-7mg
3d_export
$5

j hook
...j hook
3dexport
j hook
3d_export
$17

J-21 jastreb
...j-21 jastreb
3dexport
j-21 jastreb
3d_export
$17

Chengdu J-10
...chengdu j-10
3dexport
chengdu j-10
turbosquid
$96

J-20
...20
turbosquid
royalty free 3d model j-20 for download as max on turbosquid: 3d models for games, architecture, videos. (1658873)
turbosquid
$68

J-10A
...a
turbosquid
royalty free 3d model j-10a for download as max on turbosquid: 3d models for games, architecture, videos. (1658854)
turbosquid
$30

J-7
...j-7
turbosquid
royalty free 3d model j-7 for download as max on turbosquid: 3d models for games, architecture, videos. (1538420)
turbosquid
$14

Fence J
...turbosquid
royalty free 3d model fence j for download as fbx on turbosquid: 3d models for games, architecture, videos. (1313345)
turbosquid
$7

J for Jug
...rbosquid
royalty free 3d model j for jug for download as max on turbosquid: 3d models for games, architecture, videos. (1688347)
turbosquid
$5

Letter J
...urbosquid
royalty free 3d model letter j for download as max on turbosquid: 3d models for games, architecture, videos. (1408483)
Fan
3d_export
$5

fan
...fan
3dexport
fan 3d model, table fan, fan, electric fan, ventilator
archibase_planet
free

Fan
...fan
archibase planet
fan large fan
fan out n260707 - 3d model for interior 3d visualization.
archibase_planet
free

Fan
...fan
archibase planet
fan ceiling fan ventilator
fan stealth n300615 - 3d model (*.gsm+*.3ds) for interior 3d visualization.
3d_export
$15

fan
...fan
3dexport
is an ancient fan
3ddd
$1

Fan-C-Fan by marco gallegos
...n-c-fan by marco gallegos
3ddd
вентилятор , marco gallegos
fan-c-fan by marco gallegos
3d_export
$10

fan
...fan
3dexport
a detailed fan designed for home or space blowing is now available for only 19.99!
turbosquid
$1

Fan
...fan
turbosquid
free 3d model fan for download as on turbosquid: 3d models for games, architecture, videos. (1427865)
turbosquid
$14

Fan
...fan
turbosquid
royalty free 3d model fan for download as on turbosquid: 3d models for games, architecture, videos. (1415642)
3ddd
$1

Светильник Fan
...светильник fan
3ddd
fan , italamp
светильник fan, производитель italamp
turbosquid
$25

Fan
...fan
turbosquid
royalty free 3d model fan for download as c4d on turbosquid: 3d models for games, architecture, videos. (1483246)
Head
3d_export
$5

head
...head
3dexport
simulated female head.
3d_ocean
$5

Deer Head
...deer head
3docean
deer head
simple model of deer head with neck.
cg_studio
$25

Marble Head - Head A3d model
... - head a3d model
cgstudio
.ma - marble head - head a 3d model, royalty free license available, instant download after purchase.
turbosquid
$5
Head
...ad
turbosquid
royalty free 3d model head for download as max on turbosquid: 3d models for games, architecture, videos. (1230068)
turbosquid
free

The Head
...urbosquid
royalty free 3d model the head for download as max on turbosquid: 3d models for games, architecture, videos. (1386205)
turbosquid
free

Head
...
turbosquid
royalty free 3d model head for download as blend on turbosquid: 3d models for games, architecture, videos. (1276899)
3d_export
$10

bull head
...bull head
3dexport
bull head
3d_export
$5

girl head
...girl head
3dexport
head girl
3d_export
$5

Tigger-head
...tigger-head
3dexport
tigger-head
3d_export
$5

head on a spear
...head on a spear
3dexport
head on a spear