Thingiverse
F2K Trebuchet by Blastronauticus
by Thingiverse
Last crawled date: 3 years, 1 month ago
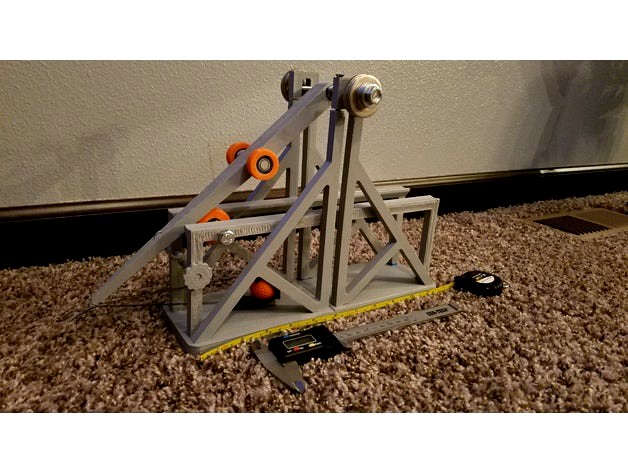
This is an f2k style floating arm trebuchet. My son loves launching stuff with this thing, but he needs help loading it. For office wars it can be adjusted to launch objects high over cubicle walls and vanquish your opponents. One of these days I'll post a video of it.
The frame stands about 8" tall by 12" long. It can easily launch the small golf ball included in the files a good 25-30 feet with the right sling/pin and counterweight. This must be printed in pieces and assembled, with some hardware and other items required for assembly. Press fits are designed for 608-2rs bearings.
What to print:
Base_front 1x
Base_rear 1x
Frame parts 1 of each (4 total)
Arm 1x
Top pieces 2x
Trigger shaft 1x
Trigger wheel 1x
Wheel 1 1x (optional)
Wheel 2 1x (optional)
Wheel 3 2x (optional)
Wheel 4 2x (optional)
Ball As many as you want (optional)
What to Buy:
M8x150mm threaded rod 1x (I used the one from the spool holder that came with my printer)
M8x80mm bolt 1x
M8 washers 4x (to retain any larger washers used for counterweight)
M8 nut 9x
Large washers 10-14x (25-40mm outside diamter, for counterweight)
Thread 2meters or so, for sling
Cloth 40x80mm ish, I used microfiber, for sling
Paper clips 2x (medium-large size)
M4 or M5 washer 1x (for sling to pin connection)
608-2rs bearings 3x
Assembly:
If you printed the wheels (I really didn't notice much of a difference in performance with or without them, they probably help a bit with keeping the arm centered on the frame) then snap them onto the bearings. Press two of the bearings with the small wheels onto the arm shafts. The other one goes on the M8 bolt at the rear of the frame. The frame is intended to be pressed together. Center the M8 threaded rod on the arm and retain it with nuts. Add counterweight. Slide it into the center slots on the frame and install the top pieces. For the pin, cut a 50mm long piece of paperclip, heat it up with a lighter, and press it into the small hole on the end of the arm. You will need to play with the length and angle of the pin to get the ideal throwing arc. For the trigger, use another paperclip and bend it/ cut it to the proper length. The sling is a rectangular piece of cloth with holes in each corner, and 150-200mm thread doubled up for each side. One side of the sling is attached to the thru hole at the end of the arm, the other is attached to a small washer that goes around the pin on the end of the arm. You'll figure it out.
Similar models
thingiverse
free

Filament Spool Arm by jesc
...ap.
requires:
2x m3 screws and nuts (optional: another 2x)
2x m8 nuts
1x m8 threaded rod (~10cm long)
1x m8 washer
1x 608 bearing
thingiverse
free

CadetPedals Pedal shaft upgrade by Alekoy1
...ngle of the pedal.
-install a jam-nut on the end.
now you can install the pedal and gear as described in the original build guide
thingiverse
free
3D printed Belt sander by Kris3DK
...ap ring
2x m8 x 25/30mm internal hex bolt
2x m8 (flange) nut
1x m6 grub screw
6x m3 x 6 mm screws
and rubber bands for tensioning
thingiverse
free
Another Spool Holder by jbolbach
...1x m8 nut 2x m8 washer 2x 608-2rs (or similar 8mm id/22mm od) bearing assembly order is: bolt ->...
thingiverse
free

3/16" Tube Straightener by njmcpherson
...ut the demo video - https://youtu.be/mgnnrnlcs7u
qty 16 - tube straightener wheel
qty 32 - m8 washer
qty 4 - straightener bracket
thingiverse
free

625ZZ bearing extractor by PKKShadow
...00mm on hand)
2-4x metal m5 washers
assemble it, and crank it til you feel the wheel become free of the bearings or it falls off.
thingiverse
free

Spoolholder by Jarele
...m5x14
need:
1x m8 trheaded rood 160mm
4x 608 bearing
2x abrollerhalter (for 608 bearings)
1x verschluss
1x gewindestangehalter-m8
thingiverse
free

Dual 608 bearing Y idler for Prusa i3 by PristineSource
...08 bearings with a m8 bolt.
you will need:
1x m8x30mm cap screw
1x m8 lock nut
2x 608 bearings
2x m4x20mm cap screws
2x m4 nuts
thingiverse
free

YALFUSP (Yet another Low Friction Universal Spool Holder) by CritsHappen
...threaded rod (220mm lenght)
1x - hollow rod slightly bigger than the m8 threaded rod (~ 110 mm - 111 mm)
2x - 608 ball bearings
thingiverse
free

Kossel Mini Spool Holder by mccarmo
...ce assembled in part 2;
fix the other piece of the spool holder;
fix the spool holder in the piece assempled in part 1.
enjoy! :)
Blastronauticus
thingiverse
free
Toyota Rav4 roof rack key by Blastronauticus
... face with the keyed profile on it.
i used petg but pla would be fine, just don't leave it in a hot car or it'll deform.
thingiverse
free

Enterprise D 1:2000 model display stand by Blastronauticus
...chbox wood pla, which required me to use a 0.6mm nozzle, so some of the finer details of the federation emblem were lost. engage.
thingiverse
free

Hydraulic Robot Arm 6-Axis by Blastronauticus
...speeds, and consider a smaller nozzle. i used a 0.2mm nozzle and 30mm/s for the outer wall speed, but 0.3mm or 0.4mm might be ok.
Trebuchet
thingiverse
free

Trebuchet by DevinWilcox
...trebuchet by devinwilcox
thingiverse
just a trebuchet.
thingiverse
free

Trebuchet by Tacospaceship
...trebuchet by tacospaceship
thingiverse
its a trebuchet.
thingiverse
free

Trebuchet by DemostheneS
...trebuchet by demosthenes
thingiverse
trebuchet by claire [created on 3dtin]
thingiverse
free

Trebuchet by DemostheneS
...trebuchet by demosthenes
thingiverse
trebuchet by claire [created on 3dtin]
thingiverse
free

Trebuchet by DemostheneS
...trebuchet by demosthenes
thingiverse
trebuchet by claire [created on 3dtin]
thingiverse
free

Trebuchet by DemostheneS
...trebuchet by demosthenes
thingiverse
trebuchet by claire [created on 3dtin]
thingiverse
free

Trebuchet by DemostheneS
...trebuchet by demosthenes
thingiverse
trebuchet by claire [created on 3dtin]
thingiverse
free

Trebuchet by DemostheneS
...trebuchet by demosthenes
thingiverse
trebuchet by claire [created on 3dtin]
thingiverse
free

Trebuchet by DemostheneS
...trebuchet by demosthenes
thingiverse
trebuchet by claire [created on 3dtin]
thingiverse
free

Trebuchet by DemostheneS
...trebuchet by demosthenes
thingiverse
trebuchet by claire [created on 3dtin]