Thingiverse
Extension to allow fitting a 40x80mm capacitor with the original battery pack into flashguns Metz 45 series by Luni
by Thingiverse
Last crawled date: 3 years ago
DISCLAIMER: Read this FIRST!
I can't be held responsible for anything that may happen to people or things by using or applying the informations contained in this document: if you do not agree don't read further. You have been warned.
DANGER!
The disassembling of a flashgun is DANGEROUS!
Remember that even disconnected from power and/or removed battery pack, a capacitor for flashgun can still retain for long time HIGH VOLTAGE that can hurt and even kill!
If you decide to disassemble or repair a flashgun please, take all the precautions to avoid incidents, wear goggles, thick rubber gloves and DISCHARGE the capacitor before acting on it, shorting its terminals with a 1000ohm 10W resistor for at least fifteen seconds or more.
THE THING!
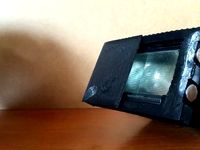
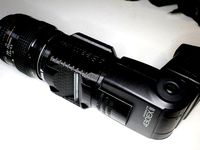
Do you own an old Metz 45 flashgun with the high voltage capacitor gone bad?
You can make it to work again by simply replacing it with a new one, but...
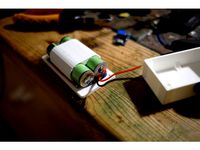
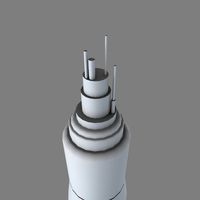
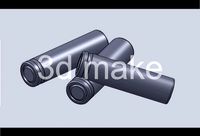
The high voltage capacitor is sometimes too expensive to justify the repair for the value of the flashgun or, having been able to find an affordable price on the Internet, is often longer than the original one (65mm), not allowing the insertion of the batteries after its replacement.
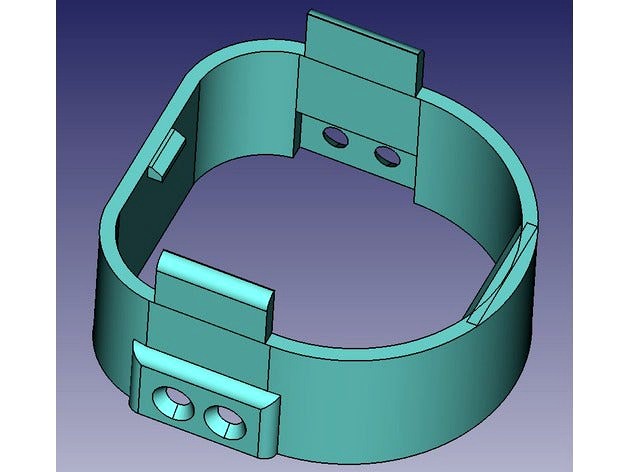
As you can see, I already had this problem and I thought that you will find in my project a useful workaround to repair your flashgun with a 40x80mm capacitor.
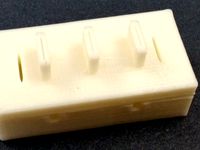
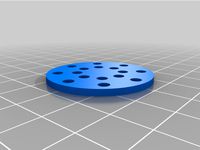
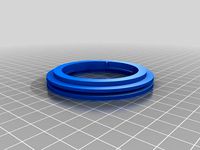
You can print this extension to be able to continue using the original battery pack.
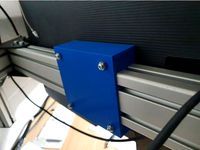
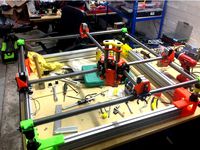
The only work to do on the flashgun casing, with the help of the 'just printed' piece, is to mark and drill two 2,5mm holes on each of the two little flaps that help to slide the battery pack into its receptacle, to allow to screw the extension on them, as shown in the photos.
To screw the piece I cutted four 3xMA countersunk head screws, leaving 2 millimeters of thread from their heads.
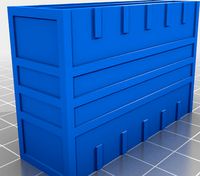
The .STL file foreseen two supports for the internal latches of the battery pack, as you can see evidenced in red in the drawings above. These supports consist of thin walls (0,2mm thick), that must be removed with a sharp cutter, taking care of not cutting off the latches themselves.
Thanks for reading and have good 3D printing time!
I can't be held responsible for anything that may happen to people or things by using or applying the informations contained in this document: if you do not agree don't read further. You have been warned.
DANGER!
The disassembling of a flashgun is DANGEROUS!
Remember that even disconnected from power and/or removed battery pack, a capacitor for flashgun can still retain for long time HIGH VOLTAGE that can hurt and even kill!
If you decide to disassemble or repair a flashgun please, take all the precautions to avoid incidents, wear goggles, thick rubber gloves and DISCHARGE the capacitor before acting on it, shorting its terminals with a 1000ohm 10W resistor for at least fifteen seconds or more.
THE THING!
Do you own an old Metz 45 flashgun with the high voltage capacitor gone bad?
You can make it to work again by simply replacing it with a new one, but...
The high voltage capacitor is sometimes too expensive to justify the repair for the value of the flashgun or, having been able to find an affordable price on the Internet, is often longer than the original one (65mm), not allowing the insertion of the batteries after its replacement.
As you can see, I already had this problem and I thought that you will find in my project a useful workaround to repair your flashgun with a 40x80mm capacitor.
You can print this extension to be able to continue using the original battery pack.
The only work to do on the flashgun casing, with the help of the 'just printed' piece, is to mark and drill two 2,5mm holes on each of the two little flaps that help to slide the battery pack into its receptacle, to allow to screw the extension on them, as shown in the photos.
To screw the piece I cutted four 3xMA countersunk head screws, leaving 2 millimeters of thread from their heads.
The .STL file foreseen two supports for the internal latches of the battery pack, as you can see evidenced in red in the drawings above. These supports consist of thin walls (0,2mm thick), that must be removed with a sharp cutter, taking care of not cutting off the latches themselves.
Thanks for reading and have good 3D printing time!
Similar models
thingiverse
free

High voltage generator by the_messy_desk
...chematic !
if you want more power you can replace the two aaa batteries by a 3.7v battery, holes for charching are predesigned !
grabcad
free

United Chemi-Con SMH 40x80mm 5pin snap-in capacitor
...e 40x80mm smh series large capacitors i used for my new capacitive discharge welder project.
i hope someone will find it useful.
thingiverse
free

*my latch G by imaicom
...led and assembled latch. it is assembled with a wooden hammer, and the distance can be adjusted by the number of 10mm extensions.
thingiverse
free
Parameterized battery pack with contacts (m4 screws and nuts) by LuisDUgena
...gn m4 screws and nuts you can use paperclips to make the connections.
there is two versions:
two aa batteries
three aa batteries
thingiverse
free
Hyphylite Capacitor Mount by AK0490
...rse
capacitor mount and battery lead tie down extension. if you just want the cap mount you can cut the rest off after printing.
thingiverse
free
18650 USB Rechargeable 7.4V battery pack by jacobtc
...battery.
work in progress!
warning: some electronic experience is needed, and soldering directly on 18650 cells can be dangerous!
thingiverse
free
Kobalt 80v Battery Connector by HeavyOsmium
...ions, shock hazards, fires or worse. do not use this connector if you are unfamiliar with high voltages or lithium ion batteries.
thingiverse
free

CMSbike f16 plus battery Lock Repair
...han 25mm.
do not worry if they will prove the screws, the screws are not locked in the battery, but it is the shape of the piece!
thingiverse
free

Anet A8 extruder fan hinge with latch by CuriousMan5
....
you need a m4 x 40mm countersunk screw and m4 nut to assemble hinge1 and hinge2.
m4 x 10mm countersunk screw is used for latch.
thingiverse
free

LedLenser P7.2 Battery Pack replacement by daMaker
...
thingiverse
the torchlight fell down and the battery pack broke in many ways.
the torchlight is good so i decided do repair it.
40X80Mm
thingiverse
free
40x80mm Profile to Vesa 100x100 Monitor Holder by thegreatdane7
...thegreatdane7
thingiverse
nicely fits the 40x80mm aluminum profiles and holds the monitor stable. should fit most profile types.
thingiverse
free
Container / Box / Crate by Wingedlionstudios
...box / crate by wingedlionstudios thingiverse container 60x40mm, 40x40mm, 40x80mm for miniature...
thingiverse
free

MPCNC Ramps Case by sunep
...a ramps case for mpcnc for mounting on a 40x80mm aluminum...
thingiverse
free
More Vase-mode Component Drawers
...drawers add:- label friendly 80x80mm wide drawer. label friendly 40x80mm narrow drawer with 5 small compartments. label friendly 40x80mm...
thingiverse
free
Mostly Printed CNC Table Corner by sunep
...corner by sunep thingiverse i had a aluminium extrusion 40x80mm laying around in 3m, cut it in 4 parts...
thingiverse
free
F2K Trebuchet by Blastronauticus
...for counterweight) thread 2meters or so, for sling cloth 40x80mm ish, i used microfiber, for sling paper clips 2x...
grabcad
free
United Chemi-Con SMH 40x80mm 5pin snap-in capacitor
...e 40x80mm smh series large capacitors i used for my new capacitive discharge welder project.
i hope someone will find it useful.
grabcad
free

cap alu 4080
...4080 grabcad a end cap for a aluminium profile 40x80mm ...
grabcad
free

Linear movement mechanism for aluminum profile
...aluminum profile grabcad linear movement mechanism for aluminum profile 40x80mm ...
Flashguns
3d_export
$5

Kingston 2gb flash drive 3D Model
...atch thingmabob twisting wind gubbins whatchamacallum gizmo that skwardj
kingston 2gb flash drive 3d model skwardj 17334 3dexport
thingiverse
free
Snoots for Flashguns by gauravmm
...n dimensions.scad. the size of the mount is cube([_od_w, _od_h, _od_z]), with _magnet_t extra width on either side of the y axis.
thingiverse
free

Canon EOS flashgun bracket offset
.../4" x 20 tpi nut, which can be hammered (press-fit) into the bracket, and allows the flashgun to be mounted to this bracket.
thingiverse
free
Heiland Flashgun Saber Parts by Mr_MinerAl
...by mr_mineral thingiverse a few parts for real heiland flashguns to make them look like vader sabers. most of...
thingiverse
free
Graflex Pommel Cap Vent template by Leoburton
...e speaker sounds if you're converting to a saber,
this is not for the kobold clip though, that you should measure separately.
thingiverse
free

Peak Switch Module
...switch module thingiverse this is for converting vintage peak flashguns into lightsabers. this design allows for the use of...
thingiverse
free

PX72 Adapter (Flashbattery) for 15x AG9 by Verticalascend
...out loosing the buttoncells.
congrats, you have a working 22,5v 72px derivate
an shorter adapter (49mm) for 14 button cells added
thingiverse
free
Adapters for mounting ring flash on Canon lenses by ProtoX3D
...enses and meike fc100 flashgun, which basically is a common ebay item and my guess that other "brands" could also work.
thingiverse
free
Electron flash adapters for Guerilla projectors by universalist
...hgun with a head that's at most 42mm thick.
with all adapters you'll need some duct tape to fix the flash to the adapter.
Luni
3ddd
$1

Кровать Lunis
... lunis
кровать lunis от немецкой фабрики hülsta
габариты кровати: 4070мм х 2210мм
матрас: 2000мм х 2000мм
thingiverse
free

ABSolute Flow Limiter (for small chinese aquarium pumps) by Luni
...millimeter down in the water, so, please, install the pump so that the outlet nozzle remains as close as possible to the surface.
thingiverse
free

JR compatible module enclosure for RC radio Walkera WK-1001 by Luni
...screw the lid of the module. these can be adjusted in height at need by cutting away the excess of material.
thanks for reading!
thingiverse
free

Campark action-camera gimbal counterweight and battery cover by Luni
...ando il pla, forse è necessario impostare le ventole di raffreddamento della stampa alla massima velocità.
grazie per aver letto!
thingiverse
free

Scorpio's Backpack - remix of Scorpio fan duct to allow using 40x40mm axial fans (for Smartrapcore) by Luni
... really solved my pla cooling printing troubles!
p.p.s.: i printed it on my homemade prusa clone because ready to print abs. ;-)
cg_trader
$15

Marble White and Materials Vol 2 Carrara Bianc
...used in ancient roman empire era, but was called luni marble, after the town near carrara [luna], where the...
3dwarehouse
free

Espelho Luni
...espelho luni
3dwarehouse
espelho com moldura em aço, alça em couro e detalhe em latão. d=70cm www.instagram.com/omadesign_br
3dwarehouse
free

Luni Bianco AC 27,9x28,6cm 10
...luni bianco ac 27,9x28,6cm 10
3dwarehouse
3dwarehouse
free

Luni Bianco PO 27,9x28,6cm 10
...luni bianco po 27,9x28,6cm 10
3dwarehouse
Metz
turbosquid
$10

metz - jardin botanique
... available on turbo squid, the world's leading provider of digital 3d models for visualization, films, television, and games.
3d_ocean
$14

WMF Lounge basket with green apples
...kitchen or dining room as a decor element. design: metz & kindler produktdesign. the set includes two round fruit...
thingiverse
free

Larry Metz by lnewkirk
...larry metz by lnewkirk
thingiverse
part for larry metz
thingiverse
free

Pont Éble Metz by Diolum
...pont éble metz by diolum
thingiverse
pont eble a l'echelle.
thingiverse
free

Keira Metz necklace by ksar
...keira metz necklace by ksar
thingiverse
quickly made, probably pretty poorly as well.
thingiverse
free

Metz 45CT strobist mount by macsimski
...ved tripod fixing screw to a better location.
2.6 added support material for fixing screw
2.7 changed to m6 stepbolt for tilting.
thingiverse
free

Metz 60CT-x battery shell by Gelandangan123
...h 6 x 18650 lipo cells and a 2s bms board to replicate the battery.
i printed this at 0.2mm, 3 layers walls and 20% gyroid infill
thingiverse
free

Photo Camera KeyChain by JKLEIN
...photo camera keychain by jklein thingiverse photo camera metz photo keychain & plate metz photo keychain creation...
thingiverse
free

simple Bouncer Metz 58 AF by Horex1200
...en stelle der kugel. dort ist die wandung nun 3mm stark. ich hoffe so lässt sich die kegel besser drucken (ohne infill)
horex1200
thingiverse
free

Micro-snyc receiver mount - Minimal by geotrick
...i added this to a speedring adapter for a metz 45 handle...
Capacitor
3d_export
$5

capacitor
...capacitor
3dexport
the capacitor obj,fbx,blend
3d_export
$5

Capacitor
...capacitor
3dexport
this is model of a 3-phase capacitor. it is made with 3ds max 2018 software version.
turbosquid
$3

capacitor
...osquid
royalty free 3d model capacitor for download as blend on turbosquid: 3d models for games, architecture, videos. (1499027)
turbosquid
$2

Capacitor
...royalty free 3d model capacitor for download as blend and fbx on turbosquid: 3d models for games, architecture, videos. (1658189)
3d_export
free

capacitor
...capacitor
3dexport
turbosquid
$35

capacitors
... available on turbo squid, the world's leading provider of digital 3d models for visualization, films, television, and games.
turbosquid
$15

Capacitor
... available on turbo squid, the world's leading provider of digital 3d models for visualization, films, television, and games.
turbosquid
$1
Capacitor A
... available on turbo squid, the world's leading provider of digital 3d models for visualization, films, television, and games.
turbosquid
free

Capacitor
... available on turbo squid, the world's leading provider of digital 3d models for visualization, films, television, and games.
3d_export
$5

Electrolytic Capacitor
...or used in circuits to store power.<br>model is uv mapped and includes all materials and custom textures for the capacitor.
Extension
3d_export
$5
extension plug - extension socket
...model. low poly and game ready. with blender files and texture (.png).<br>verts: 424<br>faces: 364<br>tris: 808
3ddd
$1

Moooi, Extension Chair
... стул , вешалка
стулья фирмы moooi, коллекция extension
turbosquid
$300

Bedroom Extension
...
royalty free 3d model bedroom extension for download as skp on turbosquid: 3d models for games, architecture, videos. (1682078)
3d_export
$5
palo extensible
...palo extensible
3dexport
turbosquid
$39
Leg Extension
...ee 3d model leg extension for download as obj, fbx, and blend on turbosquid: 3d models for games, architecture, videos. (1276776)
3d_export
$5

lampe extensible architecte
...lampe extensible architecte
3dexport
lampe extensible architecte maisons du monde
turbosquid
$20

Leg Extension
... available on turbo squid, the world's leading provider of digital 3d models for visualization, films, television, and games.
turbosquid
$2

Garage Extension
... available on turbo squid, the world's leading provider of digital 3d models for visualization, films, television, and games.
turbosquid
free

Extension cable
... available on turbo squid, the world's leading provider of digital 3d models for visualization, films, television, and games.
3ddd
$1

Moooi Extension Chair
...moooi extension chair
3ddd
moooi
http://www.moooi.com/products/extension-chair
45
3ddd
$1
T 45
...t 45
3ddd
t-45
кабинет руководителя t 45
12 предметов
подробнее:http://www.prezident-mebel.ru/index.php?productid=1541
design_connected
$18

Model 45
...model 45
designconnected
onecollection model 45 computer generated 3d model. designed by juhl, finn.
3d_export
free

vase 45
...vase 45
3dexport
3ddd
$1
Frap F101-45
...frap f101-45
3ddd
frap f101-45
turbosquid
$10

building 45
...osquid
royalty free 3d model building 45 for download as max on turbosquid: 3d models for games, architecture, videos. (1362764)
turbosquid
$7
45 Vetrina
...bosquid
royalty free 3d model 45 vetrina for download as max on turbosquid: 3d models for games, architecture, videos. (1630647)
turbosquid
$6
Bedcloth 45
...osquid
royalty free 3d model bedcloth 45 for download as max on turbosquid: 3d models for games, architecture, videos. (1522743)
3ddd
$1

Castle 8341-45
...castle 8341-45
3ddd
castle
люстра castle 8341-45
turbosquid
$25
Submachine 45
...yalty free 3d model submachine 45 for download as fbx and obj on turbosquid: 3d models for games, architecture, videos. (1563993)
turbosquid
$15

Curtain 45
...
royalty free 3d model curtain 45 for download as max and obj on turbosquid: 3d models for games, architecture, videos. (1324828)
Battery
3d_ocean
$2

Battery
...battery
3docean
battery electronic
a high quality battery .
3d_export
free
battery
...battery
3dexport
battery
3d_ocean
$5
Battery
...battery
3docean
battery electronics
a classic 6 v battery, high poly with materials
3d_ocean
$3
Batteries
...batteries 3docean aa aaa batteries battery d electronics energy materials power subdivision uv unwrapped aa,...
3d_export
$19
Lead-acid battery storage battery lithium battery
...ttery storage battery lithium battery
3dexport
1.lead-acid battery storage battery lithium battery 2.files include 3dmax obj fbx
3d_ocean
$7
Battery Model
...battery model
3docean
big battery car battery vehicle battery
car battery, big battery, vehicle battery.
3ddd
free
battery energier
...battery energier
3ddd
battery energier , батарейка
battery energier
turbosquid
free
battery
...battery
turbosquid
free 3d model battery for download as obj on turbosquid: 3d models for games, architecture, videos. (1151676)
3d_ocean
$1
Battery Model
...lack minus plus white yellow
this is battery model is about 1000 triangles. turntable preview is smoothed version of the battery.
3d_export
$10
battery 18650
...battery 18650
3dexport
battery 18650
Series
design_connected
$13
T-Series
...t-series
designconnected
bolia t-series computer generated 3d model. designed by burgess, james.
3ddd
$1
SYSTEMPOOL Serie Curve
..., serie curve , раковина
systempool serie curve
3ddd
free
Table Series 1
... series 1 , обеденный
table series 1 for dining room.
3ddd
free
KOLARZ Serie Explosion
... serie explosion , австрия
kolarz serie explosion 0109.118.5.kot. врай. текстуры.
3d_export
$8
jwm series elevator
...jwm series elevator
3dexport
jwm series elevator
3ddd
$1
Cappellini Serie 331
...cappellini serie 331
3ddd
cappellini
cappellini serie 331
3ddd
free
R3310 POS Series
...r3310 pos series
3ddd
терминал
r3310 pos series
turbosquid
$19

A series of curtains
...oyalty free 3d model a series of curtains for download as max on turbosquid: 3d models for games, architecture, videos. (1440593)
turbosquid
$15

Ribbed Series
...free 3d model ribbed series for download as max, obj, and fbx on turbosquid: 3d models for games, architecture, videos. (1311360)
turbosquid
$12

Dune series
...y free 3d model dune series for download as max, obj, and fbx on turbosquid: 3d models for games, architecture, videos. (1294893)
Pack
3d_export
$5
pack
...pack
3dexport
low poly pack
archibase_planet
free

Packing
...packing
archibase planet
wrapping wrapper packing
packing 2 - 3d model (*.gsm+*.3ds) for interior 3d visualization.
archibase_planet
free

Packing
...packing
archibase planet
packaging wrapping packing
packing 3 - 3d model (*.gsm+*.3ds) for interior 3d visualization.
archibase_planet
free

Packing
...packing
archibase planet
wrapper packing packaging
packing 4 - 3d model (*.gsm+*.3ds) for interior 3d visualization.
archibase_planet
free

Packing
...packing
archibase planet
packaging wrapping packing
packing 5 - 3d model (*.gsm+*.3ds) for interior 3d visualization.
archibase_planet
free

Packing
...packing
archibase planet
packing packaging wrapper
packing 7 - 3d model (*.gsm+*.3ds) for interior 3d visualization.
3d_export
$7

Health Pack Armor Pack and Ammo Pack 3D Model
...pack 3d model
3dexport
health armor ammo pack check point game
health pack armor pack and ammo pack 3d model u2501 99166 3dexport
3d_ocean
$79

Turrets Pack - Tower Defense Pack
...be used in any sf type of game, especially in tower defense games. the pack includes: - flack cannon: 6239 polygons - chain gu...
3d_export
$7
arbalet pack
...arbalet pack
3dexport
arbalet pack
3d_export
$5
rocks pack
...rocks pack
3dexport
rocks pack
Allow
turbosquid
$5

Not Allowed Sign
... available on turbo squid, the world's leading provider of digital 3d models for visualization, films, television, and games.
turbosquid
$5

no vehicles allowed signs
... available on turbo squid, the world's leading provider of digital 3d models for visualization, films, television, and games.
turbosquid
$5
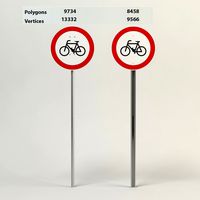
Traffic allowed bicycles sign
... available on turbo squid, the world's leading provider of digital 3d models for visualization, films, television, and games.
3d_ocean
$5

ktAnimWorx
...for timeslider on snap mode. thus allows smooth navigation +allow... ...
3d_export
$5

Kitchen set
...set with decorations. the size of the headset will allow you to install it in a house with high...
3d_export
free

Multifunctional Shader
...multifunctional shader 3dexport multifunctional shader (group of nodes) allow you to quickly and easily customize materials for your...
3d_export
$5

Magnetic GoPro Mount
...magnetic gopro mount 3dexport cool magnetic mount for gopro. allow you to mount the camera on flat metal surfaces...
3d_export
$20
Universal carrier
...towing artillery. the model is as detailed as voxels allow ...
3d_export
$5

gingerbread house cookie cutters
...cookie cutters 3dexport cookie cutters for baking gingerbread house. allow you to prepare a holiday house. children like it...
3ddd
free

Franke Planar / Light
...under the barrel has two strips of leds that allow it to illuminate the...
Fitting
turbosquid
$21

Fitting
... available on turbo squid, the world's leading provider of digital 3d models for visualization, films, television, and games.
turbosquid
$20

fitness
... available on turbo squid, the world's leading provider of digital 3d models for visualization, films, television, and games.
turbosquid
$5

Fitness
... available on turbo squid, the world's leading provider of digital 3d models for visualization, films, television, and games.
turbosquid
$1
fitness
... available on turbo squid, the world's leading provider of digital 3d models for visualization, films, television, and games.
3d_export
$5

fittings
...fittings
3dexport
low poly 3d model for games
3d_export
$5

fittings
...fittings
3dexport
low poly 3d model for game
3d_export
$30

pipe fit
...pipe fit 3dexport this models basically used for pipe fitting ...
3d_ocean
$19
Fitting room
...m fitting fitting room furniture interior materials photorealistic restaurant table textured wardrobe
fitting room with textures.
turbosquid
free
Fitness equipment, technogym tools, fitness ball
... available on turbo squid, the world's leading provider of digital 3d models for visualization, films, television, and games.
3ddd
$1
ITRE FIT
...itre fit
3ddd
itre
itre fit, моделировалась по фото. высота 800 мм, диаметр одного - 130 мм.
Original
3d_export
free
original table
...original table
3dexport
this is an original table with on one side a metallic square and on the other side a wood cylinder
design_connected
$16
Original beanbag
...designconnected
photo-realistic 3d models of the fatboy original beanbag for 3d architectural and interior design presentations.
turbosquid
$15

Original Gun
...squid
royalty free 3d model original gun for download as obj on turbosquid: 3d models for games, architecture, videos. (1483511)
turbosquid
$10
original faucet
...ree 3d model original faucet for download as ma, obj, and fbx on turbosquid: 3d models for games, architecture, videos. (1243295)
turbosquid
$30
original-armchairs
... available on turbo squid, the world's leading provider of digital 3d models for visualization, films, television, and games.
turbosquid
$29

Baileys Original
... available on turbo squid, the world's leading provider of digital 3d models for visualization, films, television, and games.
turbosquid
$20

Original Chair
... available on turbo squid, the world's leading provider of digital 3d models for visualization, films, television, and games.
turbosquid
$20

original-armchair
... available on turbo squid, the world's leading provider of digital 3d models for visualization, films, television, and games.
turbosquid
$12
Original Chair_039
... available on turbo squid, the world's leading provider of digital 3d models for visualization, films, television, and games.
turbosquid
$10

Sofia Original
... available on turbo squid, the world's leading provider of digital 3d models for visualization, films, television, and games.