Thingiverse
Experimental electrostatic Precipitator - WIP by TheChrisP
by Thingiverse
Last crawled date: 4 years, 2 months ago
/!\ WARNING :
This thing is experimental, use high voltage and can generate a strong electrostatic field if improperlly shielded.
This is NOT a finalised and safe product Do not try if you do not know exactly what you are doing. If you are under age, ask for adult supervision. Doing wrong manipulation can hurt you, kill you, burn your house or fry nearby electronic devices.
The share is only to allow people to test and improve it
/!\ USE THIS AT YOUR OWN RISK WITH THE UPMOST CAUTION
Does that sound scary enough for you ? Good, that's the spirit ;)
However, here is the thing:
3D Printing produce variable amount of ultra-fine particules that can be a concern for health, especially if your printer is operating in a small and close area.
There are various approach to reduce these particules, based on HEPA filters or activated carbon, but these methods are not perfects, HEPA is not so good to filter particules below 0.3 µm, and can host various bacetria after some time. Activated carbon can be efficient but tend to saturate over time.
An electrostatic precipitator (ESP) is a filtration device that removes fine particles, like dust and smoke, from a flowing gas using the force of an induced electrostatic charge minimally impeding the flow of gases through the unit. (Cf https://en.wikipedia.org/wiki/Electrostatic_precipitator) ESP are known to be efficient and widely used in industry.
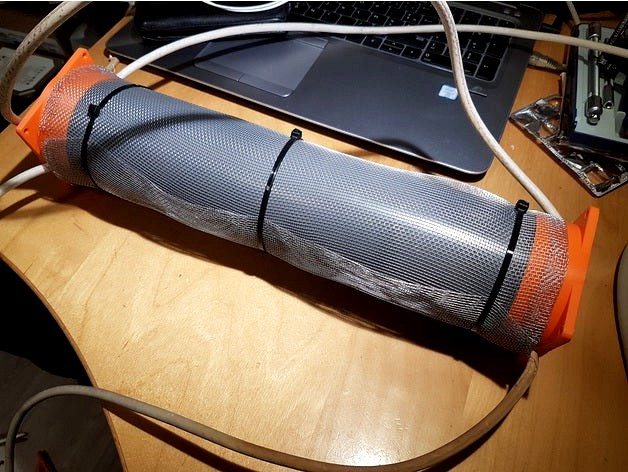
The goals of this prototype is to create an ESP suitable to include inside an enclosure, filtering air in closed circuit.
This ESP prototype use cylindric charging and collecting plate and use a central opposite charge for improved
I decided to use cylindric shape, with insulated edge, to limit Ozone production, based on this study: http://www.isesp.org/ISESP/ICESP%20X%20PAPERS/PDFS/Paper%203C1.pdf
BOM:
80mm diameter PVC tube (from 35 to 40 cm is fine)
80 mm fan (12 V)
2 small 16mm dimater copper tube (8 cm long)
Some coaxial cable.
A high voltage static generator (do not use pulsing one) with 12V power supply. I use a 20kV generator, but this is probably overkill. Starting with 1 kV should be fine. exemple: http://www.ebay.fr/itm/DC-12V-to-20000V-High-voltage-electrostatic-generator-negative-ion-generator-/171961910986?hash=item2809ba86caexperiments is needed here.
2 aluminium soda can. (the standard one)
Some screws, bolt, zip tie ...
Soda can have to been uncoated (inner and outer face) and cut. The most effective I found was to use a dremel with a round grinding stone. The cut have to be clean so that the can can be properly inserted inside the holders. A can holder is provided in the stl file to ease the manipulation and reduce the risk of cutting your hands. Please use gloves during these manipulation!
For now I'm not happy with the result, mainly because of the impact of the eletrostatic field to the surrounded eletronic devices. During my early test, the particule detector encounter strange unstability and unwanted reset. A proper shielding have to be defined to make it usable in a printing enclosure, it's where I'm stuck for now, before I would able to continue evaluation on particule capture rate.
This thing is experimental, use high voltage and can generate a strong electrostatic field if improperlly shielded.
This is NOT a finalised and safe product Do not try if you do not know exactly what you are doing. If you are under age, ask for adult supervision. Doing wrong manipulation can hurt you, kill you, burn your house or fry nearby electronic devices.
The share is only to allow people to test and improve it
/!\ USE THIS AT YOUR OWN RISK WITH THE UPMOST CAUTION
Does that sound scary enough for you ? Good, that's the spirit ;)
However, here is the thing:
3D Printing produce variable amount of ultra-fine particules that can be a concern for health, especially if your printer is operating in a small and close area.
There are various approach to reduce these particules, based on HEPA filters or activated carbon, but these methods are not perfects, HEPA is not so good to filter particules below 0.3 µm, and can host various bacetria after some time. Activated carbon can be efficient but tend to saturate over time.
An electrostatic precipitator (ESP) is a filtration device that removes fine particles, like dust and smoke, from a flowing gas using the force of an induced electrostatic charge minimally impeding the flow of gases through the unit. (Cf https://en.wikipedia.org/wiki/Electrostatic_precipitator) ESP are known to be efficient and widely used in industry.
The goals of this prototype is to create an ESP suitable to include inside an enclosure, filtering air in closed circuit.
This ESP prototype use cylindric charging and collecting plate and use a central opposite charge for improved
I decided to use cylindric shape, with insulated edge, to limit Ozone production, based on this study: http://www.isesp.org/ISESP/ICESP%20X%20PAPERS/PDFS/Paper%203C1.pdf
BOM:
80mm diameter PVC tube (from 35 to 40 cm is fine)
80 mm fan (12 V)
2 small 16mm dimater copper tube (8 cm long)
Some coaxial cable.
A high voltage static generator (do not use pulsing one) with 12V power supply. I use a 20kV generator, but this is probably overkill. Starting with 1 kV should be fine. exemple: http://www.ebay.fr/itm/DC-12V-to-20000V-High-voltage-electrostatic-generator-negative-ion-generator-/171961910986?hash=item2809ba86caexperiments is needed here.
2 aluminium soda can. (the standard one)
Some screws, bolt, zip tie ...
Soda can have to been uncoated (inner and outer face) and cut. The most effective I found was to use a dremel with a round grinding stone. The cut have to be clean so that the can can be properly inserted inside the holders. A can holder is provided in the stl file to ease the manipulation and reduce the risk of cutting your hands. Please use gloves during these manipulation!
For now I'm not happy with the result, mainly because of the impact of the eletrostatic field to the surrounded eletronic devices. During my early test, the particule detector encounter strange unstability and unwanted reset. A proper shielding have to be defined to make it usable in a printing enclosure, it's where I'm stuck for now, before I would able to continue evaluation on particule capture rate.