Thingiverse
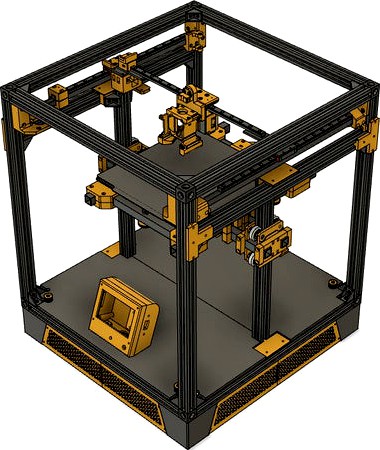
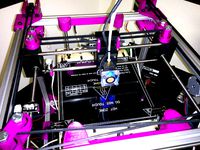
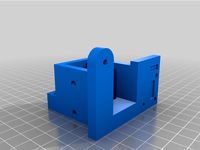
EvoB3 CoreXY 3D Printer by Braccoz
by Thingiverse
Last crawled date: 3 years, 4 months ago
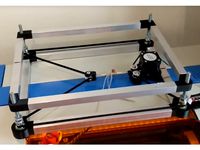
This is my custom CoreXY design that is loosely based onto HyperCube Evolution.
There's a lot to say about this printer, but i'll try to be as concise as possible:
The main design goals of this printer are:
very high print quality
easily enclosable
precise and smooth kinematics
fast (if you want to)
correct and sturdy belt pathing and use of toothed/smooth idlers
easy belt tensioning (heritage from Hypercube)
16T pulleys for maximum torque and precision
lightweight gantry
very rigid
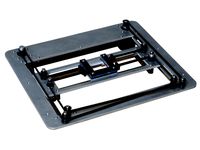
stable, reliable bed (as to not require constant releveling)
3 point bed leveling
single z-leadscrew (aka no more z-motors sync issues)
as cheap as possible while maintaining the highest possible quality standard
quiet
all in all, i think i nailed every single point of this list, maybe except the quiet one just because of the fans.
if you want a printer like this, then you're looking at the right design. If you want to maximize speed, and/or feel the need for ABL, then this might not be for you.
Should you decide to build this, message me (either here or on reddit https://www.reddit.com/user/Bracc8/) as i can provide help with many things that are not obvious about the build. Also, as of now (30th December 2020), i still have to prepare lots of additional stuff for release, like some documentation and files to print little helpers for drilling holes and the likes.
Be aware that this printer requires you to cut and drill some aluminium pieces. You can do without a CNC but you still got to have some drills and electric saws and be able to use them effectively.
Also, in the build are used some 10x10mm(x1mm thickness) and 15x15mm(x1mm thickness) aluminium square tubes. They are very very cheap (3 to 4€ per meter) and readily available at the local hardware store here in Europe, but i absolutely don't know if they can be found in the US locally or online at all)
Rough materials list:
4x 375mm 2020 V/T-Slot extrusions
4x 388mm 2020 V/T-Slot extrusions
4x 402mm 2020 V/T-Slot extrusions
2x 388mm 2020 V-Slot extrusions
1x 30x50mm(x3mm thickness) L shaped aluminium profile to be cut to 54.50mm width
about 50cm of 40mm(x3mm thickness) aluminium plate to be cut to two 40x50mm and two 60x21mm
8x openbuilds corner cubes
28x 2020 corner brackets
LOTS of M3 screws of all lengths
LOTS of M3 nuts
LOTS of M3 washers
2x M2x20mm screws
2x M2 nuts
8x M5x50 partially threaded screws
16x M5 washers
8x M5 self locking nuts
24x M5 flat slim head screws (they are the ones specific for the openbuilds corner cubes)
LOTS of M3 T-nuts
LOTS of M4 T-Nuts
LOTS of M4 screws and washers (short ones, for mounting the corners)
3x small ball bearings ~3mm (for Z micro tilt)
3x 300mm (295mm in reality) MGN9 rails with MGN9H carriages
2x 3x37mm steel shafts
4x 3x31mm steel shafts (you can get these shafts for free scavenging them in old cd/dvd drives and cutting them to length
2x 2GT 16T 5mm bore pulleys
6x 16T 3mm bore toothed idlers (with ball bearings)
2x 16T 3mm bore non-toothed idlers (with ball bearings)
2x 40mm fan
2x 4010 blower fans
1x 80mm fan
3x endstop mechanical switches with the little roller on the tip
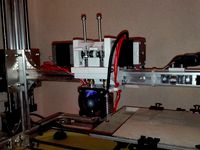
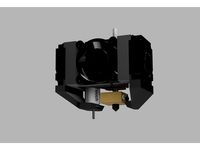
1x E3D v6 hotend or compatible alternative
2 meters of 2GT 6mm belt
2x 374mm 10x10mm square aluminium tubes
1x 309mm 10x10mm square aluminium tube
2x 385mm 15x15mm square aluminium tubes
2x 327mm 15x15mm square aluminium tubes
2x 188mm 15x15mm square aluminium tubes
8x polycarbonate v-wheels (it is important that you get PC wheels to avoid the flat spot issues of POM wheels)
8x openbuilds 6mm eccentric nuts
8x openbuilds 6mm spacers
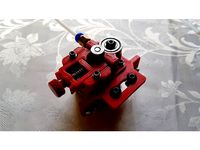
1x 8x350mm leadscrew with brass nut
1x 5mm to 8mm RIGID clamp style coupler (same as ender 3 basically)
3x bed springs
1x 220x220x3mm MK3 12/24v aluminium heated bed
1x 220x220mm magnetic PEI spring steel surface
4x nema17 stepper motors (i use 0.9° steppers for XY motors, rest is 1.8°)
1x extruder of your choice (i went with a cheap BMG extruder from aliexpress)
1 meter of ID2 OD4 bowden tube
1x SKR 1.3/1.4/1.4 Turbo mainboard with drivers of your choice (AT2100 seem to be very cheap but pretty good. i am running LV8729s @ 1/64)
1x LCD 12864 Full graphic smart display controller or compatible
1x MEAN WELL LRS-350-24
1x optional XL4015 DC-DC stepdown converter if you want to use some 12v fans
1x optional 8A DC-DC stepdown converter to power the PI4
1x optional Raspberry PI4 if you want klipper and octoprint
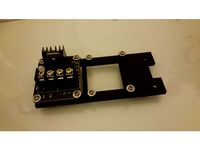
1x optional external mosfet module, if you like me don't trust the SKR too much
2x 212x411x5mm expanded PVC sheets. (or any material you like, i find expanded PVC easy to find and easy to cut by hand with an exacto knife or something)
1x IEC socket with fuse and switch
You'll also need these tools:
drill
M2, M3, M5 bits
M3, M5 tapping bits
a mini-dremel or similar
a bandsaw or circular saw
some small files
some sandpaper
an M8 threaded rod you'll use to kind of file down the burrs inside the 10x10 square tubes
now, for a little FAQ section:
Where are the STLs?
there are no stls (except for 1 to make thingiverse happy), instead the full CAD source files are provided so you can very easily modify stuff. It is made with Fusion 360.
Why not just build an HyperCube/HEVO ?
those printers have outdated designs, and have many flaws. They do work, but not to the kind of quality and precision (generally) of this machine.
Why not just build a Voron?
Vorons are super nice and i like them a lot, however they are also super expensive, and i'm not sure their Z-Axis solution is as precise/consistent as i'd like.
Why linear rails on X-Y and V-Wheels on Z?
simply put, because it's the smoothest solution possible. I've tried linear rails up to and including MGN15 and they are not even remotely smooth as V-Wheels for Z. They might be if you buy genuine HiWin. Anyway, this setup is relatively cheap and works extremely well. Do note tho, that polycarbonate wheels are mandatory to get the best quality, and that the Z-Motor mount has a micro-tilt adjustment to perfectly align the leadscrew to the bed assembly
Why no ABL/Mesh BL ?
because the aim here is to not really need those. From my experience, bed leveling is very stable with this printer. Mesh BL could be useful if your bed is warped, but that's an issue i like to solve mechanically rather than via software. My bed is a twotrees 220x220x3mm aluminium bed that was concave at the center. I straightened it with 3 small wood pieces, a straight edge and some patience
There's a lot to say about this printer, but i'll try to be as concise as possible:
The main design goals of this printer are:
very high print quality
easily enclosable
precise and smooth kinematics
fast (if you want to)
correct and sturdy belt pathing and use of toothed/smooth idlers
easy belt tensioning (heritage from Hypercube)
16T pulleys for maximum torque and precision
lightweight gantry
very rigid
stable, reliable bed (as to not require constant releveling)
3 point bed leveling
single z-leadscrew (aka no more z-motors sync issues)
as cheap as possible while maintaining the highest possible quality standard
quiet
all in all, i think i nailed every single point of this list, maybe except the quiet one just because of the fans.
if you want a printer like this, then you're looking at the right design. If you want to maximize speed, and/or feel the need for ABL, then this might not be for you.
Should you decide to build this, message me (either here or on reddit https://www.reddit.com/user/Bracc8/) as i can provide help with many things that are not obvious about the build. Also, as of now (30th December 2020), i still have to prepare lots of additional stuff for release, like some documentation and files to print little helpers for drilling holes and the likes.
Be aware that this printer requires you to cut and drill some aluminium pieces. You can do without a CNC but you still got to have some drills and electric saws and be able to use them effectively.
Also, in the build are used some 10x10mm(x1mm thickness) and 15x15mm(x1mm thickness) aluminium square tubes. They are very very cheap (3 to 4€ per meter) and readily available at the local hardware store here in Europe, but i absolutely don't know if they can be found in the US locally or online at all)
Rough materials list:
4x 375mm 2020 V/T-Slot extrusions
4x 388mm 2020 V/T-Slot extrusions
4x 402mm 2020 V/T-Slot extrusions
2x 388mm 2020 V-Slot extrusions
1x 30x50mm(x3mm thickness) L shaped aluminium profile to be cut to 54.50mm width
about 50cm of 40mm(x3mm thickness) aluminium plate to be cut to two 40x50mm and two 60x21mm
8x openbuilds corner cubes
28x 2020 corner brackets
LOTS of M3 screws of all lengths
LOTS of M3 nuts
LOTS of M3 washers
2x M2x20mm screws
2x M2 nuts
8x M5x50 partially threaded screws
16x M5 washers
8x M5 self locking nuts
24x M5 flat slim head screws (they are the ones specific for the openbuilds corner cubes)
LOTS of M3 T-nuts
LOTS of M4 T-Nuts
LOTS of M4 screws and washers (short ones, for mounting the corners)
3x small ball bearings ~3mm (for Z micro tilt)
3x 300mm (295mm in reality) MGN9 rails with MGN9H carriages
2x 3x37mm steel shafts
4x 3x31mm steel shafts (you can get these shafts for free scavenging them in old cd/dvd drives and cutting them to length
2x 2GT 16T 5mm bore pulleys
6x 16T 3mm bore toothed idlers (with ball bearings)
2x 16T 3mm bore non-toothed idlers (with ball bearings)
2x 40mm fan
2x 4010 blower fans
1x 80mm fan
3x endstop mechanical switches with the little roller on the tip
1x E3D v6 hotend or compatible alternative
2 meters of 2GT 6mm belt
2x 374mm 10x10mm square aluminium tubes
1x 309mm 10x10mm square aluminium tube
2x 385mm 15x15mm square aluminium tubes
2x 327mm 15x15mm square aluminium tubes
2x 188mm 15x15mm square aluminium tubes
8x polycarbonate v-wheels (it is important that you get PC wheels to avoid the flat spot issues of POM wheels)
8x openbuilds 6mm eccentric nuts
8x openbuilds 6mm spacers
1x 8x350mm leadscrew with brass nut
1x 5mm to 8mm RIGID clamp style coupler (same as ender 3 basically)
3x bed springs
1x 220x220x3mm MK3 12/24v aluminium heated bed
1x 220x220mm magnetic PEI spring steel surface
4x nema17 stepper motors (i use 0.9° steppers for XY motors, rest is 1.8°)
1x extruder of your choice (i went with a cheap BMG extruder from aliexpress)
1 meter of ID2 OD4 bowden tube
1x SKR 1.3/1.4/1.4 Turbo mainboard with drivers of your choice (AT2100 seem to be very cheap but pretty good. i am running LV8729s @ 1/64)
1x LCD 12864 Full graphic smart display controller or compatible
1x MEAN WELL LRS-350-24
1x optional XL4015 DC-DC stepdown converter if you want to use some 12v fans
1x optional 8A DC-DC stepdown converter to power the PI4
1x optional Raspberry PI4 if you want klipper and octoprint
1x optional external mosfet module, if you like me don't trust the SKR too much
2x 212x411x5mm expanded PVC sheets. (or any material you like, i find expanded PVC easy to find and easy to cut by hand with an exacto knife or something)
1x IEC socket with fuse and switch
You'll also need these tools:
drill
M2, M3, M5 bits
M3, M5 tapping bits
a mini-dremel or similar
a bandsaw or circular saw
some small files
some sandpaper
an M8 threaded rod you'll use to kind of file down the burrs inside the 10x10 square tubes
now, for a little FAQ section:
Where are the STLs?
there are no stls (except for 1 to make thingiverse happy), instead the full CAD source files are provided so you can very easily modify stuff. It is made with Fusion 360.
Why not just build an HyperCube/HEVO ?
those printers have outdated designs, and have many flaws. They do work, but not to the kind of quality and precision (generally) of this machine.
Why not just build a Voron?
Vorons are super nice and i like them a lot, however they are also super expensive, and i'm not sure their Z-Axis solution is as precise/consistent as i'd like.
Why linear rails on X-Y and V-Wheels on Z?
simply put, because it's the smoothest solution possible. I've tried linear rails up to and including MGN15 and they are not even remotely smooth as V-Wheels for Z. They might be if you buy genuine HiWin. Anyway, this setup is relatively cheap and works extremely well. Do note tho, that polycarbonate wheels are mandatory to get the best quality, and that the Z-Motor mount has a micro-tilt adjustment to perfectly align the leadscrew to the bed assembly
Why no ABL/Mesh BL ?
because the aim here is to not really need those. From my experience, bed leveling is very stable with this printer. Mesh BL could be useful if your bed is warped, but that's an issue i like to solve mechanically rather than via software. My bed is a twotrees 220x220x3mm aluminium bed that was concave at the center. I straightened it with 3 small wood pieces, a straight edge and some patience
Similar models
thingiverse
free

Print bed Frame for 2020 aluminium frame printer by Sjekkie
...cer m3x11
4x srew m3x40
4x m3 nuts
endstop parts
2x m3x25
1x m3x20
3x m3 nuts
all printed parts are printed with esum pla+ zilver
thingiverse
free
Dual Extruder by Psycho1981
...ng:
4x allen screw m5
4x square nut m5
4x washer m5
electronic:
-ramps 1.4 board
-atx power supply
-firmware "marlin"
thingiverse
free
Anet AM6/AM8 Dual Mosfet Holder by _silaz
...m3 nut
2x m5x10
2x m5 washer
2x m5 hammer nut for aluminium extrusion
size of mosfet i use is 52mmx42mm from mid-hole to mid-hole
thingiverse
free
Bowden Extruder for 2020 Profile - 1.75 MK7 608zz by Enrike_X5
...around 15mm lenth)
1x nema17 stepper
1x ptfe tube
you may need a tap kit (m5 and m8) to correct the threads, and a 2mm drill bit.
thingiverse
free

Filament holder
...n testing stage.
required parts
8mm shaft
2x fl08 bearings
2x m5 bolts
4x m5 washers
2x m5 nuts
1x m3 bolt
1x m3 washer
1x m3 nut
thingiverse
free
K40 Laser Motorized Z-Bed by quintesse
... i don't mind so much, i don't plan on using very thick materials.
more exact instructions will be added at a later date!
thingiverse
free
Jgaurora A5X Z-Carriage
...blower 40x40x10 all parts have been drawn by myself. similarties to other parts by other designers are not intentional...
thingiverse
free

Artillery Sidewinder x1 - Gantry Support by Renegat3
...additional hardware: 2x 10mm aluminium tubes (or something of similar diameter) 8x m5x35mm bolts 4x m5 nuts 26x m3x20mm...
thingiverse
free
One Z-Motor / Filament holder solution for Prusa i3 Rework by WieMi
...t)
360mm m8 threaded rod (middle)
2x 380mm m8 threaded rod (right)
11x m3 nut
8x m3 - 8mm grub screw
8x m8 nut
5x 688zz bearing
thingiverse
free
Anet A8 Z Axis End Stop Adjuster by FredGenius
...a knob to make adjusting easier.
you will need:
2x m3x18mm screws
2x m3 nuts
2x m3x25mm screws
1x m5x40mm hex bolt
1x m5 half nut

Corexy
thingiverse
free

CoreXY by Kaz_tech
...corexy by kaz_tech
thingiverse
this is the model of corexy platform. i separately put the parts on this place.
thingiverse
free

corexy plotter by tjwan
...corexy plotter by tjwan
thingiverse
parts for corexy mill inspired by http://der-frickler.net/technik/corexyportal
thingiverse
free
ScribbleJ CoreXY Beta by ScribbleJ
...j/corexy-v1https://github.com/scribblej/corexy-v1#corexy-beta
full gallery of development photos here: http://imgur.com/a/donun
thingiverse
free
CoreXY Emblem by emkajot
...by emkajot
thingiverse
an emblem for your corexy printer.
size: 100mm x 38mm x 2mm.
update: added a version with a proper mount.
thingiverse
free

SolidCore CoreXY Carriage by shanehooper
...olidcore 3d printer. this design could be used in other corexy 3d printers.
also see:https://3ddistributed.com/corexy-3d-printer/
thingiverse
free
CoreXY 3D Printer Model by ReginaFabricam
...bricam
thingiverse
this is an original design of a corexy printer.https://www.tinkercad.com/things/jggr9qk4s4p-3d-printer-corexy
thingiverse
free

coreXY Upper structure Left
...corexy upper structure left
thingiverse
my customized corexy 3d printer upper left parts
thingiverse
free
CoreXY by frankie
...ing machines, etc. the design is described in greater detail at http://www.corexy.com . a video is at http://vimeo.com/40914530 .
thingiverse
free

Endstop block for CoreXY carriage by svkeulen
...endstop block for corexy carriage by svkeulen
thingiverse
endstop for corexy carriage
thingiverse
free
X carriage for the CoreXY MGN12 by hackerbijay
...x carriage for the corexy mgn12 by hackerbijay
thingiverse
x carriage for the corexy frame
Printer
archibase_planet
free

Printer
...inter
archibase planet
printer laser printer pc equipment
printer n120614 - 3d model (*.gsm+*.3ds) for interior 3d visualization.
archibase_planet
free

Printer
...rchibase planet
laser printer office equipment computer equipment
printer - 3d model (*.gsm+*.3ds) for interior 3d visualization.
turbosquid
$100

Printer
...er
turbosquid
royalty free 3d model printer for download as on turbosquid: 3d models for games, architecture, videos. (1487819)
turbosquid
$3

Printer
...turbosquid
royalty free 3d model printer for download as max on turbosquid: 3d models for games, architecture, videos. (1670230)
turbosquid
$1

printer
...turbosquid
royalty free 3d model printer for download as max on turbosquid: 3d models for games, architecture, videos. (1595546)
turbosquid
$1

printer
...turbosquid
royalty free 3d model printer for download as max on turbosquid: 3d models for games, architecture, videos. (1595105)
turbosquid
$10

Printer
...id
royalty free 3d model printer for download as max and 3dm on turbosquid: 3d models for games, architecture, videos. (1607146)
turbosquid
$7

Printer
...royalty free 3d model printer for download as ma, ma, and obj on turbosquid: 3d models for games, architecture, videos. (1644580)
turbosquid
$30

Printer
... available on turbo squid, the world's leading provider of digital 3d models for visualization, films, television, and games.
turbosquid
$20

Printer
... available on turbo squid, the world's leading provider of digital 3d models for visualization, films, television, and games.