Cults

ESM P-51D Accessories
by Cults
Last crawled date: 6 years, 2 months ago
the items here are for the 1:6.26 scale ESM P-51 model. They can be used on other models off course. Just calculate the size difference and scale to size.
----------
Cockpit:
Avionics01 - Behind-seat fuel tank with VHF and battery detail.
Seat01 - Rear seat plate.
Seat02 - Headrest backing.
Seat03 - Headrest.
Seat04 - Hook for antenna wire.
Seat05 - Seatback.
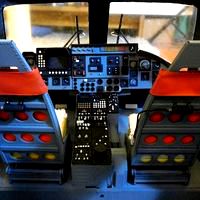
ESMinstrument01 - Instrument panel
Some of the photos show prototype parts that may be slightly different. For example the seat back plate doesn't have mounting holes in the photos. The instrument panel in the photo is oversize. The one listed here is more scale.
The avionics assembly is secured to the fuselage to two plywood cross members which you glue to the top of the horizontal frame already in place in the fuselage. Add wires using thin electrical wires.
The rear seat plate should be bent just below the grab handle. Use a heat gun and carefully heat from the back until it can be bent. It helps to lay it flat and hold something flat under when you bend, like a spatula. After bending and painting secure it to the avionics assembly using two self tapping screws.
The seatback should be glued to the back plate after the back plate is attached to the avionick assembly.When installed in the cockpit, the seatback should sit 100 mm rear from the canopy frame.
Attach the hook to the back of the rear seat plate and secure with a #0 countersunk screw. Then glue on the headrest backing and headrest. I recommend using a spring between the seat plate and antenna wire to avoid handling damage.
Print the jpg in ESMinstrument.zip and glue to the back of the instrument panel. The jpg should come out 83 mm wide at 300 dpi.
------------
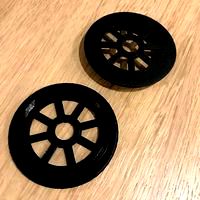
Aeroprop Spinner:
Spinner01 - Spinner backplate.
Spinner02 - Spinner cone.
10 mm center hole and 4 mm bolt hole. The head of the bolt needs to be ground down in diameter to fit the hole in the cone of the spinner. The hole needs to be this small to look scale.
------------
Hard point:
Hardpoint01 - One complete hard point.
Glue the halves together after printing. Install 385 mm fron the centerline and the rear of the hardpoint 185 mm from the flap trailing edge.
------------
Exhaust stacks:
Exhaust01 - Left and right exhaust stacks.
------------
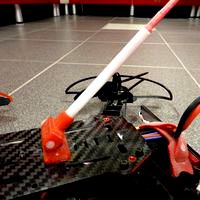
Rear dorsal antenna:
Antenna01 - Dorsal antenna.
I recommend printing four even though you only need one to avoid overheating the plastic. Install with a screw 380 mm forward of the rudder hinge point. This is the scale position.
----------
Cockpit:
Avionics01 - Behind-seat fuel tank with VHF and battery detail.
Seat01 - Rear seat plate.
Seat02 - Headrest backing.
Seat03 - Headrest.
Seat04 - Hook for antenna wire.
Seat05 - Seatback.
ESMinstrument01 - Instrument panel
Some of the photos show prototype parts that may be slightly different. For example the seat back plate doesn't have mounting holes in the photos. The instrument panel in the photo is oversize. The one listed here is more scale.
The avionics assembly is secured to the fuselage to two plywood cross members which you glue to the top of the horizontal frame already in place in the fuselage. Add wires using thin electrical wires.
The rear seat plate should be bent just below the grab handle. Use a heat gun and carefully heat from the back until it can be bent. It helps to lay it flat and hold something flat under when you bend, like a spatula. After bending and painting secure it to the avionics assembly using two self tapping screws.
The seatback should be glued to the back plate after the back plate is attached to the avionick assembly.When installed in the cockpit, the seatback should sit 100 mm rear from the canopy frame.
Attach the hook to the back of the rear seat plate and secure with a #0 countersunk screw. Then glue on the headrest backing and headrest. I recommend using a spring between the seat plate and antenna wire to avoid handling damage.
Print the jpg in ESMinstrument.zip and glue to the back of the instrument panel. The jpg should come out 83 mm wide at 300 dpi.
------------
Aeroprop Spinner:
Spinner01 - Spinner backplate.
Spinner02 - Spinner cone.
10 mm center hole and 4 mm bolt hole. The head of the bolt needs to be ground down in diameter to fit the hole in the cone of the spinner. The hole needs to be this small to look scale.
------------
Hard point:
Hardpoint01 - One complete hard point.
Glue the halves together after printing. Install 385 mm fron the centerline and the rear of the hardpoint 185 mm from the flap trailing edge.
------------
Exhaust stacks:
Exhaust01 - Left and right exhaust stacks.
------------
Rear dorsal antenna:
Antenna01 - Dorsal antenna.
I recommend printing four even though you only need one to avoid overheating the plastic. Install with a screw 380 mm forward of the rudder hinge point. This is the scale position.
Similar models
cults
$11

Scale wheels and tires for ESM P-51 Mustang
...ld require a lot of difficult to remove support material. here's a video showing the gear doors:
https://youtu.be/2lypqokaezg
cults
$14

Scale helicopter seats. Westland Lynx 1:8 seats.
... with headrest.
seat03.stl - pillow, emergency seat pack and tray for the seat pack.
seat04.stl - shafts for the seat mechanism.
cults
$35
Vario Lynx 1:8 scale cockpit interior.
... cross tubes for the seat mechanism.
seat05 - floor clips for clipping on the seats. use 1.6 mm piano wire between the seat lugs.
cults
$23

Vario Lynx 1:8 scale cabin and cockpit doors.
... door handles and emergency release handles.
video of door removal and installation:
https://www.youtube.com/watch?v=mzdk6oaexa8
cults
free

Small Spinner _ Small Spinner
... by force or with glue if necessary.
bearing + nuts + caps must be inserted with force or glue if necessary.
cults
free

Small Spinner _ Small Spinner
... force or with glue if necessary.
bearing + nuts + caps must be inserted with force or glue if necessary.
cults
free
eTurbine TB250 antenna support
...e existing holes on the chassi
the pivot is formed by a nylon screw m5
to keep the antenna wire, i use a straw cut lengthwise
cults
$23

Vario Lynx 1:8 external scale detail parts.
...center antenna.
hf02.stl - middle and rear hf antenna posts.
anticollision01.stl - anti collision lights for the top of the tail.
cults
free

Fidget Spinner
...se classic bearing abec 5 with diameter 22 mm.
feel free to customize it here: https://www.vectary.com/u/meshtush/fidget-spinner
cults
free

Funkey AS350 1/8-scale accessories.
... the cargo hook outside, and a thin steel cable runs inside to operate the lock. i used 0,6 mm cable left over from an arf plane.
51D
cults
$2

Candy washing machine door hook Top 11551D
...g machine candy top 115 51d.
it has been printed and works perfectly on the washing machine.
do not buy the door + hook assembly.
cults
$11
Scale wheels and tires for ESM P-51 Mustang
...tires for esm p-51 mustang cults rc p-51 p-51b p-51d mustang esm scale model wheel printable scale wheels for...
Esm
cults
$11

Wheel set for ESM F7F Tigercat.
...ww.youtube.com/watch?v=7hlkjdslank
video of my nose wheel:
https://youtu.be/ukhxzvsbtse
for personal use only, not for resale.
cults
$11
Scale wheels and tires for ESM P-51 Mustang
...ld require a lot of difficult to remove support material. here's a video showing the gear doors:
https://youtu.be/2lypqokaezg
cults
$22
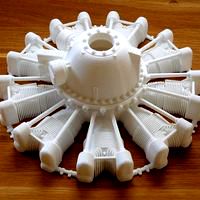
Dummy radial engine. Pratt & Whitney R2800
...formed dummy engines. designed for my 1:7.5 scale rc esm f7f tigercat. diameter: 166 mm. inside cavity large diameter:...
Mustang
cults
free

MUSTANG 2016
...mustang 2016
cults
car model mustang sport
pretty pretty this mustang to print / paste the color you want!
cults
free

Mustang P-51
...mustang p-51
cults
p-51 mustang warbird aircraft. plane
warbird mustang p-51
cults
$10

ford mustang gt 500
...odel gt500
a 100% printable model! a ’ford shelby mustang gt 500, with a lot of details, designed especially for fdm 3d printers.
cults
$3

P51 MUSTANG (P51B-5 NA)
...a6m3-zero
f4u cosair: https://cults3d.com/en/art/f4u-corsair
sr71 a blackbird: https: // cults3d .com / gadget / sr71-a-blackbird
cults
$11
Scale wheels and tires for ESM P-51 Mustang
...ld require a lot of difficult to remove support material. here's a video showing the gear doors:
https://youtu.be/2lypqokaezg
cults
free

Wolverine Re-Sculpt
...wolverine re-sculpt cults thanks mustang dave for finding this and making it printable in...
cults
$4

SmallToys - Cars pack
...trains ...). this pack contains 8 vehicles including the mustang car also available separately (sample). update (january 2018): added...
cults
free

Ghostbusters Terror Dog Re-Sculpted
...ghostbusters terror dog re-sculpted cults thanks again mustang dave for finding it and adam beamish for the...
cults
free

Ultimate Biplane 10-300S
...hands). few years ago i wanted to build the mustang p-51. i found some plans and started building. however,...
cults
free

Panthro Resculpted (36mb)
...panthro resculpted (36mb) cults thanks to mustang dave for finding it, and of course adam beamish...
51
cults
free
Mustang P-51
...mustang p-51
cults
p-51 mustang warbird aircraft. plane
warbird mustang p-51
cults
$11
Scale wheels and tires for ESM P-51 Mustang
...ld require a lot of difficult to remove support material. here's a video showing the gear doors:
https://youtu.be/2lypqokaezg
cults
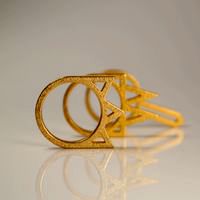
$7

bague feuilletée
...bague feuilletée cults bague design taille 51 ...
cults
$7

bague papillon T51
...bague papillon t51
cults
bague design taille 51.
cults
$7

bague perlée T51
...bague perlée t51
cults
bague design taille 51.
cults
$8

bague siamoise ondulée T51
...bague siamoise ondulée t51
cults
bague design taille 51.
cults
$7

bague fragment ondulée T51
...bague fragment ondulée t51
cults
bague design taille 51.
cults
free

Bevel Gear Toy Set, 17/51 Tooth or 3:1 Ratio
... check out my website or my shop on etsy!
http://shookideas.com
https://www.etsy.com/shop/shookideas?ref=hdr_shop_menu
thanks!
cults
$1
Filament spool shaft
...the side of the filament coil (3 files available 51 mm, 53 mm, 55 mm) for a 10 mm...
cults
free

Bust of Auguste crowned with oak
...from the roman villa chiragan martres-tolosane (excavations 1826-1830). h. 51 l. 34 p. 25 cm inv. ra 57 https://tools.wmflabs.org/reasonator/?&q=24580187...
Cockpit
cults
free

Millenium Falcon, Cockpit.
...e top and bottom hulls only, and is 717.5mm wide, 1000mm deep and 244.46mm tall or 28.228in wide, 39.370in deep and 9.606in tall.
cults
$23
Vario Lynx 1:8 scale cabin and cockpit doors.
... door handles and emergency release handles.
video of door removal and installation:
https://www.youtube.com/watch?v=mzdk6oaexa8
cults
$35
Vario Lynx 1:8 scale cockpit interior.
... cross tubes for the seat mechanism.
seat05 - floor clips for clipping on the seats. use 1.6 mm piano wire between the seat lugs.
cults
free

XL-RCP 16.0 XYCLOPS: Cockpit camera pan-tilt for 808 # 16 HD cam
...era / menu-id-118.html build this 3d parts so would look "cracky" on some 3d viewer but no problem during 3d printing.
cults
$1

Fire extinguisher for model, model
...helicopters, i needed to fine-tune the interior of the cockpit and the model rendering of a fire extinguisher. now...
cults
free

XL-RCP 14.0 HAWX EYE: Nano camera pan-tilt for 808 # 16
...full freedom view from all angle at close the cockpit dash view and wings. originally i had both plane:...
cults
$110

Airbus Knob
...scale, for use in the manufacture of flight simulators cockpit, professional or amateur, all ready for 3d...
cults
free

No Mans Sky Ship 2
...is now fixed). also improved the inside of the cockpit - the section behind the seat looked...
cults
free

GBE: Rapid Air Transport
...body is printed in fillamentum pla extrafill metallic grey cockpit canopy is printed in fillamentum pla extrafill iceland blue...
cults
$23
Vario Lynx 1:8 external scale detail parts.
...ice01.stl - ice accretion indicator for right side under cockpit door. pitot01.stl - pitot tube. flotation01.stl - front flotation...
Instrument
cults
$18

Instrument with strings
... music rope guitar custom kit
instrument de musique à 4 cordes pensé et créé par moi , en kit , pour la plupart des imprimantes .
cults
free
Jinghu (Chinese Bowed Instrument)
...jinghu (chinese bowed instrument)
cults
jinghu (chinese bowed instrument)
jinghu (chinese bowed instrument)
cults
free

Balalaika (Russian Stringed Instrument)
...balalaika (russian stringed instrument)
cults
balalaika (russian stringed instrument)
balalaika (russian stringed instrument)
cults
free
Recorder (Music instrument)
...recorder (music instrument)
cults
a fully 3d printable instument
cults
free

3D Printed One Man Band Musical Instrument
...be.com/watch?v=_yq-dfcyeas
one man band how to assemble: https://www.youtube.com/watch?v=2v9czutdlus
thank you for your support!
cults
free

Loosen ropes
...to loosen or tighten the strings of a string instrument ...
cults
$6

ukulele
...ukulele cults ukulele instrument guitar toy 3d printable...
cults
free

Chromatic Panflute
...chromatic panflute cults flute recorder instrument panflute chromatic a chromatic tenor panflute from c3 to...
cults
free

Shamisen Tuning Peg
...shamisen tuning peg cults accessory instrument music peg shamisen string tool tuning tuning peg for...
cults
$1

Arm Mini Cooper
...for gps or tel, which adapts to countryman minicopper instrument all models until...
Plane
cults
free
Plane of Chains
...plane of chains
cults
plane of chains
plane of chains
cults
free

Bi Plane
...bi plane
cults
bi plane
bi plane
cults
free

Model plane
...model plane
cults
model plane
model plane
cults
free

A10 Plane
...a10 plane
cults
a10 warthog plane. a classic!
cults
free
RC Plane Stand
...rc plane stand
cults
rc plane stand
rc plane stand
cults
free

Skis for RC planes
...skis for rc planes
cults
skis for rc planes
skis for rc planes
cults
free

Little Jet Plane
...little jet plane
cults
little jet plane
little jet plane
cults
$5

Paper Plane Pendant
...his is a cute little paper plane pendant like one of the planes you used to make as a kid. well at least i made a lot of them...
cults
$2

Paper Plane Nose
...
avion
this is a nose cone for the front of a paper plane. it will help your plane fly great distances. instead of short flights.
cults
free

Playmobil plane landing gear
...playmobil plane landing gear
cults
playmobil plane landing gear
playmobil plane landing gear
P
cults
free

P-47 Thunderbolt
...p-47 thunderbolt
cults
p-47 thunderbolt
p-47 thunderbolt
cults
free
Mustang P-51
...mustang p-51
cults
p-51 mustang warbird aircraft. plane
warbird mustang p-51
cults
$3

Curtiss P 40 Warhawk
...curtiss p 40 warhawk
cults
curtiss p 40 warhawk
curtiss p 40 warhawk
cults
free
Schwarz P surface lattice
...schwarz p surface lattice
cults
schwarz p surface lattice
schwarz p surface lattice
cults
$1

I said with letter P
...i said with letter p
cults
said letter p
dimensions 30mm x 40mm x 3mm.
cults
$7
p a w
...lts
janeandlisa dontbesuchasquare ring customjewelry
let your inner animal show with this little one. perfect for ring stacking.
cults
free

smarthone and tablet PC stand - uni-stand-P -
...d tablet pc stand - uni-stand-p -
cults
smarthone and tablet pc stand - uni-stand-p
smarthone and tablet pc stand - uni-stand-p -
cults
free

MRH MOLLE To P-Rail Adapter
... another mrh accessory, this converts any p-rail system into a molle compatible system, male & female adapters available.
cults
free

Jonction-P
...nce. the 3d model should adjust to it’s new dimensions automatically.
make sure to watch the video: https://youtu.be/b27dtyzjgwe
cults
free

Triple P-Rails
...e p-rails
cults
great for air-soft.
!don't forget to check out my other designs and follow my daily kookoo uploads, enjoy ;)
Accessories
cults
$2

Accessories of Ryunosuke
...accessories of ryunosuke
cults
accessories of ryunosuke idolish7
accessories of ryunosuke game: idolish7.
cults
free

Bathroom accessory
...bathroom accessory
cults
cup toothbrush soap dish bathroom sdb accessory
3 sdb accessory - cup - toothbrush holder - soap dish.
cults
$1
Accessory for cell phone
...accessory for cell phone
cults
accessory cell phone home charger cable
accessory so that the cell phone cable is not loose
cults
$3
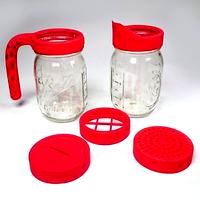
Mason Jar Accessories
... home use. they are compatible with the united states version of the mason jar and they all work with the metal sealing insert.
cults
free

Kuromi accessories (Necklace, Earrings, Ring)
...sories (necklace, earrings, ring)
cults
kuromi accessories (necklace earrings ring)
kuromi accessories (necklace, earrings, ring)
cults
free

Rotating flower Accessories (ring, necklace)
...ing flower accessories (ring, necklace)
cults
rotating flower accessories (ring, necklace)
fb:https://www.facebook.com/3dppark/
cults
$6

Brush module c is accessory N ° 1
...dule c is accessory n ° 1
cults
module iron solder accessory screwdriver pliers brush modelisme
brush module c is accessory n ° 1
cults
$6
Module for screwdriver and c is accessory N ° 3
...ssory n ° 3
cults
module iron solder accessory screwdriver pliers brush modelisme
module for screwdriver and c is accessory n ° 3
cults
free

SmallToys - Freight Accessories
... compatible with most 3d printers.
instructions, videos and vehicle composition: www.wabbysland.com/3d-print-play/smalltoys/
cults
free

Wago modular accessory / Wago modular accessory
...n electrical panel.
thickness of layer 0.3
shell thickness 0.6
fill rate 25
print temperature 220c °
media type none
Scale
cults
free

Dragon (18mm scale)
...dragon (18mm scale)
cults
dragon (18mm scale)
dragon (18mm scale)
cults
free

The Awoken (15mm scale)
...the awoken (15mm scale)
cults
the awoken (15mm scale)
the awoken (15mm scale)
cults
free

OctoWalker (18mm scale)
...octowalker (18mm scale)
cults
octowalker (18mm scale)
octowalker (18mm scale)
cults
free

Scale Cookie Cutter
...scale cookie cutter
cults
scale cookie cutter
scale cookie cutter
cults
free
28mm Scale Omnisphere
...28mm scale omnisphere
cults
28mm scale omnisphere
28mm scale omnisphere
cults
free

Longshadow (18mm scale)
...longshadow (18mm scale)
cults
longshadow (18mm scale)
longshadow (18mm scale)
cults
free

Gazebo (N-Scale)
...cale.
it is a companion structure for my suburban n-scale house which can be found here: https://cults3d.com/en/users/mfouillard
cults
free

Vanara Adventurer (18mm scale)
...vanara adventurer (18mm scale)
cults
vanara adventurer (18mm scale)
vanara adventurer (18mm scale)
cults
free

Dominion ExoKnights (18mm scale)
...dominion exoknights (18mm scale)
cults
dominion exoknights (18mm scale)
dominion exoknights (18mm scale)
cults
free

OpenRC F1 250% scaled
...openrc f1 250% scaled
cults
openrc f1 250% scaled
openrc f1 250% scaled