Thingiverse
Eryone Thinker SE BLTouch Mount (2021) by adolson
by Thingiverse
Last crawled date: 3 years, 1 month ago
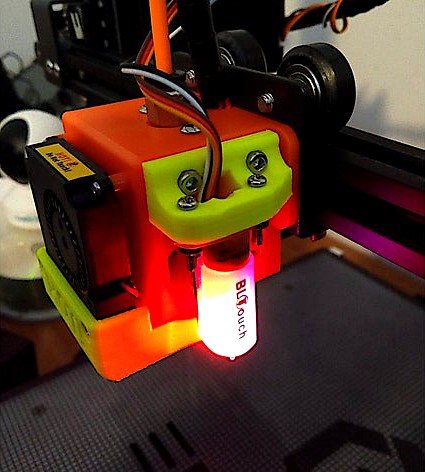
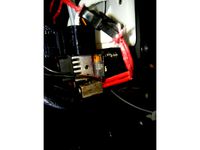
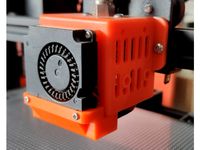
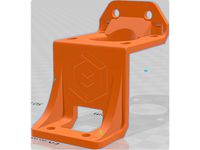
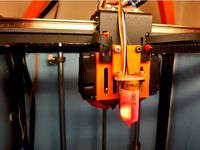
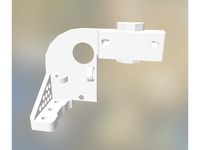
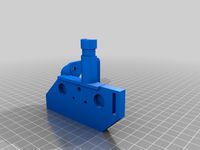
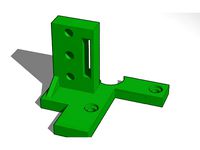
A plate for mounting a genuine Antclabs BLTouch v3.1 on an Eryone Thinker SE (2021 version). It may also work on the Thinker S V2 as well, if it has the same plastic hotend cage.
ANOTHER BLTouch mount plate?
Yes, I bought a brand new Eryone Thinker SE this year and I couldn't find a good BLTouch mount that I liked the look of and was going to fit. The one provided by Eryone leaves much to be desired, as I found the probe a bit bouncy, being attached by the single top screw, and I was a bit worried about inaccuracies due to that.
I really liked the design from madizmo, since it had the hole for the cable to run through, letting the logo show on the side. But, as other commenters on that Thing also discovered, after printing it, I learned that the holes did not line up with the holes on the newer, plastic Thinker hotend cages. I aimed to fix this.
I first tried to remix his design, but since I'm pretty inexperienced with 3D tools, I gave up fairly quickly, and resorted to designing this from scratch. It was my first time using FreeCAD (and my first design to use something other than Tinkercad!). However, I still entered it as a remix because I took heavy inspiration from madizmo's design and measurements.
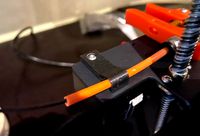
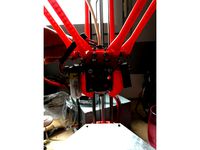
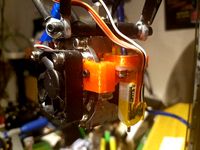
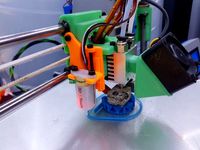
I mounted the BLTouch to the plate with the screws, washers, and nuts that came with the BLTouch, and to the plastic hotend cage using 8mm M3 screws and nuts. Mounting it and then getting the hotend cage back onto the gantry was a bit tricky, since there isn't much clearance and these are tiny parts, but I managed to do so without pulling the hotend out of the cage or anything like that. Patience is all that was really needed.
Probe Offsets
X Offset: 32mmY Offset: -6mm
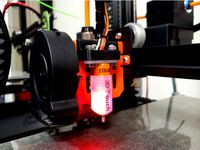
These values are what I got using the Z Probe Wizard. You can double-check/fine-tune your settings easily by marking a dot on a piece of paper, then using the Z Probe Wizard. After homing, when the probe lowers to the bed, quickly line up the dot on the paper, and keep the paper still. When you get the step to lower the nozzle to the bed, lower it until it's gripping the paper tightly, enough that it'll make a mark for you to measure from (I rotated the paper a bit to be sure there'd be a visible mark, and it worked a treat - I could even see the nozzle hole on the paper!). Measure the offset there and apply it in your settings (or hard-code into your firmware config), and you're good to go!
Be sure to re-run the Wizard properly once you set your XY offset, in order to accurately set your Z offset!
ANOTHER BLTouch mount plate?
Yes, I bought a brand new Eryone Thinker SE this year and I couldn't find a good BLTouch mount that I liked the look of and was going to fit. The one provided by Eryone leaves much to be desired, as I found the probe a bit bouncy, being attached by the single top screw, and I was a bit worried about inaccuracies due to that.
I really liked the design from madizmo, since it had the hole for the cable to run through, letting the logo show on the side. But, as other commenters on that Thing also discovered, after printing it, I learned that the holes did not line up with the holes on the newer, plastic Thinker hotend cages. I aimed to fix this.
I first tried to remix his design, but since I'm pretty inexperienced with 3D tools, I gave up fairly quickly, and resorted to designing this from scratch. It was my first time using FreeCAD (and my first design to use something other than Tinkercad!). However, I still entered it as a remix because I took heavy inspiration from madizmo's design and measurements.
I mounted the BLTouch to the plate with the screws, washers, and nuts that came with the BLTouch, and to the plastic hotend cage using 8mm M3 screws and nuts. Mounting it and then getting the hotend cage back onto the gantry was a bit tricky, since there isn't much clearance and these are tiny parts, but I managed to do so without pulling the hotend out of the cage or anything like that. Patience is all that was really needed.
Probe Offsets
X Offset: 32mmY Offset: -6mm
These values are what I got using the Z Probe Wizard. You can double-check/fine-tune your settings easily by marking a dot on a piece of paper, then using the Z Probe Wizard. After homing, when the probe lowers to the bed, quickly line up the dot on the paper, and keep the paper still. When you get the step to lower the nozzle to the bed, lower it until it's gripping the paper tightly, enough that it'll make a mark for you to measure from (I rotated the paper a bit to be sure there'd be a visible mark, and it worked a treat - I could even see the nozzle hole on the paper!). Measure the offset there and apply it in your settings (or hard-code into your firmware config), and you're good to go!
Be sure to re-run the Wizard properly once you set your XY offset, in order to accurately set your Z offset!
Similar models
thingiverse
free

Eryone Thinker SE BLTouch mount by ecornbower
...er-simple mount for the bltouch probe on the eryone thinker se printer. i tried other mounts but none of the others fit properly.
thingiverse
free
Eryone Thinker S BLtouch mount
...m extra clearance which was needed on my thinker beta machine.
probe offsets: #define nozzle_to_probe_offset { 30, -9.5, -0.750 }
thingiverse
free

BLTouch Smart mount for Microdelta Rework by marlequeen
...by marlequeen
thingiverse
mount for bltouch z-probe
it has a bit of tolerance to be able to adjust the z offset with the nozzle.
thingiverse
free

Eryone Thinker SE Direct Drive Mod by lucabartoli
... for the hotend, highly recommendederyone thinker s hotend fix
come to eryone 3d italia facebook group for support and more mods!
thingiverse
free
Anycubic i3 Mega new hotend housing and BLTouch mount by guilhem034
...eed two m3 screws and nuts.
bltouch which i'm using: https://bit.ly/3vnoet3
offsets:
x probe offset -23.22
y probe offset 3.3
thingiverse
free
Eryone Mosquito Mount with BLTouch - ER20 Thinker S by RcTomcatt
....
currently testing it out myself :) might post an improved version in the future
added a prototype mount for the er20 ery sensor
thingiverse
free
LPA Modular X Carriage Daughter Plates with BLTouch by bkbreyme
...with the fan mount facing downward.
added additional diamond mount based on lhartmann's version with extra attachment points.
thingiverse
free

Radial Fang Fan - 4020 Blower fan, 40mm hotend fan by 6squarefeet
...ltouch side for easy cable management.
//
mesh is a little broken, just repair it in whatever slicer you use. it will print fine
thingiverse
free
Eryone Hotend case for thinker se and er20 by EryoneTom
...e and er20 by eryonetom
thingiverse
this part can fit for the eryone thinker se/ er20 3d printer.
this version is the stock one.
thingiverse
free

BL Touch Bracket by markus_wankus
...bl touch bracket by markus_wankus
thingiverse
bltouch bracket for eryone thinker se
Adolson
thingiverse
free
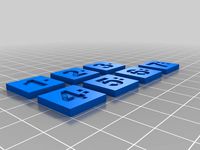
The Shipwreck Arcana - tokens for print & play by adolson
...t size compared to my first two, larger designs. just paint in the numbers and pips afterwards to get a more visible, nicer look.
thingiverse
free

Height-adjustable semi-circular fan duct for Tech2C E3D V6 X-carriage by adolson
...s to this fan duct by peter1280. may not have been needed, but i like the assurance i could tweak without reprinting, if need be.
thingiverse
free

ADXL345 Adapter for Remixed Tech2C E3Dv6 Mount Clamp Remix by adolson
...link: https://www.thingiverse.com/thing:4887212
why would you want this? if you don't already know, you don't need it. ;)
thingiverse
free
Bottom-Slots-SM-VESA-mount for Malolo's RPi 3B+ snap-fit case by adolson
...emix source by armourcraft.
you will need a top from malolo's original thing, here: https://www.thingiverse.com/thing:3719217
thingiverse
free

E3Dv6 Bowden Clamp w/ 30mm Fan + BLTouch + Drawing Mode by adolson
...n. i will design and post this as soon as i receive mine).
the v3 stl fixes a bug that appeared in prusaslicer (but not in cura).
thingiverse
free

Eryone Thinker / ER-20 mount plate for Tech2C's E3Dv6 Bowden X-carriage mount by adolson
...tioned (i have yet to test this, but i will be printing it shortly, and i measured carefully. still, it may need further tweaks).
Eryone
thingiverse
free

Eryone Spool to Storage Box by BelSD
...eryone spool to storage box by belsd
thingiverse
eryone spool to storage box
thingiverse
free
Eryone Spool Spacer
...ne filament spools so that it fits nicely inside my monoprice maker ultimate 2 printer. probably has other applications as well.
thingiverse
free
Filament Tube Holder for Eryone by titust11
...filament tube holder for eryone by titust11
thingiverse
filament tube holder for the eryone printers
thingiverse
free

Z Endstop Adjustable for Eryone Thinker
...z endstop adjustable for eryone thinker
thingiverse
z endstop adjustable for eryone thinker.
thingiverse
free

Eryone spool holder for CR-10
...eryone spool holder for cr-10
thingiverse
made a spool holder for cr-10 for eryone filament
thingiverse
free

Eryone Thinker S Temptower
...one thinker s temptower
thingiverse
temptower test pla for eryone tinker s
attention. don't use the gcode for other printer!
thingiverse
free
Spool Caps for Eryone Filament by Filmman586
...spool caps for eryone filament by filmman586
thingiverse
just some spool end caps for eryone filament reels.
thingiverse
free

Eryone Thinker Control Knob by dapostol73
...nker control knob by dapostol73
thingiverse
quick little control knob for eryone thinker to match the leveling knobs on the bed.
thingiverse
free
Eryone Thinker ZMotor Mount
...n the extrusion rails.
original design by madizmo for the tevo tarantula
modified/remade for the eryone thinker / s
enjoy!
~rvolt
thingiverse
free

bnbsx adapter for eryone thinker s by duke66
...bnbsx adapter for eryone thinker s by duke66
thingiverse
adapter for bnbsx extruder for eryone thinker s
Thinker
3d_export
$12

Thinker 3D Model
...thinker 3d model
3dexport
figure thinker decoration figura decoracion pensador
thinker 3d model mikebibby 49927 3dexport
turbosquid
$20

Thinker Statue
...uid
royalty free 3d model thinker statue for download as obj on turbosquid: 3d models for games, architecture, videos. (1384418)
turbosquid
$7

Wooden thinker
... available on turbo squid, the world's leading provider of digital 3d models for visualization, films, television, and games.
turbosquid
$10

Rodin's Thinker
...el rodin's thinker for download as c4d, fbx, obj, and 3ds on turbosquid: 3d models for games, architecture, videos. (1690114)
3d_export
$15

3d sculpture thinker
...d sculpture thinker
3dexport
3d sculpture thinker ,is a of high quality model hope you like it!<br>formats,max,fbx,obj,3ds
3d_export
$6
Wooden thinker 3D Model
...statuette figurine decor wooden art neanderthal handcraft toy ancient antique old
wooden thinker 3d model pompiduz 93662 3dexport
turbosquid
$39

Thinkers Resin Figurines Art Decor
...gurines art decor for download as max, 3ds, obj, stl, and fbx on turbosquid: 3d models for games, architecture, videos. (1686801)
3d_export
$39

thinkers resin figurines art decor
...ines art decor<br>file 3dsmax 2014<br>max - stl - 3ds - fbx - obj<br>polys : 1371655<br>vertices : 685990
archibase_planet
free

Man
...man archibase planet woman female thinker - 3d model (*.gsm+*.3ds) for interior 3d...
archive3d
free

Statuette 3D Model
...statuette 3d model archive3d statuette figurine wood thinker n020807 - 3d model for interior 3d...
Bltouch
thingiverse
free
Support bltouch by TonyJ
...support bltouch by tonyj
thingiverse
support bltouch
thingiverse
free
BLTOUCH for MICRON3DP by lamerhouse
...bltouch for micron3dp by lamerhouse
thingiverse
bltouch for micron3dp
thingiverse
free
SapphirePro mount for Bltouch
...sapphirepro mount for bltouch
thingiverse
sapphirepro mount for bltouch
thingiverse
free
ender6 BLtouch by chimaer
...ender6 bltouch by chimaer
thingiverse
ender6 bltouch
this is an external bracket
thingiverse
free
BLTouch KP3s by 1devilman1
...bltouch kp3s by 1devilman1
thingiverse
bltouch mount for kingroon kp3s
thingiverse
free
Bltouch support adjustable
...bltouch support adjustable
thingiverse
adjustable support for bltouch, p3steel.
thingiverse
free
BMG NEREUS BLTOUCH
...bmg nereus bltouch
thingiverse
petg
m3 screws and nuts for the bltouch
thingiverse
free

BLTouch Bracket by tidh666
...bltouch bracket by tidh666
thingiverse
serves to attach the bltouch sensor to the extruders
thingiverse
free
bltouch mount by wars
...bltouch mount by wars
thingiverse
reinforced bracket for bltouch cooperates with high_clearance_cr10_oem_fang_mod
thingiverse
free

BLTouch Holder by Jonthan06
...bltouch holder by jonthan06
thingiverse
support bltouch pour wanhao d12
2021
turbosquid
$15

Human-2021
...turbosquid
royalty free 3d model human-2021 for download as on turbosquid: 3d models for games, architecture, videos. (1175117)
3d_export
$26

Peugeot 208 2021
...peugeot 208 2021
3dexport
peugeot 208 2021 low poly version
turbosquid
$1

Present 2021
...y free 3d model present 2021 for download as ma, fbx, and obj on turbosquid: 3d models for games, architecture, videos. (1673576)
3d_export
$26

Shelby GT500 2021
...shelby gt500 2021
3dexport
shelby gt500 2021 low poly version with interior
3d_export
free

stone 2021
...stone 2021
3dexport
subscribe to my youtube channel:
3d_export
$8

imac 2021
... magic mouse and magic keyboard with pbr textures in the colors of the set. includes model in fbx and obj. does not include hdri.
3d_export
$10

racing 2021
...racing 2021
3dexport
c4d , v ray<br>3d environment
turbosquid
$29

Bull Head 2021
...uid
royalty free 3d model bull head 2021 for download as ztl on turbosquid: 3d models for games, architecture, videos. (1675814)
turbosquid
$3
2021 style armchair
... 2021 style armchair for download as blend, fbx, obj, and stl on turbosquid: 3d models for games, architecture, videos. (1694756)
turbosquid
free

New Year 2021
...del new year 2021 for download as c4d, obj, fbx, dae, and 3ds on turbosquid: 3d models for games, architecture, videos. (1547633)
Mount
3d_export
free

mounting bracket
...mounting plate is the portion of a hinge that attaches to the wood. mounting plates can be used indoors, cabinetry and furniture.
turbosquid
$2

MOUNTING
... available on turbo squid, the world's leading provider of digital 3d models for visualization, films, television, and games.
turbosquid
free

Mounts
... available on turbo squid, the world's leading provider of digital 3d models for visualization, films, television, and games.
turbosquid
free

Mount Fuji
...fuji
turbosquid
free 3d model mount fuji for download as obj on turbosquid: 3d models for games, architecture, videos. (1579977)
3d_export
$5

Headphone mount LR
...headphone mount lr
3dexport
headphone mount l+r
turbosquid
$39

Mount rainier
...quid
royalty free 3d model mount rainier for download as fbx on turbosquid: 3d models for games, architecture, videos. (1492586)
turbosquid
$5

pipe mounting
...quid
royalty free 3d model pipe mounting for download as obj on turbosquid: 3d models for games, architecture, videos. (1293744)
turbosquid
$3

Mounting Tires
...uid
royalty free 3d model mounting tires for download as fbx on turbosquid: 3d models for games, architecture, videos. (1708511)
3d_export
$5

Magnetic GoPro Mount
...pro mount
3dexport
cool magnetic mount for gopro. allows you to mount the camera on flat metal surfaces and get exclusive shots.
turbosquid
$5

Stone Mount
...ty free 3d model stone mount for download as ma, obj, and fbx on turbosquid: 3d models for games, architecture, videos. (1370306)