Thingiverse
Enlarged Rostock by kolergy
by Thingiverse
Last crawled date: 2 years, 11 months ago
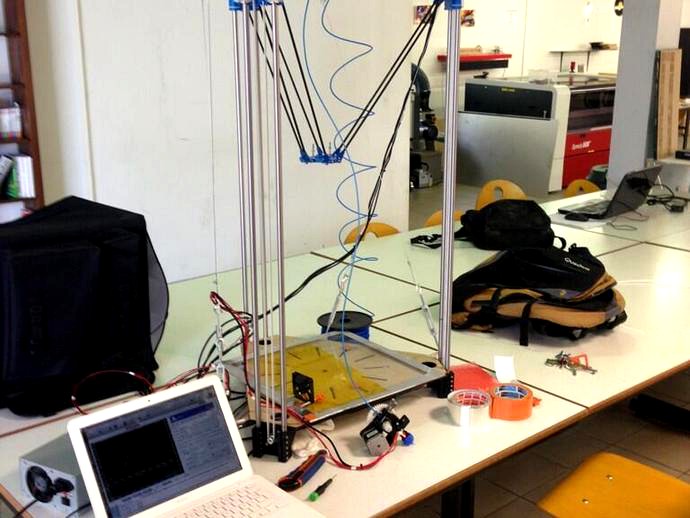
This is a linear delta 3D printer based on Johann's Rostock which has been enlarged to acomodate roughly double the print volume.
All of the 3D printed & laser cut parts have been made thanks to the Artilect Fablab Toulouse.
This is still work in progress so below you will find a blog like story of the build & set-up:
30/08/2013 Discovered that one of the Idler_end started to develop cracks, therefore the design of the idler_end was updated to be stronger and as well for a better installation of the end stops.
Updated Idler End design (V1.2) is there: http://www.thingiverse.com/thing:143186
27/08/2013 Found an interesting improvement by Antonio Bencini which adapted magnetic bearings to the enlarged Rostock, this is really cool!
Platform: http://www.thingiverse.com/thing:139730
Carriage: http://www.thingiverse.com/thing:139264
23/08/2013 Back from holidays...
Following Zoltan's comment I realized that I had forgotten to put the platform STL, this is corrected now. Anyway it is unchanged from the Original Rostock one.
09/07/2013 Presentation of the Enlarged rostock development (in French, sorry for the English speakers) http://prezi.com/slg0ddtggc2_/?utm_campaign=share&utm_medium=copy
15/06/2013 Refined calibration
Refined the calibration of the extruder folowing the process proposed by:
Triffid Hunter: http://reprap.org/wiki/Triffid_Hunter%27s_Calibration_Guide
Tantillus: http://www.tantillus.org/Tutorials.html
Performed retraction calibratio, After fiddeling with various retraction values & extra lengt values I did not notice much improvments or even much difference until I stumbled on this discussion http://forums.reprap.org/read.php?262,156806,157207 and this Blog: http://systematictechnology.net/?tag=calibration where I understood that my max feedrate should be around 10mm/s and before it was set to 100 or 200mm/s which was way to high but it did not strike me as Repetier you set filament speed around 100 but mm/min & not mm/s.
09/06/2013 Some Updates
Demonstrated the printer at the Artilect Fablab Toulouse on the 03/06 (Picture of it being re assembled there). http://artilect.fr/
Added cable tentioner to allow speed increase without shacking
Insulated the hotend to be able to perform efficient cooling without affecting hotend temperature http://www.thingiverse.com/thing:101104
Chased play in the wade extruder drive.
25/05/2013 First Perfect Print !
As on small part there were thermal issues I decided to test larger prints.
I went for the 6 sided Vase from
MaakMijnIdee http://www.thingiverse.com/thing:18672
Printed with blue PLA 0.2mm layer thickness, 207degC for first layer & 197degC for the others, speed 40% of prusa std settings (5hour print time)
The result excellent :) It will be time to accelerate...
22/05/2013 Biger & More precise but stil thermal issues
Slightly tightened the belts to improve acuracy
Went for the large Lucy the cat (in blue) with no ventilation & still at low velocity
Low parts where excellent with a good prescision of the layers
One can notice a problem around the head of the cat which give it a frog attitude. This was due to excessive softening of the material & partial colapse.
21/05/2013 Post mortem & Back to life
Went to see the E-Motion Tech people with my dead J-Head and after post mortem analysis they figured out that the termistor reading was not correct it should be around 90k Ohms and was 120k. They where very kind & helped me to restore the head.
Now back to life calibrating properly the thermistor.
20/05/2013 The J-Head lost it's head!
Trying to print another lucy the cat after tightening the belt to get a bit more prescision, Extrusion was not going well again. I tried to do a manual extrude, temperature was set @ 210degC, there it felt strange the extruder stepper's seemed to force significantely jumping some steps but the PLA was only going out lazily.
Sudently I the head started to move & poped out before I could stop the mains power.
19/05/2013 Fighting with the Cat
Today I tried to print something beter than a cube but still relatively small & simple So I went for Lucy the cat http://www.thingiverse.com/thing:24255 which is small & rather low difficulty.
Yesturday wen printing the cube I realised that it required cooling so I installed a PC fan (which was the cause of follow up difficulties)
As you can see on the second row of the picture there has been several failures before getting something that looks like the STL. To make a long story short temperature is measured on the top part of the Brass part of the J-Head hotend, which hsa been a bit isolated with layers of kapton tape. however the tip of the hotend is not insulated and would get some degrees colder suficiently to reach very hygh viscosity of the PLA dramatically reducing the flow.
and at the same time cloging the teeth of the filament pushing axis.
Increasing temperature by 10degC & cleaning the extruder was the solution.
Looking at the last Lucy printed it is not yet perfect the layers are not well alligned, so my next task will be to fight the play to ensure everything is alligned.
In addition I need to work on the extruder as for the moment the Wade's extruder sit on top of the platform limiting the movment of the printers and I have not yet ordered the tube to make the bowden extruder which was initially planned. As I start to realise that booth systems have different advantage & weekness. I guess the solution could be to devise an interchangable system able to do booth.
18/05/2013 Geting a bit better...
Just made two more print reducing temperature & extruder feed and now it start to look as a very small cube 10mmx10mm. (see the picture)
17/05/13 First Print!!!
After fighting without sucess to have Repetier working I guess I will need to get an atmega1284 to replace the 644 that came with the Gen7 but which lacks memory for Delta printers.
I finnaly manage to get a 10uH self to replace the 100uH original one and got rid of the brown outs
Over the week I had to transport the printer a few hundred kilometers by car and apparently it did notlike it as play started to appear on some components and notably the joints.
Very late tonight I finally manage to attempt a first print: a 10mm cube, there was to much plastic feed and the hot end was too hot, so the result is not great see the picture and the video http://youtu.be/8jBBFH91Mn0.
Still some work to do to have high quality prints. Any way I'm very happy to be finnaly able to have a first print.
12/05/13 A bit frustrating
I finnally managed to have the repeter firmware heating the hot end (the temperature measurement will need calibration)
For some strange reason it needs to be on the bed sensor plug & not the extruder, I guess I'l need to go & see in the Pin layout of the firmware.
But with repetier I do not manage to get the axis moving !
So I have the axis moving on the Marlin & extruder heating on Repetier...
11/05/13 Trying to get it hot
Assambled the hot end
Assambled the extruder (Wade) initial plan was tu use it deported (Bowden) with a Teflon tube to link it to the hot end but I do not yer have the tube so it will be mounted directly on the platform. limiting speed & amplitude in the mean time.
With a friend we assembled the hot end to the extruder and then tryed it on the board. We were quite disapointed to see that there was still a 0degC temperature reading. I just realosed now that on the 06/05 the quick fix that I used to stop the broun out problem disables the temperatures. and I could not yet purchace the termistance to definately correct the brownout problem.
Therfore I tryed the Repetier-firmware with the lower memory settings & it seems to work. (it still needs to be configured properly for the rest.
Tryed again the heater with the Repetier-Firmware and there it was displaying -55degC which felt strange as earlier we tested the thermistor resistance & it was around 114k Ohms.
10/05/13 Plenty of problems & some solutions:
After all the problem described bellow it finaly made some first decent drawings see the video: http://youtu.be/04nmR4zaZQw
Marlin Configuration Files & Test STL used for the drawings added to the downloadable files.
Found the solution for the homming problems from yesturday Had to reduce Max speed in the firmware.
Still one of the axis was not moving properly. At first I thought it was losing steps so I tried to increase the Driver's Current without sucess, I even switched the Drivers without results, to finnaly find that it was the pulley that was not tight enough.
Once that was solved I went back to drawing experiments and for some reason the drawings were to small & the overal movements where shorter than expected, after verifying all the set-up of the firmware was more or less correct found one error on the DELTA_CARRIAGE_OFFSET which was 22 on the original rostock & now is 28.0mm but this did not solve the main problem. Therfore I started to measure the belt pitch which was 2.5mm as expected and I went to count the numbers of teeth and there I understood where the problem was comming from: The pulley which I thought was an 18teeth one was in fact a 16teeth one. Once this corrected in the firmware It gave much better results.
Still some issues of steps lost from time to time
Glonally it looks rather sensitive to the speed the 400 steps per revolution & the 16 teeth T2.5 pulley means that it is hitting the maximum steps/s limits of the arduino
On top of that there is some issues of repetability of the starting height due to the endstops set-up which is not yet perfect
With all this I did not get a chance to try again the Repeter Firmware.
09/05/13
Installation of end-stops
Start of calibration
It made it's first drawings (It is not great for the time being)
Some issues with homming: when moves comands are sent it moves correctely but when homming the steppers vibrates and nothing moves. I assume it is a error in my ste-up of the firmware, or too low current in the stepers drivers TBC.
Had some feedback on the issue with Repetier http://forums.reprap.org/read.php?267,206320 which should come from an excess usage of memory so I will try to lower the memory useage as advised and I will let you know.
07/05/13 Platform fitted & moving
Diagonal rods Cut from The carbon Arrows & glued to the Jaws
Got some extra MDF to rigidify the structure at some later point
Fitted Diagolal rods & Platform to the Printer
Tried some movements: it is not perfectely flat yet nor rapid but it is going the right way. Here is a video of some of the first moves http://youtu.be/qAyjTx0MV_U
The Z stepper seems a bit week I will need to adjust the power on the driver.
06/05/13 IT MOVES!!!
Did not work on the structure today
Temporarly gave-up on Repieter Firmware and moved to the modified Marlin by Johann
Got Brown out issue on Marlin as described in the following thread https://github.com/ErikZalm/Marlin/issues/174 Got to change L1 on the Gen7 V1.4.1 as explained on the last post. I used the temporary fix from the first post as I do not require heating.
Had to invert the Pinning of the steppers for them to turn on the correct direction
For some strange reason the M80 comand needs to be entered manually
Now all the three axis moves corectly on delta mode!
05/05/13 Now it looks like something
Installed The belts & Steppers on each axis
Assembled the Three Axes with the frame
Still fighting with Repetier Firmware to make it work in delta mode
04/05/13 Start of the assembly
The three columns of the printer are now complete
All motors & endstops are properly wired & tested on cartesian mode
Configured & uploaded the delta mode of Repetier but for some reason the stepers do not move in delta mode. Still need to beter understand config...
03/05/13 Back to the printer after a forced pause.
Today I have been playing with the Gen7 & the stepers:
Ran the Test set-up with sucess
Installed the repetier firmware 0.82.2 & tested with sucess the cartesian mode steppers turning ok.
Started to set-up the delta mode of the repetier firmware but haven't had the time to test it today.
Enlarged version of Johann's Rostock adapted with the folowing features:
400x400x500mm expected build area
0.08mm theoretical vertical presision (400step/rev + 16 teeth T2.5 Pulley)
Carriages with self tensioning & play elimination
It is just the begining... Almost everything is available now it is time to start building.
Made in Fablab Artilect: https://artilect.fr/
To be Continued
All of the 3D printed & laser cut parts have been made thanks to the Artilect Fablab Toulouse.
This is still work in progress so below you will find a blog like story of the build & set-up:
30/08/2013 Discovered that one of the Idler_end started to develop cracks, therefore the design of the idler_end was updated to be stronger and as well for a better installation of the end stops.
Updated Idler End design (V1.2) is there: http://www.thingiverse.com/thing:143186
27/08/2013 Found an interesting improvement by Antonio Bencini which adapted magnetic bearings to the enlarged Rostock, this is really cool!
Platform: http://www.thingiverse.com/thing:139730
Carriage: http://www.thingiverse.com/thing:139264
23/08/2013 Back from holidays...
Following Zoltan's comment I realized that I had forgotten to put the platform STL, this is corrected now. Anyway it is unchanged from the Original Rostock one.
09/07/2013 Presentation of the Enlarged rostock development (in French, sorry for the English speakers) http://prezi.com/slg0ddtggc2_/?utm_campaign=share&utm_medium=copy
15/06/2013 Refined calibration
Refined the calibration of the extruder folowing the process proposed by:
Triffid Hunter: http://reprap.org/wiki/Triffid_Hunter%27s_Calibration_Guide
Tantillus: http://www.tantillus.org/Tutorials.html
Performed retraction calibratio, After fiddeling with various retraction values & extra lengt values I did not notice much improvments or even much difference until I stumbled on this discussion http://forums.reprap.org/read.php?262,156806,157207 and this Blog: http://systematictechnology.net/?tag=calibration where I understood that my max feedrate should be around 10mm/s and before it was set to 100 or 200mm/s which was way to high but it did not strike me as Repetier you set filament speed around 100 but mm/min & not mm/s.
09/06/2013 Some Updates
Demonstrated the printer at the Artilect Fablab Toulouse on the 03/06 (Picture of it being re assembled there). http://artilect.fr/
Added cable tentioner to allow speed increase without shacking
Insulated the hotend to be able to perform efficient cooling without affecting hotend temperature http://www.thingiverse.com/thing:101104
Chased play in the wade extruder drive.
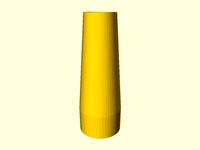
25/05/2013 First Perfect Print !
As on small part there were thermal issues I decided to test larger prints.
I went for the 6 sided Vase from
MaakMijnIdee http://www.thingiverse.com/thing:18672
Printed with blue PLA 0.2mm layer thickness, 207degC for first layer & 197degC for the others, speed 40% of prusa std settings (5hour print time)
The result excellent :) It will be time to accelerate...
22/05/2013 Biger & More precise but stil thermal issues
Slightly tightened the belts to improve acuracy
Went for the large Lucy the cat (in blue) with no ventilation & still at low velocity
Low parts where excellent with a good prescision of the layers
One can notice a problem around the head of the cat which give it a frog attitude. This was due to excessive softening of the material & partial colapse.
21/05/2013 Post mortem & Back to life
Went to see the E-Motion Tech people with my dead J-Head and after post mortem analysis they figured out that the termistor reading was not correct it should be around 90k Ohms and was 120k. They where very kind & helped me to restore the head.
Now back to life calibrating properly the thermistor.
20/05/2013 The J-Head lost it's head!
Trying to print another lucy the cat after tightening the belt to get a bit more prescision, Extrusion was not going well again. I tried to do a manual extrude, temperature was set @ 210degC, there it felt strange the extruder stepper's seemed to force significantely jumping some steps but the PLA was only going out lazily.
Sudently I the head started to move & poped out before I could stop the mains power.
19/05/2013 Fighting with the Cat
Today I tried to print something beter than a cube but still relatively small & simple So I went for Lucy the cat http://www.thingiverse.com/thing:24255 which is small & rather low difficulty.
Yesturday wen printing the cube I realised that it required cooling so I installed a PC fan (which was the cause of follow up difficulties)
As you can see on the second row of the picture there has been several failures before getting something that looks like the STL. To make a long story short temperature is measured on the top part of the Brass part of the J-Head hotend, which hsa been a bit isolated with layers of kapton tape. however the tip of the hotend is not insulated and would get some degrees colder suficiently to reach very hygh viscosity of the PLA dramatically reducing the flow.
and at the same time cloging the teeth of the filament pushing axis.
Increasing temperature by 10degC & cleaning the extruder was the solution.
Looking at the last Lucy printed it is not yet perfect the layers are not well alligned, so my next task will be to fight the play to ensure everything is alligned.
In addition I need to work on the extruder as for the moment the Wade's extruder sit on top of the platform limiting the movment of the printers and I have not yet ordered the tube to make the bowden extruder which was initially planned. As I start to realise that booth systems have different advantage & weekness. I guess the solution could be to devise an interchangable system able to do booth.
18/05/2013 Geting a bit better...
Just made two more print reducing temperature & extruder feed and now it start to look as a very small cube 10mmx10mm. (see the picture)
17/05/13 First Print!!!
After fighting without sucess to have Repetier working I guess I will need to get an atmega1284 to replace the 644 that came with the Gen7 but which lacks memory for Delta printers.
I finnaly manage to get a 10uH self to replace the 100uH original one and got rid of the brown outs
Over the week I had to transport the printer a few hundred kilometers by car and apparently it did notlike it as play started to appear on some components and notably the joints.
Very late tonight I finally manage to attempt a first print: a 10mm cube, there was to much plastic feed and the hot end was too hot, so the result is not great see the picture and the video http://youtu.be/8jBBFH91Mn0.
Still some work to do to have high quality prints. Any way I'm very happy to be finnaly able to have a first print.
12/05/13 A bit frustrating
I finnally managed to have the repeter firmware heating the hot end (the temperature measurement will need calibration)
For some strange reason it needs to be on the bed sensor plug & not the extruder, I guess I'l need to go & see in the Pin layout of the firmware.
But with repetier I do not manage to get the axis moving !
So I have the axis moving on the Marlin & extruder heating on Repetier...
11/05/13 Trying to get it hot
Assambled the hot end
Assambled the extruder (Wade) initial plan was tu use it deported (Bowden) with a Teflon tube to link it to the hot end but I do not yer have the tube so it will be mounted directly on the platform. limiting speed & amplitude in the mean time.
With a friend we assembled the hot end to the extruder and then tryed it on the board. We were quite disapointed to see that there was still a 0degC temperature reading. I just realosed now that on the 06/05 the quick fix that I used to stop the broun out problem disables the temperatures. and I could not yet purchace the termistance to definately correct the brownout problem.
Therfore I tryed the Repetier-firmware with the lower memory settings & it seems to work. (it still needs to be configured properly for the rest.
Tryed again the heater with the Repetier-Firmware and there it was displaying -55degC which felt strange as earlier we tested the thermistor resistance & it was around 114k Ohms.
10/05/13 Plenty of problems & some solutions:
After all the problem described bellow it finaly made some first decent drawings see the video: http://youtu.be/04nmR4zaZQw
Marlin Configuration Files & Test STL used for the drawings added to the downloadable files.
Found the solution for the homming problems from yesturday Had to reduce Max speed in the firmware.
Still one of the axis was not moving properly. At first I thought it was losing steps so I tried to increase the Driver's Current without sucess, I even switched the Drivers without results, to finnaly find that it was the pulley that was not tight enough.
Once that was solved I went back to drawing experiments and for some reason the drawings were to small & the overal movements where shorter than expected, after verifying all the set-up of the firmware was more or less correct found one error on the DELTA_CARRIAGE_OFFSET which was 22 on the original rostock & now is 28.0mm but this did not solve the main problem. Therfore I started to measure the belt pitch which was 2.5mm as expected and I went to count the numbers of teeth and there I understood where the problem was comming from: The pulley which I thought was an 18teeth one was in fact a 16teeth one. Once this corrected in the firmware It gave much better results.
Still some issues of steps lost from time to time
Glonally it looks rather sensitive to the speed the 400 steps per revolution & the 16 teeth T2.5 pulley means that it is hitting the maximum steps/s limits of the arduino
On top of that there is some issues of repetability of the starting height due to the endstops set-up which is not yet perfect
With all this I did not get a chance to try again the Repeter Firmware.
09/05/13
Installation of end-stops
Start of calibration
It made it's first drawings (It is not great for the time being)
Some issues with homming: when moves comands are sent it moves correctely but when homming the steppers vibrates and nothing moves. I assume it is a error in my ste-up of the firmware, or too low current in the stepers drivers TBC.
Had some feedback on the issue with Repetier http://forums.reprap.org/read.php?267,206320 which should come from an excess usage of memory so I will try to lower the memory useage as advised and I will let you know.
07/05/13 Platform fitted & moving
Diagonal rods Cut from The carbon Arrows & glued to the Jaws
Got some extra MDF to rigidify the structure at some later point
Fitted Diagolal rods & Platform to the Printer
Tried some movements: it is not perfectely flat yet nor rapid but it is going the right way. Here is a video of some of the first moves http://youtu.be/qAyjTx0MV_U
The Z stepper seems a bit week I will need to adjust the power on the driver.
06/05/13 IT MOVES!!!
Did not work on the structure today
Temporarly gave-up on Repieter Firmware and moved to the modified Marlin by Johann
Got Brown out issue on Marlin as described in the following thread https://github.com/ErikZalm/Marlin/issues/174 Got to change L1 on the Gen7 V1.4.1 as explained on the last post. I used the temporary fix from the first post as I do not require heating.
Had to invert the Pinning of the steppers for them to turn on the correct direction
For some strange reason the M80 comand needs to be entered manually
Now all the three axis moves corectly on delta mode!
05/05/13 Now it looks like something
Installed The belts & Steppers on each axis
Assembled the Three Axes with the frame
Still fighting with Repetier Firmware to make it work in delta mode
04/05/13 Start of the assembly
The three columns of the printer are now complete
All motors & endstops are properly wired & tested on cartesian mode
Configured & uploaded the delta mode of Repetier but for some reason the stepers do not move in delta mode. Still need to beter understand config...
03/05/13 Back to the printer after a forced pause.
Today I have been playing with the Gen7 & the stepers:
Ran the Test set-up with sucess
Installed the repetier firmware 0.82.2 & tested with sucess the cartesian mode steppers turning ok.
Started to set-up the delta mode of the repetier firmware but haven't had the time to test it today.
Enlarged version of Johann's Rostock adapted with the folowing features:
400x400x500mm expected build area
0.08mm theoretical vertical presision (400step/rev + 16 teeth T2.5 Pulley)
Carriages with self tensioning & play elimination
It is just the begining... Almost everything is available now it is time to start building.
Made in Fablab Artilect: https://artilect.fr/
To be Continued
Similar models
thingiverse
free

Radius Calibration Tool by MSURunner
...c radius correction for a rostock 3d printer using the cheapskate setup (rostock max) running the latest (.91) repetier firmware.
thingiverse
free

Delta Calibration Bullseye by ezrec
....
at least on repetier firmware, this is a much faster printing pattern than the original calibration spiral it was remixed from.
thingiverse
free

PG35L Micro Extruder - Kossel Rostock Delta by Verohomie
... res photos of prints can be found at: http://www.thingiverse.com/make:70482
added e3d 3mm version that is untested per request.
thingiverse
free

Hephestos Repetier Firmware by Wingman94
...www.repetier.com/firmware/v092/index.html
disclaimer: use at your own risk! i am not reponsible for any damage to your printer.
thingiverse
free

Yet another Delta Kossel printer calibration verifier by alsen
...and move the effector along the surface by verifying the changes on the indicator and verify, the correctness of defined geometry
thingiverse
free
Rostock Max V2 Reprap Discount Full Graphics Mount by dbfrompw
... discount full graphics mount for my rostock max v2. i had to use marlin firmware over repetier because if usb disconnect issues.
thingiverse
free
Delta Calibration & Validation Tool by clefranc
...er instructions, i'll include them in my pdf as well.
a big thanks to taede de jong (dolpin) for its work and instructions.
thingiverse
free

Modified Rostock or Delta Extruder on Platform by tlmxcpmpp
...ed and installed it.https://www.thingiverse.com/thing:2414471
it can use some fine tuning but as it sits now it works flawlessly.
thingiverse
free

Rostock Max spiral test pattern for bed flatness calibration by Rips
...sion width to slightly under .50 if you are having issues with it not slicing.
feel free to stop the print after the first layer.
thingiverse
free
Linealanschlag - Rulerstop
...rint a temp tower to find a suitable temperature for your filament and edit your slicer https://www.thingiverse.com/thing:2493504
Kolergy
thingiverse
free
AirForce Tip by kolergy
...airforce tip by kolergy
thingiverse
end bit to be 3d printed
thingiverse
free

WireGuide V0.9 by kolergy
...wireguide v0.9 by kolergy
thingiverse
wire guide for strong print: http://www.thingiverse.com/thing:329498
thingiverse
free
MiniStruder for uDelta by kolergy
...er for udelta by kolergy
thingiverse
the ministruder adapted to the udelta printer
made in fablab artilect: https://artilect.fr/
thingiverse
free

Frabjous 3mm by kolergy
...jous 3mm by kolergy
thingiverse
a scaled version of http://www.thingiverse.com/thing:12271 to use 3mm plywood or other materials
thingiverse
free

DTE by kolergy
...t;dronons tous ensembles"
aimed at providing access to drone to persons with various handicaps
https://artilect.fr/dronelab/
thingiverse
free
Ball Holder for Magnetic Bearing by kolergy
...ball holder for magnetic bearing by kolergy
thingiverse
to comme soon
thingiverse
free
Tool Holder for the Magnetic Platform by kolergy
...tool holder for the magnetic platform by kolergy
thingiverse
soon to come
thingiverse
free
SR17 Torch Holder V0.9 by kolergy
...sr17 torch holder v0.9 by kolergy
thingiverse
to come soon
thingiverse
free

Springy Clip for uDelta by kolergy
...springy clip for udelta by kolergy
thingiverse
springy clip to reduce play on delta printers adapted to the udelta
thingiverse
free

Micro Scisky Board by kolergy
...micro scisky board by kolergy
thingiverse
open scad model of the naze32 based micro scisky board
Rostock
thingiverse
free
Endstop for Rostock by Raz0neR
...endstop for rostock by raz0ner
thingiverse
endstop for rostock.
thingiverse
free

Rostock Cooling by nobicore
...rostock cooling by nobicore
thingiverse
rostock cooling
thingiverse
free
ROSTOCK PARTS by OC3D
...rostock parts by oc3d
thingiverse
parts for our modified rostock extruder assembly
thingiverse
free
Rostock squirrel fan by MarioPanic
...rostock squirrel fan by mariopanic
thingiverse
rostock squirrel fan
thingiverse
free
FC Hansa Rostock by ron86
...fc hansa rostock by ron86
thingiverse
fc hans rostock logo
thingiverse
free
rostock mini carriage by cjol
...rostock mini carriage by cjol
thingiverse
carriage for my rostock mini project
thingiverse
free

Rostock and Rostock Mini Dual Extruder Mount by westonshakespear
...ht.
sorry about the pictures, my filament jammed for part of the print and i am waiting for a new part to print a better version.
thingiverse
free
Rostock mini clip by Scott_Chen
...rostock mini clip by scott_chen
thingiverse
rostock mini clip for printer base glass
thingiverse
free
Rostock Board holder by drewan
...rostock board holder by drewan
thingiverse
this is a clip for using a rostock board as a print surface.
thingiverse
free
Rostock Fan Bracket by ImprisonedByTime
...rostock fan bracket by imprisonedbytime
thingiverse
this bracket is for a 40mm fan to attach to the rostock 3d printer
Enlarged
3d_export
$50

Highway tunnels cutaway 3D Model
...pavement asphalt roads highway freeway construction widening widen enlarge
highway tunnels cutaway 3d model tartino 2450 3dexport
3d_export
$13

solitaire ring
...down side is straight and it's size can be enlarged ...
3d_ocean
$19

Giraffe
...giraffe models realistic a young slightly cute giraffe with enlarged eyes. fully unwrapped, normal map, diffuse map. designed for...
3d_export
$10

Magnifier 3D Model
...trument equipment view eyes visual
magnifier 3d model download .c4d .max .obj .fbx .ma .lwo .3ds .3dm .stl matvic 111054 3dexport
3d_export
$10
Magnifying glass 3D Model
...pe magnification magnifier magnifying object optical research search tool zoom
magnifying glass 3d model vitamares 29221 3dexport
3d_ocean
$89

Subaru Forester
...rior space and offer improved utility without substantially enlarging the body size. compared to the previous model, the new f...
3d_export
$15

modular watchtower and house
...a stove, a bed, fridge, etc buildings can be enlarged using modules walls, doors and windows. the roof can...
3d_ocean
$6

Antique Magnifying Glass & Pirate Map
...bean sea. high detailed model. scene included: high resolution textures. vray gi setup. textures, materials, hdri and vray setup.
3d_export
$60

eurocopter as332 super puma
...to the as 332 was introduced in 2004, the further-enlarged eurocopter ec225 super...
3d_export
$110

uss midway cv-41 carrier
...area was increased to 13.5 degrees. the elevators were enlarged moved, and given almost double the weight capacity. midway...