GrabCAD

Ender3 V2
by GrabCAD
Last crawled date: 1 year, 10 months ago
Many custom designed parts for the Ender3 V2 that make an already great 3D printer even better
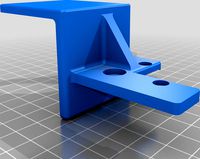
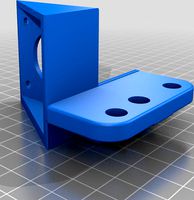
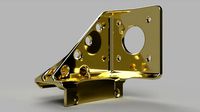
I designed a new direct drive mount that utilizes the stock, or an after-market extruder mechanism. This plate is also made to fit an 12mm Linear rail (MGN12C) for the X-Axis. This very small piece of Bowden tubing line up perfectly to create a super short filament path to the hot-end. I used MIC6 Tooling plate that was 3/8" of an inch thick and faced it down to the thickness I wanted it to be. I have been using 2 of these plates on both of my Ender3 V2's for several months and have had zero issues. As a matter of fact, I also own a MicroSwiss Direct-drive plate system for the stock Ender3-V2 using the stock V-Wheels and the design I made works as good if not better than that particular unit. The only difference being that they made their own tension/arm system that is integrated into their design and I didn't. I wanted this to be easily machined by those guys with a smaller CNC machine that can mill small thinner pieces of aluminum stock without issue. You will have to create your own toolpaths obviously, but the CAD files are all there and you can just open it up in your CAM software and create your toolpaths and get machining. I added a couple pictures of the plate and with a stock Ender3 hot-end and stepper motor. Obviously the extruder bracket would attach on top of this plate using M3 screws to attach the extruder stepper from behind. So, in order, extruder bracket, direct drive plate, and then the extruder stepper motor. If you have any questions feel free to send me a message or drop a comment and I'll get back to you as soon as I can.
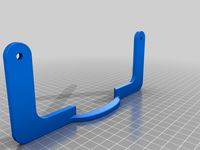
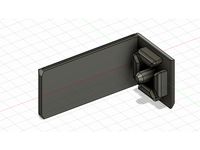
The rest of the parts in Bright Green I designed to be add-ons to the Ender3-V2. The extra drawers on the sides, the 4040 extrusion drawers (there are some like this on Thingiverse however, mine are deeper and print in 2 pieces (the drawer and knob) whereas others print in 3 pieces making it a real pain to assemble if you have even a slight elephants foot on the initial layer. So, I designed it to be all one piece and used a massive fillet in the inside corners to keep the bridging to a minimum across the rear of the drawer (which is the very top as it is orientated on the print bed) to enable this to be a single piece instead of two.
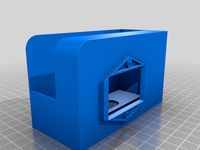
As for the Motherboard and Raspberry Pi enclosures these were a culmination of me sick of looking for something that used a downdraft fan to blow cool air across the boards
I designed a new direct drive mount that utilizes the stock, or an after-market extruder mechanism. This plate is also made to fit an 12mm Linear rail (MGN12C) for the X-Axis. This very small piece of Bowden tubing line up perfectly to create a super short filament path to the hot-end. I used MIC6 Tooling plate that was 3/8" of an inch thick and faced it down to the thickness I wanted it to be. I have been using 2 of these plates on both of my Ender3 V2's for several months and have had zero issues. As a matter of fact, I also own a MicroSwiss Direct-drive plate system for the stock Ender3-V2 using the stock V-Wheels and the design I made works as good if not better than that particular unit. The only difference being that they made their own tension/arm system that is integrated into their design and I didn't. I wanted this to be easily machined by those guys with a smaller CNC machine that can mill small thinner pieces of aluminum stock without issue. You will have to create your own toolpaths obviously, but the CAD files are all there and you can just open it up in your CAM software and create your toolpaths and get machining. I added a couple pictures of the plate and with a stock Ender3 hot-end and stepper motor. Obviously the extruder bracket would attach on top of this plate using M3 screws to attach the extruder stepper from behind. So, in order, extruder bracket, direct drive plate, and then the extruder stepper motor. If you have any questions feel free to send me a message or drop a comment and I'll get back to you as soon as I can.
The rest of the parts in Bright Green I designed to be add-ons to the Ender3-V2. The extra drawers on the sides, the 4040 extrusion drawers (there are some like this on Thingiverse however, mine are deeper and print in 2 pieces (the drawer and knob) whereas others print in 3 pieces making it a real pain to assemble if you have even a slight elephants foot on the initial layer. So, I designed it to be all one piece and used a massive fillet in the inside corners to keep the bridging to a minimum across the rear of the drawer (which is the very top as it is orientated on the print bed) to enable this to be a single piece instead of two.
As for the Motherboard and Raspberry Pi enclosures these were a culmination of me sick of looking for something that used a downdraft fan to blow cool air across the boards
Similar models
thingiverse
free

Titan Extruder Direct drive plate for Ender3. by meo_udon
...titan extruder direct drive plate for ender3. by meo_udon
thingiverse
titan extruder direct drive plate for ender3.
thingiverse
free
Direct Drive Extruder Mod for Ender3 by madwrench
...rain the hot-end wiring across the front.
edit: i re-uploaded the correct file, without the goofy embossing and crap. mea culpa.
thingiverse
free

Ender 3 V2 Direct Drive Stock Extruder Mod by bgyen
...iverse.com/thing:4666359 it might or might not work with other fan ducts; it will depend on how the duct is mounted on the plate.
thingiverse
free
E3V2 Satsana direct drive bracket tested by Darky82
...drive bracket for satsana with red metal extruder and stock hotend
print standing on the angled face where the stepper motor sits
thingiverse
free

Direct Drive Extruder 1.75mm V1.0 by SarwarKhan
...as well as to have an extruder as 1 piece (fan mount, hotend etc)
please feel free to modify and comment so we all can benefit.
thingiverse
free

Ender3 Direct Drive Mount with support for BL Touch and Dual Gear Extruder by furconc
... the stock plastic extruder or an upgraded metal single-gear extruder.
no extra hardware should be needed to install this part.
thingiverse
free
DMD - CR10s Pro V2 Direct drive bracket by _Ymir_
...thing:4814295) and my bracket is a perfect fit with it.
you can use the stock one. just use some washers/spacers to fill the gap
thingiverse
free

BMG V6 Direct Drive mount for HeroMe Gen 5 (Stock Creality Gantry) by edddeduck
...ng position for a bl touch and fan mounts. i recommend the light weight 5015 fans but you can pick your own they all should work.
thingiverse
free

CR-10 Direct Drive by s_gutz
...xis limit switch. this is necessary due to the added thickness of the direct drive plate so it can make contact with the switch.
thingiverse
free

Ender 3 Printermods MDD Bracket and spacers by ddwilli
...e
hot end spacers provided for thicknesses of 2.5 - 5.5mm. you can resize the hot-end spacer in cura if other thickness required
Ender3
3d_export
free

ender 3 3d print bed clips
...ender 3 3d print bed clips 3dexport ender3 3d print, print bed clips, glass bed clips, i...
3d_export
free

danish lunch
...with 3d printer made in thindercad and printed on ender3 max,<br>i used petg filament and have painted with vajjejo...
thingiverse
free
Ender3 pro
...ender3 pro
thingiverse
a plastic cover for the ender3 pro power supply, 100% fit.
note: fits only on the ender3 pro.
thingiverse
free

Guide filament ENDER3
...guide filament ender3
thingiverse
guide filament pour ender3
thingiverse
free

Ender3 Display Knob
...ender3 display knob
thingiverse
rotary encoder knob for ender3
thingiverse
free
Poignée ender3
...poignée ender3
thingiverse
bon print
thingiverse
free

Support Buses Ender3 / Nozzles holder Ender3
...support buses ender3 / nozzles holder ender3
thingiverse
un support de buses directement sur votre ender 3
thingiverse
free
Scrapper holder for Ender3 by clem3109
...scrapper holder for ender3 by clem3109
thingiverse
scrapper holder for ender3
thingiverse
free

ender3 filament guide by robotic_arm
...ender3 filament guide by robotic_arm
thingiverse
ender3 filament guide
thingiverse
free

Ender3, Ender3 pro reel holder with ballracer by nesan
...ender3, ender3 pro reel holder with ballracer by nesan
thingiverse
ender 3 ball racers need raft support on bed plate only.
V2
3d_export
free

Lamp v2
...lamp v2
3dexport
lamp v2 with solar panel
3d_export
$5

hammerhead v2
...hammerhead v2
3dexport
razer hammerhead v2 headphones, modeled in cinema 4d, render in corona
3d_export
$5

manometer v2
...manometer v2
3dexport
3d_export
$5

potato v2
...potato v2
3dexport
turbosquid
$52

Lifebuoys v2
...squid
royalty free 3d model lifebuoys v2 for download as fbx on turbosquid: 3d models for games, architecture, videos. (1560870)
turbosquid
$2

Mask v2
...turbosquid
royalty free 3d model mask v2 for download as stl on turbosquid: 3d models for games, architecture, videos. (1527741)
turbosquid
free

Flashlight V2
...d
free 3d model flashlight v2 for download as , obj, and fbx on turbosquid: 3d models for games, architecture, videos. (1663559)
turbosquid
$29

Thanos v2
...
royalty free 3d model thanos v2 for download as ztl and obj on turbosquid: 3d models for games, architecture, videos. (1651077)
turbosquid
$29

Titan v2
...d
royalty free 3d model titan v2 for download as ztl and obj on turbosquid: 3d models for games, architecture, videos. (1540228)
turbosquid
$29

Frieza v2
...
royalty free 3d model frieza v2 for download as ztl and obj on turbosquid: 3d models for games, architecture, videos. (1701238)