Thingiverse
Ender 5 plus silicone nozzle cleaner by ddovod
by Thingiverse
Last crawled date: 2 years, 10 months ago
Demo
Info
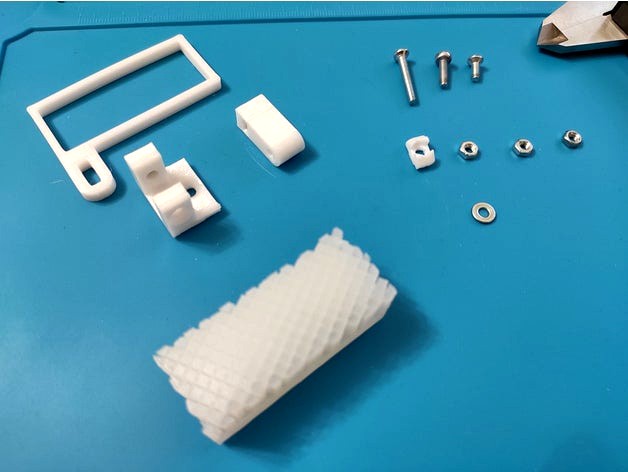
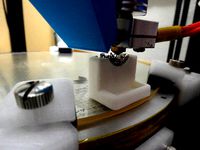
I've tried brass brushes, but they're limited in size (if you use some common brushes available widely) and the melted filament stick too much to the wires so it's hard to remove it.
This is a cleaner I came up with. Apart from printed parts you should cast a silicone brush using one-time mold (cast, destroy the mold, use your silicone part).
Also this cleaner occupies only ~1cm of printing surface if you bend it and move outside of the print bed (see photos).
BOM
M3 nut x2
M3x8 bolt
M3x12 bolt with washer (M3x8 also works)
M3x22 or M3x24 bolt
M3 t-nut (I use M3 nut + printed t-nut)
Some platinum cure 2-component silicone, around 30 shore A, better to buy transparent and color it when curing (important! don't use tin based silicone since it's not high temperature resistant)
For this model you need not more than 30ml of silicone in total (15ml A + 15ml B), but if you buy 500ml or 1000ml tare, you'll have a lot of fun creating molds and casting cool things (socks for the heater blocks, socks for clips of your heated bed since bare metal clips can scratch the PCB on the bottom side of the bed, and a lot more stuff).
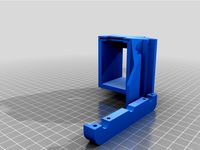
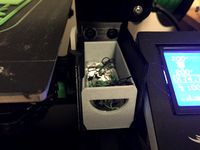
Printing and casting the silicone brush
First, print brush_holder.stl, brush_lever.stl and brush_mount.stl in PETG or ABS with your default settings and 50%+ infill.
Next, print brush_mold.stl in PLA (it is important) with following settings:
Wall line count: 1
Top layers: 0
Bottom layers and Initial bottom layers: 1
Infill line distance: 2.7
Infill pattern: Grid
Infill line directions: [30]
This config gives you a nice mold with thin walls between brush fibers. Make sure you don't have problems with infill in general, it should be even, with no holes in the walls. If it's not, lower your infill speed and/or increase infill flow.
Cast the silicone in it. It is important to take out as much air as possible. To do this, you can use a vibrating platform or any other strong vibration motor, or vacuum camera if you have some. I used something like this, but made of a half of plastic bottle and some strong rope (cast the silicone, place the mold into the bottle, rotate it fast, check for bubbles, repeat). Wait for 12-24 hours, warm the whole thing with hairdryer or something else to make the mold soft and gently destroy the mold using cutters, pliers or any other hardware you have. If it doesn't work well, put it into the fridge for 20-30 minutes, take it out and smash it with a hummer several times (PLA becomes more brittle when freezed).
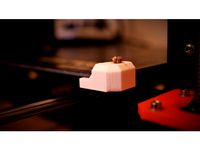
Then assemble everything, install it on the printer (brush_mount.stl should be as close to the bed as possible) and use this piece of Start gcode for your prints (this is my complete start gcode, but the important part is only between Begin/End of nozzle clean, also Z height can be different for your setup, experiment with it a bit):
M220 S100 ;Reset Feedrate
M221 S100 ;Reset Flowrate
G28 ;Home
G34 ;Align z steppers (only if your setup supports DualZ)
M420 S1 Z2 ;Enable ABL using saved Mesh and Fade Height
; Begin of nozzle cleaning
G92 E0 ;Reset Extruder
G1 Z30.0 F5000.0
G1 X350.0 Y30.0
G1 Z18.0
G1 E25 F100
G1 X350.0 Y50.0 F3000.0
G1 X342.0 Y55.0
G1 X358.0 Y65.0
G1 X342.0 Y75.0
G1 X358.0 Y85.0
G1 X350.0 Y95.0
G92 E0
; End of nozzle cleaning
The whole thing works like 14 times out of 15 which is acceptable for me.
Info
I've tried brass brushes, but they're limited in size (if you use some common brushes available widely) and the melted filament stick too much to the wires so it's hard to remove it.
This is a cleaner I came up with. Apart from printed parts you should cast a silicone brush using one-time mold (cast, destroy the mold, use your silicone part).
Also this cleaner occupies only ~1cm of printing surface if you bend it and move outside of the print bed (see photos).
BOM
M3 nut x2
M3x8 bolt
M3x12 bolt with washer (M3x8 also works)
M3x22 or M3x24 bolt
M3 t-nut (I use M3 nut + printed t-nut)
Some platinum cure 2-component silicone, around 30 shore A, better to buy transparent and color it when curing (important! don't use tin based silicone since it's not high temperature resistant)
For this model you need not more than 30ml of silicone in total (15ml A + 15ml B), but if you buy 500ml or 1000ml tare, you'll have a lot of fun creating molds and casting cool things (socks for the heater blocks, socks for clips of your heated bed since bare metal clips can scratch the PCB on the bottom side of the bed, and a lot more stuff).
Printing and casting the silicone brush
First, print brush_holder.stl, brush_lever.stl and brush_mount.stl in PETG or ABS with your default settings and 50%+ infill.
Next, print brush_mold.stl in PLA (it is important) with following settings:
Wall line count: 1
Top layers: 0
Bottom layers and Initial bottom layers: 1
Infill line distance: 2.7
Infill pattern: Grid
Infill line directions: [30]
This config gives you a nice mold with thin walls between brush fibers. Make sure you don't have problems with infill in general, it should be even, with no holes in the walls. If it's not, lower your infill speed and/or increase infill flow.
Cast the silicone in it. It is important to take out as much air as possible. To do this, you can use a vibrating platform or any other strong vibration motor, or vacuum camera if you have some. I used something like this, but made of a half of plastic bottle and some strong rope (cast the silicone, place the mold into the bottle, rotate it fast, check for bubbles, repeat). Wait for 12-24 hours, warm the whole thing with hairdryer or something else to make the mold soft and gently destroy the mold using cutters, pliers or any other hardware you have. If it doesn't work well, put it into the fridge for 20-30 minutes, take it out and smash it with a hummer several times (PLA becomes more brittle when freezed).
Then assemble everything, install it on the printer (brush_mount.stl should be as close to the bed as possible) and use this piece of Start gcode for your prints (this is my complete start gcode, but the important part is only between Begin/End of nozzle clean, also Z height can be different for your setup, experiment with it a bit):
M220 S100 ;Reset Feedrate
M221 S100 ;Reset Flowrate
G28 ;Home
G34 ;Align z steppers (only if your setup supports DualZ)
M420 S1 Z2 ;Enable ABL using saved Mesh and Fade Height
; Begin of nozzle cleaning
G92 E0 ;Reset Extruder
G1 Z30.0 F5000.0
G1 X350.0 Y30.0
G1 Z18.0
G1 E25 F100
G1 X350.0 Y50.0 F3000.0
G1 X342.0 Y55.0
G1 X358.0 Y65.0
G1 X342.0 Y75.0
G1 X358.0 Y85.0
G1 X350.0 Y95.0
G92 E0
; End of nozzle cleaning
The whole thing works like 14 times out of 15 which is acceptable for me.
Similar models
thingiverse
free
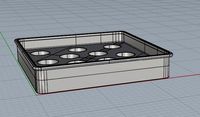
A20M A10M BigMac MKII 5015 Blower
...
g1 e70 f3000
g92 e0
g1 e30 f200
g92 e0
g4 s3
g0 f10000
; end extruder 2
g92 e0
g1 e-5 f6000
g1 x-10.5 f8000
g1 e-70 f3000
g92 e0
thingiverse
free

Purge Bucket for A10M (cleaned up) by carterlewellyn
... e0 ;reset extruder positioning
g1 e-2 f5000 ;retract filament to resting spot
g92 e0 ;reset extruder positioning
i hope it helps
thingiverse
free
Custom start Gcode by monopriceman
... a priming/wiping line to the rear)
g0 z3
g0 y0
g0 z0
g1 x-1;(move a little closer to the print area)
g1 e15 f250;(small retract)
thingiverse
free
SVO2 Purge Bucket and GCODE by RedSquirrelHobbies
... positioning on
g1 z-1 f1000 ; lower nozzle by 1mm
g90 ; absolute positioning on
m400 ; wait for finish
thingiverse
free
Auto Nozzle Cleaner by NeFa
...xtruder position
; wait for all used extruders to reach temperature
{if_ext0}m109 t0 s{temp0}
g1 z17 x0 y-50 f2000 ; clean nozzle
thingiverse
free
Ender-3 Filament Waste Squeegee
...0 y10 f2000.0 ; wipe
g1 x248 y10 f2000.0 ; wipe
g1 z0 x200 y10 f1500.0 ;
m117 printing...
thingiverse
free

tevo tornado nozzle scrubber/prime buckettttttttttt by makermitch69
...
g1 x320
g1 x300
g1 x320
g1 x300
g1 x320
g1 x300
g1 x320 ; end scrub
m300 s987 p120 ; beep to let me know the print has commenced
thingiverse
free

Dual material Y joiner remix by hackwell
...ustom gcode
g92 e0 t1
g91
g1 t1 e-140 f3500; unload filament
g90
g92 e0 t1
g0 x{prime_tower_position_x} y{prime_tower_position_y}
thingiverse
free
MK2s Automatic brush nozzle cleaner by mrjefferson105
...offee:
yoyo12345@live.co.uk - paypal
other than that enjoy and i hope you find it intriguing and useful.
mrjefferson105 - youtube
thingiverse
free

Ender 3 V2 Brush mount by SharpSeer
...ed
g1 x5 y20 z0.3 f5000.0 ; move over to prevent blob squish
lastly, rotate the print till it is flat, i have not altered it yet.
Cleaner
archibase_planet
free
Cleaner
...cleaner
archibase planet
crane lift
fased cleaner - 3d model for interior 3d visualization.
3d_export
$12

vacuum cleaner
...vacuum cleaner
3dexport
vacuum cleaner fo houses
3ddd
$1

Vacuum Cleaner
...vacuum cleaner
3ddd
пылесос
vacuum cleaner + obj + textures
turbosquid
$4

Cleaner
...r 3d model for download as max, obj, c4d, fbx, dwg, and blend on turbosquid: 3d models for games, architecture, videos. (1514067)
archibase_planet
free

Vacuum cleaner
...cuum cleaner vacuum hoover exhauster
vacuum cleaner stefano galli n250213 - 3d model (*.gsm+*.3ds) for interior 3d visualization.
archive3d
free

Cleaner 3D Model
...archive3d
cleaner bathroom ware
cleaner - 3d model (*.gsm+*.3ds) for interior 3d visualization.
archive3d
free

Cleaner 3D Model
...e3d
brush cleaner sanitary ware
cleaner - 3d model (*.gsm+*.3ds) for interior 3d visualization.
archive3d
free

Cleaner 3D Model
...h cleaner sanitary ware
cleaner n210608 - 3d model (*.gsm+*.3ds) for interior 3d visualization.
3d_ocean
$17

Window Cleaner Platform
...tform rooftop window window cleaner platform
model of a window cleaner platform made in cinema 4d. files inlcuded: .c4d .obj .3ds
archive3d
free

Cleaner 3D Model
...ment
vacuum cleaner samsung vcc_sc 9560 - 3d model (*.gsm+*.3ds) for interior 3d visualization.
Silicone
3d_export
$5
cake molds silicone
...cake molds silicone
3dexport
silicone cake molds
turbosquid
$19

Bunny Silicone
...ree 3d model bunny silicone for download as max, fbx, and obj on turbosquid: 3d models for games, architecture, videos. (1672014)
turbosquid
free
silicone spatula
... available on turbo squid, the world's leading provider of digital 3d models for visualization, films, television, and games.
turbosquid
$5
Container Silicon
...for download as ma, max, obj, fbx, prj, unitypackage, and upk on turbosquid: 3d models for games, architecture, videos. (1415212)
turbosquid
$1
Silicone Oil Brush
...
royalty free 3d model silicone oil brush for download as max on turbosquid: 3d models for games, architecture, videos. (1700355)
cg_studio
$35
silicon gun3d model
...cgstudio
industrial slicon gun tool
.lwo - silicon gun 3d model, royalty free license available, instant download after purchase.
turbosquid
free

Acetic Silicon Sealant
... available on turbo squid, the world's leading provider of digital 3d models for visualization, films, television, and games.
turbosquid
$19

Silicone Cute Modern Lamp
...l silicone cute modern lamp for download as max, obj, and fbx on turbosquid: 3d models for games, architecture, videos. (1161149)
3ddd
$1

Silicon Power Ultima II I-Series
... usb , флешка
флеш накопитель silicon power ultima ii i-series.
turbosquid
$12
Pendant lamp shade silicone mold
...nt lamp shade silicone mold for download as max, max, and obj on turbosquid: 3d models for games, architecture, videos. (1610347)
Ender
3ddd
$1

Enders / Elegance
...enders / elegance
3ddd
обогреватель
уличный газовый обогреватель enders elegance
высота: 2200 мм
3d_export
free

ender 3 frame cavity covers
... of the creality ender 3 - makes it look a bit more attractive it just slides into the open channels of the aluminium framework
turbosquid
$1

pen support for ender 3
...y free 3d model pen support for ender 3 for download as blend on turbosquid: 3d models for games, architecture, videos. (1611282)
3d_ocean
$9

Ender Dragon Minecraft
...ojang obj poly videogames
ender dragon minecraft created with cinema 4d r15 formats included: max 2013 – fbx 2012 – c4d r15 – obj
3d_export
free

Creality ender enclosure webcam mount
...e creality enclosure. sure is better than a tripod. change it up if it helps. i printed pla with 50% infill on my dd ender 3 pro.
3d_export
free

ender 3 enclosure corners
...er corners and 4 upper corners, using 25mmx25mm angled aluminium pieces that gets covered on inside of the frame with plexiglass
3d_export
free

ender 3 3d print bed clips
...ed + normal aluminium bed frame of the creality ender 3 = 6mm (b) these clips are designed for glass plate + aluminium bed = 4mm
3d_export
$5

GRUMPY CAT
...grumpy cat 3dexport grumpy cat to print in ender ...
3d_export
$5

Logs fire
...with one multi material for corona and vray r ender. albedo, normal, uvmap, roughness format jpg 4096x4096 models:...
3d_export
$42

excavator
...is the original size. 0.12 mm printing surface creality ender5 ...
Nozzle
3d_export
$5
nozzle
...nozzle
3dexport
3d_export
$49
fuel nozzles
...fuel nozzles
3dexport
fuel nozzles 3d model. include max, obj, fbx files.
archive3d
free

Nozzle 3D Model
...archive3d
nozzle hair-drier ware
nozzle - 3d model (*.gsm+*.3ds) for interior 3d visualization.
turbosquid
$25

Pirouette Nozzle
... available on turbo squid, the world's leading provider of digital 3d models for visualization, films, television, and games.
turbosquid
$10

Fuel Nozzle
...model fuel nozzle for download as c4d, fbx, obj, 3ds, and stl on turbosquid: 3d models for games, architecture, videos. (1672732)
turbosquid
$8
Aeration Nozzles
... available on turbo squid, the world's leading provider of digital 3d models for visualization, films, television, and games.
3d_export
$10

laval airjet nozzle
...laval airjet nozzle
3dexport
a simple modified laval nozzle (airjet shooter) for sorting purposes.
3d_export
$36

Gas nozzle 3D Model
... 3d model
3dexport
gas pump nozzle dispenser filling station petrol fuel spout tank gun
gas nozzle 3d model tartino 1945 3dexport
turbosquid
$10

Diecast Jet nozzle
... free 3d model diecast jet nozzle for download as obj and stl on turbosquid: 3d models for games, architecture, videos. (1425990)
turbosquid
$39
Rocket nozzle, supressor.
... available on turbo squid, the world's leading provider of digital 3d models for visualization, films, television, and games.
Plus
turbosquid
$2
plus-plus puzzle and lego
...d model plus-plus puzzle and lego for download as stl and obj on turbosquid: 3d models for games, architecture, videos. (1662633)
3ddd
$1
Стенка Plus
...стенка plus
3ddd
plus , модная мебель
фабрика "модная мебель", модель plus
3ddd
$1
Спальня METIS plus
... hulsta , metis , спальня
спальня metis plus
design_connected
$11
be plus B+
...be plus b+
designconnected
blå station be plus b+ chairs computer generated 3d model. designed by börge lindau.
design_connected
$11
Bank Plus
...bank plus
designconnected
röthlisberger kollektion bank plus coffee tables computer generated 3d model. designed by atelier oi.
3ddd
$1
elos Plus
... candela
elos plus — мультифункциональный аппарат для проведения лазерного и ipl лечений
3ddd
$1
Calligaris Even Plus
...calligaris even plus
3ddd
calligaris
calligaris_chair_even plus
design_connected
$29
Basket Plus
...nconnected
photo-realistic 3d models of the basket plus bed from bonaldo for 3d architectural and interior design presentations.
3ddd
free
Artpole Faktum Plus
... артполе , панель
artpole faktum plus
размеры:
высота 625мм
ширина 800мм
глубина 17мм
3ddd
$1
Мария / Jazz Plus
...мария / jazz plus
3ddd
мария
кухня фабрики мария модель__jazz plus
5
turbosquid
$6

Rock 5-5
...urbosquid
royalty free 3d model rock 5-5 for download as obj on turbosquid: 3d models for games, architecture, videos. (1639063)
3d_export
$5

hinge 5
...hinge 5
3dexport
hinge 5
turbosquid
$10

A-5
... available on turbo squid, the world's leading provider of digital 3d models for visualization, films, television, and games.
turbosquid
$2

A-5
... available on turbo squid, the world's leading provider of digital 3d models for visualization, films, television, and games.
turbosquid
$12

Calligraphic Digit 5 Number 5
...hic digit 5 number 5 for download as max, obj, fbx, and blend on turbosquid: 3d models for games, architecture, videos. (1389333)
3ddd
$1

5 роз
...5 роз
3ddd
5 роз в стеклянной вазе
design_connected
$11

iPhone 5
...iphone 5
designconnected
apple iphone 5 computer generated 3d model.
3ddd
$1

Lola 5
...lola 5
3ddd
miniforms
lola 5 miniforms 300*65*134
3ddd
$1

Nexus 5
...dd
nexus , phone , телефон
google nexus 5 phone
3d_ocean
$15

iPhone 5
...iphone 5
3docean
3d 4d apple cinema iphone model modeling phone screen texture
iphone 5 3d model and texture realistic iphone 5.