Thingiverse
Ender 5 Dual Z 2020 (Bed Support)
by Thingiverse
Last crawled date: 4 years, 1 month ago
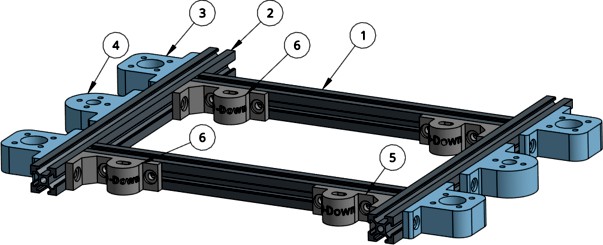
Hello, Thanks for stopping by to look at my project. This is for the Ender 5 and it will move the Z to the sides rather than front to back. You can use your existing plate or buy a new thicker plate and drill/tap M4 holes in the bottom of the plate like I did. Up to you. This mod also allows for expansion of the bed mount screws which happens during heating. (Keep the warping to a minimum.) You can just cut your own extrusions and use your own corners or open build corners like I did.
In addition to this, I raised the Z height by buying (2) 2040 extrusions thus raising the XY top portion of the machine. I moved the Y motor (short extrusion mount) to the top of the frame to match the additional 20mm frame height.
For this project I will assume:
You will purchase or already have lead screws and anti-backlash nuts from Zyltech.
(Important, the mounts currently are only designed for these backlash nuts which are much larger in diameter than the stock nuts or the ones you normally buy. I may at some point design an optional mount for the stock nuts.)
You will purchase or already have an extra motor or 2 new motors to drive your dual Z.
You will purchase or already have 2 extra 10LMUU bearings and 4 new 10MM X ??? Shafts. 4 10MM Rod supports.
You will purchase or already have screws and T-Nuts of your choice.
You will purchase or already have extrusions. I selected Misumi part numbers which are cut to length. You can buy or use any extrusions you like in addition to using printed corners or open build corners.
You have knowledge on how to change your e-steps, add another z motor if needed through your firmware.
You will need to align and test the movement of your set up before you "home all" or you could have one motor bind and that's not a good start. So put it together, measure for consistency and move a mm at a time all the down and all the way up to adjust for any issues.
You will need to print, prior to tearing down your printer:
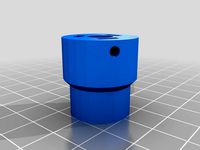
2 Each T8_Lead Screw Mounts
4 Each 10LMUU_Mounts
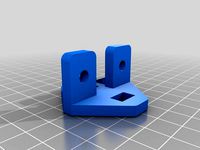
2 Each Bedsupports_Right
2 Each Bedsupports_Left
Suggested Sources:
Lead screws and nuts.https://www.zyltech.com/8mm-t8x2-trapezoidal-acme-lead-screw-w-brass-nut-custom-length-up-to-1000mm/ ( I ordered them cut to 400MM)
Round shafts for LMUU motionhttps://www.zyltech.com/10mm-chrome-plated-hardened-rod-shaft-pre-cut-lengths-300mm-1000mm/
Shaft Supportshttps://www.zyltech.com/2x-sk10-10mm-smooth-rod-shaft-vertical-support/
Extrusionshttps://us.misumi-ec.com/
Misumi US 2 Each HFSB5-2020-246 & 2 Each HFSB5-2020-300
If you buy the wrong thing, please don't blame me. This is why I called them "suggested" sources. You may want to reuse parts or use a different pitch or motor. Use your thinker don't be a stinker. ;) Questions? Do ask please. I'll help as much as I can.
Special thanks, credits, considerations:
@rgrugan : Without his support, this project wouldn't have been posted. His solid E5 ED3V6 mount really made this printer precise. https://www.thingiverse.com/thing:3946974
@snakep : His linear rail mod is awesome! https://www.thingiverse.com/thing:3782865
Good Luck! :)
In addition to this, I raised the Z height by buying (2) 2040 extrusions thus raising the XY top portion of the machine. I moved the Y motor (short extrusion mount) to the top of the frame to match the additional 20mm frame height.
For this project I will assume:
You will purchase or already have lead screws and anti-backlash nuts from Zyltech.
(Important, the mounts currently are only designed for these backlash nuts which are much larger in diameter than the stock nuts or the ones you normally buy. I may at some point design an optional mount for the stock nuts.)
You will purchase or already have an extra motor or 2 new motors to drive your dual Z.
You will purchase or already have 2 extra 10LMUU bearings and 4 new 10MM X ??? Shafts. 4 10MM Rod supports.
You will purchase or already have screws and T-Nuts of your choice.
You will purchase or already have extrusions. I selected Misumi part numbers which are cut to length. You can buy or use any extrusions you like in addition to using printed corners or open build corners.
You have knowledge on how to change your e-steps, add another z motor if needed through your firmware.
You will need to align and test the movement of your set up before you "home all" or you could have one motor bind and that's not a good start. So put it together, measure for consistency and move a mm at a time all the down and all the way up to adjust for any issues.
You will need to print, prior to tearing down your printer:
2 Each T8_Lead Screw Mounts
4 Each 10LMUU_Mounts
2 Each Bedsupports_Right
2 Each Bedsupports_Left
Suggested Sources:
Lead screws and nuts.https://www.zyltech.com/8mm-t8x2-trapezoidal-acme-lead-screw-w-brass-nut-custom-length-up-to-1000mm/ ( I ordered them cut to 400MM)
Round shafts for LMUU motionhttps://www.zyltech.com/10mm-chrome-plated-hardened-rod-shaft-pre-cut-lengths-300mm-1000mm/
Shaft Supportshttps://www.zyltech.com/2x-sk10-10mm-smooth-rod-shaft-vertical-support/
Extrusionshttps://us.misumi-ec.com/
Misumi US 2 Each HFSB5-2020-246 & 2 Each HFSB5-2020-300
If you buy the wrong thing, please don't blame me. This is why I called them "suggested" sources. You may want to reuse parts or use a different pitch or motor. Use your thinker don't be a stinker. ;) Questions? Do ask please. I'll help as much as I can.
Special thanks, credits, considerations:
@rgrugan : Without his support, this project wouldn't have been posted. His solid E5 ED3V6 mount really made this printer precise. https://www.thingiverse.com/thing:3946974
@snakep : His linear rail mod is awesome! https://www.thingiverse.com/thing:3782865
Good Luck! :)
Similar models
grabcad
free

Misumi Aluminium Extrusion HFSB5-2020-TPW
...misumi aluminium extrusion hfsb5-2020-tpw
grabcad
misumi 2020
hfsb5-2020-tpw
thingiverse
free
Yet another Z Shaft Coupler for Prusa Mendel by raldrich
...ews to hang on to the shaft - one pushing the motor shaft into the flats on the motor shaft hole, and 3 holding the z axis screw.
grabcad
free

Misumi Aluminium Extrusion HFSB5-2020-200-TPW
...misumi aluminium extrusion hfsb5-2020-200-tpw
grabcad
misumi 2020x200mm
hfsb5-2020-200-tpw
thingiverse
free
HyperCube Z Nut Mounts various brass nuts by Tech2C
...epper motor
z_nut_mount_b for this integrated lead-screw stepper motor
z_nut_mount_c for this integrated lead-screw stepper motor
grabcad
free

Misumi Aluminium Extrusion
...misumi aluminium extrusion
grabcad
hfsb5-2020 200mm
thingiverse
free

Tronxy X1 Z-Axis Gantry Bracket by simonwilson
... currently using can be found below!
250mm t8 8mm 'lead' lead screw
t8 backlash block link
3pcs - t8 backlash block link
thingiverse
free

Extruder mounting plate for 2020 extrusion by dc42
...e plate (you need 35mm length cap head screws for a 34mm long motor). then secure the plate to the extrusion using two m4 screws.
thingiverse
free

Adjustable Z endstop for Tevo Tarantula by Lollixx
...x20 screw
i took all the parts from the spares came with the printer so you should already have everything you need to mount this
thingiverse
free

Z-Motor holder with precision Z-Axis calibration for Velleman K8200 / 3Drag by akkenoth
...m3 nut and 4x m3 washer to mount microswitch to plate
to mount z endstop screw block you can use original screw, washers and nut.
thingiverse
free

Z Axis Adjsutable Motor Mount (one-sided) by jprizzle
...is for a second z motor on the opposite side of the printer.
required hardware:
4 m3 x 6mm screws
2 m4 x 10mm screws
2 m4 t-nuts
Ender
3ddd
$1

Enders / Elegance
...enders / elegance
3ddd
обогреватель
уличный газовый обогреватель enders elegance
высота: 2200 мм
3d_export
free

ender 3 frame cavity covers
... of the creality ender 3 - makes it look a bit more attractive it just slides into the open channels of the aluminium framework
turbosquid
$1

pen support for ender 3
...y free 3d model pen support for ender 3 for download as blend on turbosquid: 3d models for games, architecture, videos. (1611282)
3d_ocean
$9

Ender Dragon Minecraft
...ojang obj poly videogames
ender dragon minecraft created with cinema 4d r15 formats included: max 2013 – fbx 2012 – c4d r15 – obj
3d_export
free

Creality ender enclosure webcam mount
...e creality enclosure. sure is better than a tripod. change it up if it helps. i printed pla with 50% infill on my dd ender 3 pro.
3d_export
free

ender 3 enclosure corners
...er corners and 4 upper corners, using 25mmx25mm angled aluminium pieces that gets covered on inside of the frame with plexiglass
3d_export
free

ender 3 3d print bed clips
...ed + normal aluminium bed frame of the creality ender 3 = 6mm (b) these clips are designed for glass plate + aluminium bed = 4mm
3d_export
$5

GRUMPY CAT
...grumpy cat 3dexport grumpy cat to print in ender ...
3d_export
$5

Logs fire
...with one multi material for corona and vray r ender. albedo, normal, uvmap, roughness format jpg 4096x4096 models:...
3d_export
$42

excavator
...is the original size. 0.12 mm printing surface creality ender5 ...
Dual
turbosquid
free

Dual Pistols
...ls
turbosquid
free 3d model dual pistols for download as fbx on turbosquid: 3d models for games, architecture, videos. (1320360)
turbosquid
$2

Dual Axe
...urbosquid
royalty free 3d model dual axe for download as fbx on turbosquid: 3d models for games, architecture, videos. (1332372)
turbosquid
$10

Dual Lesaths
... available on turbo squid, the world's leading provider of digital 3d models for visualization, films, television, and games.
3ddd
$1

плитка Dual Bianco (Испания)
...й плитки venis dual (испания). технические качества: устойчивость к стирания, отличная геометрия, отсутствие проблем при укладке.
turbosquid
$35

Dual Mesh Fonts
...ree 3d model dual mesh fonts for download as ma, obj, and fbx on turbosquid: 3d models for games, architecture, videos. (1352989)
turbosquid
$29

Dual Flask with Bungs
...del dual flask with bungs for download as obj, fbx, and blend on turbosquid: 3d models for games, architecture, videos. (1210512)
turbosquid
$19

Dual Socket Plug
...3d model dual socket plug for download as obj, fbx, and blend on turbosquid: 3d models for games, architecture, videos. (1303912)
turbosquid
$13

Dual Adjustable Pulley
... available on turbo squid, the world's leading provider of digital 3d models for visualization, films, television, and games.
turbosquid
$10

Amoi N809 Dual
... available on turbo squid, the world's leading provider of digital 3d models for visualization, films, television, and games.
turbosquid
$5

Dual Turret Tank
... available on turbo squid, the world's leading provider of digital 3d models for visualization, films, television, and games.
2020
3d_export
$5

cyberpunk 2020
...cyberpunk 2020
3dexport
cyberpunk 2020
3d_export
$5
monster01 2020
...monster01 2020
3dexport
monster01 2020 dxf file rigged in mixamo.
3d_export
$129

explorer 2020
...explorer 2020
3dexport
3d_export
$5

mug 2020
...mug 2020
3dexport
3d_export
$15

3 rims 2020
...3 rims 2020
3dexport
new rims 2020 from inventor
turbosquid
$7

Keepsake of 2020
...ty free 3d model keepsake of 2020 for download as obj and stl on turbosquid: 3d models for games, architecture, videos. (1657350)
3d_export
$35

landrover 2020
...landrover 2020
3dexport
turbosquid
$15

Timeless 2020
...free 3d model timeless 2020 for download as max, obj, and fbx on turbosquid: 3d models for games, architecture, videos. (1433362)
turbosquid
$85

Q8 2020
... free 3d model audi q8 2020 for download as max, obj, and fbx on turbosquid: 3d models for games, architecture, videos. (1559582)
turbosquid
$59

Supra 2020
...ee 3d model supra 2020 for download as max, lwo, obj, and c4d on turbosquid: 3d models for games, architecture, videos. (1404492)
Z
3d_export
$5

nissan z
...nissan z
3dexport
nissan z
3ddd
$1

Vase Z
...vase z
3ddd
vase z
3ddd
$1

полотенцесушить Z
...полотенцесушить z
3ddd
полотенцесушитель
полотенцесушить z
design_connected
free

Z-Chair
...z-chair
designconnected
free 3d model of z-chair designed by karman, aleksei.
design_connected
$11

Z Lamp
...z lamp
designconnected
phillips z lamp computer generated 3d model. designed by kalff, louis.
3d_export
$5

Dragon balls z
...dragon balls z
3dexport
dragon ball z
turbosquid
$20

Fighter Z
...
turbosquid
royalty free 3d model fighter z for download as on turbosquid: 3d models for games, architecture, videos. (1292563)
turbosquid
$9

Pen Z
...pen z
turbosquid
free 3d model pen z for download as obj on turbosquid: 3d models for games, architecture, videos. (1686775)
turbosquid
free

z chair
...z chair
turbosquid
free 3d model z chair for download as max on turbosquid: 3d models for games, architecture, videos. (1410230)
turbosquid
$5

Letter Z
...urbosquid
royalty free 3d model letter z for download as max on turbosquid: 3d models for games, architecture, videos. (1408540)
Bed
3ddd
$1

bed
...bed
3ddd
bed , постельное белье
bed
3ddd
$1

bed
...bed
3ddd
bed , постельное белье
bed
3ddd
$1

bed
...bed
3ddd
bed , постельное белье
bed
3ddd
$1

bed
...bed
3ddd
bed , постельное белье
bed
3ddd
$1

bed
...bed
3ddd
bed , постельное белье
bed
3ddd
$1

bed
...bed
3ddd
bed , постельное белье
bed
3ddd
free

bed
...bed
3ddd
bed , постельное белье
bed
3ddd
free

bed
...bed
3ddd
bed , постельное белье
bed
3ddd
$1

Bed
...bed
3ddd
bed , постельное белье , постель
bed
3d_export
$7

bed adairs bed
...rs bed
3dexport
bed adairs bed in modern style. if you want a smoother surface, please turn on turbosmooth in the modifier list.
5
turbosquid
$6

Rock 5-5
...urbosquid
royalty free 3d model rock 5-5 for download as obj on turbosquid: 3d models for games, architecture, videos. (1639063)
3d_export
$5

hinge 5
...hinge 5
3dexport
hinge 5
turbosquid
$10

A-5
... available on turbo squid, the world's leading provider of digital 3d models for visualization, films, television, and games.
turbosquid
$2

A-5
... available on turbo squid, the world's leading provider of digital 3d models for visualization, films, television, and games.
turbosquid
$12

Calligraphic Digit 5 Number 5
...hic digit 5 number 5 for download as max, obj, fbx, and blend on turbosquid: 3d models for games, architecture, videos. (1389333)
3ddd
$1

5 роз
...5 роз
3ddd
5 роз в стеклянной вазе
design_connected
$11

iPhone 5
...iphone 5
designconnected
apple iphone 5 computer generated 3d model.
3ddd
$1

Lola 5
...lola 5
3ddd
miniforms
lola 5 miniforms 300*65*134
3ddd
$1

Nexus 5
...dd
nexus , phone , телефон
google nexus 5 phone
3d_ocean
$15

iPhone 5
...iphone 5
3docean
3d 4d apple cinema iphone model modeling phone screen texture
iphone 5 3d model and texture realistic iphone 5.
Support
turbosquid
$5

Support
... available on turbo squid, the world's leading provider of digital 3d models for visualization, films, television, and games.
3d_export
$8
Support 3D Model
...support 3d model
3dexport
support cantilever console
support 3d model tasal 73900 3dexport
3d_export
$5
phone support
...phone support
3dexport
phone
turbosquid
$12
Support bars
...squid
royalty free 3d model support bars for download as max on turbosquid: 3d models for games, architecture, videos. (1411542)
turbosquid
$8

support weights
...id
royalty free 3d model support weights for download as max on turbosquid: 3d models for games, architecture, videos. (1411538)
turbosquid
$2

headphone support
...royalty free 3d model headphone support for download as sldpr on turbosquid: 3d models for games, architecture, videos. (1357583)
turbosquid
$2

Support for flowers
...royalty free 3d model support for flowers for download as max on turbosquid: 3d models for games, architecture, videos. (1463543)
turbosquid
$14

Flower Support
...alty free 3d model flower support for download as max and obj on turbosquid: 3d models for games, architecture, videos. (1497066)
turbosquid
$5

serum support
...yalty free 3d model serum support for download as c4d and obj on turbosquid: 3d models for games, architecture, videos. (1551267)
3d_export
$10
spyro joystick support
...spyro joystick support
3dexport
joystick support of spyro dragon