Thingiverse
Ender 4 - Power Main Plug & ON/OFF switch little box by Toto74
by Thingiverse
Last crawled date: 3 years, 1 month ago
Français (English just below!):
La Creality Ender 4 se connecte directement au secteur 240V via un câble connecté en permanence sur l'alimentation 24 Vdc. L'interrupteur ON/OFF sur le boitier de carte-mère ne coupe que l'alimentation de celle-ci.
Donc raccordée au secteur, l'alimentation 24 Vdc est en permanence sous tension....
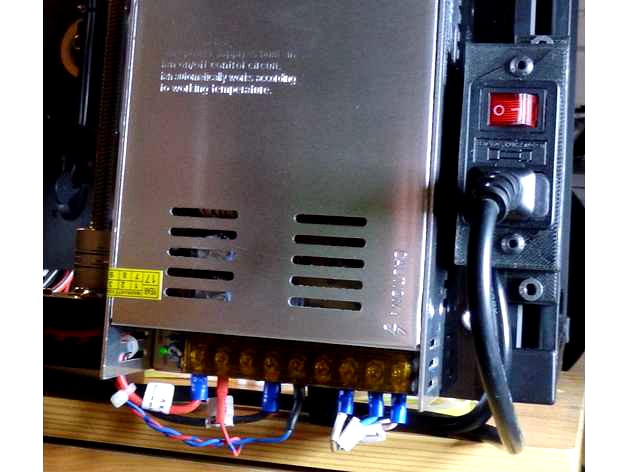
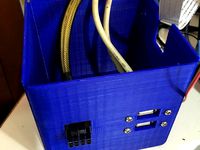
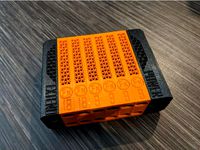
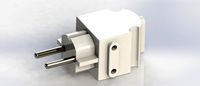
J'ai donc développé un petit ensemble qui permet d'intégrer une embase qui comprend un fiche secteur au format CE, un fusible 5x20 et un interrupteur bipolaire avec voyant intégré.
Prix de cet ensemble prise/inter: 1,73 euros chez Banggood.
L'ouverture dans le boitier, pour intégrer le bloc embase/inter, fait 47,50 mm x 27,70 mm (j'ai prévu un peu de jeu pour que ça se monte relativement facilement...mais reste bien en place)
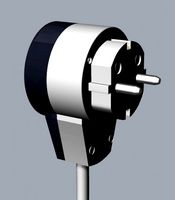
La première pièce rempli plusieurs fonctions: rattraper le niveau de la plaque de montage de l'alim 24 Vdc (5mm), permettre la fixation du boitier support (l'autre pièce) et de fixer le tout sur le profilé Alu à droite de l'alim 24Vdc.
La deuxième pièce porte l'embase/inter et se fixe via 2 vis M4 sur les colonne de la première.
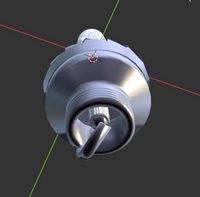
Pour info, j'ai taraudé en M4 les trous des colonnes dont le Ø d'impression est prévu pour cela. Utilisez un taraud bien affûté: neuf de préférence...
Pour les raccordements, j'ai simplement coupé la partie du câble d'origine en gardant le côté fil/cosses de raccordement à l'alim 24 Vdc.
Je vais prochainement définir un autre système qui s'intégrera en bas du bloc 24Vdc, mais cette solution "moindre coût" permet déjà d'avoir une solution avec un ON/OFF général.
Pour le fusible 5x20: j'ai mis un 3A type Rapide.
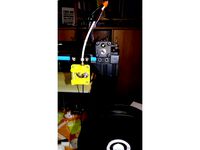
Actuellement en place et fonctionnel!
English here :
The Creality Ender 4 connects directly to the 240V mains via a cable so that is permanently connected to the 24 Vdc power supply. The ON / OFF switch on the motherboard box cuts power to the motherboard only.
So connected to the mains, the 24 Vdc power supply is always live ....
So I developed this small set that integrates a base including a plug in CE format, a 5x20 fuse and a bipolar switch with integrated LED.
Price of this component: 1,73 euros at Banggood.
The window, to integrate the plug/switch, is 47.50 mm x 27.70 mm (I planned a little gap so that it mounts relatively easily ... but remains in place)
The first part fulfills several functions: to catch the level of the mounting plate of the power supply 24 Vdc (5mm), to allow the fixing of the support box (the other part) and to fix everything on the 3D printer Aluminium profile on the right of the 24Vdc power supply.
The second part carries the plug/switch component and is fixed via 2 screws M4 on the columns of the first part.
FYI, I tapped in M4 the 2 holes of columns whose printing Ø is expected for that. Use a sharp tap: preferably a new one...
For the connection, I simply cut the original part of the cable while keeping the wire side / lugs connecting to the 24 Vdc power supply.
I will soon define another system that will integrate at the bottom of the 24Vdc block, but this "lower cost" solution already allows to have a solution with a general ON / OFF.
For the 5x20 fuse: I put a 3A Fast blown type.
Currently in place and operational on my printer!
La Creality Ender 4 se connecte directement au secteur 240V via un câble connecté en permanence sur l'alimentation 24 Vdc. L'interrupteur ON/OFF sur le boitier de carte-mère ne coupe que l'alimentation de celle-ci.
Donc raccordée au secteur, l'alimentation 24 Vdc est en permanence sous tension....
J'ai donc développé un petit ensemble qui permet d'intégrer une embase qui comprend un fiche secteur au format CE, un fusible 5x20 et un interrupteur bipolaire avec voyant intégré.
Prix de cet ensemble prise/inter: 1,73 euros chez Banggood.
L'ouverture dans le boitier, pour intégrer le bloc embase/inter, fait 47,50 mm x 27,70 mm (j'ai prévu un peu de jeu pour que ça se monte relativement facilement...mais reste bien en place)
La première pièce rempli plusieurs fonctions: rattraper le niveau de la plaque de montage de l'alim 24 Vdc (5mm), permettre la fixation du boitier support (l'autre pièce) et de fixer le tout sur le profilé Alu à droite de l'alim 24Vdc.
La deuxième pièce porte l'embase/inter et se fixe via 2 vis M4 sur les colonne de la première.
Pour info, j'ai taraudé en M4 les trous des colonnes dont le Ø d'impression est prévu pour cela. Utilisez un taraud bien affûté: neuf de préférence...
Pour les raccordements, j'ai simplement coupé la partie du câble d'origine en gardant le côté fil/cosses de raccordement à l'alim 24 Vdc.
Je vais prochainement définir un autre système qui s'intégrera en bas du bloc 24Vdc, mais cette solution "moindre coût" permet déjà d'avoir une solution avec un ON/OFF général.
Pour le fusible 5x20: j'ai mis un 3A type Rapide.
Actuellement en place et fonctionnel!
English here :
The Creality Ender 4 connects directly to the 240V mains via a cable so that is permanently connected to the 24 Vdc power supply. The ON / OFF switch on the motherboard box cuts power to the motherboard only.
So connected to the mains, the 24 Vdc power supply is always live ....
So I developed this small set that integrates a base including a plug in CE format, a 5x20 fuse and a bipolar switch with integrated LED.
Price of this component: 1,73 euros at Banggood.
The window, to integrate the plug/switch, is 47.50 mm x 27.70 mm (I planned a little gap so that it mounts relatively easily ... but remains in place)
The first part fulfills several functions: to catch the level of the mounting plate of the power supply 24 Vdc (5mm), to allow the fixing of the support box (the other part) and to fix everything on the 3D printer Aluminium profile on the right of the 24Vdc power supply.
The second part carries the plug/switch component and is fixed via 2 screws M4 on the columns of the first part.
FYI, I tapped in M4 the 2 holes of columns whose printing Ø is expected for that. Use a sharp tap: preferably a new one...
For the connection, I simply cut the original part of the cable while keeping the wire side / lugs connecting to the 24 Vdc power supply.
I will soon define another system that will integrate at the bottom of the 24Vdc block, but this "lower cost" solution already allows to have a solution with a general ON / OFF.
For the 5x20 fuse: I put a 3A Fast blown type.
Currently in place and operational on my printer!
Similar models
thingiverse
free

ANET A8 / A6 POWER SUPPLY Switch Socket by Thearc
...est pour la dernière version de l'alim de l'anet a8 qui mesure 11cm
thanks for printing !
merci pour l'impression !
thingiverse
free
Boitier alimentation Raspberry Pi / Imprimante 3D by Jpg32190
...our l'éclairage).
le module haut permet de mettre la sortie pour l'alimentation de l'imprimante 3d et deux ports usb.
thingiverse
free

Support alimentation plateau chauffant by Demoniac
...lisées pour assembler le boitier sont de type m3 ainsi que deux boulons de type m4 avec rondelles pour fixer l'alimentation.
thingiverse
free

Ender 4 switch box Rev2 - Boitier inter Ender 4 version 2 by Toto74
...ss, because with this one only, i think the electrical schock risk is almost impossible.
hope it will be usefull for some of you!
thingiverse
free
carter alimentation Hictop 3DP17 by Diauguerry93
... prise 220v et un interrupteur pour l'arret atomatique de l'alimentation (voir https://www.thingiverse.com/thing:2448359)
thingiverse
free
boitier de fixation switch avec connecteur 230V pour mon (projet REX 8) by krys22
...egroupant tous les fichiers de mon projet rex 8 avec la configuration de marlin 1.1.8 : https://www.thingiverse.com/thing:2854957
thingiverse
free

lab power supply 3.3v/5v/12v with power pc - alim d'atelier avec un alim de pc by oclains
...r 3.3v 5v 12v
4 led
4 resitances
une alimentation de pc
interupteur
fiche banane femelle
options une lampe et un inter
thingiverse
free

Ender 3 power supply holder / Cale de maintien alimentation Ender 3 by Alarik72
...n the side so that the case moves a little when plugging / unplugging the electrical cable. i made this to hold the set properly.
thingiverse
free
CASE FX Power Source (anasound) by Owlicious
...y.
essential parameters for printing:
layer 0.2
nozzle 0.4
of walls 2
ps: i am attaching the fusion file, do not hesitate to fork
thingiverse
free

Fermeture automatique de poulailler by Littlejuce
...té, à l'intérieur du boitier.
la photo-résistance est à coller sur la face dans son emplacement à l'intérieur du boitier.
Toto74
thingiverse
free

Artillery Sidewinder X1 32mm flat cable holder (and gantry connectors cover) by Toto74
...ent this in order to hold firmly the cable so printer virbrations/movements will not induce electrical connection weakness again
thingiverse
free
Ender 4 auxiliary Fan switch box by Toto74
...nd led indicator and then i can decide when i want to turn on or off the additional radial fan.
if it can help someone else ....
thingiverse
free

ENDER 4 support/adapter (ball bearings) for spool Ø 54 mm by Toto74
...to serve in this application.
this is my first post, as an "absolute 3d prints beginner"...i hope you will be indulgent
thingiverse
free

Ender 4 - Power Main Plug & ON/OFF switch box by AlexPankratov
...plug & on/off switch box by alexpankratov thingiverse thanks toto74 for a very useful on/off switch. i've tryed to...
thingiverse
free

Bobine pour échantillons de fil / Filament Samples holding spool by Toto74
...contact bearings saved from the bin…) but any similar dimensions bearing will be ok
hope this could help some of you
best regards
thingiverse
free
Ender 4 switch box Rev2 - Boitier inter Ender 4 version 2 by Toto74
...ss, because with this one only, i think the electrical schock risk is almost impossible.
hope it will be usefull for some of you!
Ender
3ddd
$1

Enders / Elegance
...enders / elegance
3ddd
обогреватель
уличный газовый обогреватель enders elegance
высота: 2200 мм
3d_export
free

ender 3 frame cavity covers
... of the creality ender 3 - makes it look a bit more attractive it just slides into the open channels of the aluminium framework
turbosquid
$1

pen support for ender 3
...y free 3d model pen support for ender 3 for download as blend on turbosquid: 3d models for games, architecture, videos. (1611282)
3d_ocean
$9

Ender Dragon Minecraft
...ojang obj poly videogames
ender dragon minecraft created with cinema 4d r15 formats included: max 2013 – fbx 2012 – c4d r15 – obj
3d_export
free

Creality ender enclosure webcam mount
...e creality enclosure. sure is better than a tripod. change it up if it helps. i printed pla with 50% infill on my dd ender 3 pro.
3d_export
free

ender 3 enclosure corners
...er corners and 4 upper corners, using 25mmx25mm angled aluminium pieces that gets covered on inside of the frame with plexiglass
3d_export
free

ender 3 3d print bed clips
...ed + normal aluminium bed frame of the creality ender 3 = 6mm (b) these clips are designed for glass plate + aluminium bed = 4mm
3d_export
$5

GRUMPY CAT
...grumpy cat 3dexport grumpy cat to print in ender ...
3d_export
$5

Logs fire
...with one multi material for corona and vray r ender. albedo, normal, uvmap, roughness format jpg 4096x4096 models:...
3d_export
$42

excavator
...is the original size. 0.12 mm printing surface creality ender5 ...
Plug
3d_export
$5
plug
...plug
3dexport
3d_export
$5

plug cover
...plug cover
3dexport
plug cover
3d_export
$5
spark plug
...spark plug
3dexport
spark plug
3d_export
free

spark plug
...spark plug
3dexport
spark plug
turbosquid
$30

plug
... available on turbo squid, the world's leading provider of digital 3d models for visualization, films, television, and games.
turbosquid
$15

plug
... available on turbo squid, the world's leading provider of digital 3d models for visualization, films, television, and games.
turbosquid
$10
Plug
... available on turbo squid, the world's leading provider of digital 3d models for visualization, films, television, and games.
turbosquid
$10

Plug
... available on turbo squid, the world's leading provider of digital 3d models for visualization, films, television, and games.
turbosquid
$1

Plug
... available on turbo squid, the world's leading provider of digital 3d models for visualization, films, television, and games.
turbosquid
free
plug
... available on turbo squid, the world's leading provider of digital 3d models for visualization, films, television, and games.
Switch
archibase_planet
free

Switch
...switch
archibase planet
switch cluster switch
light switch 1 - 3d model for interior 3d visualization.
archibase_planet
free
Switch
...switch
archibase planet
switches switch
switch 1 - 3d model (*.gsm+*.3ds) for interior 3d visualization.
archibase_planet
free
Switch
...switch
archibase planet
closer button switch cluster switch
switch - 3d model (*.3ds) for interior 3d visualization.
archibase_planet
free

Switch
...switch
archibase planet
switch closer
light switch 2 - 3d model for interior 3d visualization.
archibase_planet
free

Switch
...switch
archibase planet
closer button switch
switch n300808 - 3d model (*.gsm+*.3ds) for interior 3d visualization
archibase_planet
free

Switch
...switch
archibase planet
closer button switch
switch n141108 - 3d model (*.gsm+*.3ds) for interior 3d visualization.
archibase_planet
free

Switch
...switch
archibase planet
cluster switch closer
switch n260609 - 3d model (*.gsm+*.3ds) for interior 3d visualization.
archibase_planet
free

Switch
...switch
archibase planet
button switch closer
switch 2 - 3d model (*.gsm+*.3ds) for interior 3d visualization.
archibase_planet
free

Switch
...switch
archibase planet
button switch closer
switch n070510 - 3d model (*.gsm+*.3ds) for interior 3d visualization.
3d_export
$5

switch
...switch
3dexport
3d model of a low-poly switch
Main
turbosquid
$49

Maine
... available on turbo squid, the world's leading provider of digital 3d models for visualization, films, television, and games.
turbosquid
$30

main
... available on turbo squid, the world's leading provider of digital 3d models for visualization, films, television, and games.
3d_export
$18

main city-outside the main hall-square
...main city-outside the main hall-square
3dexport
main city-outside the main hall-square<br>3ds max 2015
3ddd
$1
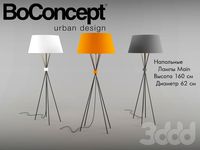
BoConcept / Main
...boconcept / main
3ddd
boconcept
напольная лампа main, черный металл с оранжевым, белым и серым абажуром.
3ddd
$1

BoConcept / Main
...boconcept / main
3ddd
boconcept
настольная лампа main, черный металл с оранжевым, белым и серым абажюром - фирмы boconcept
turbosquid
$72

Main Home
...rbosquid
royalty free 3d model main home for download as c4d on turbosquid: 3d models for games, architecture, videos. (1229913)
turbosquid
$15

MAIN MODEL_CHAIR
...d
royalty free 3d model main model_chair for download as max on turbosquid: 3d models for games, architecture, videos. (1707523)
turbosquid
$4

Main closet
...osquid
royalty free 3d model main closet for download as max on turbosquid: 3d models for games, architecture, videos. (1557230)
turbosquid
$2

main door
...rbosquid
royalty free 3d model main door for download as max on turbosquid: 3d models for games, architecture, videos. (1459968)
turbosquid
$26

main bedroom
... free 3d model main bedroom for download as max, obj, and fbx on turbosquid: 3d models for games, architecture, videos. (1492862)
Power
turbosquid
$100

power
...ower
turbosquid
royalty free 3d model power for download as on turbosquid: 3d models for games, architecture, videos. (1421990)
3d_export
$5

Power
...power
3dexport
3d_export
$5

power outlets
...power outlets
3dexport
power outlets
3ddd
$1

lion power
...lion power
3ddd
лев , статуя
lion power gold sculpture
3ddd
$1

Sea Power
...
компас , море , часы
часы с компасом sea power
3ddd
free

Meridiani / Power
...power
3ddd
meridiani , круглый
стол power производитель meridiani, диаметр 120,высота 67
3d_export
$5

Power Surge
...power surge
3dexport
the power surge is a all mesh carnival ride to lower in game part count and lag
turbosquid
$8

Airport Ground Power Unit (AXA Power )
... available on turbo squid, the world's leading provider of digital 3d models for visualization, films, television, and games.
turbosquid
$50

Power Houser
...rbosquid
royalty free 3d model power houser for download as on turbosquid: 3d models for games, architecture, videos. (1333800)
3d_export
$5

power outlet
...power outlet
3dexport
power outlet<br>format file maya 2018, 3d max 2017, obj, fbx
Little
3d_ocean
$8
Little Zombie
...little zombie
3docean
little zombie
little zombie
3d_export
$60
Little Badger
...little badger
3dexport
little badger
3d_export
$5

little house
...little house
3dexport
little house
3d_ocean
$10

Little Wolf
...little wolf
3docean
wolf
little wolf for game
3d_export
$5
a little home
...a little home
3dexport
a little home for your games)
3d_export
$5

little monster
...little monster
3dexport
little toothy funny monster
3ddd
$1

little squirt
...little squirt
3ddd
детская
коллекция обоев little squirt
design_connected
$20

Little Bloom
...little bloom
designconnected
devon&devon little bloom computer generated 3d model.
design_connected
$16

Little Albert
...little albert
designconnected
moroso little albert computer generated 3d model. designed by arad, ron.
3d_ocean
$5

Little Bag
...little bag
3docean
accessory bag bundle design fashion handbag interior
a little bag model.
Box
archibase_planet
free

Box
...box
archibase planet
box carton cardboard box
box 2 - 3d model (*.3ds) for interior 3d visualization.
archibase_planet
free

Box
...box
archibase planet
carton cardboard box box
box 1 - 3d model (*.3ds) for interior 3d visualization.
3d_export
$6

box
...box
3dexport
box
3d_export
$5

Box
...box
3dexport
box
3d_export
$5

box
...box
3dexport
box
3d_export
$5

box
...box
3dexport
box
archibase_planet
free

Box
...box
archibase planet
box box for paper notebook pencil
box - 3d model (*.gsm+*.3ds) for interior 3d visualization.
archibase_planet
free

Box
...box
archibase planet
box carton cardboard box
box n170111 - 3d model (*.gsm+*.3ds) for interior 3d visualization.
archibase_planet
free

Box
...box
archibase planet
box carton cardboard box
box n050411 - 3d model (*.gsm+*.3ds) for interior 3d visualization.
archibase_planet
free

Boxes
...boxes
archibase planet
boxes box case bin
boxes n281213 - 3d model (*.gsm+*.3ds+*.max) for interior 3d visualization.
4
turbosquid
$9

Office Chair 4-4
... available on turbo squid, the world's leading provider of digital 3d models for visualization, films, television, and games.
3d_export
$5

doors- 4
...doors- 4
3dexport
doors 4
3d_export
$5

hinge 4
...hinge 4
3dexport
hinge 4
3ddd
$1

Штора №4
...штора №4
3ddd
штора №4
3d_export
free

playstation 4
...playstation 4
3dexport
playstation 4
turbosquid
$1

re 4-4 electric locomotive
... free 3d model re 4 4 electric locomotive for download as obj on turbosquid: 3d models for games, architecture, videos. (1707845)
3ddd
$1

nexus 4
...nexus 4
3ddd
lg , телефон
nexus 4
3ddd
$1

4 Poufs
...4 poufs
3ddd
пуф
4 soft poufs
turbosquid
$12

Calligraphic Digit 4 Number 4
...hic digit 4 number 4 for download as max, obj, fbx, and blend on turbosquid: 3d models for games, architecture, videos. (1389332)
3ddd
$1

Dauphin 4+
...dauphin 4+
3ddd
кресло
dauphin 4+ конференц кресло