Thingiverse
Ender 3 Zinus Table Enclosure
by Thingiverse
Last crawled date: 4 years, 3 months ago
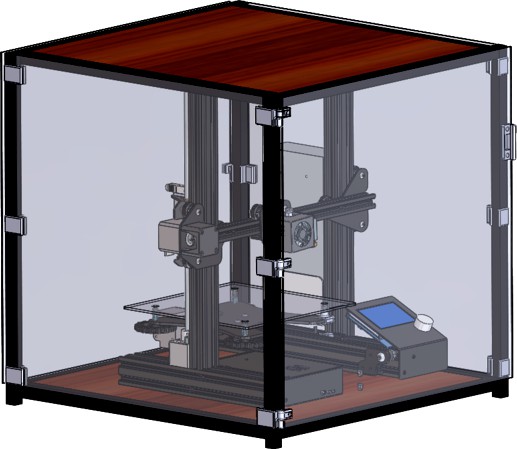
A common enclosure that has been made for the Ender 3 and similarly sized printers uses the Ikea Lack table, but I decided to use the Zinus Dane table with some light modifications because it has a slightly smaller footprint, is more robust, and looks a little nicer:
https://www.amazon.com/gp/product/B01BEGS15E/ref=ppx_yo_dt_b_asin_title_o05_s00?ie=UTF8&psc=1
To get started, all you need is:a power drill with some drill bitsthe Zinus Dane table (20 inch square side)some magnets from Lowes or somewhere similar, these magnets latches were sized to fit 2x [0.9"x0.22"x0.22"] ceramic magnets per latch.some 3/32" thick plexiglass sheets (2x [18.8" by 18.5"] for the sides and 2x [18.8" by 19.2"] for the front/back)
*and an Ender 3 or similarly sized printer of course.
To allow the printer to fit on the bottom shelf of this table, I drilled holes in the legs approximately in line with the crossbar connecting the 2 side legs so that it was essentially ~0.25" off the ground when assembled (see pictures to get a better idea).
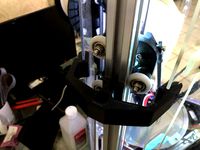
I removed the filament mount from the top of the printer and remounted it to the top of the table, then drilled a 1/4" hole approximately in line with where the filament would be coming down from in it's normal configuration. Though, I plan to replace the stock filament mount with this customizable one that has bearings integrated and a stand option made by HugoHuge:
https://www.thingiverse.com/thing:3020026
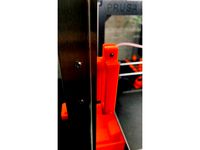
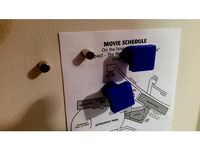
You can configure the mounts and magnetic latches however you want, but I evenly spaced my pieces. I put 2 magnetic latches on the sides of the doors (one on the front and back of the table), then another at the top of each door. Then I also added a magnetic latch at the top of each side panel.
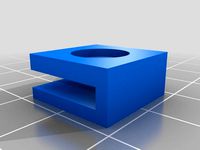
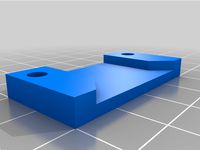
To attach the "hinge.stl" and magnetLatch.stl" to the plexiglass, you can use the piece itself to position the holes that have to be drilled out, then press the "hingeLock.stl" through the piece and the plexi to hold them together. It's a tight fit considering how the dimensions of the pieces change slightly during printing, but it should work if everything is lined up well.
** Be very careful drilling thru the plexiglass as it will shatter if you apply too much pressure or drill too slow. You can also use the drill to clean up the inside of the printed parts' holes to ensure they match the diameter of the hole cut in the plexiglass as closely as possible.
If you don't want to mess with drilling so many holes, you could probably get by with just gluing all of the pieces to the plexiglass.
Lastly, you can add some 1/4" window insulation around the edges to fully seal the inside space of the printer. On mine, I added some black sticky backed insulation around all sides that matches very nicely with the aesthetic of the table too.
***Note: I have the magnetically latched doors in the direction of the Y-axis because the bed cable guide currently causes the cables to protrude too far out the back and possibly bump against the back door. Or if I shift the printer forward slightly, then the fully extended Y-axis bumps open the front door. This allows the doors to open and close pretty easily without interfering with prints until I make an enhanced bed cable guide to reduce cable protrusion.
https://www.amazon.com/gp/product/B01BEGS15E/ref=ppx_yo_dt_b_asin_title_o05_s00?ie=UTF8&psc=1
To get started, all you need is:a power drill with some drill bitsthe Zinus Dane table (20 inch square side)some magnets from Lowes or somewhere similar, these magnets latches were sized to fit 2x [0.9"x0.22"x0.22"] ceramic magnets per latch.some 3/32" thick plexiglass sheets (2x [18.8" by 18.5"] for the sides and 2x [18.8" by 19.2"] for the front/back)
*and an Ender 3 or similarly sized printer of course.
To allow the printer to fit on the bottom shelf of this table, I drilled holes in the legs approximately in line with the crossbar connecting the 2 side legs so that it was essentially ~0.25" off the ground when assembled (see pictures to get a better idea).
I removed the filament mount from the top of the printer and remounted it to the top of the table, then drilled a 1/4" hole approximately in line with where the filament would be coming down from in it's normal configuration. Though, I plan to replace the stock filament mount with this customizable one that has bearings integrated and a stand option made by HugoHuge:
https://www.thingiverse.com/thing:3020026
You can configure the mounts and magnetic latches however you want, but I evenly spaced my pieces. I put 2 magnetic latches on the sides of the doors (one on the front and back of the table), then another at the top of each door. Then I also added a magnetic latch at the top of each side panel.
To attach the "hinge.stl" and magnetLatch.stl" to the plexiglass, you can use the piece itself to position the holes that have to be drilled out, then press the "hingeLock.stl" through the piece and the plexi to hold them together. It's a tight fit considering how the dimensions of the pieces change slightly during printing, but it should work if everything is lined up well.
** Be very careful drilling thru the plexiglass as it will shatter if you apply too much pressure or drill too slow. You can also use the drill to clean up the inside of the printed parts' holes to ensure they match the diameter of the hole cut in the plexiglass as closely as possible.
If you don't want to mess with drilling so many holes, you could probably get by with just gluing all of the pieces to the plexiglass.
Lastly, you can add some 1/4" window insulation around the edges to fully seal the inside space of the printer. On mine, I added some black sticky backed insulation around all sides that matches very nicely with the aesthetic of the table too.
***Note: I have the magnetically latched doors in the direction of the Y-axis because the bed cable guide currently causes the cables to protrude too far out the back and possibly bump against the back door. Or if I shift the printer forward slightly, then the fully extended Y-axis bumps open the front door. This allows the doors to open and close pretty easily without interfering with prints until I make an enhanced bed cable guide to reduce cable protrusion.
Similar models
thingiverse
free
Folgertech Kossel 2020 Plexiglass Enclosure support by mcclarydesign
...ces of plex. the third side should have a door cut in it. i have also uploaded magnetic latches which can be used for the door.
thingiverse
free

Magnetic Latch for .125" Plex by mcclarydesign
... for .125" plex by mcclarydesign
thingiverse
magnetic latch to hold a plexiglass door closed. designed for .125" plex
thingiverse
free
Magnetic Door Latch for PrusaBox by Mundl
...f 8x3mm round magnets. the door handle is the original from prusabox. you need to drill 2 holes in the front door for the handle.
thingiverse
free
Plexiglass Magnet Adapter by SimplicityGuy
...enclosure (https://www.thingiverse.com/thing:1843235), since i cut the plexiglass to be too big and didn't want to re-cut it.
thingiverse
free
Rep 2x Magnetic Door Latch by cadsys
...uring prints. this magnetic latch keeps the door nice and tight.
i added a plain version for those who don't want the logo.
thingiverse
free
Ender 3 Enclosure by stinkbug58
...simple enclosure for an ender 3 or anything with similar dimensions i used petg but i suppose any filament...
thingiverse
free
PiBoy DMG Magnetic charging dock by Silver_Surfer234
...mazon link for charging cable: https://www.amazon.de/gp/product/b08lbc3k8q/ref=ppx_yo_dt_b_asin_title_o01_s00?ie=utf8&psc=1 )
thingiverse
free

Ikea Lack Leg Connector for Printer Cabinet by djeaton
...ar-down and moving, you can use the latches for the middle and top of all sides. i am also using the handles from thing:1920010.
thingiverse
free
Easy Grasp Refrigerator Magnet by Doer
...deally it should stick out very, very slightly, if it is pushed in even a little bit too far, it loses much of its holding power.
thingiverse
free
Enclosure for 3-D Printer by WarEagleEE94
...take the doors off if needed.
the door magnet handle and holder are designed for a 8mm diameter 3mm tall round rare earth magnet.
Zinus
thingiverse
free

Bed Skirt Clips by ccrowder5
...designed clips to hold on bed skirts to a zinus metal bed frame. may work on other metal bed...
thingiverse
free

MacBook Pro (15" 2018) Desk Hooks by DandyPandy
...for my 2017 12" macbook to go on the zinus jennifer modern studio collection soho desk i got last...
thingiverse
free

MacBook (12" 2017) Desk Hooks by DandyPandy
...for my 2017 12" macbook to go on the zinus jennifer modern studio collection soho desk i got last...
cg_trader
$3

Zinus Queen Bed OBJ FBX BLEND
...mail.com
alternatively, follow me on my socials
https://www.instagram.com/cgimadethis/
https://www.artstation.com/jeremystratford
3dwarehouse
free

Glass ZINU
...glass zinu
3dwarehouse
people understand and take responsibility like a card!
3dwarehouse
free

Fan ZINU
...fan zinu
3dwarehouse
people understand and take responsibility like you do!
3dwarehouse
free

Modern Studio Collection Soho Desk
...modern studio collection soho desk 3dwarehouse zinus jennifer modern studio collection soho desk 47 x 24...
3dwarehouse
free
BED European headboard queen
...old to the new. and add finials to the zinus i think it will...
Enclosure
3d_export
free

electrical enclosure
...l enclosure where electrical devices like (relays, contactors, busbars ) are kept in order to protect from hazardous environment.
turbosquid
$100

GPU Enclosure
...yalty free 3d model gpu enclosure for download as obj and stl on turbosquid: 3d models for games, architecture, videos. (1381061)
3d_export
$5

Electrical Enclosure
...ed. also has tower lights attaced on the top.<br>file format that are available:<br>.step<br>.obj<br>.stl
archive3d
free

Enclosure 3D Model
...closure 3d model
archive3d
shower enclosure-acquarius- 3d model for interior 3d visualization.
archive3d
free

Enclosure 3D Model
...enclosure 3d model
archive3d
shower enclosure-omega- 3d model for interior 3d visualization.
archive3d
free

Enclosure 3D Model
...enclosure 3d model
archive3d
shower enclosure-vega - 3d model for interior 3d visualization.
archive3d
free

Enclosure 3D Model
...enclosure 3d model
archive3d
shower enclosure-zenith - 3d model for interior 3d visualization.
turbosquid
$20

shower enclosure
... available on turbo squid, the world's leading provider of digital 3d models for visualization, films, television, and games.
turbosquid
$14

Dumpster Enclosure
... available on turbo squid, the world's leading provider of digital 3d models for visualization, films, television, and games.
turbosquid
$25

3d printer enclosure
... model 3d printer enclosure for download as ipt, skp, and fbx on turbosquid: 3d models for games, architecture, videos. (1634310)
Ender
3ddd
$1

Enders / Elegance
...enders / elegance
3ddd
обогреватель
уличный газовый обогреватель enders elegance
высота: 2200 мм
3d_export
free

ender 3 frame cavity covers
... of the creality ender 3 - makes it look a bit more attractive it just slides into the open channels of the aluminium framework
turbosquid
$1

pen support for ender 3
...y free 3d model pen support for ender 3 for download as blend on turbosquid: 3d models for games, architecture, videos. (1611282)
3d_ocean
$9

Ender Dragon Minecraft
...ojang obj poly videogames
ender dragon minecraft created with cinema 4d r15 formats included: max 2013 – fbx 2012 – c4d r15 – obj
3d_export
free

Creality ender enclosure webcam mount
...e creality enclosure. sure is better than a tripod. change it up if it helps. i printed pla with 50% infill on my dd ender 3 pro.
3d_export
free

ender 3 enclosure corners
...er corners and 4 upper corners, using 25mmx25mm angled aluminium pieces that gets covered on inside of the frame with plexiglass
3d_export
free

ender 3 3d print bed clips
...ed + normal aluminium bed frame of the creality ender 3 = 6mm (b) these clips are designed for glass plate + aluminium bed = 4mm
3d_export
$5

GRUMPY CAT
...grumpy cat 3dexport grumpy cat to print in ender ...
3d_export
$5

Logs fire
...with one multi material for corona and vray r ender. albedo, normal, uvmap, roughness format jpg 4096x4096 models:...
3d_export
$42

excavator
...is the original size. 0.12 mm printing surface creality ender5 ...
Table
3ddd
free
Table
...table
3ddd
table
table
archibase_planet
free
Table
...table
archibase planet
table glass-table round table glass table
table n240311 - 3d model (*.3ds) for interior 3d visualization.
archibase_planet
free
Table
...e
archibase planet
table dining-room table dinner table round table
table - 3d model (*.gsm+*.3ds) for interior 3d visualization.
3d_export
$5

table
...table
3dexport
table classic-table
archibase_planet
free
Table
...se planet
table glass table round table glass-table
table tonin habitat n280111 - 3d model (*.3ds) for interior 3d visualization.
archibase_planet
free

Table
...table
archibase planet
table dining-room table dinner table
table - 3d model (*.3ds) for interior 3d visualization.
archibase_planet
free
Table
...table
archibase planet
table coffee table glass table
table - 3d model (*.gsm+*.3ds) for interior 3d visualization.
archibase_planet
free
Table
...table
archibase planet
table glass-table coffee table
table - 3d model (*.gsm+*.3ds) for interior 3d visualization.
archibase_planet
free
Table
...table
archibase planet
table writing table office table
table - 3d model (*.gsm+*.3ds) for interior 3d visualization.
3d_ocean
$5
Table
...table
3docean
dining table furniture home kitchen table
simple wooden table.
3
turbosquid
$10

Mountain Bike 3 -3 of 3
...model mountain bike 3 (#3 of 3) for download as fbx and blend on turbosquid: 3d models for games, architecture, videos. (1438752)
turbosquid
$6

Rock 3-3
...urbosquid
royalty free 3d model rock 3-3 for download as obj on turbosquid: 3d models for games, architecture, videos. (1628065)
turbosquid
$29

Books 150 pieces 3-3-3
...books 150 pieces 3-3-3 for download as max, obj, fbx, and stl on turbosquid: 3d models for games, architecture, videos. (1384033)
turbosquid
$3

Genesis 3 Clothing 3
... available on turbo squid, the world's leading provider of digital 3d models for visualization, films, television, and games.
3d_export
$5

hinge 3
...hinge 3
3dexport
hinge 3
3ddd
$1

Розетка 3
...розетка 3
3ddd
розетка
розетка 3
turbosquid
$50

is-3
... available on turbo squid, the world's leading provider of digital 3d models for visualization, films, television, and games.
turbosquid
$10

Mountain Bike 3 -2 of 3
...model mountain bike 3 (#2 of 3) for download as fbx and blend on turbosquid: 3d models for games, architecture, videos. (1438750)
turbosquid
$10

Mountain Bike 1 -3 of 3
...model mountain bike 1 (#3 of 3) for download as fbx and blend on turbosquid: 3d models for games, architecture, videos. (1438743)
3d_export
$5

3 CATS
...3 cats
3dexport
3 cats pen holder