Thingiverse
Ender 3 Vinyl Cutter Mod by greekjohnny
by Thingiverse
Last crawled date: 3 years ago
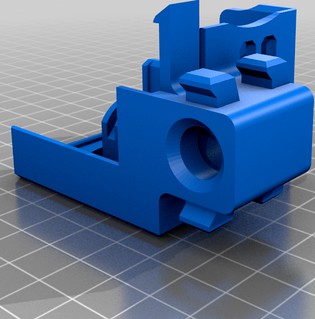
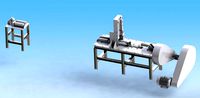
This is a Vinyl Cutter Mod for the print head of the Ender 3 printer.
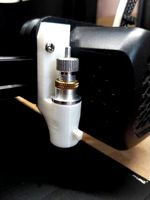
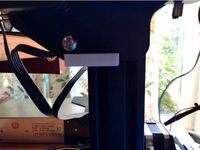
You can click it on the head of the printer as shown on the photos and youtube video
https://youtu.be/W9Sjunk6gig
In order to print it you must enable the support option. I have included the sketchup files if you want to modify it on to your needs. (Different cutter).
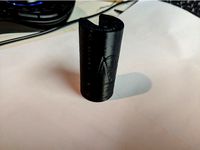
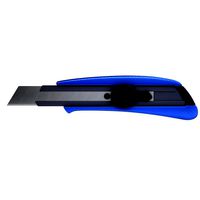
The cutter I used can be easily found in Ebay, Bangood or other e-shops. Along with the cutter you can find spare blades too.
(Search for: 12mm Cutting Plotter)
It has a snag fit in the pocket. If it is too snag use some heat (lighter) to soften the pla and push it through.
If is loose then use the cup and a rubber band to keep it in place. This works as a safety feature too in case the head hits the bed. This way it will pop up and not damage the bed’s surface.
Once you install it you must measure the distance from the bed. Put some vinyl, paper, or other material to be cut on the leveled bed. Use scotch tape to fix them in place. Select the auto-home sequence in the menu of the printer, then disable the stepper motors. Using the “move axis” options in the ender’s menu, lift the head, move it on top of the bed and slowly bring it down until the cutter touches the material. On the LCD you will read the distance number which is needed as an offset number in the Cura settings.
In Cura now you only need one layer from the design you want to cut, so using the resize options bring it down to the appropriate height and size of one layer.
Use the following settings:
Wall Line Count :1
Top bottom thickness : zero (that option will bring to zero more settings)
Infill Density : zero
Nozzle and bed temperatures to zero
Print speeds down to 30 or 40 (this needs to be tested regarding the material, the slowest the better)
No Supports and No Skirt
Now the most important settings are the : “Z Offset” and “Z Hop when Retracted”.
In the Z Offset you must put the number you measured before using the move axis procedure described before and in after you select the Z Hop when Retracted you will need to add a value in the Z Hop Height of 2mm. This will enable the cutter to lift each time it moves to a new cutting point.
Important: Keep in mind that you have a smaller usable space on bed since the cutter is further to the left than the nozzle, so you must move your design stl to the right in Cura so as be in the center of the actual bed.
Go ahead and do the “print – cut” but be sure to test everything before you do your final cut. (do some tries without the cutter installed, use a pencil instead).
If you break something is not my fault… ok?
Best of luck!
You can click it on the head of the printer as shown on the photos and youtube video
https://youtu.be/W9Sjunk6gig
In order to print it you must enable the support option. I have included the sketchup files if you want to modify it on to your needs. (Different cutter).
The cutter I used can be easily found in Ebay, Bangood or other e-shops. Along with the cutter you can find spare blades too.
(Search for: 12mm Cutting Plotter)
It has a snag fit in the pocket. If it is too snag use some heat (lighter) to soften the pla and push it through.
If is loose then use the cup and a rubber band to keep it in place. This works as a safety feature too in case the head hits the bed. This way it will pop up and not damage the bed’s surface.
Once you install it you must measure the distance from the bed. Put some vinyl, paper, or other material to be cut on the leveled bed. Use scotch tape to fix them in place. Select the auto-home sequence in the menu of the printer, then disable the stepper motors. Using the “move axis” options in the ender’s menu, lift the head, move it on top of the bed and slowly bring it down until the cutter touches the material. On the LCD you will read the distance number which is needed as an offset number in the Cura settings.
In Cura now you only need one layer from the design you want to cut, so using the resize options bring it down to the appropriate height and size of one layer.
Use the following settings:
Wall Line Count :1
Top bottom thickness : zero (that option will bring to zero more settings)
Infill Density : zero
Nozzle and bed temperatures to zero
Print speeds down to 30 or 40 (this needs to be tested regarding the material, the slowest the better)
No Supports and No Skirt
Now the most important settings are the : “Z Offset” and “Z Hop when Retracted”.
In the Z Offset you must put the number you measured before using the move axis procedure described before and in after you select the Z Hop when Retracted you will need to add a value in the Z Hop Height of 2mm. This will enable the cutter to lift each time it moves to a new cutting point.
Important: Keep in mind that you have a smaller usable space on bed since the cutter is further to the left than the nozzle, so you must move your design stl to the right in Cura so as be in the center of the actual bed.
Go ahead and do the “print – cut” but be sure to test everything before you do your final cut. (do some tries without the cutter installed, use a pencil instead).
If you break something is not my fault… ok?
Best of luck!
Similar models
thingiverse
free
Ender 3 v2 Vinyl Cutter Knife Blade mount by SpaxMk
...rse
ender 3v2 vinyl cutter knife blade mount for bltouch
use two m3x10mm or m3x15mm hex head screws
required x, y & z offset
thingiverse
free

Cura plugin - Z over shoot by yoyoek1
...ve is against gravity to remove slop.
idea from kisslicer
exelent for printers where the bed moves down insted of head moving up.
thingiverse
free

Z-Offset Test by SpiderSpartan
...asn't easily knocked off the bed before it cooled and looked decent, and adjusted the offset, then printed another test cube.
thingiverse
free

Large Bed Retraction Test
...r this mod - https://www.thingiverse.com/thing:3203831
if you are using cura, also turn off z-hop on the ender 5 series printers.
thingiverse
free

Ender 3v2 Laser Holder w/ BLTouch & Multi-mount by mrfansworth
...ul. if i come up with other attachments i will add them and if you come up with new ones that work with this system please share.
thingiverse
free

Ender 3 Z stop replacement by h4rr1s0n_pu94
...eplacement by h4rr1s0n_pu94
thingiverse
replacement part for ender 3 z-stop switch mount. bed must be leveled again before using
thingiverse
free

Ender 5 Plus Bed Test by LaporteIndustries
...hen 350mm x 350mm.
warning paper clip of the front left corner must to be move to 100mm to the right before use the gcode file.
thingiverse
free
Ender 2 Z offset by OxProps
...ender 2 z offset by oxprops
thingiverse
i used this piece so that i can place a new bed on my 3d printer bed
thingiverse
free
LINEAR RAIL SPACERS ENDER 5 PLUS by Maltvat
... enough that the stock ender 5 + hotend will not be able to touch the bed when you tighten the z axis, so no fear of it crashing.
thingiverse
free

Tevo Tornado Z Offset Clip by calebbrewer
...onally there is a hole for a m3 screw to make sure it doesn't move. be careful with the screw as you could scratch the green.

Vinyl
archibase_planet
free

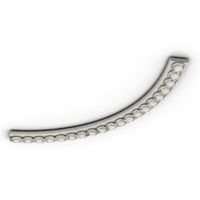
Vinyl record
...planet
vinyl record gramophone record vinyl disk
disc vinyl music n090414 - 3d model (*.gsm+*.3ds) for interior 3d visualization.
3d_export
$5

Vinyl 3D Model
...vinyl 3d model
3dexport
vinyl model
vinyl 3d model dzya 27264 3dexport
3d_export
$7

crosley vinyl player
...crosley vinyl player
3dexport
vinyl crosley player with headphones.
turbosquid
free

Vinyl Record
...rd
turbosquid
free 3d model vinyl record for download as fbx on turbosquid: 3d models for games, architecture, videos. (1298466)
turbosquid
free

vinyl disc
...
free 3d model vinyl disc for download as blend, fbx, and obj on turbosquid: 3d models for games, architecture, videos. (1608654)
turbosquid
$15

Vinyl Table
...3d model vinyl table for download as blend, 3ds, fbx, and obj on turbosquid: 3d models for games, architecture, videos. (1633839)
3d_ocean
$4

Vinyl Record
...album artwork or adding to a music scene. each layer and material has been named clearly. i have included an .obj file for any...
turbosquid
$10

Vinyl Record
... available on turbo squid, the world's leading provider of digital 3d models for visualization, films, television, and games.
turbosquid
$4

Vinyl Record
... available on turbo squid, the world's leading provider of digital 3d models for visualization, films, television, and games.
3d_ocean
$4

LP vinyl + cover
... textures (vinyl label & cover label) are in .psd format (included in tex folder) you can personalize it like you want enjoy
Ender
3ddd
$1

Enders / Elegance
...enders / elegance
3ddd
обогреватель
уличный газовый обогреватель enders elegance
высота: 2200 мм
3d_export
free

ender 3 frame cavity covers
... of the creality ender 3 - makes it look a bit more attractive it just slides into the open channels of the aluminium framework
turbosquid
$1

pen support for ender 3
...y free 3d model pen support for ender 3 for download as blend on turbosquid: 3d models for games, architecture, videos. (1611282)
3d_ocean
$9

Ender Dragon Minecraft
...ojang obj poly videogames
ender dragon minecraft created with cinema 4d r15 formats included: max 2013 – fbx 2012 – c4d r15 – obj
3d_export
free

Creality ender enclosure webcam mount
...e creality enclosure. sure is better than a tripod. change it up if it helps. i printed pla with 50% infill on my dd ender 3 pro.
3d_export
free

ender 3 enclosure corners
...er corners and 4 upper corners, using 25mmx25mm angled aluminium pieces that gets covered on inside of the frame with plexiglass
3d_export
free

ender 3 3d print bed clips
...ed + normal aluminium bed frame of the creality ender 3 = 6mm (b) these clips are designed for glass plate + aluminium bed = 4mm
3d_export
$5

GRUMPY CAT
...grumpy cat 3dexport grumpy cat to print in ender ...
3d_export
$5

Logs fire
...with one multi material for corona and vray r ender. albedo, normal, uvmap, roughness format jpg 4096x4096 models:...
3d_export
$42

excavator
...is the original size. 0.12 mm printing surface creality ender5 ...
Cutter
archibase_planet
free
Cutter
...cutter
archibase planet
cutter mill milling cutter
cutter 2 n050712 - 3d model (*.gsm+*.3ds) for interior 3d visualization.
3d_export
$10
pipe cutter
...pipe cutter
3dexport
pipe cutter
3d_export
$8

Grass Cutter
...grass cutter
3dexport
grass cutter
turbosquid
$5

Cutter
...alty free 3d model cutter for download as ige, stl, and sldpr on turbosquid: 3d models for games, architecture, videos. (1505202)
turbosquid
$29
Cutter
... available on turbo squid, the world's leading provider of digital 3d models for visualization, films, television, and games.
turbosquid
$15

Cutter
... available on turbo squid, the world's leading provider of digital 3d models for visualization, films, television, and games.
turbosquid
$9

Cutter
... available on turbo squid, the world's leading provider of digital 3d models for visualization, films, television, and games.
turbosquid
$3

cutter
... available on turbo squid, the world's leading provider of digital 3d models for visualization, films, television, and games.
turbosquid
$1

cutter
... available on turbo squid, the world's leading provider of digital 3d models for visualization, films, television, and games.
turbosquid
free

Cutter
... available on turbo squid, the world's leading provider of digital 3d models for visualization, films, television, and games.
Mod
design_connected
$13

MOD. 4233 - MOD. 4234 Table Lamp
...mod. 4233 - mod. 4234 table lamp
designconnected
arcahorn mod. 4233 - mod. 4234 table lamp computer generated 3d model.
design_connected
$11

MOD.1095
...mod.1095
designconnected
mod.1095 computer generated 3d model. designed by sarfatti, gino.
3ddd
$1

fireplaces mod Spec
...fireplaces mod spec
3ddd
камин
fireplaces mod spec 180x90x125h
3ddd
free

Flos Mod. 2129
... mod
фабрика: flos
модель: mod. 2129
описание: подвесной светильник, металл, белый, черный.
сайт: www.flos.com
turbosquid
$34
Mod Lamp.c4d
... available on turbo squid, the world's leading provider of digital 3d models for visualization, films, television, and games.
turbosquid
$32

MOD A 001
... available on turbo squid, the world's leading provider of digital 3d models for visualization, films, television, and games.
turbosquid
$29

Maars Mod
... available on turbo squid, the world's leading provider of digital 3d models for visualization, films, television, and games.
turbosquid
$15

Mod 70..
... available on turbo squid, the world's leading provider of digital 3d models for visualization, films, television, and games.
turbosquid
$10

MOD Sofa
... available on turbo squid, the world's leading provider of digital 3d models for visualization, films, television, and games.
turbosquid
$1

Mod-Lite
... available on turbo squid, the world's leading provider of digital 3d models for visualization, films, television, and games.
3
turbosquid
$10

Mountain Bike 3 -3 of 3
...model mountain bike 3 (#3 of 3) for download as fbx and blend on turbosquid: 3d models for games, architecture, videos. (1438752)
turbosquid
$6

Rock 3-3
...urbosquid
royalty free 3d model rock 3-3 for download as obj on turbosquid: 3d models for games, architecture, videos. (1628065)
turbosquid
$29

Books 150 pieces 3-3-3
...books 150 pieces 3-3-3 for download as max, obj, fbx, and stl on turbosquid: 3d models for games, architecture, videos. (1384033)
turbosquid
$3

Genesis 3 Clothing 3
... available on turbo squid, the world's leading provider of digital 3d models for visualization, films, television, and games.
3d_export
$5

hinge 3
...hinge 3
3dexport
hinge 3
3ddd
$1

Розетка 3
...розетка 3
3ddd
розетка
розетка 3
turbosquid
$50

is-3
... available on turbo squid, the world's leading provider of digital 3d models for visualization, films, television, and games.
turbosquid
$10

Mountain Bike 3 -2 of 3
...model mountain bike 3 (#2 of 3) for download as fbx and blend on turbosquid: 3d models for games, architecture, videos. (1438750)
turbosquid
$10

Mountain Bike 1 -3 of 3
...model mountain bike 1 (#3 of 3) for download as fbx and blend on turbosquid: 3d models for games, architecture, videos. (1438743)
3d_export
$5

3 CATS
...3 cats
3dexport
3 cats pen holder