Thingiverse

Ender 3 V2 Cluck Duct fan shroud by MegaChicken
by Thingiverse
Last crawled date: 3 years, 2 months ago
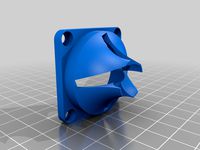
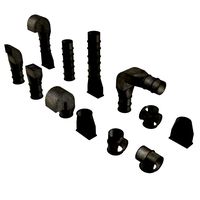
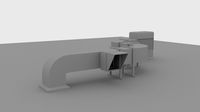
Cluck Duct Ender 3 V2 duct/shroud.
MAKE SURE YOUR X AXIS CARRIAGE HAS THE RECTANGULAR HOLE FOR THIS TO WORK.
Summary:
Does not require any supports to print
Clips into place without fixings - Clips onto the ender 3v2 carriage - check your carriage has the rectangular hole below the left wheel (as you look at it)
Only uses the fan screws to hold the fans in place.
Designed to fit 4020 fans for quiet running.
Capable of good bridging (standard for using radial fans but if you want extreme bridging you will need to use a blower-style duct).
Filament cooling fan shroud clips into place
Hides Noctua fans (i don't like the brown!)
Important - Check your x-axis carriage has the rectangular hole below the left wheel (as you look at it)
Printing Instuctions
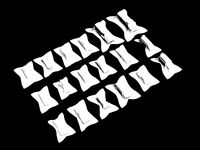
Image shows the suggested orientation to avoid the need for supports
Fan covers print without an additional brim
The main body needs a brim but I would recommend printing a skirt with a 0mm distance from the part to avoid the brim on the inside of the part.
I've printed in PETG but many people seem to find PLA fine for similar shrouds.
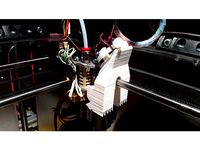
Assembly Instructions - Photos show stages to put in position.
Print components and remove integrated support from the main body
Screw fans into position*
Push cables into the slot at the back of the duct
Locate the fork on the x-axis carriage (don't push fully in yet)
Carefully rotate the duct so that the hook on the left is on top of the carriage
Ensure the peg goes into the rectangular hole of the carriage
Check the duct is seated on the carriage by looking underneath.
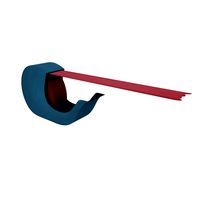
*Top fan just pushes into place. Use the scraper blade to lever apart if you want to remove it.
Suggestions for improvement are welcome to develop the part.
MAKE SURE YOUR X AXIS CARRIAGE HAS THE RECTANGULAR HOLE FOR THIS TO WORK.
Summary:
Does not require any supports to print
Clips into place without fixings - Clips onto the ender 3v2 carriage - check your carriage has the rectangular hole below the left wheel (as you look at it)
Only uses the fan screws to hold the fans in place.
Designed to fit 4020 fans for quiet running.
Capable of good bridging (standard for using radial fans but if you want extreme bridging you will need to use a blower-style duct).
Filament cooling fan shroud clips into place
Hides Noctua fans (i don't like the brown!)
Important - Check your x-axis carriage has the rectangular hole below the left wheel (as you look at it)
Printing Instuctions
Image shows the suggested orientation to avoid the need for supports
Fan covers print without an additional brim
The main body needs a brim but I would recommend printing a skirt with a 0mm distance from the part to avoid the brim on the inside of the part.
I've printed in PETG but many people seem to find PLA fine for similar shrouds.
Assembly Instructions - Photos show stages to put in position.
Print components and remove integrated support from the main body
Screw fans into position*
Push cables into the slot at the back of the duct
Locate the fork on the x-axis carriage (don't push fully in yet)
Carefully rotate the duct so that the hook on the left is on top of the carriage
Ensure the peg goes into the rectangular hole of the carriage
Check the duct is seated on the carriage by looking underneath.
*Top fan just pushes into place. Use the scraper blade to lever apart if you want to remove it.
Suggestions for improvement are welcome to develop the part.
Similar models
thingiverse
free

Ender 5/5+ Part Cooling + Hotend Fan Duct Shroud - Uses Stock Parts by ahdemarne
...fan holes are sized to be tapped by the fasteners.
if you print this and install it, please post a make or comment with feedback!
thingiverse
free

fan shroud for direct drive ender 3
...arriage clip, i do not recommend printing it for a stock ender 3. for a stock one go to https://www.thingiverse.com/thing:3562807
thingiverse
free

MINIMAL Ender 3 Fan Shroud by EnoOnraefi
... and has been printing great today. i'm open to any and all feedback if anyone has printed it and has issues or suggestions.
thingiverse
free

Screwless Dual 5015 Satsana Duct For Ender 3 v2 Remix by gpilapil09
...or where you insert the nozzle of the fans! everything else can be printed without supports.
comment if you have any suggestions!
thingiverse
free

Rostock Max V2 50mm fan shroud by PulseNeko
...er fan for the rostock max v2. it uses the same mount and duct as the original fan shroud that the user manual has you print out.
thingiverse
free

Screwless, angled and ajustable 40 mm fan duct. by scarou
...t. (only the fan is screwless of course)
this is the right side one. just mirror it for the left side.
print without support.
thingiverse
free

Huxley Fold Fan Shroud by natko
...h 2 perimeters 30% infill, 3 layers top in bottom
update added v19 chopped down v18 after glass plate clips obstruct fan shroud
thingiverse
free

Ender 3 v2 Fan Shroud Clip by HyjinxTuesday
...ted to change the nozzle or get inside the fan shroud. i took out the screws on the back of the plate, and use this clip instead.
thingiverse
free

Ender 2 Part/Filament cooling duct fang for 50x50mm fan by nedmo
...vers https://www.thingiverse.com/thing:2751027
i will be uploading some fan vents i created too (once printed and checked)
cheers
thingiverse
free
K8400 fan shroud duct clip MK3 - no screws needed by B4R
...
bend up the existing little fan and apply this clip.
you will not loose additional space and the print results are much better.
Cluck
thingiverse
free

What the Cluck? by ScribbleJ
...bjects.com/2009/06/23/9-free-vector-animal-farm/
bonus points if you add the sound of a chicken clucking when you turn the knobs!
thingiverse
free
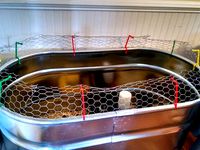
Jurassic Cluck: Chicken Brooder Fence by Andrew_Thaler
...alvanized stock troughs.
support more projects like this by contributing to my patreon: tools for ocean science and conservation
thingiverse
free

Octocluck by animalmixes
...ve no cares if you on land or in the ocean or if you a bird or some shizzz. it can swim, cluck, and kill. what else does it need?
blendswap
free

Kutztown Clock Tower
...of the model are separated for easy customization.used in cluck tower by...
thingiverse
free

Mother's Day Lithopane and Picture Frame by Jeremy8077
...the little chickens on the bottom are 'buck and cluck#39;, two of my daughter's buddies when she was an...
cg_trader
$2

Knuckles Knuckls
...shall we click our tongues? ( mass clucking) click cluck click cluck click cluck knuckls cnockls knockls knokls knuckl...
3dwarehouse
free

digital cluck radio
... with quacktime and an ipod duck. ipod by yeshua yames and duck by btm #clock #digital #digital_clock #ipod #ipod_dock #quicktime
3dwarehouse
free

Chicken House
...chicken house 3dwarehouse cluck cluck!! ...
3dwarehouse
free

CK-01 Henterprise
...ck-01 henterprise, is the final boss in chicken invaders: cluck of the dark side. it is the fifth attempt...
Shroud
3d_export
$500

Centrifugal pump volute casing with impeller
...casing with impeller 3dexport volute casing with impeller and shroud ...
3d_export
$35

The Holy Face base relief 3D Model
...the holy face base relief 3d model 3dexport shroud turin veronica veronica's veil gospel ikon jesus holy face...
3d_export
$20
present car cloth presentation transport transportation shape concepts show celebration cover showro
...transportation shape concepts show celebration cover showroom covered revealin shroudd cover covering tarp draped fabric cloth showroom reveal revealing...
3d_export
$5

Lockheed F-117 Nighthawk lowpoly stealth bomber
...initial operating capability status in 1983. the aircraft was shroudd in secrecy until it was revealed to the public...
3d_export
$49

kriss vector gen 2 sub-d
...rear flip sight.<br>- vector ejection port.<br>- vector crb square shroud / 16"" sliencer.<br>- ds150 stock.<br>- .ma (maya 2020 ascii)<br>-...
3d_export
$10

vichy dining table
...in oak, sycamore and walnut marquetry.<br>even if the restaurant shroud the vichy in a long table cloth, two slender...
3d_export
$500

us navy pcu sterett ddg-104 arleigh burke class destroyer flight iia max
...the position has been shifted.<br>q. where are the exhaust shroud for the stacks?<br>a. since ddg-89, the exhaust system was...
thingiverse
free

shroud by samshay317
...shroud by samshay317
thingiverse
shroud
thingiverse
free

Fan Shroud
...fan shroud
thingiverse
this is a fan shroud for a 140mm fan
thingiverse
free
40mm fan shroud
...40mm fan shroud
thingiverse
40mm fan shroud
Duct
turbosquid
$19
Duct Set
...d
royalty free 3d model duct set for download as max and fbx on turbosquid: 3d models for games, architecture, videos. (1145038)
turbosquid
$10
Duct Tape
...id
royalty free 3d model duct tape for download as ma and ma on turbosquid: 3d models for games, architecture, videos. (1580351)
turbosquid
free
Duct Tape
...
free 3d model duct tape for download as obj, fbx, and blend on turbosquid: 3d models for games, architecture, videos. (1486518)
3d_ocean
$7
Air-duct
... ventilation
high quality industrial air duct ventilation model. created in cinema 4d but comes in various other formats as well.
turbosquid
$20
Air ducts
...lty free 3d model air ducts for download as max, obj, and fbx on turbosquid: 3d models for games, architecture, videos. (1262476)
3d_export
$10

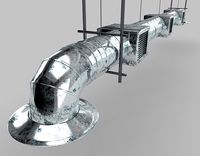
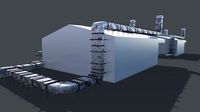
Supply air duct
...supply air duct
3dexport
supply air duct with two axial fans and hangers
turbosquid
$2
Duct Tape
...e 3d model duct tape for download as obj, fbx, blend, and dae on turbosquid: 3d models for games, architecture, videos. (1473972)
turbosquid
free

Duct Tape
... available on turbo squid, the world's leading provider of digital 3d models for visualization, films, television, and games.
3d_ocean
$3
Duct tape
...polys. includes: cinema 4d project. model in 3 formats (obj, fbx, 3ds). 6 .tga texture maps (albedo, ambient occlusion, diffus...
turbosquid
$40
Ventilation Duct PACK
...tion duct pack for download as ma, obj, fbx, and unitypackage on turbosquid: 3d models for games, architecture, videos. (1287068)
Ender
3ddd
$1

Enders / Elegance
...enders / elegance
3ddd
обогреватель
уличный газовый обогреватель enders elegance
высота: 2200 мм
3d_export
free

ender 3 frame cavity covers
... of the creality ender 3 - makes it look a bit more attractive it just slides into the open channels of the aluminium framework
turbosquid
$1

pen support for ender 3
...y free 3d model pen support for ender 3 for download as blend on turbosquid: 3d models for games, architecture, videos. (1611282)
3d_ocean
$9

Ender Dragon Minecraft
...ojang obj poly videogames
ender dragon minecraft created with cinema 4d r15 formats included: max 2013 – fbx 2012 – c4d r15 – obj
3d_export
free

Creality ender enclosure webcam mount
...e creality enclosure. sure is better than a tripod. change it up if it helps. i printed pla with 50% infill on my dd ender 3 pro.
3d_export
free

ender 3 enclosure corners
...er corners and 4 upper corners, using 25mmx25mm angled aluminium pieces that gets covered on inside of the frame with plexiglass
3d_export
free

ender 3 3d print bed clips
...ed + normal aluminium bed frame of the creality ender 3 = 6mm (b) these clips are designed for glass plate + aluminium bed = 4mm
3d_export
$5

GRUMPY CAT
...grumpy cat 3dexport grumpy cat to print in ender ...
3d_export
$5

Logs fire
...with one multi material for corona and vray r ender. albedo, normal, uvmap, roughness format jpg 4096x4096 models:...
3d_export
$42

excavator
...is the original size. 0.12 mm printing surface creality ender5 ...
V2
3d_export
free

Lamp v2
...lamp v2
3dexport
lamp v2 with solar panel
3d_export
$5

hammerhead v2
...hammerhead v2
3dexport
razer hammerhead v2 headphones, modeled in cinema 4d, render in corona
3d_export
$5

manometer v2
...manometer v2
3dexport
3d_export
$5

potato v2
...potato v2
3dexport
turbosquid
$52

Lifebuoys v2
...squid
royalty free 3d model lifebuoys v2 for download as fbx on turbosquid: 3d models for games, architecture, videos. (1560870)
turbosquid
$2

Mask v2
...turbosquid
royalty free 3d model mask v2 for download as stl on turbosquid: 3d models for games, architecture, videos. (1527741)
turbosquid
free

Flashlight V2
...d
free 3d model flashlight v2 for download as , obj, and fbx on turbosquid: 3d models for games, architecture, videos. (1663559)
turbosquid
$29

Thanos v2
...
royalty free 3d model thanos v2 for download as ztl and obj on turbosquid: 3d models for games, architecture, videos. (1651077)
turbosquid
$29

Titan v2
...d
royalty free 3d model titan v2 for download as ztl and obj on turbosquid: 3d models for games, architecture, videos. (1540228)
turbosquid
$29

Frieza v2
...
royalty free 3d model frieza v2 for download as ztl and obj on turbosquid: 3d models for games, architecture, videos. (1701238)
Fan
3d_export
$5

fan
...fan
3dexport
fan 3d model, table fan, fan, electric fan, ventilator
archibase_planet
free

Fan
...fan
archibase planet
fan large fan
fan out n260707 - 3d model for interior 3d visualization.
archibase_planet
free

Fan
...fan
archibase planet
fan ceiling fan ventilator
fan stealth n300615 - 3d model (*.gsm+*.3ds) for interior 3d visualization.
3d_export
$15

fan
...fan
3dexport
is an ancient fan
3ddd
$1

Fan-C-Fan by marco gallegos
...n-c-fan by marco gallegos
3ddd
вентилятор , marco gallegos
fan-c-fan by marco gallegos
3d_export
$10

fan
...fan
3dexport
a detailed fan designed for home or space blowing is now available for only 19.99!
turbosquid
$1

Fan
...fan
turbosquid
free 3d model fan for download as on turbosquid: 3d models for games, architecture, videos. (1427865)
turbosquid
$14

Fan
...fan
turbosquid
royalty free 3d model fan for download as on turbosquid: 3d models for games, architecture, videos. (1415642)
3ddd
$1

Светильник Fan
...светильник fan
3ddd
fan , italamp
светильник fan, производитель italamp
turbosquid
$25

Fan
...fan
turbosquid
royalty free 3d model fan for download as c4d on turbosquid: 3d models for games, architecture, videos. (1483246)
3
turbosquid
$10

Mountain Bike 3 -3 of 3
...model mountain bike 3 (#3 of 3) for download as fbx and blend on turbosquid: 3d models for games, architecture, videos. (1438752)
turbosquid
$6

Rock 3-3
...urbosquid
royalty free 3d model rock 3-3 for download as obj on turbosquid: 3d models for games, architecture, videos. (1628065)
turbosquid
$29

Books 150 pieces 3-3-3
...books 150 pieces 3-3-3 for download as max, obj, fbx, and stl on turbosquid: 3d models for games, architecture, videos. (1384033)
turbosquid
$3

Genesis 3 Clothing 3
... available on turbo squid, the world's leading provider of digital 3d models for visualization, films, television, and games.
3d_export
$5

hinge 3
...hinge 3
3dexport
hinge 3
3ddd
$1

Розетка 3
...розетка 3
3ddd
розетка
розетка 3
turbosquid
$50

is-3
... available on turbo squid, the world's leading provider of digital 3d models for visualization, films, television, and games.
turbosquid
$10

Mountain Bike 3 -2 of 3
...model mountain bike 3 (#2 of 3) for download as fbx and blend on turbosquid: 3d models for games, architecture, videos. (1438750)
turbosquid
$10

Mountain Bike 1 -3 of 3
...model mountain bike 1 (#3 of 3) for download as fbx and blend on turbosquid: 3d models for games, architecture, videos. (1438743)
3d_export
$5

3 CATS
...3 cats
3dexport
3 cats pen holder