Thingiverse

Ender 3 Tool Holder with *Embedded* Magnet Bars by 6ROM7
by Thingiverse
Last crawled date: 3 years, 5 months ago
Remixed from this very useful magnetic tool holder for an Ender 3 (and other 20x20 extrusion printers), itself remixed from this original design.
This is not just my first remix, but my first ever 3D modeling effort! Any and all input very much appreciated. I hope I'm following proper protocols as I try to give back to this awesome community.
Here are the principal revisions:
In lieu of the surface-mounted magnetic discs, utilizes 4 neodymium magnetic bars (60mm x 10mm x 3mm) that are embedded into the print.
Adjusts the plate to be wider and longer (now 47mm x 128mm), increasing the surface area for storing tools and maximizing the dead space on the back/right side of the printer.
Makes the screw holes bigger and more recessed to better accommodate M4 pan head screws.MPORTANT NOTES – ESPECIALLY #1
The magnets are embedded/“sandwiched” between top and bottom (front and back) printed layers. This requires pausing the print (after layer 22 for me, at 0.2mm layer height), carefully placing the magnets into the cavities, and then resuming the print. This is akin to a color filament change at a certain layer height. (There’s a lot of documentation on how you can do this manually, through your slicer, or through Octoprint.)
The cavities are specifically sized for these magnets from Amazon. They friction fit, with just a bit of pressure. After several trial-and-error prints, I found that if the cavities are too tight, forcing the magnets in will cause bed/head movement that will interfere with the resumed print; if they’re too loose, the magnets tend to jump out of the cavity to stick to one another. Some people use adhesives (super glue or epoxy for these sorts of embedded magnets). I didn’t want to get started with potentially getting epoxy on my printer and wanted to limit the pause length. It is a delicate dance getting each magnet to stay in its cavity when inserting the adjacent ones. NB: Pay attention to the top/bottom of each magnet and install them all with the same pole down.
The screw holes are designed for M4 pan head bolts and M4 T-nuts. (Socket heads should work but may stick out above the surface slightly.)
I printed the object with the front face (with the countersunk holes) on the print bed. Yes, I realize this is counterintuitive, as it requires supports in the screw holes. Still, I chose this approach for two reasons: First, but I wanted the front face to be the smoothest surface (and I like the slight texturing effect from the glass on my E3v2). Second, I wanted the weaker side to be the back side, which is mechanically mounted against the rail. (Yes, you can print it without supports with the other face down.)
I debossed stylized text of my username in the bottom (assuming you print the front face down) of one of the cavities. That wasn’t an ego play — ok, maybe just ever so slightly — but was instead just an experiment for having slight grooves for adhesives if used.
PLEASE BE CAREFUL! Magnets are pretty amazing, but also hard to work with. They want to stick to each other and a lot of other things in your workspace. I had a scare when they pulled a sharp knife toward me unexpectedly. Also, two magnets can pull together with enough force to crack/break each other. (This happened to me twice.) Finally, magnets can mess with pacemakers and create other health issues. So, please proceed at your own risk, and be very careful.
MAKE SURE YOUR NOZZLE ISN’T MAGNETICALLY ATTRACTIVE. My brass nozzle is not attractive, but I suppose steel nozzles would be. To prevent damage your nozzle and hot-end, please do a careful test before printing and trying to embed magnets as described here.
Similar models
thingiverse
free
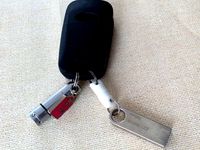
magnetic keychain customizable by hackermagnet
...layer of solid infill and placed the magnets.
resume as quickly as you can. if you delay the two layers won't stick together.
thingiverse
free
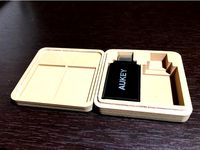
Case for Aukey USB-C Adapter by lambdahindiii
...id and box are attracted to each other when assembled.
links
aukey usb-c to usb 3.0 (usb-a) adapter6 x 3 mm magnetgcode simulator
thingiverse
free

Dishwasher Magnet Flip by LloydNebulon
...finishes with the magnet inside. works great! to get the two tone color i stopped the print, changed colors and resumed printing.
thingiverse
free

Magnetic Tetra-Bricks! by QuantumZ
...es c. printing with pla should not be an issue but you may want to limit the bet temperature to 75 c or less for other materials.
thingiverse
free

Magnetic tool holder for pegboard by d300vs
...int head is magnetic at all (usually the heater), just add a dab of glue to keep it from moving. print with the pegs pointing up!
thingiverse
free
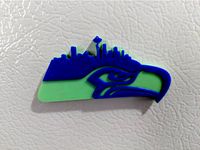
Seattle Seahawks Fridge Magnet by crunchymetal
...detailpage_o04_s00?ie=utf8&psc=1
https://www.amazon.com/gp/product/b00j0gpc80/ref=oh_aui_detailpage_o04_s00?ie=utf8&psc=1
thingiverse
free

Traveling lid for Comandante C40 grinder by Grrregol
...ayer with prusaslicer to warn me to be ready.
mandatory : superglue the magnet (learned by trial and error)
magnet size : 12x3mm
thingiverse
free

s54 Vanos tool by Janmagga
...that the magnets dont jump up from the holes and stick to the hot end of your printer.
please share your makes on this profile :)
thingiverse
free

Denture bit holder by msalem09
...the front/middle so i am only able to make the holes 8.5mm while the back teeth the holes are further apart so the holes are 9mm.
thingiverse
free

Celestial magnets
...all together
print on front with the holes up
after printing stick 8x3mm magnets into the holes on the back
please post any makes
6Rom7
thingiverse
free

Raspberry Pi 4 Case - 40mm fan, PiCam slot, easier card access, large heatsink by 6ROM7
...for 40x10 fan (friction fits underneath)
re-designs and enlarges slot for accessing memory card
adds slot for picam ribbon cable
thingiverse
free

X Axis C270 Camera mount for CR-10 and Ender 3 All Models / SNAP Version by loneship
...thing from blastosupreme (https://www.thingiverse.com/blastosupreme)https://www.thingiverse.com/thing:3365934 and merged snap-part from 6rom7 (https://www.thingiverse.com/6rom7https://www.thingiverse.com/thing:4809662 thanx for the pre work. i changed mount base...
thingiverse
free
Ender 3 v2 X-Axis Cable Chains Hot-End Clip for Satsana (w/ BL Touch Wire Routing) by 6ROM7
... routed side of the clip on the bed. the part does require minimal (~4mm) bridging that an e3v2 should be able to handle easily.
thingiverse
free

Satsana Duct Remix for Ender 3v2 - integrated BLTouch mount (4010 + 5015 fans) by 6ROM7
... file labeled "test". i have not printed or tested it myself. if you do test it, please let me know your experience.]
thingiverse
free

C270 Mutli-Section Mount, Swing Arm (Ender 3 v2) - Print-in-Place Hinges by 6ROM7
...t the bed.
see picture for print orientation in cura
slow down printing to ~50 mm/s to ensure more accuracy around the joints
Embedded
turbosquid
free

BECHOFF__CX5010_CX5020 __ Embedded PC
... available on turbo squid, the world's leading provider of digital 3d models for visualization, films, television, and games.
3d_ocean
$5
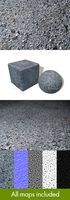
Tarmac with Embedded Shells Seamless Texture
...mation. created from photographs. texture, displacement, normal, occlusion and specular jpg maps are all included in this down...
3d_export
$15

CLamp 3D Model
...clamp 3d model
3dexport
lamp embeded design
clamp 3d model pknobloch 25653 3dexport
3d_export
$5

best plants set
...3dexport plants are made in blender 2.83, textures are embedded in blend file. also you will get them in...
3d_export
$5
stoplight
... performed in the cinema 4d program. additional formats on request. suitable for embedding in any scene, for animation and games.
3d_export
$60

elon musk character with spacex dragon suits
...character with spacex dragon suits 3dexport the format has embedded texture. very well rigged this you can use 3d...
3d_export
$10

Roadster 30s
...the model consists of a roadster and textures.<br>textures are embedded in the main file.<br>scenes shown are not included in...
3d_export
$10

screen syrian
...dealer drew pritchard. the screen is inlaid with mother-of-pearl embedded in a wooden frame with mashrabiya reel panels. it...
3d_export
$15

classic sculpture 1
...vertices<br>- 3ds<br>- obj<br>- stl<br>- fbx-low texture embedded<br>- fbx-hi texture embedded ...
3d_export
$5

rose gold gold ring
...fancy rose gold and gold ring with a diamond embedded at the top which is held in place by...
Ender
3ddd
$1

Enders / Elegance
...enders / elegance
3ddd
обогреватель
уличный газовый обогреватель enders elegance
высота: 2200 мм
3d_export
free

ender 3 frame cavity covers
... of the creality ender 3 - makes it look a bit more attractive it just slides into the open channels of the aluminium framework
turbosquid
$1

pen support for ender 3
...y free 3d model pen support for ender 3 for download as blend on turbosquid: 3d models for games, architecture, videos. (1611282)
3d_ocean
$9

Ender Dragon Minecraft
...ojang obj poly videogames
ender dragon minecraft created with cinema 4d r15 formats included: max 2013 – fbx 2012 – c4d r15 – obj
3d_export
free

Creality ender enclosure webcam mount
...e creality enclosure. sure is better than a tripod. change it up if it helps. i printed pla with 50% infill on my dd ender 3 pro.
3d_export
free

ender 3 enclosure corners
...er corners and 4 upper corners, using 25mmx25mm angled aluminium pieces that gets covered on inside of the frame with plexiglass
3d_export
free

ender 3 3d print bed clips
...ed + normal aluminium bed frame of the creality ender 3 = 6mm (b) these clips are designed for glass plate + aluminium bed = 4mm
3d_export
$5

GRUMPY CAT
...grumpy cat 3dexport grumpy cat to print in ender ...
3d_export
$5

Logs fire
...with one multi material for corona and vray r ender. albedo, normal, uvmap, roughness format jpg 4096x4096 models:...
3d_export
$42

excavator
...is the original size. 0.12 mm printing surface creality ender5 ...
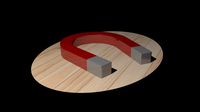
Magnet
3d_ocean
$2

Magnet
...
3docean
3d 3ds max electric magnet magnetic magnetism max model polygon realistic tesla
magnet created in 3ds max by umurdesign.
turbosquid
$6
Magnet
...
turbosquid
royalty free 3d model magnet for download as obj on turbosquid: 3d models for games, architecture, videos. (1548733)
turbosquid
$6

magnet
...uid
royalty free 3d model magnet for download as 3dm and max on turbosquid: 3d models for games, architecture, videos. (1670606)
turbosquid
$1

Magnet
...y free 3d model magnet for download as 3ds, max, obj, and fbx on turbosquid: 3d models for games, architecture, videos. (1215037)
turbosquid
$7

Magnet
...agnet for download as blend, unitypackage, fbx, gltf, and obj on turbosquid: 3d models for games, architecture, videos. (1576588)
3d_export
$5

magnetic knife holder
...magnetic knife holder
3dexport
ordinary magnetic knife holder
archive3d
free

Fridge magnet 3D Model
...t fridge magnet magnet
toy magnetic s n280712 - 3d model (*.3ds) for interior 3d visualization.
turbosquid
$35

Magnetic butterflies
...alty free 3d model magnetic butterflies for download as blend on turbosquid: 3d models for games, architecture, videos. (1315792)
turbosquid
$2
Magnetic Board
...quid
royalty free 3d model magnetic board for download as ma on turbosquid: 3d models for games, architecture, videos. (1264141)
turbosquid
$977
Magnetic Lego
...oyalty free 3d model magnetic lego for download as ma and obj on turbosquid: 3d models for games, architecture, videos. (1142761)
Bars
archibase_planet
free
Bar
...bar
archibase planet
bar bar rack
bar 2 - 3d model for interior 3d visualization.
archibase_planet
free
Bars
...bars
archibase planet
horizontal bar parallel bars
parallel bars - 3d model for interior 3d visualization.
3d_export
$10

bar
...bar
3dexport
modern bar
3d_export
$10

bar
...bar
3dexport
modern bar
3d_export
$10

bar
...bar
3dexport
modern bar
3d_export
$10

bar
...bar
3dexport
modern bar
3d_export
$10

bar
...bar
3dexport
modern bar
3d_export
$10

bar
...bar
3dexport
modern bar
3d_export
$10

bar
...bar
3dexport
modern bar
3d_export
$10

bar
...bar
3dexport
modern bar
Tool
turbosquid
$21
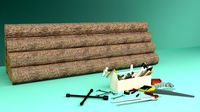
Tool box with tools
... available on turbo squid, the world's leading provider of digital 3d models for visualization, films, television, and games.
archibase_planet
free
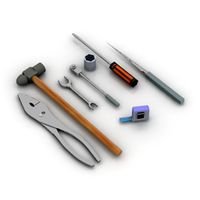
Tools
...tools
archibase planet
tools instruments implements
tools n070114 - 3d model (*.gsm+*.3ds+*.max) for interior 3d visualization.
3d_ocean
$12

Tools
...tools
3docean
hammer metal old screw tools wrench
maya
turbosquid
$6

Tool Cart / Tool Box
...
royalty free 3d model tool cart / tool box for download as on turbosquid: 3d models for games, architecture, videos. (1241859)
3d_ocean
$15

crimp tool
... tool copper cutter crimp crimp tool electrical electrical tools press tools pressing tool tools wire cutter
created in maya 2013
3d_ocean
$5

Tools
...tools
3docean
3d models paint tools work
3d,models,works,paint,art,create,working,
3d_export
free
tools
...tools
3dexport
coldsteel
turbosquid
$15
Tools
...turbosquid
royalty free 3d model tools for download as blend on turbosquid: 3d models for games, architecture, videos. (1331352)
3ddd
$1
bar tool
...bar tool
3ddd
барный
bar tool
turbosquid
$35

tools
... available on turbo squid, the world's leading provider of digital 3d models for visualization, films, television, and games.
Holder
archibase_planet
free

Holder
...holder
archibase planet
holder toilet paper holder
holder paper n070712 - 3d model (*.gsm+*.3ds) for interior 3d visualization.
archibase_planet
free

Holder
...e planet
holder rack toilet paper holder
holder toilet roll n240715 - 3d model (*.gsm+*.3ds+*.max) for interior 3d visualization.
archibase_planet
free

Holder
...holder
archibase planet
pen holder support prop
pen holder - 3d model for interior 3d visualization.
archibase_planet
free

Holder
...holder
archibase planet
pole post holder
сhurch cross pole holder - 3d model for interior 3d visualization.
archibase_planet
free

Holder
...holder
archibase planet
holder bathroom ware
shower holder - 3d model (*.gsm+*.3ds) for interior 3d visualization.
archibase_planet
free

Holder
...oilet paper holder
holder paper devon&devon; time black n241113 - 3d model (*.gsm+*.3ds+*.max) for interior 3d visualization.
archibase_planet
free

Holder
...holder
archibase planet
holder hanger hanger for towel
holder 7 - 3d model (*.gsm+*.3ds) for interior 3d visualization.
archibase_planet
free

Holder
...holder
archibase planet
holder hanger hanger for towel
holder 3 - 3d model (*.gsm+*.3ds) for interior 3d visualization.
archibase_planet
free

Holder
...holder
archibase planet
holder towel rack towel-horse
holder - 3d model (*.gsm+*.3ds) for interior 3d visualization.
archibase_planet
free

Holder
...lder
archibase planet
holder hanger hanger for towel
holder towel n250912 - 3d model (*.gsm+*.3ds) for interior 3d visualization.
3
turbosquid
$10

Mountain Bike 3 -3 of 3
...model mountain bike 3 (#3 of 3) for download as fbx and blend on turbosquid: 3d models for games, architecture, videos. (1438752)
turbosquid
$6

Rock 3-3
...urbosquid
royalty free 3d model rock 3-3 for download as obj on turbosquid: 3d models for games, architecture, videos. (1628065)
turbosquid
$29

Books 150 pieces 3-3-3
...books 150 pieces 3-3-3 for download as max, obj, fbx, and stl on turbosquid: 3d models for games, architecture, videos. (1384033)
turbosquid
$3

Genesis 3 Clothing 3
... available on turbo squid, the world's leading provider of digital 3d models for visualization, films, television, and games.
3d_export
$5

hinge 3
...hinge 3
3dexport
hinge 3
3ddd
$1

Розетка 3
...розетка 3
3ddd
розетка
розетка 3
turbosquid
$50

is-3
... available on turbo squid, the world's leading provider of digital 3d models for visualization, films, television, and games.
turbosquid
$10

Mountain Bike 3 -2 of 3
...model mountain bike 3 (#2 of 3) for download as fbx and blend on turbosquid: 3d models for games, architecture, videos. (1438750)
turbosquid
$10

Mountain Bike 1 -3 of 3
...model mountain bike 1 (#3 of 3) for download as fbx and blend on turbosquid: 3d models for games, architecture, videos. (1438743)
3d_export
$5

3 CATS
...3 cats
3dexport
3 cats pen holder