Thingiverse
Ender 3 Nozzle Brush by umbacos
by Thingiverse
Last crawled date: 3 years, 3 months ago
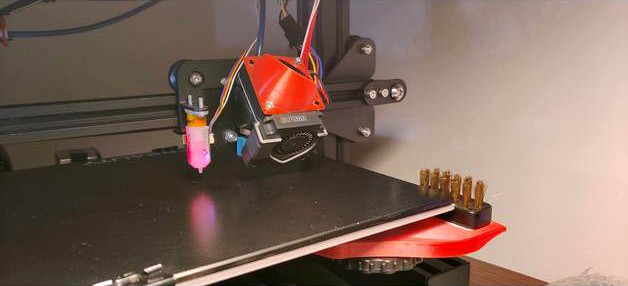
This is not my idea, but wiping the nozzle before every print clearly helps to have a better first layer. Especially when you have thin lines like the one in the video.
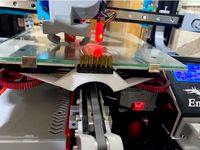
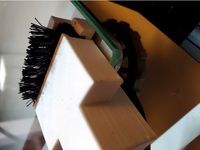
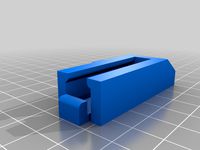
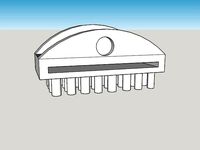
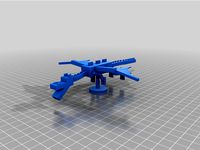
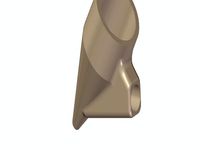
Buy a brass brush, cut it like in the picture and use double-sided tape to attach it to the bracket.
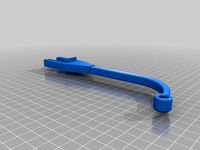
To attach the bracket to the bed, you don't need to disassemble the bed. Just slide the bracket between the bed and the knob and it should clip into place, with a little pressure. If your printer has a different calibration than mine, and the fit is too tight, you can trim or cut a bit the press fit.
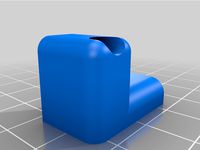
There are other versions around, which lock in the knob, but when you heat the bed, heat is passed to the bracket and the bracket tends to melt or bend with time.
You have to tune your x-stop switch and homing info to make sure that the nozzle can reach the brush. Or do like I did, and change the firmware to set the x size of the bed 250mm instead of 235. then you have to configure your slicer so that in the Start G-Code you have this:
; Wipe nozzle
G0 Z3
G0 F6000
G0 X250 Y0
G0 Y40
G0 Y0
G0 Y40
G0 Y0
G0 X235
G0 X250
G0 X235
G0 X250
G0 Y40
G0 Y0
G0 Z5
G0 Y40
G0 Y0
; End Wipe nozzle
Insert the code above, between the temperature setting and the nozzle-priming line print.
Should be easy. Drop me a line in the comment if you need support.
Buy a brass brush, cut it like in the picture and use double-sided tape to attach it to the bracket.
To attach the bracket to the bed, you don't need to disassemble the bed. Just slide the bracket between the bed and the knob and it should clip into place, with a little pressure. If your printer has a different calibration than mine, and the fit is too tight, you can trim or cut a bit the press fit.
There are other versions around, which lock in the knob, but when you heat the bed, heat is passed to the bracket and the bracket tends to melt or bend with time.
You have to tune your x-stop switch and homing info to make sure that the nozzle can reach the brush. Or do like I did, and change the firmware to set the x size of the bed 250mm instead of 235. then you have to configure your slicer so that in the Start G-Code you have this:
; Wipe nozzle
G0 Z3
G0 F6000
G0 X250 Y0
G0 Y40
G0 Y0
G0 Y40
G0 Y0
G0 X235
G0 X250
G0 X235
G0 X250
G0 Y40
G0 Y0
G0 Z5
G0 Y40
G0 Y0
; End Wipe nozzle
Insert the code above, between the temperature setting and the nozzle-priming line print.
Should be easy. Drop me a line in the comment if you need support.
Similar models
thingiverse
free
Ender 3/Pro Ender5/Pro Bed Nozzle Brush by blindley125
...1 z10.0 f3000 ; move z axis up little to prevent scratching of heat bed
g1 x8 y20 z0.3 f5000.0 ; move over to prevent blob squish
thingiverse
free
Universal Nozzle brush Cleaner by NabCube
...g0 x290 y18 f7500;
g0 x260 y17 f7500;
g0 x290 y16 f7500;
g0 z20; end brush nozzle
g0 x150 y36 f7500
g28 z0
m117 cleaning finished
thingiverse
free
Ender 3 HotEnd Brush (remix) by ShaneAPowell
...y0 z7
g0 x90 y0 z7
; end final pre brush sequence
g0 x115 y115 f8000
see it in actionhttps://www.youtube.com/watch?v=ukf7wno6ka8
thingiverse
free
Tronxy X5SA Pro - Brush Holder for nozzle cleaning
...r other tronxy corexy printers
https://youtu.be/xhomeibaiyw
do you like my work? then support me
https://www.paypal.me/raabi1991/
thingiverse
free

Nozzle Clean Clamp by pcmaik
... x285 y25 f7500;
g0 x260 y35 f7500;
g0 x280 y40 f7500;
g0 x280 y10 f7500;
g0 x275 y5 f7500;
g0 x275 y50 f7500;
g0 x110 y50 f7500;
thingiverse
free

WEEDO X40 WIPE BRUSH BRACKET by Camo6126
...a but it started to sag over time.
the stock bolts can be used to fit this
the stock brushes and small wipe parts fit this model.
thingiverse
free

Brush Ender 3v2 Nozzle by heywatchitt
...dit your firmware again to limit x travel to that value- 1mm safety margin
in cura you can now wipe the nozzle, no gcode required
thingiverse
free

Ender 3 v2 nozzle cleaning brush by Amoulier
...ure you home all axis before running this code or the printer can go pass the limit and slam the nozzle carrier to the far right!
thingiverse
free

Brush holder for wipe station Tevo Tornado by JerrZvW
...your needs.i have added the fusion360 file for you to edit. (measure the thickness you need, and adjust "clamping size"
thingiverse
free

HICTOP Calibration Upgrade Version 1 by chaoren
...s with a new configuration once i get the parts from hictop. i also plan t make a video. i will update when i make it.
enjoy,
jlb

Brush
thingiverse
free

Happy Brush - brush holder by netzmensch
...happy brush - brush holder by netzmensch
thingiverse
this is a holder for the "happy brush" toothbrush brushes.
thingiverse
free

Brush by Kharakhorin
...brush by kharakhorin
thingiverse
brush
thingiverse
free
BRUSH by leonk
...brush by leonk
thingiverse
brush
thingiverse
free

brush holder fit 8mm brush by gero666
...brush holder fit 8mm brush by gero666
thingiverse
a small brush holder that fit 8mm brush
thingiverse
free
Brush holder for Vallejo Brush Restorer by mmonsta
...lding the brushes with my hand. enter the brush holder cap for the vallejo brush restorer. groom your brushes in a handsfree way!
thingiverse
free

Poloh Brush - 100% Printed Brush by Taito
...ted this brush to clean the printer and the workbench.
the brush uses the support structure [first layer] to create the bristles.
thingiverse
free

Brush Holder
... the stl flat when slicing. [ in cura, click "lay flat" ]
for size reference, the brushes of the picture are 6 & 16
thingiverse
free

Brush holder
...brush holder
thingiverse
small hook to hold brushes or a cloth maybe keychain?
thingiverse
free

BRUSH OLDER by zampox
...brush older by zampox
thingiverse
tooth brush fits for every normal tooth brush or for the head electronic brushes of 0,85cm
thingiverse
free

Brush Holder by Thom70
...brush holder by thom70
thingiverse
brush holder and lagre brush holder drilling 9mm and 13mm
brush holder small drilling 9mm
Ender
thingiverse
free
Ender-5
...ngiverse
3d model of ender-5.
attention: there are some changes in later versions on ender-5, so use this 3d model with caution.
thingiverse
free

USB Holder (Ender 3 / Ender 3 Pro)
...usb holder (ender 3 / ender 3 pro)
thingiverse
usb holder that easily mounts to the ender 3 / ender 3 pro lcd housing
thingiverse
free

Ender 3V2 LCD Cover with Ender Dragon by PhotoBud
...mplistic cover with extruded ender dragon and handle designed on fusion 360 to cover and protect the lcd screen of the ender 3v2.
thingiverse
free

ENDER 3
...ender 3
thingiverse
this is my first upgrade for ender 3 printer from long extruder to short extruder
thingiverse
free

Simple QUICK PRINT LCD Cover for Creality Ender-3/Ender-3s/Ender-3 Pro/Ender-5 by 1MavZ
...e quick print lcd cover for creality ender-3/ender-3s/ender-3 pro/ender-5 by 1mavz
thingiverse
quick and simple upgrade print...
thingiverse
free

Mini Ender 3
...mini ender 3
thingiverse
mini ender 3
thingiverse
free
Ender Dragon by piisawesome314159
...ender dragon by piisawesome314159
thingiverse
the ender dragon with a base.
thingiverse
free
Ender 3 / Ender 3 / Pro - 3D Filament Support
...ender 3 / ender 3 / pro - 3d filament support
thingiverse
filament holder for plug-in ender 3 / ender 3 / pro 3d printers
thingiverse
free
Filament Guide for ENDER 3 and ENDER 3 V2 by muhannad703
...filament guide for ender 3 and ender 3 v2 by muhannad703
thingiverse
ender 3 v2
thingiverse
free
fancover ender 3
...fancover ender 3
thingiverse
fan cover for ender 3
Nozzle
thingiverse
free

Nozzle holder with lid. (6 nozzles)
...nozzle holder with lid. (6 nozzles)
thingiverse
nozzle holder for 6 nozzles.
thingiverse
free
Nozzle
...nozzle
thingiverse
:)
thingiverse
free
Nozzle Holder for spare nozzles by Mi3Dke
...ld up to 8 spare nozzles.
it is meant to have spare nozzles at hand near your printing, not for storing a huge amount of nozzles.
thingiverse
free

Nozzle Box for E3D Nozzles by squirtle_93
... e3d nozzles by squirtle_93
thingiverse
nozzle box for e3d nozzles for your prusa printer. insert 6x m6 nuts in the middle part.
thingiverse
free

nozzle by stevehaines
...nozzle by stevehaines
thingiverse
nozzle
thingiverse
free

Nozzle holder
...nozzle holder
thingiverse
nozzle holder for mk-8 extruder nozzles.
0,2mm-1,0mm
thingiverse
free

The Nozzle by andrewsharmon
...the nozzle by andrewsharmon
thingiverse
please do not look away from the nozzle.... the nozzle is calibrating.
thingiverse
free
Nozzle holder/Case for nozzles
...two holes for the 0.4 sized nozzle (it is the most used one, so i guess it won't hurt to have one more in there just in case)
thingiverse
free

Nozzle Box
...nozzle box
thingiverse
this is a box for your nozzles.
thingiverse
free

Nozzle by oldold7
...nozzle by oldold7
thingiverse
nozzle for refill lighter
3
thingiverse
free
Raspberry 3 and 3+ case
...raspberry 3 and 3+ case
thingiverse
case for raspberry 3 and 3+ wit fan
thingiverse
free
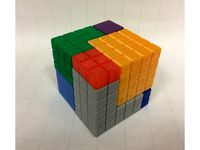
Cube Dissection Puzzle/ Model for 3^3 + 4^3 +5^3 = 6^3 by lgbu
...: oxford university press. (p. 203). the authors gave credit to a solution in eureka, the magazine of the cambridge archimedeans.
thingiverse
free
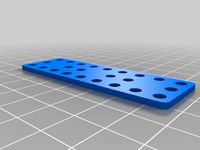
Makeblock Aluminum Pieces 3*3/3*9
...makeblock aluminum pieces 3*3/3*9
thingiverse
makeblock pieces 3x3 and 3x9 recreated for 3d printing
thingiverse
free
Floss 3 Lite - lollipop 3
...floss 3 lite - lollipop 3
thingiverse
antenna mount for floss 3 lite.
thingiverse
free
3 by obstacledaddy
...3 by obstacledaddy
thingiverse
3
thingiverse
free

????????? ??? ??????? 3 ?? by Rigel
...????????? ??? ??????? 3 ?? by rigel
thingiverse
????????? ??? ??????? 3 ??
thingiverse
free
oloid 3
...oloid 3
thingiverse
oloid 3
thingiverse
free

A stand 3
...a stand 3
thingiverse
a stand 3.
thingiverse
free

Tischlampe #3
...tischlampe #3
thingiverse
tischlampe #3
thingiverse
free
3/8 to 3/4 grommet by quikniq
...3/8 to 3/4 grommet by quikniq
thingiverse
3/8" to 3/4" grommet.