Thingiverse
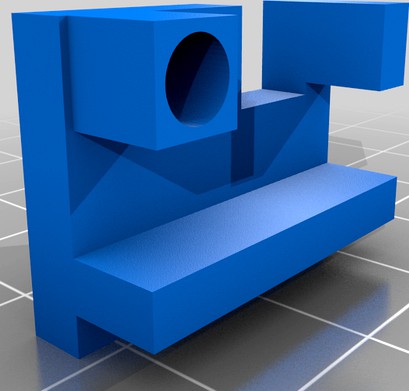
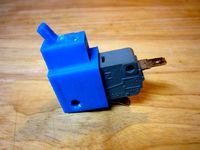
Ender 3 Microswitch Bracket by Abrash9
by Thingiverse
Last crawled date: 3 years ago
Decided to add a auto shut off to my ender so I Don't have to monitor it and know it will shut off safely.
I also have a BLINK MINI camera set up so I can tune in and watch if I need to. I also have the power unit hooked up to a WIFI PLUG incase I need to shut it down remotely if I am away.
This works amazing and happy with how it all turned out.. yes there are simpler options, but this is by far the safest.
TO BUY:
Microswitch with Wiringhttps://www.amazon.ca/gp/product/B071JV158X/ref=ppx_yo_dt_b_asin_image_o04_s00?ie=UTF8&psc=1
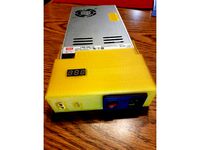
Enclosed High Power Relayhttps://www.amazon.ca/gp/product/B00WV7GMA2/ref=ppx_yo_dt_b_asin_image_o04_s00?ie=UTF8&psc=1
9V Power Adapterhttps://www.amazon.ca/gp/product/B082VVSLGR/ref=ppx_yo_dt_b_asin_image_o03_s00?ie=UTF8&psc=1
HARDWARE NEEDED:
1x M4 x 18mm (16mm works but it takes some fidgeting with the nut)
1x M4 Nut
STEP BY STEP:
Remove Front Screw from right of Belt Tensioner
Insert Longer M4 screw through both the microswitch and the Printed stop
plug in your wires and run some v slot covers (or cable clips) to the back of the power supply
Wire the Switch as followed:
Green to (-) terminal
Black from micro switch & (+) power from 9v adapter to the (+) side terminal
Red from Micro Switch & Other wire from 9v adapter get tied together
Plug Printer into NORMALLY OFF outlet
Plug 9V Adapter into ALWAYS ON outlet
Add a small M4 Nut onto end of the last screw under the bed
optional: I added a tiny dab of superglue to the top of the microswitch to hold it to the Bracket
8.Change the end .GCODE on your cura program
this is my custom code and should work well with Cura 3 Printers. (copy and paste into your Machine Settings under end code)
; Ender 3 Custom End G-code
G4 ; Wait
M220 S100 ; Reset Speed factor override percentage to default (100%)
M221 S100 ; Reset Extrude factor override percentage to default (100%)
G91 ; Set coordinates to relative
G1 F1800 E-3 ; Retract filament 3 mm to prevent oozing
G1 F3000 Z10 ; Move Z Axis up 10 mm to allow filament ooze freely
G90 ; Set coordinates to absolute
M104 S0 ; Turn off Extruder temperature
M140 S0 ; Turn off Heat Bed
M106 S0 ; Turn off Cooling Fan
M107 ; Turn off Fan
G1 X0 ; Zero X axis
G4 s20 ; Wait 20 Seconds
G1 Y233 F1000 ; Move Heat Bed to the front for easy print removal
M84 ; Disable stepper motors
here is a youtube guide (not my video) of a similar setup but he uses a 9v battery)https://www.youtube.com/watch?v=_dvHjjSTGZk&list=WL&index=16&t=380s&ab_channel=CHEP
I also have a BLINK MINI camera set up so I can tune in and watch if I need to. I also have the power unit hooked up to a WIFI PLUG incase I need to shut it down remotely if I am away.
This works amazing and happy with how it all turned out.. yes there are simpler options, but this is by far the safest.
TO BUY:
Microswitch with Wiringhttps://www.amazon.ca/gp/product/B071JV158X/ref=ppx_yo_dt_b_asin_image_o04_s00?ie=UTF8&psc=1
Enclosed High Power Relayhttps://www.amazon.ca/gp/product/B00WV7GMA2/ref=ppx_yo_dt_b_asin_image_o04_s00?ie=UTF8&psc=1
9V Power Adapterhttps://www.amazon.ca/gp/product/B082VVSLGR/ref=ppx_yo_dt_b_asin_image_o03_s00?ie=UTF8&psc=1
HARDWARE NEEDED:
1x M4 x 18mm (16mm works but it takes some fidgeting with the nut)
1x M4 Nut
STEP BY STEP:
Remove Front Screw from right of Belt Tensioner
Insert Longer M4 screw through both the microswitch and the Printed stop
plug in your wires and run some v slot covers (or cable clips) to the back of the power supply
Wire the Switch as followed:
Green to (-) terminal
Black from micro switch & (+) power from 9v adapter to the (+) side terminal
Red from Micro Switch & Other wire from 9v adapter get tied together
Plug Printer into NORMALLY OFF outlet
Plug 9V Adapter into ALWAYS ON outlet
Add a small M4 Nut onto end of the last screw under the bed
optional: I added a tiny dab of superglue to the top of the microswitch to hold it to the Bracket
8.Change the end .GCODE on your cura program
this is my custom code and should work well with Cura 3 Printers. (copy and paste into your Machine Settings under end code)
; Ender 3 Custom End G-code
G4 ; Wait
M220 S100 ; Reset Speed factor override percentage to default (100%)
M221 S100 ; Reset Extrude factor override percentage to default (100%)
G91 ; Set coordinates to relative
G1 F1800 E-3 ; Retract filament 3 mm to prevent oozing
G1 F3000 Z10 ; Move Z Axis up 10 mm to allow filament ooze freely
G90 ; Set coordinates to absolute
M104 S0 ; Turn off Extruder temperature
M140 S0 ; Turn off Heat Bed
M106 S0 ; Turn off Cooling Fan
M107 ; Turn off Fan
G1 X0 ; Zero X axis
G4 s20 ; Wait 20 Seconds
G1 Y233 F1000 ; Move Heat Bed to the front for easy print removal
M84 ; Disable stepper motors
here is a youtube guide (not my video) of a similar setup but he uses a 9v battery)https://www.youtube.com/watch?v=_dvHjjSTGZk&list=WL&index=16&t=380s&ab_channel=CHEP
Similar models
thingiverse
free

PowerSupplyAnetA8Case
...iec320 plug (1x) : https://www.amazon.ca/-/fr/gp/product/b07bnkdtwr/ref=ppx_yo_dt_b_asin_title_o00_s00?ie=utf8&psc=1
enjoy :)
thingiverse
free

Litho Stand ONNO
...?ie=utf8&psc=1
power adapter:https://www.amazon.de/gp/product/b07wcb8443/ref=ppx_yo_dt_b_asin_title_o04_s01?ie=utf8&psc=1
thingiverse
free

Ender3 2021 AutoOff Switch Mount by Novaglow
...tors
; end of custom end gcode
uses 20mm m3 button head screws
240v 20a nc/no switch (part xv-154-1c25)
2 core lamp cord 240v 15a
thingiverse
free
End cap for Meanwell LRS-350-12 by didjareally
...t/b005vulxa0/ref=oh_aui_search_detailpage?ie=utf8&psc=1
meanwell lrs-350-12 power supply:https://holiday.lighting/psorderform
thingiverse
free
50A Power Supply Cover W/LCD Display by hkgary_g
...lpage_o06_s01?ie=utf8&psc=1
power socket
www.amazon.com/gp/product/b06xnmt3wl/ref=oh_aui_detailpage_o06_s00?ie=utf8&psc=1
thingiverse
free
![[FUN] Useless Box by Florent_Degouve](/t/8052241.jpg)
[FUN] Useless Box by Florent_Degouve
...p;psc=1
1 x servo motor sg90https://www.amazon.ca/-/fr/gp/product/b07z16dwgw/ref=ppx_yo_dt_b_asin_title_o02_s01?ie=utf8&psc=1
thingiverse
free

Ender 3 micro Sd Extension cover for Octoprint
...;psc=1
made to fit this adapter:
https://www.amazon.ca/gp/product/b06xy5qb2z/ref=ppx_yo_dt_b_asin_title_o01_s01?ie=utf8&psc=1
thingiverse
free
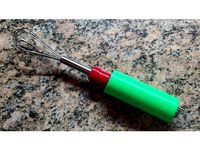
Hand Mixer by OM3
...e?ie=utf8&psc=1
power supplyhttps://www.amazon.com/gp/product/b01461mogq/ref=ppx_yo_dt_b_search_asin_title?ie=utf8&psc=1
thingiverse
free

MuriDron by inakimurillo
...i_detailpage_o03_s00?ie=utf8&psc=1https://www.amazon.es/gp/product/b016eqqpra/ref=oh_aui_detailpage_o04_s00?ie=utf8&psc=1
thingiverse
free

Desk Fan by NebNorse
...lpages04?ie=utf8&psc=1
motor control: https://www.amazon.com/gp/product/b01cnl6imc/ref=od_aui_detailpages04?ie=utf8&psc=1

Microswitch
3d_export
$5

Microswitch
...microswitch
3dexport
microswitch<br>verts 287<br>faces 499
thingiverse
free

Microswitch With Roller12,7X5,6mm by scorpio_man30ro
...microswitch with roller12,7x5,6mm by scorpio_man30ro
thingiverse
microswitch with roller12,7x5,6mm
thingiverse
free
Microswitch hack by Terminus
...microswitch hack by terminus
thingiverse
turn a microswitch into an on / off switch.
thingiverse
free

Microswitch holder by rgthane
...microswitch holder by rgthane
thingiverse
this was designed for a cnc limit microswitch.
thingiverse
free

Microswitch holder by peze78
...microswitch holder by peze78
thingiverse
holder for microswitch for use in diy applications
thingiverse
free

Microswitch holder by bwitz
...icroswitch that is not part of a 3d printer. i needed this for my automated chicken coop to check if the door is open or closed.
thingiverse
free

Endstop Holder, Microswitch by PropsFactory
...endstop holder, microswitch by propsfactory
thingiverse
this is a small endstop holder for microswitch, 8mm rod
thingiverse
free

Microswitch by NilsR
...t as a reference test object as these microswitches are more or less the same over various manufacturers. this is the large type.
thingiverse
free

Silent microswitch for mouse
... diameter of 0.5mm.
i decline any responsibility for damage caused to the equipment in which these microswitches will be mounted.
thingiverse
free

X carriage with microswitch by Swejper
...oswitch by swejper
thingiverse
this is a remix to keep the microswitch on the carrier and use the original flsun v5 clone hotend
Ender
3ddd
$1

Enders / Elegance
...enders / elegance
3ddd
обогреватель
уличный газовый обогреватель enders elegance
высота: 2200 мм
3d_export
free

ender 3 frame cavity covers
... of the creality ender 3 - makes it look a bit more attractive it just slides into the open channels of the aluminium framework
3d_ocean
$9

Ender Dragon Minecraft
...ojang obj poly videogames
ender dragon minecraft created with cinema 4d r15 formats included: max 2013 – fbx 2012 – c4d r15 – obj
3d_export
free

Creality ender enclosure webcam mount
...e creality enclosure. sure is better than a tripod. change it up if it helps. i printed pla with 50% infill on my dd ender 3 pro.
3d_export
free

ender 3 enclosure corners
...er corners and 4 upper corners, using 25mmx25mm angled aluminium pieces that gets covered on inside of the frame with plexiglass
3d_export
free

ender 3 3d print bed clips
...ed + normal aluminium bed frame of the creality ender 3 = 6mm (b) these clips are designed for glass plate + aluminium bed = 4mm
3d_export
$5

GRUMPY CAT
...grumpy cat 3dexport grumpy cat to print in ender ...
3d_export
$5

Logs fire
...with one multi material for corona and vray r ender. albedo, normal, uvmap, roughness format jpg 4096x4096 models:...
3d_export
$42

excavator
...is the original size. 0.12 mm printing surface creality ender5 ...
3d_export
$10

lamp shade
...feel and look. this was the best use of ender 3 pro...
Bracket
archibase_planet
free

Bracket
...bracket
archibase planet
bracket corbel holder
bracket 1 - 3d model (*.gsm+*.3ds) for interior 3d visualization.
archibase_planet
free

Bracket
...bracket
archibase planet
bracket corbel console
bracket 5 - 3d model (*.gsm+*.3ds) for interior 3d visualization.
archibase_planet
free

Bracket
...bracket
archibase planet
corbel holder bracket
bracket 6 - 3d model (*.gsm+*.3ds) for interior 3d visualization.
archibase_planet
free

Bracket
...bracket
archibase planet
bracket corbel console
bracket 8 - 3d model (*.gsm+*.3ds) for interior 3d visualization.
archibase_planet
free

Bracket
...bracket
archibase planet
bracket corbel holder
bracket n280911 - 3d model (*.gsm+*.3ds) for interior 3d visualization.
archibase_planet
free

Bracket
...bracket
archibase planet
holder corbel bracket
bracket 9 - 3d model (*.gsm+*.3ds) for interior 3d visualization.
archibase_planet
free

Bracket
...bracket
archibase planet
corbel holder bracket
bracket 10 - 3d model (*.gsm+*.3ds) for interior 3d visualization.
archibase_planet
free

Bracket
...bracket
archibase planet
corbel console bracket
bracket 11 - 3d model (*.gsm+*.3ds) for interior 3d visualization.
archibase_planet
free

Bracket
...bracket
archibase planet
holder console bracket
bracket 12 - 3d model (*.gsm+*.3ds) for interior 3d visualization.
archibase_planet
free

Bracket
...bracket
archibase planet
bracket corbel holder
bracket 13 - 3d model (*.gsm+*.3ds) for interior 3d visualization.
3
3d_export
$5

hinge 3
...hinge 3
3dexport
hinge 3
3ddd
$1

Розетка 3
...розетка 3
3ddd
розетка
розетка 3
turbosquid
$50

is-3
... available on turbo squid, the world's leading provider of digital 3d models for visualization, films, television, and games.
3d_export
$5

3 CATS
...3 cats
3dexport
3 cats pen holder
3ddd
free
3 Буфета
...3 буфета
3ddd
буфет , кантри
3 буфета
3ddd
$1

Plant - 3
...plant - 3
3ddd
цветок , горшок
decorative plant -3
3ddd
free

3 подушки
...3 подушки
3ddd
подушка
3 подушки в морском стиле.
design_connected
$9
Tamarin 3
...tamarin 3
designconnected
chista tamarin 3 computer generated 3d model.
3d_export
free

rubiks cube 3 by 3
...bx, stl, obj<br>:all textures applied to the model<br>:verts 7226<br>:face 6832<br>:enjoy using the model
design_connected
$25

Bella for 3
...bella for 3
designconnected
robert plumb bella for 3 computer generated 3d model.