Thingiverse
Ender 3 AEIOU - Electronics enclosure
by Thingiverse
Last crawled date: 4 years, 3 months ago
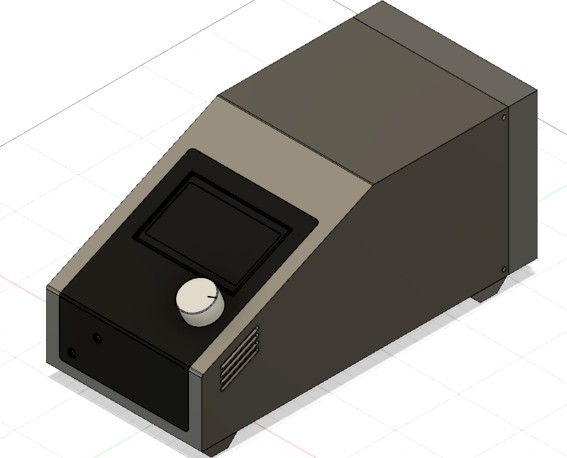
Always wish you had CR-10 instead of the Ender 3? Put your Ender in an enclosure and need somewhere to put all the electric bits? Enjoy torturing your self and printer? Well friend then you have come to the right place. Now you can have All Electronics In One Unit.
I looked for some time for an electronics enclosure that would do everything I wanted, hold an SKR Mini E3/Melzi, a Raspberry Pi, and some relays. Nothing seemed quite right. So, here it is, after weeks of learning Fusion 360, I have got to the point I feel like this is ready to share. Make no mistake, this is my first design, and it is not without problems. Print this at your own risk as I assume no responsibility for any damage to your printer or your mental state.
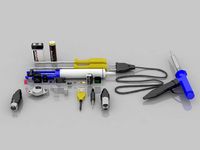
Down to the nitty gritty. This was designed around the following parts.
Relay modulehttps://www.amazon.com/gp/product/B072TR82K9
MOSFET modulehttps://www.amazon.com/gp/product/B077SBC1B5
CSI to HDMIhttps://www.amazon.com/gp/product/B06XDNBM63
Buck Convertors
Your favorite cheap blue buck converters
Secondary AC input
Any fused AC input such as https://www.amazon.com/gp/product/B01GBW8J8A
Your favorite 6025 fan or anything thinner.
Hardware required.
Outside
4 - M3x8 - Case
2 - M5x8 - Display - Reuse from original display
4 - M5 - Fan - No length requirment, or use fan screws
Top Level
4 - M2.5x5 - Buck converters
6 - M3x5 - MOSFET and Relay modules
4 - M3x8 - Layer mount - Kit
Bottom Level
5 - M3x5 - SKR Mini E3 - Reuse Melzi screws
4 - M2.5x5 - Raspberry Pi
3 - M4x5 - Layer mount - Reuse from factory PSU
1 - M4x8 - Display/Layer mount
All mounts are easily movable as they are separate bodies in the STEP files, if you would like to use different modules.
My personal setup is intended as such.
Relay for SKR/Melzi control
Relay for an enclosure heater
MOSFET for LED in enclosure
MOSFET for ventilation/cooling fan
Secondary AC input for heater power.
Everything else is pretty self explanatory.
Assembly should be done from rear to front. The rear panel should slide onto the power supply, be careful will the terminals on the AC input, they should be able to slide in next to the terminals on the PSU with a little coaxing. The base layer should be attached to the PSU and all wiring completed and tested, and repeat for the second layer. The display mount should be added at this point too. Once you are happy with everything the case should slide over everything and a few M3 screws can be used to hold it in place.
No supports are required to print, however the case will most likely need a brim.
I looked for some time for an electronics enclosure that would do everything I wanted, hold an SKR Mini E3/Melzi, a Raspberry Pi, and some relays. Nothing seemed quite right. So, here it is, after weeks of learning Fusion 360, I have got to the point I feel like this is ready to share. Make no mistake, this is my first design, and it is not without problems. Print this at your own risk as I assume no responsibility for any damage to your printer or your mental state.
Down to the nitty gritty. This was designed around the following parts.
Relay modulehttps://www.amazon.com/gp/product/B072TR82K9
MOSFET modulehttps://www.amazon.com/gp/product/B077SBC1B5
CSI to HDMIhttps://www.amazon.com/gp/product/B06XDNBM63
Buck Convertors
Your favorite cheap blue buck converters
Secondary AC input
Any fused AC input such as https://www.amazon.com/gp/product/B01GBW8J8A
Your favorite 6025 fan or anything thinner.
Hardware required.
Outside
4 - M3x8 - Case
2 - M5x8 - Display - Reuse from original display
4 - M5 - Fan - No length requirment, or use fan screws
Top Level
4 - M2.5x5 - Buck converters
6 - M3x5 - MOSFET and Relay modules
4 - M3x8 - Layer mount - Kit
Bottom Level
5 - M3x5 - SKR Mini E3 - Reuse Melzi screws
4 - M2.5x5 - Raspberry Pi
3 - M4x5 - Layer mount - Reuse from factory PSU
1 - M4x8 - Display/Layer mount
All mounts are easily movable as they are separate bodies in the STEP files, if you would like to use different modules.
My personal setup is intended as such.
Relay for SKR/Melzi control
Relay for an enclosure heater
MOSFET for LED in enclosure
MOSFET for ventilation/cooling fan
Secondary AC input for heater power.
Everything else is pretty self explanatory.
Assembly should be done from rear to front. The rear panel should slide onto the power supply, be careful will the terminals on the AC input, they should be able to slide in next to the terminals on the PSU with a little coaxing. The base layer should be attached to the PSU and all wiring completed and tested, and repeat for the second layer. The display mount should be added at this point too. Once you are happy with everything the case should slide over everything and a few M3 screws can be used to hold it in place.
No supports are required to print, however the case will most likely need a brim.
Similar models
thingiverse
free

Right side mounting for relay, 40mm fan, and slot for Pi Camera cable by paxxoid
...th powered by a buck converter.
https://www.amazon.com/gp/product/b07dszflmq/ref=ppx_yo_dt_b_asin_title_o02_s00?ie=utf8&psc=1
thingiverse
free

Ender 5 Plus SKR 1.4 Turbo + RPi 2/3/4 Mount by 3ddavies
...l 40 mm fan mount for the pi and the mosfet is included.
the following things were used:https://www.thingiverse.com/thing:4543939
thingiverse
free

SKR 1.3 Enclosure with 2 Mosfets
...uch. bed and heater cartridge connect to the box with xt60 connectors and are permanently wired to mosfets inside the enclosure.
thingiverse
free
Ender 5 Plus SKR Conversion Base FYSETC-DROK by temelvin
...mp;psc=1
(1) drok buck converterhttps://www.amazon.com/gp/product/b078xq5mwr/ref=ppx_yo_dt_b_asin_title_o01_s01?ie=utf8&psc=1
thingiverse
free
Enclosure for XY-2596 Buck Converter
...as a light pipe.
fan = https://www.amazon.com/gp/product/b009nqlt0m
buck converter = https://www.amazon.com/gp/product/b07wqj2gd6
thingiverse
free
Anet A8 80mm PSU cooler fan grill by freddan_6
...s should go closes to "+" of the input for the mosfet. i wanted a logo and i like honeycomb pattern, so i remixed them.
thingiverse
free

Ender-3 SKR Case by NettechSC
... and 2 m3x15 screws with nuts. although one should be enough.
the lid uses 2 m3x5 for the front and one m3x15 for the rear screw.
thingiverse
free

Ender 3 electronics enclosure Skr mini e3 by Bilgaard
...n well lrs-350-24 psu
creality 3d 12864 lcd display screen
40x40x10 and 40x40x20 noctura
two buck converters lm2596
iec320 socket
thingiverse
free

HiLetgo Single Channel Relay Enclosure by drichert
...s, but they can be added for extra security
designed in tinkercad
relay module used: https://www.amazon.com/gp/product/b00lw15a4w
thingiverse
free

Raspberry Pi & SKR E3 Turbo back case for Ender 3 by JakeTri
...one for 5v (from powering 30mm fans from fan2 board connector)
two 30mm fans
customizable fan grill cover used for the 30mm fans
Aeiou
thingiverse
free

Alphabet molds a–z. Build your own fridge messages by Movil
...will end up with broken letters. update 2018-08-10: added aeiou vocals. does anyone need special characters ? to-do: heart...
thingiverse
free

String Theory, a string library for OpenSCAD by 16807
...11/27/2014 thanksgiving update. regex now supports negative character sets ("[^aeiou"), character ranges ("[a-z]"), and curly bracket repetition (".{2,3}"). 11/13/2014...
clara_io
free

aeiou
...aeiou
clara.io
clara_io
free

aeiou
...aeiou
clara.io
3dwarehouse
free

aeiou
...aeiou
3dwarehouse
mis vocales
3dwarehouse
free

Camion
...camion 3dwarehouse aeiou ...
3dwarehouse
free

Abitacion
...abitacion 3dwarehouse aeiou ...
3dwarehouse
free

Aux. de serviços gerais
...empresas, edifícios e etc... formato personalizado da letra w. #aeiou #entrada #monumento_de_entrada...
3dwarehouse
free

another newcomers guide READ DESCRIPTION FOR GUIDE DONT DWNLD!
...at sketchup. i will make another guide soon :d #aeiou #blue #blueprint #brains #come #coming #eat #good #guide #learn...
Enclosure
3d_export
free

electrical enclosure
...l enclosure where electrical devices like (relays, contactors, busbars ) are kept in order to protect from hazardous environment.
turbosquid
$100

GPU Enclosure
...yalty free 3d model gpu enclosure for download as obj and stl on turbosquid: 3d models for games, architecture, videos. (1381061)
3d_export
$5

Electrical Enclosure
...ed. also has tower lights attaced on the top.<br>file format that are available:<br>.step<br>.obj<br>.stl
archive3d
free

Enclosure 3D Model
...closure 3d model
archive3d
shower enclosure-acquarius- 3d model for interior 3d visualization.
archive3d
free

Enclosure 3D Model
...enclosure 3d model
archive3d
shower enclosure-omega- 3d model for interior 3d visualization.
archive3d
free

Enclosure 3D Model
...enclosure 3d model
archive3d
shower enclosure-vega - 3d model for interior 3d visualization.
archive3d
free

Enclosure 3D Model
...enclosure 3d model
archive3d
shower enclosure-zenith - 3d model for interior 3d visualization.
turbosquid
$20

shower enclosure
... available on turbo squid, the world's leading provider of digital 3d models for visualization, films, television, and games.
turbosquid
$14

Dumpster Enclosure
... available on turbo squid, the world's leading provider of digital 3d models for visualization, films, television, and games.
turbosquid
$25

3d printer enclosure
... model 3d printer enclosure for download as ipt, skp, and fbx on turbosquid: 3d models for games, architecture, videos. (1634310)
Ender
3ddd
$1

Enders / Elegance
...enders / elegance
3ddd
обогреватель
уличный газовый обогреватель enders elegance
высота: 2200 мм
3d_export
free

ender 3 frame cavity covers
... of the creality ender 3 - makes it look a bit more attractive it just slides into the open channels of the aluminium framework
turbosquid
$1

pen support for ender 3
...y free 3d model pen support for ender 3 for download as blend on turbosquid: 3d models for games, architecture, videos. (1611282)
3d_ocean
$9

Ender Dragon Minecraft
...ojang obj poly videogames
ender dragon minecraft created with cinema 4d r15 formats included: max 2013 – fbx 2012 – c4d r15 – obj
3d_export
free

Creality ender enclosure webcam mount
...e creality enclosure. sure is better than a tripod. change it up if it helps. i printed pla with 50% infill on my dd ender 3 pro.
3d_export
free

ender 3 enclosure corners
...er corners and 4 upper corners, using 25mmx25mm angled aluminium pieces that gets covered on inside of the frame with plexiglass
3d_export
free

ender 3 3d print bed clips
...ed + normal aluminium bed frame of the creality ender 3 = 6mm (b) these clips are designed for glass plate + aluminium bed = 4mm
3d_export
$5

GRUMPY CAT
...grumpy cat 3dexport grumpy cat to print in ender ...
3d_export
$5

Logs fire
...with one multi material for corona and vray r ender. albedo, normal, uvmap, roughness format jpg 4096x4096 models:...
3d_export
$42

excavator
...is the original size. 0.12 mm printing surface creality ender5 ...
Electronics
turbosquid
$1

electron
...urbosquid
royalty free 3d model electron for download as max on turbosquid: 3d models for games, architecture, videos. (1157488)
turbosquid
$50

electronic
...
royalty free 3d model electronic for download as max and obj on turbosquid: 3d models for games, architecture, videos. (1289427)
turbosquid
$40

Electron
... available on turbo squid, the world's leading provider of digital 3d models for visualization, films, television, and games.
3d_ocean
$8
Electronic game
...electronic game
3docean
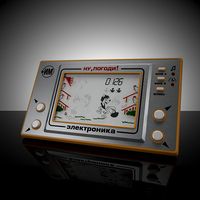
electronic games nu pogody wait a minute well
electronic game “well, wait a minute”, “nu pogody”
3ddd
$1
Brilux Electronic
...brilux electronic
3ddd
подвес. brilux electronic. польша. материалы настроены.
3d_export
free

electronic shop
...lectronic shop with high quality interior and exterior. it has tvs smartphone play station printer and many more electronic item.
3ddd
$1

Термостаты OJ Electronics
...ермостаты oj electronics
3ddd
oj electronics , термостат
термостаты фирмы oj electronics
3d_export
$8

electron 714
...electron 714
3dexport
game ready model for export to unreal engine soviet tv electron 714 pbr 4k
3ddd
$1

Термостат OJ Electronics
... oj electronics
3ddd
oj electronics , термостат
термостат occ2-1991 фирмы oj electronics
turbosquid
$60
Electronics Stuff
...
royalty free 3d model electronics stuff for download as max on turbosquid: 3d models for games, architecture, videos. (1624680)
3
turbosquid
$10

Mountain Bike 3 -3 of 3
...model mountain bike 3 (#3 of 3) for download as fbx and blend on turbosquid: 3d models for games, architecture, videos. (1438752)
turbosquid
$6

Rock 3-3
...urbosquid
royalty free 3d model rock 3-3 for download as obj on turbosquid: 3d models for games, architecture, videos. (1628065)
turbosquid
$29

Books 150 pieces 3-3-3
...books 150 pieces 3-3-3 for download as max, obj, fbx, and stl on turbosquid: 3d models for games, architecture, videos. (1384033)
turbosquid
$3

Genesis 3 Clothing 3
... available on turbo squid, the world's leading provider of digital 3d models for visualization, films, television, and games.
3d_export
$5

hinge 3
...hinge 3
3dexport
hinge 3
3ddd
$1

Розетка 3
...розетка 3
3ddd
розетка
розетка 3
turbosquid
$50

is-3
... available on turbo squid, the world's leading provider of digital 3d models for visualization, films, television, and games.
turbosquid
$10

Mountain Bike 3 -2 of 3
...model mountain bike 3 (#2 of 3) for download as fbx and blend on turbosquid: 3d models for games, architecture, videos. (1438750)
turbosquid
$10

Mountain Bike 1 -3 of 3
...model mountain bike 1 (#3 of 3) for download as fbx and blend on turbosquid: 3d models for games, architecture, videos. (1438743)
3d_export
$5

3 CATS
...3 cats
3dexport
3 cats pen holder