Thingiverse

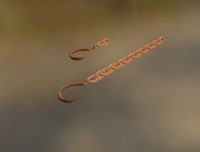
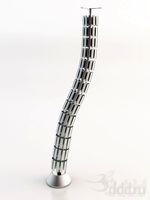
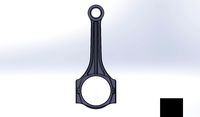
Ender 3/ 3 Pro Chain Z holder and Cable Connects. by Myk1
by Thingiverse
Last crawled date: 3 years, 2 months ago
When replacing fans you have to either cut the wires or pull everything out of the harness and disconnect from the main board which is always time consuming and risky if you're not into playing around with wiring.
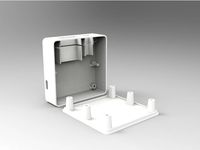
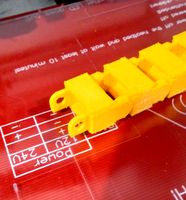
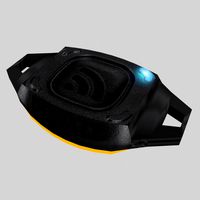
I decided to make a bracket that would hold 3, 2pin JST Connectors and a Terminal strip so that it would make it easier to unplug the wiring and remove the hot end for repairs, cleaning etc. All the connections are protected with heat shrink and covered with a cover.
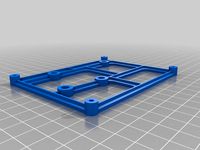
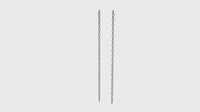
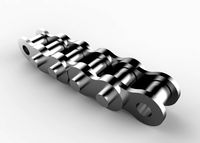
Since the new metal extruders don't come with a place to secure the cable I incorporated the complete bracket to the Z axis chain mount to make it easier to access.
required:-
3 x male and female JST connectors
1 x 10/20Amp terminal strip ( only need 2 terminals removed from plastic casing)
1 x M3 screw
3 x 1cm strips of 3mm heat shrink for the connections on the female JST plug.
3 x 2 /3 mm cable ties to secure the cables.
The wires on the hot end, 2 fans and the Thermistor should be cut no longer than 445mm (17-1/4") when measured from the top of the fan cover.
The rest of the wires should be long enough to reach from the control board to the new connectors, be careful when preparing the end of the wires for the JST's not to remove too much insulation, 3mm is more than enough.
The wires are soldered to the pins on the female JST's and then slide the heat shrink over the connections to protect the open wires. The Male JST's are fitted as normal to the fans and the Thermistors, keeping the color coding the same.
I used the old protective sheath to keep all the wires together and cut it to suit.
The female JST's go in the new holder in any order but I preferred the thermistor to go on
the top followed by the fans and then finally the heater wires for the hot end just go into the terminals and are properly tightened.
The JST's are a snug fit into the holder and may need a bit of gentle persuasion to get them to go into the holder , I designed the holder so that the JST's cant be pulled out or pushed back when inserting or removing the other end of the plug.
The screw hole to secure the cover is made for a M3 screw but is not threaded and you should be able to screw in a screw the first time or use a M3 tap to cut the threads.
I decided to make a bracket that would hold 3, 2pin JST Connectors and a Terminal strip so that it would make it easier to unplug the wiring and remove the hot end for repairs, cleaning etc. All the connections are protected with heat shrink and covered with a cover.
Since the new metal extruders don't come with a place to secure the cable I incorporated the complete bracket to the Z axis chain mount to make it easier to access.
required:-
3 x male and female JST connectors
1 x 10/20Amp terminal strip ( only need 2 terminals removed from plastic casing)
1 x M3 screw
3 x 1cm strips of 3mm heat shrink for the connections on the female JST plug.
3 x 2 /3 mm cable ties to secure the cables.
The wires on the hot end, 2 fans and the Thermistor should be cut no longer than 445mm (17-1/4") when measured from the top of the fan cover.
The rest of the wires should be long enough to reach from the control board to the new connectors, be careful when preparing the end of the wires for the JST's not to remove too much insulation, 3mm is more than enough.
The wires are soldered to the pins on the female JST's and then slide the heat shrink over the connections to protect the open wires. The Male JST's are fitted as normal to the fans and the Thermistors, keeping the color coding the same.
I used the old protective sheath to keep all the wires together and cut it to suit.
The female JST's go in the new holder in any order but I preferred the thermistor to go on
the top followed by the fans and then finally the heater wires for the hot end just go into the terminals and are properly tightened.
The JST's are a snug fit into the holder and may need a bit of gentle persuasion to get them to go into the holder , I designed the holder so that the JST's cant be pulled out or pushed back when inserting or removing the other end of the plug.
The screw hole to secure the cover is made for a M3 screw but is not threaded and you should be able to screw in a screw the first time or use a M3 tap to cut the threads.
Similar models
thingiverse
free

Prusa DIY Clone heated bed connector holder by Gadjet0
...d mounting bracket, this means it's easier to remove the heated bed and bracket, it also has a recess to hold an m3 nut *****
thingiverse
free
Molex powered NodeMCU Neopixel Controller
...d flash the latest release of wled from here
plug everything in and configure the controller by following the wled wiki on github
thingiverse
free

FanHolder for Printrbot Play by enhydra
...mm screws for mounting the fanholder to the extruder base.
4 pcs m3 by 16 screws for fixing fan and mini-shroud to the fanholder.
thingiverse
free

CR-6 SE Bed Cable Chain by AntFJ
...w the chain had no curve to it so i created a new "cover" for the chain that forces the chain to follow a constant arc.
thingiverse
free

DIN Rail Screw Held Terminal Block by Atomist
...nc connect connection connector connectors electronics screw terminal_block terminal_strip wire wires wire_holder wire_management
thingiverse
free
Ender 3 adaptor for MKS Gen L by TotalRetribution
...quiet. also i used the e1 output to drive the hot end fan and setup marlin to only turn this fan on when the hot end is over 50c.
thingiverse
free

Nema 23 Stepper db9 Plug Case by claudiapinto
...s wires and screw the cover on the motor with 4 more m3 screws.
all to give a cleaner and more professional look to our projects.
thingiverse
free

XT60 Bed Connector for Ender 3 Cable Chain by qwertymodo
...ficult to desolder from the bed heater if you need to rework them. i suggest jst ph (2.0mm pitch) connectors for the thermistor.
thingiverse
free

12V PSU safety cover + 120mm fan modification by limwenyao
...su.
mount setup
1 x psu mount
2 x m4*10mm screw
2 x m4 t-nut
changelog
11 jan 2018 - screw positioning at back of psu recentered.
thingiverse
free

Extension Cord connection (Splice Box)
...me.
put connection in one half of splice box and attach with 4" cable ties.
attach 2nd half of splice box using 2 wire ties.
Ender
3ddd
$1

Enders / Elegance
...enders / elegance
3ddd
обогреватель
уличный газовый обогреватель enders elegance
высота: 2200 мм
3d_export
free

ender 3 frame cavity covers
... of the creality ender 3 - makes it look a bit more attractive it just slides into the open channels of the aluminium framework
turbosquid
$1

pen support for ender 3
...y free 3d model pen support for ender 3 for download as blend on turbosquid: 3d models for games, architecture, videos. (1611282)
3d_ocean
$9

Ender Dragon Minecraft
...ojang obj poly videogames
ender dragon minecraft created with cinema 4d r15 formats included: max 2013 – fbx 2012 – c4d r15 – obj
3d_export
free

Creality ender enclosure webcam mount
...e creality enclosure. sure is better than a tripod. change it up if it helps. i printed pla with 50% infill on my dd ender 3 pro.
3d_export
free

ender 3 enclosure corners
...er corners and 4 upper corners, using 25mmx25mm angled aluminium pieces that gets covered on inside of the frame with plexiglass
3d_export
free

ender 3 3d print bed clips
...ed + normal aluminium bed frame of the creality ender 3 = 6mm (b) these clips are designed for glass plate + aluminium bed = 4mm
3d_export
$5

GRUMPY CAT
...grumpy cat 3dexport grumpy cat to print in ender ...
3d_export
$5

Logs fire
...with one multi material for corona and vray r ender. albedo, normal, uvmap, roughness format jpg 4096x4096 models:...
3d_export
$42

excavator
...is the original size. 0.12 mm printing surface creality ender5 ...
Chain
archibase_planet
free
Chain
...chain
archibase planet
chain chain link chain loop
chain n020708 - 3d model (*.gsm+*.3ds) for interior 3d visualization.
3d_export
$5
chain
...chain
3dexport
3d model chain
3d_export
$5
chain
...chain
3dexport
chain. obj,fbx,blend
archibase_planet
free

Chain
...se planet
chain circuit catena
chain - archicad parametrical gdl 3d model (*.gsm). regulation of the length, curvature and angle.
archibase_planet
free
Chain
...n
archibase planet
chain circuit catena
chain - archicad parametrical gdl 3d model(*.gsm). regulation of the length and angle xyz
3d_ocean
$5
Chain
...chain
3docean
3d models chain design elements
3d models, design elements
3d_ocean
$5

Chain
...chain
3docean
3d models chain design elements
3d models, design elements
turbosquid
$10
Chain
...hain
turbosquid
royalty free 3d model chain for download as on turbosquid: 3d models for games, architecture, videos. (1329200)
turbosquid
$9
chain
...hain
turbosquid
royalty free 3d model chain for download as on turbosquid: 3d models for games, architecture, videos. (1549461)
turbosquid
$2
Chain
...hain
turbosquid
royalty free 3d model chain for download as on turbosquid: 3d models for games, architecture, videos. (1148668)
Cable
3d_export
free

Cables
...cables
3dexport
cables for your purposes
3d_export
free
cable belt for cable organization
...ze your cables in 3d printers. it will bend only to one direction. the area to put the cables per piece is aprox. 1,6cmx2,6cmx1cm
3d_ocean
$16
Ethernet Cable
...ethernet cable
3docean
cable computer electronics ethernet internet network connected
ethernet cable 3d model
3d_export
$65

cable
...cable
3dexport
simple rendering of the scene file
turbosquid
$14

Cable
...l cable for download as ma, max, fbx, 3ds, gltf, obj, and stl on turbosquid: 3d models for games, architecture, videos. (1631358)
3ddd
$1
Cable Cover
...cable cover
3ddd
кабель
vertebra passacavo - cable cover
max + vray 2.20.03
3d_export
$15
Cable reel
...without cable. textures 4k 4096x4096 targa, png, jpeg.<br>number of polygons without cable: 2896<br>with cable: 35328
3d_export
$7

short cable
...short cable
3dexport
rubber cord. very detailed. cable thickness: 2.55 mm total length: 55mm
3d_export
$5

USB CABLE
...usb cable
3dexport
turbosquid
$30
Cable Reels
...osquid
royalty free 3d model cable reels for download as fbx on turbosquid: 3d models for games, architecture, videos. (1439507)
Z
3d_export
$5

nissan z
...nissan z
3dexport
nissan z
3ddd
$1

Vase Z
...vase z
3ddd
vase z
3ddd
$1

полотенцесушить Z
...полотенцесушить z
3ddd
полотенцесушитель
полотенцесушить z
design_connected
free

Z-Chair
...z-chair
designconnected
free 3d model of z-chair designed by karman, aleksei.
design_connected
$11

Z Lamp
...z lamp
designconnected
phillips z lamp computer generated 3d model. designed by kalff, louis.
3d_export
$5

Dragon balls z
...dragon balls z
3dexport
dragon ball z
turbosquid
$20

Fighter Z
...
turbosquid
royalty free 3d model fighter z for download as on turbosquid: 3d models for games, architecture, videos. (1292563)
turbosquid
$9

Pen Z
...pen z
turbosquid
free 3d model pen z for download as obj on turbosquid: 3d models for games, architecture, videos. (1686775)
turbosquid
free

z chair
...z chair
turbosquid
free 3d model z chair for download as max on turbosquid: 3d models for games, architecture, videos. (1410230)
turbosquid
$5

Letter Z
...urbosquid
royalty free 3d model letter z for download as max on turbosquid: 3d models for games, architecture, videos. (1408540)
Connects
turbosquid
$12
connection
...bosquid
royalty free 3d model connection for download as max on turbosquid: 3d models for games, architecture, videos. (1479836)
3d_export
$5
CONNECTED PUMP
...connected pump
3dexport
connected pump<br>.blend
design_connected
$11
Connect Ottomans
...connect ottomans
designconnected
muuto connect ottomans computer generated 3d model. designed by anderssen & voll.
design_connected
$11
Connection Rectangular
...angular
designconnected
gallotti & radice connection rectangular computer generated 3d model. designed by castagna, massimo.
3d_export
$5

rope connection ring
...rope connection ring
3dexport
rope connection ring
3ddd
free

nurus - connect
... диваны, моделились под проект гостиницы новотель.
более подробная инфа тут:http://www.nurus.com.tr/en/product/connect
turbosquid
$11

pipe connective
... available on turbo squid, the world's leading provider of digital 3d models for visualization, films, television, and games.
turbosquid
$2
connecting road
... available on turbo squid, the world's leading provider of digital 3d models for visualization, films, television, and games.
turbosquid
$2

Connected Mirror
... available on turbo squid, the world's leading provider of digital 3d models for visualization, films, television, and games.
turbosquid
$29
Tool Connect
...ol connect for download as 3ds, max, obj, fbx, blend, and stl on turbosquid: 3d models for games, architecture, videos. (1342648)
Pro
turbosquid
$29

Pro
...ree 3d model mac pro for download as obj, c4d, fbx, and blend on turbosquid: 3d models for games, architecture, videos. (1505782)
turbosquid
$15

Apple Mac Pro and Pro Display
...ee 3d model apple mac pro and pro display for download as max on turbosquid: 3d models for games, architecture, videos. (1417078)
3d_export
$5

iphone 13 pro max and pro
...3 pro max and 13 pro the model is made in four colors (graphite, gold, silver, and blue), all of which are attached in the files.
3d_export
free

sapphire pro
...sapphire pro
3dexport
sapphire pro 3d printer head mask
3d_export
$4

macbook pro
...macbook pro
3dexport
macbook pro 13" inch 2020 years model
3ddd
free

GentleLase Pro
... syneron , candela
gentlelase pro аппарат для лазерной эпиляции
turbosquid
$25

PRO frame
...rbosquid
royalty free 3d model pro frame for download as max on turbosquid: 3d models for games, architecture, videos. (1148329)
turbosquid
$5

Alien pro
...osquid
royalty free 3d model alien pro for download as blend on turbosquid: 3d models for games, architecture, videos. (1678446)
turbosquid
$5

iphone11 pro
...uid
royalty free 3d model iphone11 pro for download as blend on turbosquid: 3d models for games, architecture, videos. (1562707)
3ddd
$1

Mac Pro (appel)
...mac pro (appel)
3ddd
компьютер , apple
mac pro
Holder
archibase_planet
free

Holder
...holder
archibase planet
holder toilet paper holder
holder paper n070712 - 3d model (*.gsm+*.3ds) for interior 3d visualization.
archibase_planet
free

Holder
...e planet
holder rack toilet paper holder
holder toilet roll n240715 - 3d model (*.gsm+*.3ds+*.max) for interior 3d visualization.
archibase_planet
free

Holder
...holder
archibase planet
pen holder support prop
pen holder - 3d model for interior 3d visualization.
archibase_planet
free

Holder
...holder
archibase planet
pole post holder
сhurch cross pole holder - 3d model for interior 3d visualization.
archibase_planet
free

Holder
...holder
archibase planet
holder bathroom ware
shower holder - 3d model (*.gsm+*.3ds) for interior 3d visualization.
archibase_planet
free

Holder
...oilet paper holder
holder paper devon&devon; time black n241113 - 3d model (*.gsm+*.3ds+*.max) for interior 3d visualization.
archibase_planet
free

Holder
...holder
archibase planet
holder hanger hanger for towel
holder 7 - 3d model (*.gsm+*.3ds) for interior 3d visualization.
archibase_planet
free

Holder
...holder
archibase planet
holder hanger hanger for towel
holder 3 - 3d model (*.gsm+*.3ds) for interior 3d visualization.
archibase_planet
free

Holder
...holder
archibase planet
holder towel rack towel-horse
holder - 3d model (*.gsm+*.3ds) for interior 3d visualization.
archibase_planet
free

Holder
...lder
archibase planet
holder hanger hanger for towel
holder towel n250912 - 3d model (*.gsm+*.3ds) for interior 3d visualization.
3
turbosquid
$10

Mountain Bike 3 -3 of 3
...model mountain bike 3 (#3 of 3) for download as fbx and blend on turbosquid: 3d models for games, architecture, videos. (1438752)
turbosquid
$6

Rock 3-3
...urbosquid
royalty free 3d model rock 3-3 for download as obj on turbosquid: 3d models for games, architecture, videos. (1628065)
turbosquid
$29

Books 150 pieces 3-3-3
...books 150 pieces 3-3-3 for download as max, obj, fbx, and stl on turbosquid: 3d models for games, architecture, videos. (1384033)
turbosquid
$3

Genesis 3 Clothing 3
... available on turbo squid, the world's leading provider of digital 3d models for visualization, films, television, and games.
3d_export
$5

hinge 3
...hinge 3
3dexport
hinge 3
3ddd
$1

Розетка 3
...розетка 3
3ddd
розетка
розетка 3
turbosquid
$50

is-3
... available on turbo squid, the world's leading provider of digital 3d models for visualization, films, television, and games.
turbosquid
$10

Mountain Bike 3 -2 of 3
...model mountain bike 3 (#2 of 3) for download as fbx and blend on turbosquid: 3d models for games, architecture, videos. (1438750)
turbosquid
$10

Mountain Bike 1 -3 of 3
...model mountain bike 1 (#3 of 3) for download as fbx and blend on turbosquid: 3d models for games, architecture, videos. (1438743)
3d_export
$5

3 CATS
...3 cats
3dexport
3 cats pen holder