Thingiverse
Eagle 1 (Fixed!) Easy-Print -- Space 1999 by PrintMaker28
by Thingiverse
Last crawled date: 2 years, 10 months ago
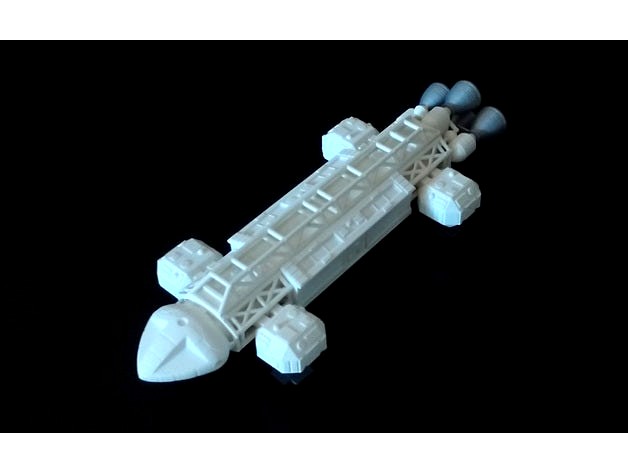
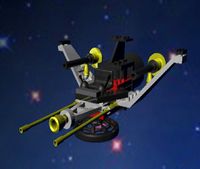
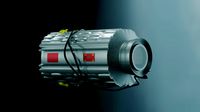
This is a massive re-work of the 12" (31cm) long "easy-print/build" Eagle 1 by korb3n and later, alpokemon. The original model had huge issues with the proportions of the center body/pod section, engines and cockpit, when compared with the on-screen studio model.
It's now about as screen-accurate as practical, but a significant amount more work could be done on fine-tuning surface details (greebles) and still-outstanding corrections.
For those that are curious, I've added a proportional comparison of this model and David Sisson's original 44" studio model (red bars are the same width). The lens and distance used to shoot the photos will distort some aspects, but a few things are now obvious! The engine bells are too large in diameter (now fixed!) and the front/rear body blocks areas might not be quite the right length (hard to tell, the model does match the reference drawing pretty closely...).
I tried to improve upon alpokemon's efforts at making it simple to print/build. I did away with the "alignment cubes" and simply made it that the core of the model can be assembled on a flat surface, using superglue (cyanoacrylate).
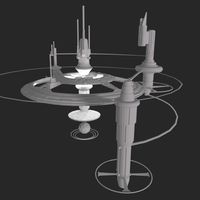
The included "exploded-view" of the model is NOT all the parts, it's just showing the positional relationship of the major components.
Major corrections/modifications:
The center "pod" was significantly narrowed, the windows were moved to the correct position, the cutout above the door was repaired, surface greebles were fixed/added and the underside VTOL engine and the pod landing gear points were correctly positioned. The lowest part of the outer pod detail is still incorrect, but that's on the to-do list!
The front/rear halved body sections were narrowed and had small underside tabs added to make building on a flat surface possible (just line-up the marks and follow the text!) All the existing "tabs" that located the grids were removed and a slot-system was implemented to line them up and make the grid positions more screen-accurate. The "leg" pins were moved to position the legs correctly. Simple surface greebles were added to the tops. VTOL engines underneath were moved to the correct position.
The engines were cleaned-up and significantly shortened The engine bells had some minor detailing added, but need to be re-sized slightly.
The octagonal "legs" were slightly re-proportioned, meaning that some circular greebles are now a bit oval!
The main landing gear was shortened to the "compressed" landed state, not the extended "flying" state they were originally in. alpokemon's original versions are readily available, if desired.
All grids were narrowed, meaning the front side grids have slightly oval tubes! Some new tubes replaced old ones, but the cross-hatch detail is still the old narrowed detail. Rear grids completely rebuilt from scratch, tube size is a bit "thick", but it helps in printing!
Printing/Build Notes:
All parts were printed on a factory-stock Ender 3 Max, using Cura 4.10.0* (see below) and cheap Creality "Ender" PLA filament.
The only part that required support was the cockpit (which is printed vertically, like the main pod), that said, a 75-degree limit was used to minimize the support material to where it was relevant. (FYI, the Ender 3 Max's dual-fan print-head is very good at bridging gaps and printing angled surfaces without support)
All parts, except the cockpit and pod, used a 15% infill. To save filament, an 8% infill was used on the cockpit and pod. The grids did not suffer from not using a 100% infill, I suspect they are too small in cross-section for infill to be used in any case.
A lot of parts, like the grids, have very limited surface area where they contact the printing bed, so brims (see photo) are a good idea to avoid having the parts detach from the bed! That said, the grids, engines and engine bells can be successfully printed without brims, but it's risky (50/50 chance of a failure). The larger parts can generally be printed without brims since it eliminates time-consuming post-printing clean-up.
Since the main parts are simply butt-glued together, a wide flat file is your friend! You want the mating surfaces to be smooth and flat.
Use very little glue on the mating surfaces. Press & hold the joint for a few seconds, then if needed, put drops along the joint-lines and it will wick into the void almost instantly.
Cura 4.10.0 (Windows) is still very "twitchy" when it comes to hanging while slicing. More often than not, it will hang forever and not complete a slice operation. I have found that randomly moving/rotating the part on the Cura "virtual" bed and re-slicing will eventually make the slicing work! Sometimes it takes many tries, YMMV...
It's now about as screen-accurate as practical, but a significant amount more work could be done on fine-tuning surface details (greebles) and still-outstanding corrections.
For those that are curious, I've added a proportional comparison of this model and David Sisson's original 44" studio model (red bars are the same width). The lens and distance used to shoot the photos will distort some aspects, but a few things are now obvious! The engine bells are too large in diameter (now fixed!) and the front/rear body blocks areas might not be quite the right length (hard to tell, the model does match the reference drawing pretty closely...).
I tried to improve upon alpokemon's efforts at making it simple to print/build. I did away with the "alignment cubes" and simply made it that the core of the model can be assembled on a flat surface, using superglue (cyanoacrylate).
The included "exploded-view" of the model is NOT all the parts, it's just showing the positional relationship of the major components.
Major corrections/modifications:
The center "pod" was significantly narrowed, the windows were moved to the correct position, the cutout above the door was repaired, surface greebles were fixed/added and the underside VTOL engine and the pod landing gear points were correctly positioned. The lowest part of the outer pod detail is still incorrect, but that's on the to-do list!
The front/rear halved body sections were narrowed and had small underside tabs added to make building on a flat surface possible (just line-up the marks and follow the text!) All the existing "tabs" that located the grids were removed and a slot-system was implemented to line them up and make the grid positions more screen-accurate. The "leg" pins were moved to position the legs correctly. Simple surface greebles were added to the tops. VTOL engines underneath were moved to the correct position.
The engines were cleaned-up and significantly shortened The engine bells had some minor detailing added, but need to be re-sized slightly.
The octagonal "legs" were slightly re-proportioned, meaning that some circular greebles are now a bit oval!
The main landing gear was shortened to the "compressed" landed state, not the extended "flying" state they were originally in. alpokemon's original versions are readily available, if desired.
All grids were narrowed, meaning the front side grids have slightly oval tubes! Some new tubes replaced old ones, but the cross-hatch detail is still the old narrowed detail. Rear grids completely rebuilt from scratch, tube size is a bit "thick", but it helps in printing!
Printing/Build Notes:
All parts were printed on a factory-stock Ender 3 Max, using Cura 4.10.0* (see below) and cheap Creality "Ender" PLA filament.
The only part that required support was the cockpit (which is printed vertically, like the main pod), that said, a 75-degree limit was used to minimize the support material to where it was relevant. (FYI, the Ender 3 Max's dual-fan print-head is very good at bridging gaps and printing angled surfaces without support)
All parts, except the cockpit and pod, used a 15% infill. To save filament, an 8% infill was used on the cockpit and pod. The grids did not suffer from not using a 100% infill, I suspect they are too small in cross-section for infill to be used in any case.
A lot of parts, like the grids, have very limited surface area where they contact the printing bed, so brims (see photo) are a good idea to avoid having the parts detach from the bed! That said, the grids, engines and engine bells can be successfully printed without brims, but it's risky (50/50 chance of a failure). The larger parts can generally be printed without brims since it eliminates time-consuming post-printing clean-up.
Since the main parts are simply butt-glued together, a wide flat file is your friend! You want the mating surfaces to be smooth and flat.
Use very little glue on the mating surfaces. Press & hold the joint for a few seconds, then if needed, put drops along the joint-lines and it will wick into the void almost instantly.
Cura 4.10.0 (Windows) is still very "twitchy" when it comes to hanging while slicing. More often than not, it will hang forever and not complete a slice operation. I have found that randomly moving/rotating the part on the Cura "virtual" bed and re-slicing will eventually make the slicing work! Sometimes it takes many tries, YMMV...
Similar models
thingiverse
free
Appa's Saddle (Easy Print)
...model are in the same download. in your slicing engine, select "split object into parts" and delete the original model.
thingiverse
free

Lixit compatible bracket & clamps by RRobaldo
...th the ridges running vertically. the bracket was printed flat on it's top surface. i used cura slicer with tree supports.
thingiverse
free

Fan and sensor mount by mousethumb
....
use 3mm screws on all. for the fan i added a nut as a spacer, do not over tighten, it only needs to be "kinda tight"
thingiverse
free

nespresso vertuo pod holders by agccga
...set to grid "that's what i use" .
8% support set to lines "that's what i use" .
prints really well,
thingiverse
free

Blower Fan duct for PrinterBot Simple Metal, vertical, more improvified by lairdb
...n out a few millimeters. i have left the original, but recommend using this version, as there doesn't seem to be a downside.
thingiverse
free
Fireflash from Thunderbirds - early work in progress by gadgetmind
...: 2017-09-09 body and wings now all sliced, so starting on some test prints as i slowly add fixing pegs and update the make file.
thingiverse
free

Ruler wall mount by h_designs
...6 ( doesn't matter)
nozzle temp: 200
bed temp: 60
supports: no ( print flat side down)
bed supports: brim
easy simple print.
thingiverse
free

IKEA Tupplur Pull Handle by LubosD
...clip / pull handle for ikea tupplur blinds, very similar to the original part. part 2 may be a...
thingiverse
free

Deathly Hallows Shadowbox by RhoadesPhoto816
... 50mm/s
printed with a brim at 25 lines
support for the nail hole with 5% density
post script added a filament change at layer 26
thingiverse
free

treelike break-away supports by arobg
...
thingiverse
added "treelike" supports. use a brim option in your slicer to keep the supports on the print surface.

1999
3d_export
$20

mazda rx7 1999
...mazda rx7 1999
3dexport
mazda rx7 1999
turbosquid
$15

human-1999
...turbosquid
royalty free 3d model human-1999 for download as on turbosquid: 3d models for games, architecture, videos. (1174903)
3d_export
$7
neo matrix 1999
...neo matrix 1999
3dexport
neo matrix 1999 под печать
3d_export
free

1999 CAR V12 LMR
...1999 car v12 lmr
3dexport
1999 car v12 lmr
3d_export
$10

1999 Silvia widedbody
...1999 silvia widedbody
3dexport
3d_export
$99

Plymouth Prowler 1999 3D Model
...2002 2-door roadster coupe spider sport racing luxury concept american us
plymouth prowler 1999 3d model humster3d 58411 3dexport
turbosquid
$5

Eagle Transporter Space 1999
...e 3d model eagle transporter (space 1999) for download as max on turbosquid: 3d models for games, architecture, videos. (1152896)
3d_export
$65
Focus HB 1999
...focus hb 1999
3dexport
renders are made in 3ds max 2015 using vray 3.20
3d_export
$99

MercedesBenz Sclass W140 1999 3D Model
...6 1999-2006 4-door saloon sedan full-size luxury mercedes germany
mercedesbenz sclass w140 1999 3d model humster3d 54232 3dexport
3d_export
$69

1999 Jeep Grand Cherokee 3D Model
...1999 jeep grand cherokee car vehicle automobile van suv 4x4 terrarin
1999 jeep grand cherokee 3d model kreations3d 43328 3dexport
Eagle
archibase_planet
free

Eagle
...eagle
archibase planet
eagle hawk eagle bird
eagle n020807 - 3d model for interior 3d visualization.
archibase_planet
free

Eagle
...eagle
archibase planet
eagle bird of prey hawk eagle
eagle 1 - 3d model (*.gsm+*.3ds) for interior 3d visualization.
archibase_planet
free
Eagle
...eagle
archibase planet
bird of prey eagle
eagle 2 - 3d model (*.gsm+*.3ds) for interior 3d visualization.
archibase_planet
free

Eagle
...eagle
archibase planet
eagle bird of prey
eagle 3 - 3d model (*.gsm+*.3ds) for interior 3d visualization.
design_connected
$4
Eagle
...eagle
designconnected
brent comber eagle computer generated 3d model. designed by comber, brent.
3d_export
$10

eagle
...eagle
3dexport
3d_export
$20

amazing eagle
...amazing eagle
3dexport
amazing eagle
3d_export
$10

eagle relief
...eagle relief
3dexport
eagle relief
3d_export
$10
eagle relief
...eagle relief
3dexport
eagle relief
3d_export
$5

eagle clock
...eagle clock
3dexport
eagle clock
Fixed
3ddd
$1
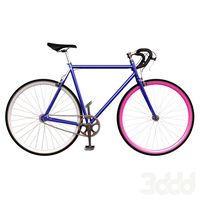
Fixed Gear Велосипед
... fixed , bicycle
классический шоссейный велосипед, переделанный под fixed gear.
design_connected
$16
Idée fixe
...idée fixe
designconnected
jacco maris idée fixe computer generated 3d model. designed by maris , jacco.
3d_export
$5
fixing scale knob
...fixing scale knob
3dexport
fixing scale knob
turbosquid
$10

Mini Fix
...bosquid
royalty free 3d model mini fix for download as sldas on turbosquid: 3d models for games, architecture, videos. (1581558)
turbosquid
$49
fixed bike
... available on turbo squid, the world's leading provider of digital 3d models for visualization, films, television, and games.
turbosquid
$39

Fixed Bicycle
... available on turbo squid, the world's leading provider of digital 3d models for visualization, films, television, and games.
3ddd
$1
Bag Fixed
...bag fixed
3ddd
чемодан
a bag model by me
3ddd
$1
Кресло BEAU FIXE
...fixe
3ddd
beau fixe , ligne roset
кресло beau fixe:
w 80 cm d 106 cm h 97 cm sh 43,5 cm
turbosquid
free

Crowbar "Fixed"
... available on turbo squid, the world's leading provider of digital 3d models for visualization, films, television, and games.
3ddd
$1
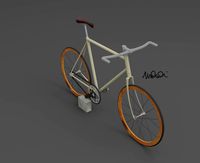
Fixed gear
...fixed gear
3ddd
велосипед
шоссейный велосипед с фиксированной передачей
Easy
design_connected
$16
Easy
...easy
designconnected
sollos easy computer generated 3d model. designed by almeida, jader.
design_connected
$20
Easy
...easy
designconnected
established & sons easy armchairs computer generated 3d model. designed by ed carpenter.
3d_ocean
$1

Easy Button
... it is accurate in close-ups. you can drop this model right into any setting. the textures are included as well as links to do...
design_connected
$16
Easy Armchair
...easy armchair
designconnected
easy armchair computer generated 3d model. designed by jeanneret, pierre.
3ddd
$1
Pouf EASY
... easy
3ds max 2010.v-ray 2.40.03.file formats fbx,obj. pouf desiree 2014 easy. dimensions 100x100x45 cm.
design_connected
$18
Easy Armchair
...easy armchair
designconnected
fsm easy armchair computer generated 3d model. designed by hartmann, markus.
design_connected
$16
Easy Chair
...easy chair
designconnected
magis easy chair computer generated 3d model. designed by seymour, jerszy.
design_connected
$16

Easy Rider
...easy rider
designconnected
bulo easy rider computer generated 3d model. designed by venlet, danny.
design_connected
$11

Easy Footstool
...easy footstool
designconnected
fsm easy footstool computer generated 3d model. designed by hartmann, markus.
design_connected
$18

Doda - Easy
...doda - easy
designconnected
molteni & c doda - easy computer generated 3d model. designed by laviani, ferruccio.
Space
3ddd
free
Space
... space , вытяжка
вытяжка elica space, производство elica evolution
3d_ocean
$19
Space station
...space station
3docean
space station
space station
3d_ocean
$7
Space Fighter
...space fighter
3docean
fighter space
space fighter
turbosquid
$5

space
...e
turbosquid
royalty free 3d model space for download as max on turbosquid: 3d models for games, architecture, videos. (1184221)
turbosquid
$2
Space
...turbosquid
royalty free 3d model space for download as blend on turbosquid: 3d models for games, architecture, videos. (1660625)
3d_ocean
$4
Space Station
...space station
3docean
habitat low poly ship space space ship space station vehicle
space station low poly modelled, not textured.
turbosquid
$2
Space
...royalty free 3d model space for download as max, fbx, and obj on turbosquid: 3d models for games, architecture, videos. (1644726)
turbosquid
$8

Space
...ty free 3d model space for download as c4d, 3ds, fbx, and obj on turbosquid: 3d models for games, architecture, videos. (1521166)
turbosquid
$160
space
... available on turbo squid, the world's leading provider of digital 3d models for visualization, films, television, and games.
turbosquid
$5

Space
... available on turbo squid, the world's leading provider of digital 3d models for visualization, films, television, and games.
1
turbosquid
$69

armchairs(1)(1)
... available on turbo squid, the world's leading provider of digital 3d models for visualization, films, television, and games.
turbosquid
$15

ring 1+1
... available on turbo squid, the world's leading provider of digital 3d models for visualization, films, television, and games.
turbosquid
$10

chair(1)(1)
... available on turbo squid, the world's leading provider of digital 3d models for visualization, films, television, and games.
turbosquid
$8

Chair(1)(1)
... available on turbo squid, the world's leading provider of digital 3d models for visualization, films, television, and games.
turbosquid
$2

RING 1(1)
... available on turbo squid, the world's leading provider of digital 3d models for visualization, films, television, and games.
turbosquid
$1

house 1(1)
... available on turbo squid, the world's leading provider of digital 3d models for visualization, films, television, and games.
turbosquid
$1

Table 1(1)
... available on turbo squid, the world's leading provider of digital 3d models for visualization, films, television, and games.
turbosquid
$59

Formula 1(1)
...lty free 3d model formula 1 for download as max, fbx, and obj on turbosquid: 3d models for games, architecture, videos. (1567088)
design_connected
$11

No 1
...no 1
designconnected
sibast no 1 computer generated 3d model. designed by sibast, helge.
turbosquid
$2

desert house(1)(1)
...3d model desert house(1)(1) for download as 3ds, max, and obj on turbosquid: 3d models for games, architecture, videos. (1055095)
design_connected
$27

...print
designconnected
moroso print computer generated 3d model. designed by wanders, marcel.
3ddd
free

Eichholtz Prints
...- eichholtz print central station i
13 - eichholtz print central station ii
14 - eichholtz print marisa
15 - eichholtz print tish
3ddd
$1

Eichholtz Prints
...print abstract - set of 2
10 - eichholtz print orange abstract
11 - eichholtz print buddha right
12 - eichholtz print buddha left
turbosquid
$1

... available on turbo squid, the world's leading provider of digital 3d models for visualization, films, television, and games.
3ddd
free

Eichholtz Prints
...of 4
2 - print dunbar 2 set of 4
3 - print guadeloupe 1 set of 4
4 - print guadeloupe 2 set of 4
5 - print giles
6 - print trett
3ddd
$1

Eichholtz Prints
...nt tutti frutti
3 - eichholtz prints watson - set of 2
4 - eichholtz prints antique nautilus - set of 2
5 - eichholtz print tiara
3d_export
$5

Monster for printing
...monster for printing
3dexport
monster 3d model printing
3ddd
free

printed rug
...printed rug
3ddd
ковер
very creative printed rug
3ddd
free

Eichholtz Prints
...иал: бумага
габариты (вхш): 72 x 62 см
описание: print sweetmeat - постер в деревянной раме.
3 - prints varsity set of 2
арти
3ddd
free

Art Print Posters
...art print posters
3ddd
прованс
art print posters by patrician prints