Thingiverse
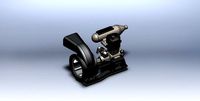
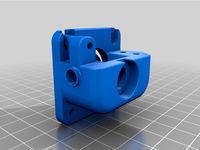
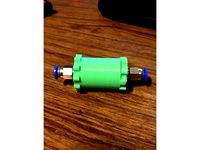
E3D V6 Volcano + Blower + Proximity Sensor Bowden Mount by WayneWeng
by Thingiverse
Last crawled date: 2 years, 12 months ago
Hot end mount on x-carrier like Prusa i3 or similar stuff.
SpecificationMounting Hole: M3 bolts, 25mm or 30mm center to center distance.Hot End: E3D V6 Volcano or standard heat block.Heat Sink Cooling: 40mm Axial Fan with this Fan Duct or 30mm Axial Fan with standard E3D Fan DuctFilament Cooling: 5015 Blower like THIS with the designed blower duct.Auto Bed Leveling Probe: 12mm diameter Inductive Proximity Sensor.
NOTES
I wish to design this mount for both E3D V6 Volcano and Standard heat block. And the only thing to do is just to change different blower duct. It only matters of height in order to make the air blown to beneath the nozzle. But currently only blower duct for volcano was designed (I use volcano.) For standard heat block, blower duct will be added soon!
For heat sink cooling, I've tried 30mm axial fan and It's not making good thermal condition. Simply because it does not supply enough air pressure to push air through heat sink.
Therefore, I stick with 40mm fan just like for my V5. Now I'm using 4028 axial fan like FFB0412UHN-SP4Z
and it has better performance, not letting the hot end to warm up on the top of heat sink. But it's quite noisy though.
For filament cooling, I use BFB0512HH-F00. Larger air flow than other brand 5015 fan.
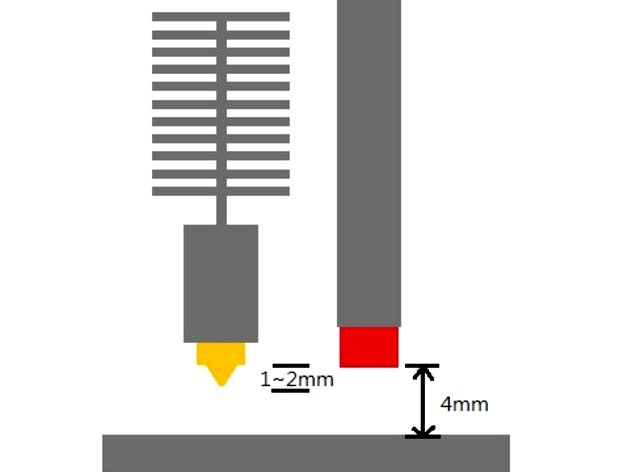
For auto bed leveling, I use FOTEK PM12-04N Inductive Proximity Sensor. With 4mm metal trigger distance. Other brands may work as well. It can't be used on a glass surface. Print bed must be metal. Aluminium works but with trigger distance shorter. But it still provides enough distance margin for probing and prevent the probe from hitting things while printing. You need to adjust it carefully before it goes on probing. The nozzle must sit somewhere between probe and bed surface. Make sure:
When z height drops to the point where the probe triggers, that nozzle doesn't touch the bed surface.
When printing starts, nozzle goes down close to the bed surface. You don't want the probe to touch the bed and it should be higher than the nozzle.
The probe might have LED indicators. Otherwise, use G code M119 to check probe status.
For the wiring, because mostly these sensors are powered from above 10VDC. We need to make sure output doesn't go above 5V(for arduino). Though the probe is NPN Normal Open Output type, it still may have internal pull-up resistors with a large value. Therefore, we should limit the output voltage with something like diode 1n4148 or so. I use the wiring from the picture. I didn't place a external diode. Instead, I rely on the internal IO pin protection diode in most digital IOs. It should limit the voltage quite safely. Thus, I don't need any external components from this setup. You could still leave the external diode there for more safety, it's fine. And for those powering with 24VDC, I presume it will still be OK(Quite a small current flow through the large internal pull-up resistor), but let's not make conclusions yet.(If you have experimented to prove OK, I'll be glad for you!)
Video:FAN DEMOProbing and Printing
SpecificationMounting Hole: M3 bolts, 25mm or 30mm center to center distance.Hot End: E3D V6 Volcano or standard heat block.Heat Sink Cooling: 40mm Axial Fan with this Fan Duct or 30mm Axial Fan with standard E3D Fan DuctFilament Cooling: 5015 Blower like THIS with the designed blower duct.Auto Bed Leveling Probe: 12mm diameter Inductive Proximity Sensor.
NOTES
I wish to design this mount for both E3D V6 Volcano and Standard heat block. And the only thing to do is just to change different blower duct. It only matters of height in order to make the air blown to beneath the nozzle. But currently only blower duct for volcano was designed (I use volcano.) For standard heat block, blower duct will be added soon!
For heat sink cooling, I've tried 30mm axial fan and It's not making good thermal condition. Simply because it does not supply enough air pressure to push air through heat sink.
Therefore, I stick with 40mm fan just like for my V5. Now I'm using 4028 axial fan like FFB0412UHN-SP4Z
and it has better performance, not letting the hot end to warm up on the top of heat sink. But it's quite noisy though.
For filament cooling, I use BFB0512HH-F00. Larger air flow than other brand 5015 fan.
For auto bed leveling, I use FOTEK PM12-04N Inductive Proximity Sensor. With 4mm metal trigger distance. Other brands may work as well. It can't be used on a glass surface. Print bed must be metal. Aluminium works but with trigger distance shorter. But it still provides enough distance margin for probing and prevent the probe from hitting things while printing. You need to adjust it carefully before it goes on probing. The nozzle must sit somewhere between probe and bed surface. Make sure:
When z height drops to the point where the probe triggers, that nozzle doesn't touch the bed surface.
When printing starts, nozzle goes down close to the bed surface. You don't want the probe to touch the bed and it should be higher than the nozzle.
The probe might have LED indicators. Otherwise, use G code M119 to check probe status.
For the wiring, because mostly these sensors are powered from above 10VDC. We need to make sure output doesn't go above 5V(for arduino). Though the probe is NPN Normal Open Output type, it still may have internal pull-up resistors with a large value. Therefore, we should limit the output voltage with something like diode 1n4148 or so. I use the wiring from the picture. I didn't place a external diode. Instead, I rely on the internal IO pin protection diode in most digital IOs. It should limit the voltage quite safely. Thus, I don't need any external components from this setup. You could still leave the external diode there for more safety, it's fine. And for those powering with 24VDC, I presume it will still be OK(Quite a small current flow through the large internal pull-up resistor), but let's not make conclusions yet.(If you have experimented to prove OK, I'll be glad for you!)
Video:FAN DEMOProbing and Printing
Similar models
thingiverse
free

E3D V6 30mm heatsink fan 30mm volcano Fan Ducts by zerosl
...s by zerosl
thingiverse
i designed a 30mm fan duct for my volcano nozzle. it attaches to the existing v6 heatsink fan
print with
thingiverse
free
SK-Go invisible hotend cooling duct e3d v6 (note: Precision Piezo users only) by superhans
...onto the heat sink and heater block.
the matching part cooling fan duct from the photo: https://www.thingiverse.com/thing:4700411
thingiverse
free

E3D V6 40mm Triple Fan Blower Duct by wooddragon48
...mm long m3 screw, nut and washers for extra clamping. the center fan can be either 10mm or 20mm thick if extra cooling is needed.
thingiverse
free

Anet A6 Fan Duct and Proximity Sensor Holder for E3D v6 by chekcian
...d e3d v6 heatsink. works flawlessly with e3d v6 clone all metal hotend without jam when used with pla. also tested on abs
enjoy
thingiverse
free

E3D V6 Cooling Fan Duct for 30mm fan by RaymondHOPK
...n duct for 30mm fan by raymondhopk
thingiverse
e3d v6 cooling fan duct for 30mm fan
update: ver3 only use 2 screws to install.
grabcad
free

Voron Afterburner V6 Volcano
...;t included the rest of the parts as they can be found on the voron github here: https://github.com/vorondesign/voron-afterburner
thingiverse
free

Delta Smart Effector dual 40mm blower cooling system by 3dprintbase
...i can't test even if make for the volcano. i'm sharing fusion 360 and other files, someone with the volcano can remix it.
thingiverse
free

Minimalist E3D 40mm Part cooling duct by DEJello
...rse
i remixed the blower fan cooling duct from media man's minimalist e3d v6 mount to accept a 40mm silent fan. works great.
thingiverse
free

E3D V6 Fan Duct 30mm 40mm fans by thaug29
...e3d v6 fan duct 30mm 40mm fans by thaug29
thingiverse
fan duct for e3d v6. uses 30mm fan and 40mm fan.
thingiverse
free

E3D V6 cooler fan and blower duct by joy1
...w on pla.
to use this system, make sure fan are installed right way. hot-end fan has to blow and blower fan have to suck the air.
Wayneweng
thingiverse
free

QCopterNano Motor Holder by WayneWeng
...qcopternano motor holder by wayneweng
thingiverse
7mm motor holder for qcopternano.
githubhackpad
thingiverse
free

3cm fan cover by WayneWeng
...3cm fan cover by wayneweng
thingiverse
protection cover for generic 3cm fan.
thingiverse
free

LED Light mount angle roatary. by WayneWeng
...led light mount angle roatary. by wayneweng
thingiverse
led light mount angle roatary.
thingiverse
free
Speaker vibration damp by WayneWeng
...3 of this and place underneath your speaker cabinet with a sheet of soft rubber will dampen out vibrations on your shelves/desks.
thingiverse
free

Push Button Switch by WayneWeng
...tton switch by wayneweng
thingiverse
couldn't find a nice model of this.
so i created one.
2.5mm pin pitch. 6mm row distance
thingiverse
free

Sidney Big 3DP parts by WayneWeng
...parts by wayneweng
thingiverse
including some useful endstop switch mount for 4040 aluminium extrusions.
z max end stop mount.
thingiverse
free

Songle Relay SPDT MODEL by WayneWeng
...odel by wayneweng
thingiverse
a relay 3d model of songle 5 pin srd-05vdc-sl-c.
songle relay spdt model.
step file available.
thingiverse
free

Wade's extruder idler with tube fitting by WayneWeng
...ube fitting by wayneweng
thingiverse
wade's extruder idler with tube fitting,
for those who had their filament fed remotely.
thingiverse
free

Servo Z probe arm customizable by WayneWeng
...
servo z probe arm customizable
based on sg90s or mg90
updated:
v1.1 : shaft geometry defined, printed and tested.
length 6 cm.
thingiverse
free
Magnetic Honeycomb Hex Bit Box 6.35mm by WayneWeng
...ayneweng
thingiverse
a simple box for hex screw bit storage, in a honeycomb style.
magnetic attachment to metal.
magnet: 10x2 mm
Proximity
3d_export
$5

side table proximity
...side table proximity
3dexport
64 x 64 x h. 37,5 cm https://www.eichholtz.com/ru/side-table-proximity-114398.html
turbosquid
$5

Proximity Land Mine
...d model proximity land mine for download as png, tga, and obj on turbosquid: 3d models for games, architecture, videos. (1265367)
3d_export
$14

proximity nesting tables
...mall:<br>width: 36,83 cm<br>depth: 36,83 cm<br>height: 55,88 cm<br>scene objects are organized by groups.
3d_ocean
$12

Alrisha Pendant Lamp
...of aluminum twisted ribbons held in place in close proximity to the...
3d_export
$7
Tibial Intramedullary Nail
...e. solidworks 2017 modeled and 3d studio max 2018 version attached too. rendered with keyshot 7. many file formats are available.
3d_export
$5
6 conifer topiary trees
...ats<br>3ds max - vray / corona<br>cinema 4d - vray / standard<br>blender<br>obj<br>fbx<br>stl
3d_export
$5

Cocos Palm Trees
...ats<br>3ds max - vray / corona<br>cinema 4d - vray / standard<br>blender<br>obj<br>fbx<br>stl
3d_export
$5

Winter paper birch tree forest
...ats<br>3ds max - vray / corona<br>cinema 4d - vray / standard<br>blender<br>obj<br>fbx<br>stl
3d_export
$5

Winter Juniperus virginiana with snow
...ats<br>3ds max - vray / corona<br>cinema 4d - vray / standard<br>blender<br>obj<br>fbx<br>stl
3d_export
$5

Winter and Summer Pinus Pinea Trees
...ats<br>3ds max - vray / corona<br>cinema 4d - vray / standard<br>blender<br>obj<br>fbx<br>stl
Volcano
3d_export
$10

volcano
...volcano
3dexport
erupting volcano for 3d printing
3d_export
$5

volcano
...volcano
3dexport
an erupting volcano with lava flows
design_connected
$11
Volcano
...volcano
designconnected
chista volcano computer generated 3d model.
3d_export
free

volcano
...volcano
3dexport
a volcano surrounded by stones<br>perfect for simple, unre demanding games
3d_export
$10

temple in volcano
...temple in volcano
3dexport
temple in volcano for 3d printing
turbosquid
$8

Volcano
... free 3d model volcano for download as fbx, stl, obj, and dae on turbosquid: 3d models for games, architecture, videos. (1664127)
turbosquid
$40

volcano
... available on turbo squid, the world's leading provider of digital 3d models for visualization, films, television, and games.
turbosquid
$5

Volcano
... available on turbo squid, the world's leading provider of digital 3d models for visualization, films, television, and games.
turbosquid
$5

Volcano
...e 3d model volcano for download as ma, max, fbx, obj, and stl on turbosquid: 3d models for games, architecture, videos. (1567779)
3d_export
free

volcano
...volcano
3dexport
low poly volcano<br>.blend<br>.obj<br>if you feel any problem, please message.
Blower
3d_export
$5
ball blower
...ball blower
3dexport
ball blower
3d_export
$10
engine blower assambly
...engine blower assambly
3dexport
engine blower assambly
3d_export
$5
air pipe blower
...air pipe blower
3dexport
air pipe blower
3d_export
$5
air hand blower
...air hand blower
3dexport
air hand blower
3d_export
$5
Blower Boom 3D Model
...blower boom 3d model
3dexport
boom blower
blower boom 3d model bkl1989 63079 3dexport
turbosquid
$44
blower-dxf
... available on turbo squid, the world's leading provider of digital 3d models for visualization, films, television, and games.
turbosquid
$39

Old Blower
...l old blower for download as ma, max, gltf, fbx, obj, and stl on turbosquid: 3d models for games, architecture, videos. (1638848)
3d_export
$7
zy series centrifugal blower
...zy series centrifugal blower
3dexport
zy series centrifugal blower
3d_export
$5
root blower compressor
...oot blower compressor
3dexport
you will get both .stl and .sldprt format of root blower compressor from here at very cheap rate.
turbosquid
$5
V8 engine with blower
... available on turbo squid, the world's leading provider of digital 3d models for visualization, films, television, and games.
Bowden
turbosquid
$199
Vintage Ben Bowden Spacelander bike
... available on turbo squid, the world's leading provider of digital 3d models for visualization, films, television, and games.
3ddd
$1

Manooi Artica
...and pendants in various sizes and forms. suspension: galvanized bowden - dia. 1,5 mm. bulb: max 60 w -...
thingiverse
free
Remix Compact Bowden extruder - m6 bowden couplers and bowden tube pass-through
...ouplers and bowden tube pass-through
thingiverse
remix compact bowden extruder - m6 bowden couplers and bowden tube pass-through
thingiverse
free

Bowden Extruder
...bowden extruder
thingiverse
i have created bowden extruder for flsun delta 3d printer.
thingiverse
free

bowden 3mm by spee_D
...bowden 3mm by spee_d
thingiverse
for bowden 3mm
thingiverse
free
Bowden Tube Cutter
...bowden tube cutter
thingiverse
bowden tube cutter
thingiverse
free
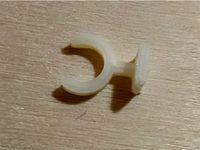
Customizable Bowden Clip
...customizable bowden clip
thingiverse
customizable bowden clip
thingiverse
free
Bowden Oiler by fcheshire
...bowden oiler by fcheshire
thingiverse
inline bowden oiler
thingiverse
free

Bowden adapter by helkaroui
...bowden adapter by helkaroui
thingiverse
this is a fixed bowden adapter
thingiverse
free

Adventure3 Bowden Clip
...adventure3 bowden clip
thingiverse
adventure3 bowden clip
E3D
cg_studio
free

e3d model
...e3d model
cgstudio
- e 3d model, royalty free license available, instant download after purchase.
turbosquid
$2

Syringe C4D (E3D Ready)
...lty free 3d model syringe c4d (e3d ready) for download as c4d on turbosquid: 3d models for games, architecture, videos. (1336720)
turbosquid
$12

Microphone USB E3D and C4D
...ree 3d model microphone usb e3d & c4d for download as c4d on turbosquid: 3d models for games, architecture, videos. (1568216)
cg_studio
$35
Picture Frame Style E3d model
...
cgstudio
.3ds .max .obj .wrl - picture frame style e 3d model, royalty free license available, instant download after purchase.
cg_studio
$10

EVE from cartoon WALL-E3d model
...3d model
cgstudio
.3ds .max - eve from cartoon wall-e 3d model, royalty free license available, instant download after purchase.
cg_studio
$45
WW2 Pz VI Tiger SdKfz 181 Ausf. E3d model
....lwo .ma .max .obj - ww2 pz vi tiger sdkfz 181 ausf. e 3d model, royalty free license available, instant download after purchase.
3d_ocean
$6

Love Heart Element 3D & Cinema4D
...red heart romance valentines simple project simple heart models e3d files, cinema 4d files & obj files step 1...
3d_export
$14

Xiaomi mi band 6
...360. materials for rendering are configured in keyshot, v-ray, e3d blender. the keyshot has 6 strap colors configured. there...
3d_export
$20

apple airpods 3
...max vray, keyshot, e3d. - formats: 3dm, aep, bip, e3d f3d, iges, ksp, max 2013, max 2016, obj, fbx,...
3d_export
$20
Samsung galaxy tab s8 ultra
...blue, beige, white, black, graphite. - in blender and e3d one color of the model is configured, graphite. -...
V6
3d_export
$100

v6 engine
...engine
3dexport
complete v6 engine modeled on solidworks 2017 along with .stl, .sldprt and .sldasm of all th parts and assembly.
3d_export
$10

V6 engine
... the first v6 engines were designed and produced independently by marmon motor car company, deutz gasmotoren fabrik and delahaye.
3d_export
$35

v6 engine
...s a complete model of a v6 engine containing over 400 components. you can contact me for a video of all the components assembling
3d_export
$10

v6 engine
...v6 engine
3dexport
turbosquid
$25

Bed1001-v6
... available on turbo squid, the world's leading provider of digital 3d models for visualization, films, television, and games.
turbosquid
$22

Chair2-v6
... available on turbo squid, the world's leading provider of digital 3d models for visualization, films, television, and games.
turbosquid
$20

V6.mb
... available on turbo squid, the world's leading provider of digital 3d models for visualization, films, television, and games.
3d_export
$20

V6 engine
...rovided in this package is all the parts in sldprt format and assembly in sldasm format. i can also convert the format on demand.
3ddd
$1

Стол V6
...6" в стиле дизельпанк изготовлен из блока двигателя, 4х поршней и 4х шатунов.
столешница изготовлена из стекла толщиной 8мм.
cg_studio
$199

V6 VVTi3d model
...v6 vvti3d model
cgstudio
.3ds - v6 vvti 3d model, royalty free license available, instant download after purchase.
Sensor
3d_export
free

parking sensor
...parking sensor
3dexport
car parking sensor
turbosquid
$1

Sensor
... available on turbo squid, the world's leading provider of digital 3d models for visualization, films, television, and games.
3d_export
$5

Smoke sensor
...port
smoke sensor, can be an impressive element for your projects. easy to use, realistic image, low polygon, quality materials.
3d_export
$5

Air Quality Sensor v1
...air quality sensor v1
3dexport
air quality sensor v1
3d_export
$15

float sensor
...e up render. - all parts and materials are logically named. other formats ================= - collada (.dae) - autodesk fbx - obj
turbosquid
$26

Wind sensor C
...free 3d model wind sensor c for download as 3ds, obj, and fbx on turbosquid: 3d models for games, architecture, videos. (1328943)
turbosquid
$26

Wind sensor B
...free 3d model wind sensor b for download as 3ds, obj, and fbx on turbosquid: 3d models for games, architecture, videos. (1328168)
3d_export
$5

ultrasound sensor
...ivers convert ultrasound into electrical signals, and transceivers can both transmit and receive ultrasound. export in: -obj -fbx
3ddd
free

Вытяжка Shindo pallada sensor
... вытяжка
вытяжка shindo pallada sensor. в двух размерах - 600 и 900. текстуры в комплекте.
turbosquid
$52

Wind sensor A B C
...
royalty free 3d model wind sensor a b c for download as fbx on turbosquid: 3d models for games, architecture, videos. (1408406)
Mount
3d_export
free

mounting bracket
...mounting plate is the portion of a hinge that attaches to the wood. mounting plates can be used indoors, cabinetry and furniture.
turbosquid
$2

MOUNTING
... available on turbo squid, the world's leading provider of digital 3d models for visualization, films, television, and games.
turbosquid
free

Mounts
... available on turbo squid, the world's leading provider of digital 3d models for visualization, films, television, and games.
turbosquid
free

Mount Fuji
...fuji
turbosquid
free 3d model mount fuji for download as obj on turbosquid: 3d models for games, architecture, videos. (1579977)
3d_export
$5

Headphone mount LR
...headphone mount lr
3dexport
headphone mount l+r
turbosquid
$39

Mount rainier
...quid
royalty free 3d model mount rainier for download as fbx on turbosquid: 3d models for games, architecture, videos. (1492586)
turbosquid
$5

pipe mounting
...quid
royalty free 3d model pipe mounting for download as obj on turbosquid: 3d models for games, architecture, videos. (1293744)
turbosquid
$3

Mounting Tires
...uid
royalty free 3d model mounting tires for download as fbx on turbosquid: 3d models for games, architecture, videos. (1708511)
3d_export
$5

Magnetic GoPro Mount
...pro mount
3dexport
cool magnetic mount for gopro. allows you to mount the camera on flat metal surfaces and get exclusive shots.
turbosquid
$5

Stone Mount
...ty free 3d model stone mount for download as ma, obj, and fbx on turbosquid: 3d models for games, architecture, videos. (1370306)