Thingiverse
E3D V6 and V6 LITE adapter for Printrbot Simple 1405 by mrAkuaku
by Thingiverse
Last crawled date: 3 years ago
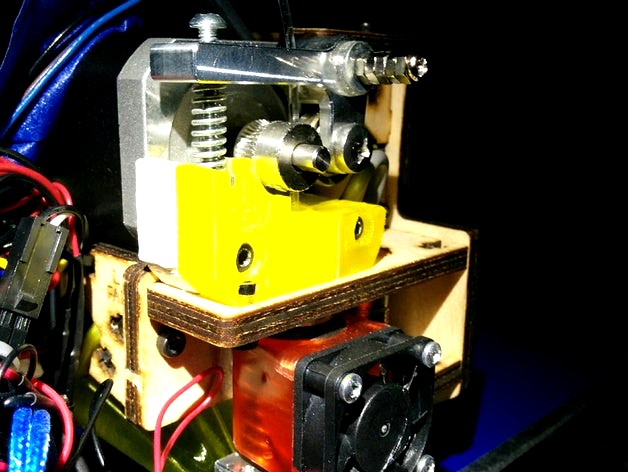
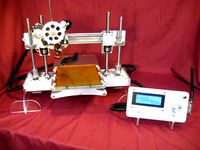
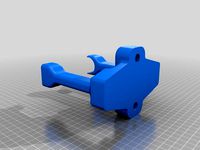
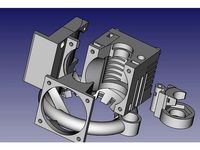
This is an adapter for the E3D V6 and V6LITE for the Printrbot Simple 1405 Makers kit. It was modified from and requires a few more parts than this http://www.thingiverse.com/thing:559657, but you don't have to glue anything to you hotend, allowing for easier PTFE adjustments.
Additional required parts for mod
Printrbot simple
E3D V6 or V6LITE
top piece and hardware of Printrbot Alu Extruder (If you don't have the top piece of the exturder, a STL for one can be downloaded here: https://www.youmagine.com/designs/printrbot-alu-extruder#information).
Instructions:
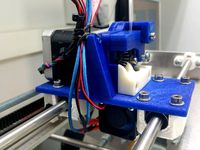
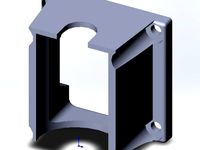
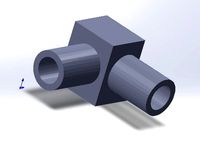
Print out all pieces with your current hotend (or have them printed for you). *Fan needed to be rotated on its Y axis by 245 degrees.
Cut away walls that are 0.4mm thick that were included as support material.
Use some needle nose pliers, angle cutters and/or forceps in difficult to reach areas.
Swap old cooling fan out for new one
Place 3 3M nuts in exturder along bottom of it
Use 3M bolt to secure front left and back piece of extruder to E stepper motor.
Pop in assembled E3D hotend (the overhang of the back piece of the extruder should help hold it in place for now.
Slide in front right piece of extruder to front left piece, then secure to E stepper motor.
Adjust Auto-level probe (http://printrbot.com/project/simple-metal/)
Flash Your Printrbot with Marlin firmware with a version that uses the type of thermistor E3D uses.
If your frame starts driving itself into the print bed (the frame hit one of the M3 screws on the last probing point), adjust your printer max X position, or probing points.
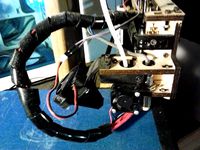
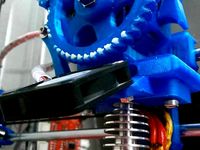
Wiring notes:
I still wanted to be able to swap my current hotend, but I didn't have the required connectors to do so. So what I did was use male (or female where needed) 22awg (maybe that's a bit thin for the hotend) "premium breadboard connectors" and cut them close to the connector, then soldered them to the hotend wires. These could then be fitted to the molex connectors (some needed one corner to be cut in order to fit.. I did this with a utility knife).
Additional required parts for mod
Printrbot simple
E3D V6 or V6LITE
top piece and hardware of Printrbot Alu Extruder (If you don't have the top piece of the exturder, a STL for one can be downloaded here: https://www.youmagine.com/designs/printrbot-alu-extruder#information).
Instructions:
Print out all pieces with your current hotend (or have them printed for you). *Fan needed to be rotated on its Y axis by 245 degrees.
Cut away walls that are 0.4mm thick that were included as support material.
Use some needle nose pliers, angle cutters and/or forceps in difficult to reach areas.
Swap old cooling fan out for new one
Place 3 3M nuts in exturder along bottom of it
Use 3M bolt to secure front left and back piece of extruder to E stepper motor.
Pop in assembled E3D hotend (the overhang of the back piece of the extruder should help hold it in place for now.
Slide in front right piece of extruder to front left piece, then secure to E stepper motor.
Adjust Auto-level probe (http://printrbot.com/project/simple-metal/)
Flash Your Printrbot with Marlin firmware with a version that uses the type of thermistor E3D uses.
If your frame starts driving itself into the print bed (the frame hit one of the M3 screws on the last probing point), adjust your printer max X position, or probing points.
Wiring notes:
I still wanted to be able to swap my current hotend, but I didn't have the required connectors to do so. So what I did was use male (or female where needed) 22awg (maybe that's a bit thin for the hotend) "premium breadboard connectors" and cut them close to the connector, then soldered them to the hotend wires. These could then be fitted to the molex connectors (some needed one corner to be cut in order to fit.. I did this with a utility knife).
Similar models
thingiverse
free
printrbot simple 1405 E3d lite6 mount by zackMcMurrin
... also added the custom mount i use for mounting the e3d lite hotend, it could be improved upon.
update: added thicker fan shroud.
thingiverse
free

Printrbot Simple Alu Fitting for 10mm Bowden screwin coupler by klop2031
...use the screwin coupler with the alu extruder that comes with the e3d v6.
settings i used:
print at 0.2mm layer height
30% infill
thingiverse
free

Printrbot 1405 Tri Rod Mod Short (For hotends like the e3d v6) by Foolish_Dave
...nation of jonlawrence's short extruder mount for the no sag mod with threefer's tri rod mod. should work with the e3d v6.
thingiverse
free

Precision Piezo and E3D V6, holder for E3D V6 and one touch connector by YMita
...touch connector which holds teflon tube.
i use precision piezo - piezo20 hotend z probe https://www.thingiverse.com/thing:2319993
thingiverse
free

AIO volcano e3d v6 pop off with probe
... with left side 40mm to 30 mm front fan to 18mm right side probe cut wire clip and just pull off hotend. made it for ease of use.
thingiverse
free

Printrbot 1405 E3D v6 Bowden Mount by Raptorfx
...ons on the main part and added the missing hole for the bed-leveling probe.
update 18.10.2014
final changes, fits perfectly now
thingiverse
free

Printrbot simple E3D by Jfv
...#39;t any need to modify the old printrbot fan that you use to cool down the pla.
update - now you can add auto-leveling probe
thingiverse
free

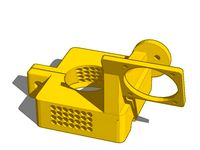
Direct Drive Holder for E3D Hotend & Exturder by CarolHaz391
...carolhaz391
thingiverse
this is my version of a direct drive set up for an e3d v6 hotend. it is very simple and easy to install.
thingiverse
free

Printrbot Simple 1405 E3D v6 Fan Shroud Mk. VII by ItsJustMidnight
...ds to be rotated sideways, with the heater cartridge between the nozzle and the leveling probe.
let me know about your results.
thingiverse
free
Solidoodle Bowden Extruder Mount for e3d v6 with servo probe by airfield20
... sanded (i got away with rubbing them together really fast) and hot glued on. as will the servo. i use this setup as of 12/13/16.
Mrakuaku
thingiverse
free

Printrbot_leveling_screw_remix by mrAkuaku
...he heads of my m3 bolts. i just trimmed a bit off the top and bottom to make it easier to tighten them with an adjustable wrench.
thingiverse
free

Coupler 5mm to 5mm for Stepper motor by mrAkuaku
... to 5mm for stepper motor by mrakuaku
thingiverse
this is a small coupler i made. it uses 3m nuts and bolts and fits 5mm to 5mm.
thingiverse
free

Snip cover by mrAkuaku
... made this cap and clip. you only need one of them to hold your snips closed, the cap is more durable, but takes longer to print.
thingiverse
free

Double Shepherd's whistle by mrAkuaku
...hingiverse.com/thing:360499
this one plays a deeper and louder bass sound, but can't hit the same high notes as the original.
thingiverse
free

Coupler 5mm to 8mm for stepper motor by mrAkuaku
...
thingiverse
this is a small coupler i made. it uses 3m nuts and bolts and fits 5mm to 8mm.
print 100% infill
layer height 0.3
thingiverse
free

Night-light Tap-light by mrAkuaku
...p-light night-light/mood-light
here's a link to that project.http://www.instructables.com/id/beautiful-tap-light-night-light/
thingiverse
free

2 Piece coupler 8mm to 5mm by mrAkuaku
...this coupler is held together with 4 m3 screws and 4 m3 nuts.
... haven't tried printing it out yet, but it should work fine.
thingiverse
free

Needle nose pliers cap by mrAkuaku
...'s a cap for some small needle nose pliers. i didn't like how they always stayed open a bit when i wasn't using them.
thingiverse
free

Luer lock by mrAkuaku
... outside ring needs to be scaled up.
it would probably be good to print with a higher resolution printer, like an sla one though.
thingiverse
free

Shepherd's whistle by mrAkuaku
...er 18, 2014: uploaded gcode of improved whistle because current version of repetier and slic3r aren't working as well for it.
1405
thingiverse
free

Printrbot 1405 Filament Guide by Meek66e
...printrbot 1405 filament guide by meek66e
thingiverse
a simple filament guide for the printrbot simple 1405.
thingiverse
free
Holder for Printrbot 1405 by AlexKhil85
...holder for printrbot 1405 by alexkhil85
thingiverse
keep one of them (wires with spiral tube)
thingiverse
free

Printrbot Simple 1405 Fan Shroud by beyersito
... beyersito
thingiverse
work in progress of fan shroud for the old simple 1405, have to print it and test fit, but it should work
thingiverse
free
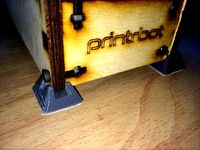
1405 Feet by brentevjen
...e underneath if you need to! you'll need 4 for an entire set.
made with tinkercad.
(my first upload to thingiverse yay!)
thingiverse
free

Printrbot Simple 1405 Adjustable YZ Plate by iamjonlawrence
...e yz plate by iamjonlawrence
thingiverse
this is for the 1405 version of the printrbot simple. please see source for more info.
thingiverse
free

Printrbot Simple Maker 1405 Extruder Handle by 3Dlirious
...andle by 3dlirious
thingiverse
this is a simple remix of http://www.thingiverse.com/thing:507944/ to fit the wooden simple 1405.
thingiverse
free

Printrbot 1405 Handle by bread_bird
...the z-axis.
please note that i cannot be responsible for any damage to the printer that results from the use of this accessory.
thingiverse
free

1405 Simple X Ends by iamjonlawrence
... "rodendclamp1405-oriented.stl" which will fit on a 100mmx100mm build plate. you will need to turn off brim and skirt.
thingiverse
free
Printrbot Simple 1405 upgrade to 10mm Z by lukewin8
... z by lukewin8
thingiverse
work in progress
upgrade your printrbot simple 1405 with this 10mm z upgrade.
standard 3d parts used
thingiverse
free

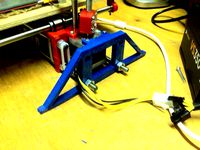
Rear leg Printrbot 1405 by mikei
...rights for the width of the printrbot. the original and the front legs can be found here:http://www.thingiverse.com/thing:350256
Lite
thingiverse
free

DS Lite Stylus
...ds lite stylus
thingiverse
ds lite stylus.
thingiverse
free

Huawei p20 Lite
...huawei p20 lite
thingiverse
great docking station for huawei p20 lite.
thingiverse
free
Lite Kroozer by Tsubureru
...lite kroozer by tsubureru
thingiverse
lite kroozer suitable for battlefleet gothic or similar space games.
thingiverse
free

Hornet XTpro Lite by Lynxtouchl5210
...hornet xtpro lite by lynxtouchl5210
thingiverse
a slinghsot that is lite :)
thingiverse
free

GoPro Lite Mount by DonMigel
...gopro lite mount by donmigel
thingiverse
gopro lite mount
thingiverse
free

MAG-LITE HOLDER by Sautech
...mag-lite holder by sautech
thingiverse
mag-lite holder
thingiverse
free

DS Lite Volume Slider
...ds lite volume slider
thingiverse
ds lite volume slider.
thingiverse
free

Taranis x9 Lite things
...taranis x9 lite things
thingiverse
somethings to taranis x9 lite
thingiverse
free

wind5 Lite by NoxesOne
...wind5 lite by noxesone
thingiverse
.
thingiverse
free

Huawei P30 Lite Case
...huawei p30 lite case
thingiverse
this is the case for cell phone huawei p30 lite.
Printrbot
thingiverse
free

printrbot gasket by Usernameunavailible
...printrbot gasket by usernameunavailible
thingiverse
a part for printrbots
thingiverse
free
Printrbot Aluminum by Chris_the_Carpenter
...printrbot aluminum by chris_the_carpenter
thingiverse
a redesign of the awesome printrbot, in aluminum.
thingiverse
free
PrintrBot keychain by SuperMaku
...printrbot keychain by supermaku
thingiverse
printrbot keychain. may need to be scaled up.
thingiverse
free
Printrbot foot by aliekens
...printrbot foot by aliekens
thingiverse
add wider feet to a printrbot for improved stability.
thingiverse
free
Printrbot to CNC by mmrrsiam
...printrbot to cnc by mmrrsiam
thingiverse
make your printrbot also a small cnc machine....
thingiverse
free

Printrbot Keychain by jackbivona
...printrbot keychain by jackbivona
thingiverse
printrbot keychain for all you pb customers out there
thingiverse
free

Printrbot+ Nutkeepr by DonaldJ
...printrbot+ nutkeepr by donaldj
thingiverse
clip to retain nut on z-axis threaded rod of printrbot+
thingiverse
free

PrintrBot Tool Caddy by spr_consulting
...printrbot tool caddy by spr_consulting
thingiverse
printrbot tool caddy.
thingiverse
free
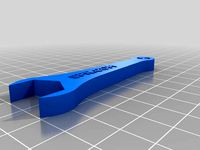
Printrbot Sensor Wrench by spr_consulting
...printrbot sensor wrench by spr_consulting
thingiverse
curvaceous printrbot sensor wrench.
thingiverse
free
Spool Holder for Printrbot by doubleAdoubleU
...spool holder for printrbot by doubleadoubleu
thingiverse
spool holder for a printrbot simple metal
V6
thingiverse
free
clip intercomunicador v6 // intercom clip v6 by javitoraz
...v6 by javitoraz
thingiverse
clip para soporte de intercomunicador v6 casco moto //clip for intercom support v6 motorcycle helmet
thingiverse
free

E3D V6
...e3d v6
thingiverse
just another remix with the belt mounting points raised 5mm. not tested yet as i still do not have a v6.
thingiverse
free

3D model E3D V6 extruder
...3d model e3d v6 extruder.
e3d v6 radiator
e3d v6 volcano nozzle
e3d v6 heat break
e3d v6 heater block
e3d v6 volcano heater block
thingiverse
free

ROBOT V6 SANTINO by chirimbolo
...robot v6 santino by chirimbolo
thingiverse
robot v6
thingiverse
free

Nut V6
...ogeqn5jnbdayqq
motherboard capacitors 1000uf 16v low esrhttps://www.ebay.com.au/itm/173841745704
donatehttp://paypal.me/rixtronix
thingiverse
free

Based_vase_hex-tapped v6 by 728design
...based_vase_hex-tapped v6 by 728design
thingiverse
based_vase_hex-tapped v6
thingiverse
free

DStike v6 oled by h4x0r1
...dstike v6 oled by h4x0r1
thingiverse
for dstike v6 oled
thingiverse
free

Flower Pot V6 by 3DPino
...flower pot v6 by 3dpino
thingiverse
flower pot v6
thingiverse
free

E3D-V6 FAN by qqbbpp1234
...e3d-v6 fan by qqbbpp1234
thingiverse
e3d v6 fan
thingiverse
free

E3D-V6 Back Support
...e3d-v6 back support
thingiverse
e3d-v6 back support
E3D
thingiverse
free

E3D fan Duck adapted for e3D mount by tambu22
...e3d fan duck adapted for e3d mount by tambu22
thingiverse
just try to adapt it to e3d mount
thingiverse
free
Extruder for E3D by xtopolx
...extruder for e3d by xtopolx
thingiverse
extruder for e3d
thingiverse
free
E3D mount by crota
...e3d mount by crota
thingiverse
e3d mount
thingiverse
free

UNI 3D E3D
...uni 3d e3d
thingiverse
e3d for uni 3d
thingiverse
free

Nozzle Holder E3D 8x / Düsenhalter E3D 8x by Walkabout77
...nozzle holder e3d 8x / düsenhalter e3d 8x by walkabout77
thingiverse
nozzle holder e3d 8x
thingiverse
free
E3D Support by Mamath
...e3d support by mamath
thingiverse
integrate e3d heat, for 40mm fan
thingiverse
free

E3d Cyclop and E3d Chimera by TanManGuy
... modeled up the cyclop and chimera
if looking for a fan shroud for it
(check this out- http://www.thingiverse.com/thing:614803)
thingiverse
free
E3D by alex16
...e3d by alex16
thingiverse
enclosure cooling e2d
thingiverse
free
3D model E3D V6 extruder
...3d model e3d v6 extruder.
e3d v6 radiator
e3d v6 volcano nozzle
e3d v6 heat break
e3d v6 heater block
e3d v6 volcano heater block
thingiverse
free

E3D Hemera Model
...e3d hemera model
thingiverse
official mounting cad for designing your own custom mounts for the e3d hemera.
Adapter
thingiverse
free

Adapter
...adapter
thingiverse
adapter to use filament rolls with 72mm inside diameter
thingiverse
free

adapter by Ladehoff
...adapter by ladehoff
thingiverse
adapter
thingiverse
free
adapter by eslyuta
...adapter by eslyuta
thingiverse
adapter
thingiverse
free

Clean 45RPM adapter, single adapter
...clean 45rpm adapter, single adapter
thingiverse
clean, basic 45rpm adapter. fits most turntables.
thingiverse
free

Fan Adapter
...fan adapter
thingiverse
fan adapter
thingiverse
free

Lens adapter
...lens adapter
thingiverse
lens adapter
thingiverse
free

Fahrradventiel Adapter
...fahrradventiel adapter
thingiverse
fahrradventiel adapter
thingiverse
free
adapter with by dougthegr8
...adapter with by dougthegr8
thingiverse
adapter holder
thingiverse
free

gopro adapter
...gopro adapter
thingiverse
angal adapter for gopro
thingiverse
free
Socket Adapter
...socket adapter
thingiverse
hand twist socket adapter
Simple
thingiverse
free

Simple Box / Boîte simple by Falkos
...simple box / boîte simple by falkos
thingiverse
simple box
thingiverse
free

Simple Diamond
...simple diamond
thingiverse
simple diamond.
thingiverse
free

Simple Bookend
...simple bookend
thingiverse
a simple bookend
thingiverse
free

Simple Cross
...simple cross
thingiverse
simple cross
thingiverse
free

Vase simple
...vase simple
thingiverse
vase simple
thingiverse
free
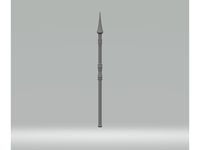
Simple Lance
...simple lance
thingiverse
simple lance
thingiverse
free
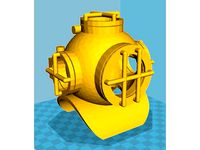
Escafandra simple. Simple scuba. by Unseulmot
...ot
thingiverse
modelo simple de una escafandra para imprimir de una pieza.
simple model of a diving suit for one-piece printing.
thingiverse
free

Simple Balisong
...simple balisong
thingiverse
simple design of a balisong.
thingiverse
free
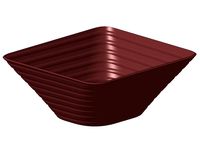
Simple Bowl
...simple bowl
thingiverse
just a simple bowl
thingiverse
free

Simple Keychains
...simple keychains
thingiverse
simple keychain design