Thingiverse

E3D Titan Aqua Mount for i3 mk3 by ChrisVahi
by Thingiverse
Last crawled date: 3 years ago
After a firmware update erasing my printer's calibration I found a flaw in this design. I have abandoned this project in favor of this one:https://www.thingiverse.com/thing:3150843
Please check it out and let me know if it works for you.
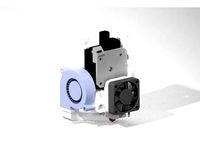
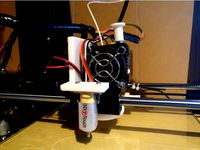
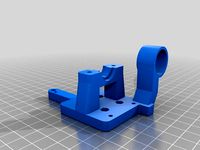
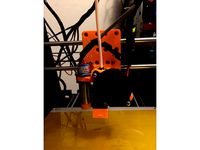
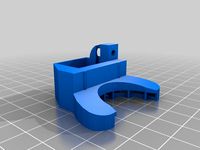
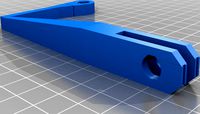
Here is my mounting fixture for the E3D Titan Aqua. I've been using it for a couple of weeks now with only minor issues. I will be continuing to work on it but I invite you to add to the project as well.
This part has been designed to be compatible with the factory X carriage. You may need to open up the hole in the rear X carriage cover depending on how flexible your plumbing tubes are. I am using clear nylon tubes at the moment and they needed just a bit of extra clearance. I started with black air brake tubes which fit without modification, but I could not monitor coolant flow. The tubes are run through the bottom of the electronics enclosure and into the main extruder cable assembly. I have removed the factory nylon filament in the cable assembly as it is no longer needed.
Added July 25, 2018: Prusa filament sensor - This part is designed to hold the Prusa Laser filament sensor. Please print this part with black filament to maximize the sensor's effectiveness. It is prone to false positives but blocking as much light as possible will help it work somewhat better. The filament sensor holder clicks onto the standard Titan idler and has ports for 4mm x 2mm Teflon tubing in and out of it. Cut a piece of tubing ~30mm long an insert it into the bottom of the filament holder, then insert the assembly over the idler until it clicks into position. Attach the top and insert the upper tube into the port. This part should be compatible with all of the Titan family extruder idlers.
NOTE: I have had limited success using this filament sensor. The holder works fine but the sensor does not work well with co-polyesters like nGen or XT, which is what I use primarily. I just wanted to provide a part that keeps all of the features that came with your printer. Please provide feedback is you find any issues using PLA, ABS or any of the known-working filaments with this sensor. I did have to flip the sensor to get clearance for the Titan and I'm not yet sure if there are firmware mods required to detect the filament accurately.
Added July 19, 2018: Print Cooling Fan mount - this is my current working model. It uses the new angled Prusa fan nozzle, which I've added to the thing files. Bolt it onto the left lower lug of the extruder. I STRONGLY recommend using the e3d heater block sock to prevent melting your fan nozzle, especially if printing materials that can not be cooled during printing. Even then, you may consider running the fan at it's minimum speed to keep your parts safe. You will have to rotate the heater block ~60 degrees so the long axis is inline with the nozzle center. Loosen your nozzle, then rotate the block and re-tighten the nozzle. Follow the instructions on e3d's website for changing a nozzle ( they say to use pliers to secure the block, I use a 5/8" or 16mm wrench): https://e3d-online.dozuki.com/Guide/Changing+Nozzles/45 .
Update 7/27/18: I have edited the mount a bit to thicken the wall for the PINDA probe. Also gave a bit more clearance for tubes
Please use the following firmware mod to adjust the position of the PINDA probe for calibration and homing. For information on editing the firmware, follow the instructions in the readme here: https://github.com/prusa3d/Prusa-Firmware. Just remember to make these edits to all firmware updates in the future.
In your configuration_prusa.h file (rename the file that matches your printer in the variants folder and move to the firmware folder) locate the following lines
_#define X_PROBE_OFFSET_FROMEXTRUDER 23 // Z probe to nozzle X offset: -left +right#define Y_PROBE_OFFSET_FROM_EXTRUDER 5 // Z probe to nozzle Y offset: -front +behind
and replace them with
_#define X_PROBE_OFFSET_FROMEXTRUDER 48 // Z probe to nozzle X offset: -left +right#define Y_PROBE_OFFSET_FROM_EXTRUDER 0 // Z probe to nozzle Y offset: -front +behind
In order to use the Titan Aqua you will need to change the extruder rotation direction and the extruder steps per mm. There are two ways to do this. I recommend swapping the red/blue pins or the green/black pins on the cable connector at the controller. Extruder steps per mm can also be changed in the EEPROM by sending the following g-code:
M92 E840 #change extruder steps to this value
M500 #store settings
M503 #to verify settings changed
If you prefer to do things in firmware then find the following lines and replace with these values.
_#define MAX_E_STEPS_PER_UNIT 1700
for Prusa stepper (200 steps/rotation):
_#define DEFAULT_AXIS_STEPS_PER_UNIT {100,100,3200/8,840}
or for e3d stepper (400 steps/rotation):
_#define DEFAULT_AXIS_STEPS_PER_UNIT {100,100,3200/8,1680}
(NOTE: I had problems with linear advance causing stalling and in-print flow control not working using this value/stepper. Changing back to the stock Prusa stepper seemed to solve this. I think the 1680 value has too many bits for whatever math the firmware does while calculating extruder speeds. That was on firmware 3.2.0)
and extruder direction:
_#define INVERT_E0_DIR 1 // for direct drive extruder v9 set to 1, for geared extruder set to 0
(NOTE: the comment on the above line appears to be backwards, but adjust to suit)
Hardware required:
4x 4mmx25 socket cap machine screws (extruder mount)
2x 3mmx20 socket cap machine screws (fan)
1x 3mmx10 socket cap machine screw (fan nozzle)
3x 3mm nuts (fan mount)
8mm x 3mm magnet + super glue (vizualizer)
zipties for reassembling the cable harness
(in a pinch you can use the 4 mounting screws from the Aqua kit run in through the front of the Titan frame into the mount. This means you are first threading into aluminum, then through into plastic. Not ideal, but it has been working for me and it makes servicing a bit easier too. I'm considering changing a few things to use 3mm screws with captive nuts instead, let me know if you'd like that edit!)
Here is a link to my Fusion 360 account if you want to download the source file:
Extruder Mount- https://a360.co/2mvuhsl
Fan Mount - https://a360.co/2mxZ73s
Filament Sensor holder- https://a360.co/2NM9ufp
Have fun!
Please check it out and let me know if it works for you.
Here is my mounting fixture for the E3D Titan Aqua. I've been using it for a couple of weeks now with only minor issues. I will be continuing to work on it but I invite you to add to the project as well.
This part has been designed to be compatible with the factory X carriage. You may need to open up the hole in the rear X carriage cover depending on how flexible your plumbing tubes are. I am using clear nylon tubes at the moment and they needed just a bit of extra clearance. I started with black air brake tubes which fit without modification, but I could not monitor coolant flow. The tubes are run through the bottom of the electronics enclosure and into the main extruder cable assembly. I have removed the factory nylon filament in the cable assembly as it is no longer needed.
Added July 25, 2018: Prusa filament sensor - This part is designed to hold the Prusa Laser filament sensor. Please print this part with black filament to maximize the sensor's effectiveness. It is prone to false positives but blocking as much light as possible will help it work somewhat better. The filament sensor holder clicks onto the standard Titan idler and has ports for 4mm x 2mm Teflon tubing in and out of it. Cut a piece of tubing ~30mm long an insert it into the bottom of the filament holder, then insert the assembly over the idler until it clicks into position. Attach the top and insert the upper tube into the port. This part should be compatible with all of the Titan family extruder idlers.
NOTE: I have had limited success using this filament sensor. The holder works fine but the sensor does not work well with co-polyesters like nGen or XT, which is what I use primarily. I just wanted to provide a part that keeps all of the features that came with your printer. Please provide feedback is you find any issues using PLA, ABS or any of the known-working filaments with this sensor. I did have to flip the sensor to get clearance for the Titan and I'm not yet sure if there are firmware mods required to detect the filament accurately.
Added July 19, 2018: Print Cooling Fan mount - this is my current working model. It uses the new angled Prusa fan nozzle, which I've added to the thing files. Bolt it onto the left lower lug of the extruder. I STRONGLY recommend using the e3d heater block sock to prevent melting your fan nozzle, especially if printing materials that can not be cooled during printing. Even then, you may consider running the fan at it's minimum speed to keep your parts safe. You will have to rotate the heater block ~60 degrees so the long axis is inline with the nozzle center. Loosen your nozzle, then rotate the block and re-tighten the nozzle. Follow the instructions on e3d's website for changing a nozzle ( they say to use pliers to secure the block, I use a 5/8" or 16mm wrench): https://e3d-online.dozuki.com/Guide/Changing+Nozzles/45 .
Update 7/27/18: I have edited the mount a bit to thicken the wall for the PINDA probe. Also gave a bit more clearance for tubes
Please use the following firmware mod to adjust the position of the PINDA probe for calibration and homing. For information on editing the firmware, follow the instructions in the readme here: https://github.com/prusa3d/Prusa-Firmware. Just remember to make these edits to all firmware updates in the future.
In your configuration_prusa.h file (rename the file that matches your printer in the variants folder and move to the firmware folder) locate the following lines
_#define X_PROBE_OFFSET_FROMEXTRUDER 23 // Z probe to nozzle X offset: -left +right#define Y_PROBE_OFFSET_FROM_EXTRUDER 5 // Z probe to nozzle Y offset: -front +behind
and replace them with
_#define X_PROBE_OFFSET_FROMEXTRUDER 48 // Z probe to nozzle X offset: -left +right#define Y_PROBE_OFFSET_FROM_EXTRUDER 0 // Z probe to nozzle Y offset: -front +behind
In order to use the Titan Aqua you will need to change the extruder rotation direction and the extruder steps per mm. There are two ways to do this. I recommend swapping the red/blue pins or the green/black pins on the cable connector at the controller. Extruder steps per mm can also be changed in the EEPROM by sending the following g-code:
M92 E840 #change extruder steps to this value
M500 #store settings
M503 #to verify settings changed
If you prefer to do things in firmware then find the following lines and replace with these values.
_#define MAX_E_STEPS_PER_UNIT 1700
for Prusa stepper (200 steps/rotation):
_#define DEFAULT_AXIS_STEPS_PER_UNIT {100,100,3200/8,840}
or for e3d stepper (400 steps/rotation):
_#define DEFAULT_AXIS_STEPS_PER_UNIT {100,100,3200/8,1680}
(NOTE: I had problems with linear advance causing stalling and in-print flow control not working using this value/stepper. Changing back to the stock Prusa stepper seemed to solve this. I think the 1680 value has too many bits for whatever math the firmware does while calculating extruder speeds. That was on firmware 3.2.0)
and extruder direction:
_#define INVERT_E0_DIR 1 // for direct drive extruder v9 set to 1, for geared extruder set to 0
(NOTE: the comment on the above line appears to be backwards, but adjust to suit)
Hardware required:
4x 4mmx25 socket cap machine screws (extruder mount)
2x 3mmx20 socket cap machine screws (fan)
1x 3mmx10 socket cap machine screw (fan nozzle)
3x 3mm nuts (fan mount)
8mm x 3mm magnet + super glue (vizualizer)
zipties for reassembling the cable harness
(in a pinch you can use the 4 mounting screws from the Aqua kit run in through the front of the Titan frame into the mount. This means you are first threading into aluminum, then through into plastic. Not ideal, but it has been working for me and it makes servicing a bit easier too. I'm considering changing a few things to use 3mm screws with captive nuts instead, let me know if you'd like that edit!)
Here is a link to my Fusion 360 account if you want to download the source file:
Extruder Mount- https://a360.co/2mvuhsl
Fan Mount - https://a360.co/2mxZ73s
Filament Sensor holder- https://a360.co/2NM9ufp
Have fun!
Similar models
thingiverse
free
br34ker's Anet A8 Titan V6 Mount by br34ker
.../ y offset: -front +behind [the nozzle]
i will provide a step-model to the tool mount, so you can easily design your own modules.
thingiverse
free

BLTouch Mount E3D Titan Extruder Enhanced Prusa i3 by mlabruyere
...set for y is 0. the offset for x is -25mm. this is an upgrade for the prusa i3/clone with e3d titan extruder and bltouch probe.
thingiverse
free

Tevo Tarantula Direct E3D Titan X-Carriage by theFPVgeek
...er
nema 17 pancake motor - http://www.omc-stepperonline.com/nema-17-bipolar-step-motor-35v-1a-13ncm184ozin-17hs081004s-p-101.html
thingiverse
free

Hypercube Bushing Probe Inductive Sensor Mount by butchja
...#define front_probe_bed_position 64
if you are interested in the pictured fan duct, seehttps://www.thingiverse.com/thing:2517118
thingiverse
free
Anet A6 BLTouch/3DTouch mount (front) by thvranken
...isplay or with command m851) and saved to the eeprom (using the display or with command m500), in my case, this was around -2 mm.
thingiverse
free
HyperCube E3D mount with M18 probe (sensor) by ziemowitp
...lin firmware:
define x_probe_offset_from_extruder 28
define y_probe_offset_from_extruder -5
define z_probe_offset_from_extruder 0
thingiverse
free

E3D Anet Sensor Extruder by cfresh
...robe_bed_position 20
#define right_probe_bed_position 195
#define front_probe_bed_position 20
#define back_probe_bed_position 170
thingiverse
free
e3d with sensor 18mm by docjones
...define y_probe_offset_from_extruder -11 // y offset: -front +behind [the nozzle]
offsets are for people using skynet3d firmware
thingiverse
free

Black Widow Back Stepper Mount, Titan Extruder, Bltouch, Active Cooling by rtimberman52
...xtruder 0
define z_probe_offset_from_extruder -1.7
you will have to reverse the stepper direction on e0
define invert_e0_dir true
thingiverse
free

E3D Titan Extruder Inductive Sensor Mount by zenstorm
... you use an inductive sensor with your new titan extruder. :) zip ties work best for securing the mount. i printed with supports.
Chrisvahi
thingiverse
free

Crown Gear by ChrisVahi
...crown gear by chrisvahi
thingiverse
spur type crown gear, 30 degree pitch. print two and join with the support for loads of fun!
thingiverse
free
Caged Ball Bearing by ChrisVahi
...l bearing with integral cage and 16 balls. elliptical grooves allow for easier release of moving parts and slight axial rotation.
thingiverse
free

Plan City Brio compatible train tracks by ChrisVahi
...brio compatible train tracks by chrisvahi
thingiverse
here are some tracks that i have modified from others found on thingiverse
thingiverse
free
Owl Cookie Cutter by ChrisVahi
...an contain lead so be cautious.
please leave feedback in the comments and i'll try to address any issues that come up.
enjoy!
thingiverse
free
Refrigerator Door Handle by ChrisVahi
... washers (you can paint these for a cleaner look)
3x #10x32x1" pan head machine screws
click here for the assembly animation
thingiverse
free
Fan nozzle for Volcano Mod for Prusa i3 mk3 by ChrisVahi
...ll reinforcement to the mounting lug (my stock nozzle broke at this point). this one does not rattle as much as the stock nozzle.
thingiverse
free
Tube Holder with PC4-1/8NPT fitting by ChrisVahi
...learance to be met.
the remix locater for thingiverse seems to be broken, remixed from https://www.thingiverse.com/thing:3338467
thingiverse
free

Toyota Replacement Door Catch by ChrisVahi
...sed from the use of this part. if you are hoping to use this commercially message me for a licence release and royalty agreement.
Aqua
3ddd
$1
AQUA
...aqua
3ddd
aqua creations
aqua
3ddd
$1
Aqua
...aqua
3ddd
aqua , aqua creations
светильники потолочный и торшер
3ddd
free

AQUA / horn
...aqua / horn
3ddd
aqua creations
aqua / horn
3ddd
$1
Aqua Rodos
...aqua rodos
3ddd
aqua
aqua rodos 99,4x 58,4 h-87,0
3d_export
$30

Aqua Car
...aqua car
3dexport
model car aqua
3ddd
$1

AQUA / morning glory
...aqua / morning glory
3ddd
aqua creations
aqua / morning glory
3ddd
$1

apaya aqua creations
... светильник , aqua creations
apaya - aqua creations, светильник и торшер.
3ddd
$1

Aqua Creations
...reations
3ddd
aqua creations
диван aqua creations
sofa gladis love sea 175x72 cm
chair gladis lounge chair 103x70cm
polis: 91092
3ddd
free
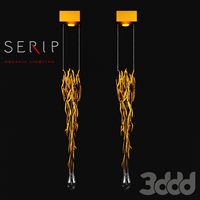
SERIP AQUA
... aqua
фабрика: serip
страна: португалия
серия: aqua
артикул: ct3313/1-fo
габариты (вхшхг): 80 x 14 x 14 см
3ddd
$1
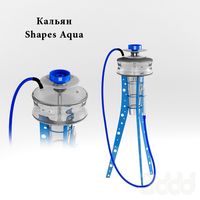
Shapes Aqua
...shapes aqua
3ddd
кальян
кальян shapes aqua
высота кальяна: 70 см.
производитель: shapes
Mk3
turbosquid
$50

cention mk3
...ty free 3d model cention mk3 for download as ma, obj, and fbx on turbosquid: 3d models for games, architecture, videos. (1454148)
turbosquid
$129

MK3 Tank
... available on turbo squid, the world's leading provider of digital 3d models for visualization, films, television, and games.
turbosquid
$100

Toyota Supra MK3
... available on turbo squid, the world's leading provider of digital 3d models for visualization, films, television, and games.
turbosquid
$44

cention mk3 low poly
...d model cention mk3 low poly for download as ma, obj, and fbx on turbosquid: 3d models for games, architecture, videos. (1454666)
turbosquid
$30

Challenger I Mk3 Falcon
... available on turbo squid, the world's leading provider of digital 3d models for visualization, films, television, and games.
turbosquid
$10

American Frag hand grenade MK3
...free 3d model american frag hand grenade mk3 for download as on turbosquid: 3d models for games, architecture, videos. (1393624)
turbosquid
$20

Mk3 US Navy Combat Knife
...ty free 3d model mk3 us navy combat knife for download as fbx on turbosquid: 3d models for games, architecture, videos. (1172791)
3d_export
$29

Ford Fiesta MK3 Modified 3D Model
...7 tumerfx mtumer mehmet t?mer 1993 1995 1996 wrc special modifed modifiye
ford fiesta mk3 modified 3d model mtumer 30698 3dexport
3d_export
$99

Toyota Supra Mk3 19861993 3D Model
...ort fast coupe japan 1986 1987 1988 1989 1990 1991 1992 1993 tuning turbo
toyota supra mk3 19861993 3d model squir 62530 3dexport
turbosquid
$5

Timothy Oulton Mars Chair MK3
...on mars chair mk3 for download as 3ds, max, obj, fbx, and dae on turbosquid: 3d models for games, architecture, videos. (1209782)
Titan
design_connected
$18

Titan
...titan
designconnected
original btc titan computer generated 3d model.
3d_ocean
$25

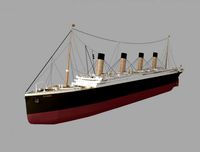
RMS Titanic
...rms titanic
3docean
ship steamer titanic
3d model of the rms titanic
turbosquid
$49
Titan
...quid
royalty free 3d model titan for download as obj and ztl on turbosquid: 3d models for games, architecture, videos. (1314276)
turbosquid
$8

Titan
...d
royalty free 3d model titan for download as , fbx, and obj on turbosquid: 3d models for games, architecture, videos. (1545505)
3d_export
$15

eren yeager titan from attack on titan
...eren yeager titan from attack on titan
3dexport
3d model of eren titan
3d_export
$5
titanic new
...titanic new
3dexport
titanic 3d model normal quality for animation
3d_export
$100
Titan 3D Model
...titan 3d model
3dexport
silo launcher rocket titan
titan 3d model acquarius 37854 3dexport
3d_ocean
$25
Titan
...nfs nfshs one ps ps1 psone rod speed sports stakes titan transport vehicle
quality exterior and low polygon interior concept car.
3ddd
$1

Titanic Lamp(table)
...titanic lamp(table)
3ddd
titanic lamp(table)
turbosquid
$10

Titan chair
...osquid
royalty free 3d model titan chair for download as max on turbosquid: 3d models for games, architecture, videos. (1301533)
E3D
turbosquid
$23

E3D - Google Home
... 3d model e3d - google home for download as max, obj, and c4d on turbosquid: 3d models for games, architecture, videos. (1192509)
cg_studio
free

e3d model
...e3d model
cgstudio
- e 3d model, royalty free license available, instant download after purchase.
turbosquid
$2

Syringe C4D (E3D Ready)
...lty free 3d model syringe c4d (e3d ready) for download as c4d on turbosquid: 3d models for games, architecture, videos. (1336720)
turbosquid
$12

Microphone USB E3D and C4D
...ree 3d model microphone usb e3d & c4d for download as c4d on turbosquid: 3d models for games, architecture, videos. (1568216)
turbosquid
$29

E3D - OnePlus 6 Black
...model e3d - oneplus 6 black for download as max, obj, and c4d on turbosquid: 3d models for games, architecture, videos. (1358534)
turbosquid
$29

E3D - Motorola One 2018
...del e3d - motorola one 2018 for download as max, obj, and c4d on turbosquid: 3d models for games, architecture, videos. (1358533)
turbosquid
$29

E3D - Disney MagicBands 2
...l e3d - disney magicbands 2 for download as max, obj, and c4d on turbosquid: 3d models for games, architecture, videos. (1355515)
turbosquid
$29

E3D - Samsung Z4 Smartphone
...e3d - samsung z4 smartphone for download as max, obj, and c4d on turbosquid: 3d models for games, architecture, videos. (1182179)
turbosquid
$23

E3D - Razer Phone model
...del e3d - razer phone model for download as max, obj, and c4d on turbosquid: 3d models for games, architecture, videos. (1231207)
turbosquid
$23

E3D - Alcatel Idol 5
... model e3d - alcatel idol 5 for download as max, obj, and c4d on turbosquid: 3d models for games, architecture, videos. (1212799)
I3
3d_export
$10

suv i3
...suv i3
3dexport
suv i3 2013 series
3d_ocean
$89

BMW i3 2012
...y, in real units of measurement, qualitatively and maximally close to the original. model formats: - *.max (3ds max 2008 scanl...
cg_studio
$99

BMW i3 20143d model
...
cgstudio
.3ds .c4d .fbx .lwo .max .obj - bmw i3 2014 3d model, royalty free license available, instant download after purchase.
cg_studio
$99

BMW i3 20123d model
...tudio
.3ds .c4d .fbx .lwo .max .mb .obj - bmw i3 2012 3d model, royalty free license available, instant download after purchase.
cg_studio
$99

BMW i3 20143d model
...tudio
.3ds .c4d .fbx .lwo .max .mb .obj - bmw i3 2014 3d model, royalty free license available, instant download after purchase.
humster3d
$75

3D model of BMW i3 2014
...
buy a detailed 3d model of bmw i3 2014 in various file formats. all our 3d models were created maximally close to the original.
humster3d
$40

3D model of Kitchen Set I3
...uy a detailed 3d model of kitchen set i3 in various file formats. all our 3d models were created maximally close to the original.
3d_ocean
$30

Kitchen set i3
...ensils oven plates shelves sink table ware
kitchen set i3 include 3d models: cooker, oven, sink, cupboards, table, chair, plates.
3d_ocean
$89

BMW i3 2014
...y, in real units of measurement, qualitatively and maximally close to the original. model formats: - *.max (3ds max 2008 scanl...
cg_studio
$99

BMW i3 Concept 20113d model
...i3
.3ds .c4d .fbx .lwo .max .obj - bmw i3 concept 2011 3d model, royalty free license available, instant download after purchase.
Mount
3d_export
free

mounting bracket
...mounting plate is the portion of a hinge that attaches to the wood. mounting plates can be used indoors, cabinetry and furniture.
turbosquid
$2

MOUNTING
... available on turbo squid, the world's leading provider of digital 3d models for visualization, films, television, and games.
turbosquid
free

Mounts
... available on turbo squid, the world's leading provider of digital 3d models for visualization, films, television, and games.
turbosquid
free

Mount Fuji
...fuji
turbosquid
free 3d model mount fuji for download as obj on turbosquid: 3d models for games, architecture, videos. (1579977)
3d_export
$5

Headphone mount LR
...headphone mount lr
3dexport
headphone mount l+r
turbosquid
$39

Mount rainier
...quid
royalty free 3d model mount rainier for download as fbx on turbosquid: 3d models for games, architecture, videos. (1492586)
turbosquid
$5

pipe mounting
...quid
royalty free 3d model pipe mounting for download as obj on turbosquid: 3d models for games, architecture, videos. (1293744)
turbosquid
$3

Mounting Tires
...uid
royalty free 3d model mounting tires for download as fbx on turbosquid: 3d models for games, architecture, videos. (1708511)
3d_export
$5

Magnetic GoPro Mount
...pro mount
3dexport
cool magnetic mount for gopro. allows you to mount the camera on flat metal surfaces and get exclusive shots.
turbosquid
$5

Stone Mount
...ty free 3d model stone mount for download as ma, obj, and fbx on turbosquid: 3d models for games, architecture, videos. (1370306)