Thingiverse
E-Gor by greatwolf
by Thingiverse
Last crawled date: 3 years, 5 months ago
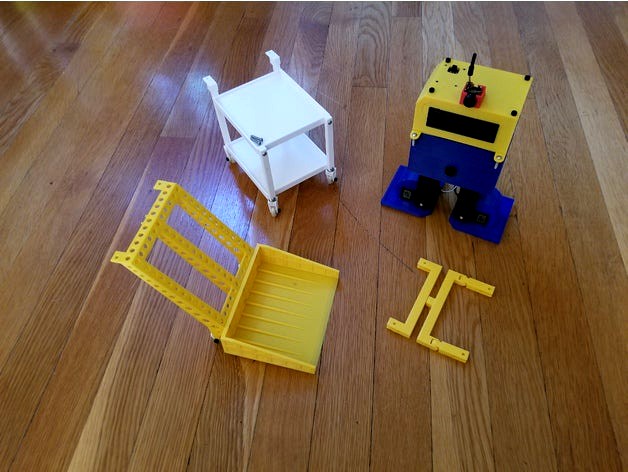
All Evil Genius/Mad Scientist wannabes need an assistant - introducing E-Gor! A remix of the Chip-E kit from Robotgeek.
Having a lower back injury which limits my sitting, standing, etc, also limits other things. like how long I can spend drawing designs or documenting them. E-Gor can't help with that. But checking how well the Roomba is cleaning, looking for the cat toys (of which there are many), recovering crashed drones (<100mm) - he can and does for me. And has a small cart to push my drink around too.
The first thing that is needed is actually a fix to the build instructions. Step 6 in the Getting Started Guide (Tuning Chip-E) is basically a trial and error process and there is nothing wrong with such a process but you you need to start from a reasonable position. Any good Evil Genius (oxymoron?) knows you don't begin building a nuke by taking a cube of plutonium and putting a stick of dynamite in it. So I took the wonderful Otto Calibrate code that J. Lopez Verdejo wrote and adapted it to Chip-E as well as translating the menus to English. Just upload this code to any Chip-E and run it with the Serial Monitor open. Be sure to set the correct baud rate and carriage return. Type a ? for help at any menu. I use the edge of a metal ruler across the feet and along the back edge to get a good base line. Adjust until it seems fairly squared up. Then type info at the main menu to list the initial values to plug into the Chip-E Gamepad code as per step 6 to have a reasonable starting place.
The next upgrade is only necessary if your primary surface is hardwood/tile floor like I have. The hard plastic (I used PETG, but ABS and PLA have the same problem) tends to slip somewhat. That is what leftTrac and rightTrac are for. They are printed in ninjaflex and attached with double sided tape. I have not tested this upgrade on carpet or concrete.
No Mad Scientist trusts his assistant and you shouldn't trust E-Gor either. That is why he is outfitted with his own goPro-like camera. Of course a goPro would be too large, so I used an FPV camera (wolfwhoop wt05, although other companies make similar). The connector will have to be cut off, fed through the holes of the cameraHolder and HeadFPV, then new wires with jumpers soldered on. Make sure to use shrink wrap to cover the exposed wires. The positive can be plugged into the 3 or 5 volt on the shield, but not the VIN (or you will need to buy a new camera). I suggest the 3 volt because the camera will still get quite warm during use. An example video, checking out the kitchen floor cleaning, can be seen here: https://youtu.be/EeNrsZY1rzQ
To receive the video, there are many options including FPV googles (not recommended for anyone susceptible to motion sickness - see video above), wolfwhoop makes a receiver that can be plugged into a monitor or tv, and the ROTG01 (which I used to record the video) which can be attached to many phones and tablets and is available from many vendors.
To use the Dozer or the Cart, you will need a stabilizer and the newTop to mount it to. Yes, I realize a wheeled robot would be far better for this task. Even a quadraped or hexaped would work better. But where would be the challenge in that? So there are two versions of the stabilizers included, the first, which uses print in place ball joints was a very limited success. The second, using print in place u-joints, is much better, but still not perfect. I include both for people to experiment with and improve upon. There is still some minimal lateral sway especially when there is no load.
You will also need wheels. Two wheels for the Dozer and four wheels for the Cart. The tire part of the wheels are printed with nija- or semi- flex. I found that both worked well for traction on hardwood/tiled floor. I believe they will be fine for carpet and and concrete, but have not tested them. The bearings are 10mm in diameter and 4mm thick with a 3mm hole. I mounted these wheels with 3mm x 10mm screws that were left over from the Chip-E kit - they supply plenty of spares in this regard.
For the Dozer just print the Dozer and dozerMount (I attached using 3mm x 6mm screws, again left over from the build).
For the Cart, you will need two Trays, two backLegs, two frontLegs, and two wheelHolders (the backLegs have the wheelHolders already attached). To attach the frontLegs to the wheelHolders, use two more of the 10mm x 4mm bearings. Press the the center of the bearing on to the 3mm peg at the bottom of the front leg. Then press the bearing into the hole in top of the wheelHolder. Attach the legs with 3mm screws between 12mm and 18mm long.
To summarize the Summary, to build E-Gor you will need the following:
Chip-E kit from RobotGeek or equivalent mechanical and electronic components
All of the 3-D printed parts except the Head and the Top (to use Cart and Dozer)
HeadFPV
cameraHolder
newTop
To reduce slippage:
leftTrac
rightTrac
To use the Cart and/or Dozer:
Stabilizer
Cart:
Tray (2)
frontLeg (2)
rearLeg (2)
wheelHolder (2)
Wheel (4)
10mm x 4mm Bearing [3mm hole] (6)
3mm x 10mm screw (4)
3mm x 12-18mm screw (8)
Dozer:
Dozer
dozerMount
Wheel (2)
10mm x 4mm Bearin [3mm hole] (2)
3mm x 6mm screw (6)
Enjoy, but never trust, your E-Gor.
Similar models
thingiverse
free

Robo 3D Spool Holder using a 608 Skate Bearings by medvampire
...
you will need
25 2mm x 10mm screws
4 3mm x 20mm screws
4 608 skate bearings
i have included the step file if you want to modify.
thingiverse
free

Bender Chip-e by daribes
... bracket
1 x geekduino
1 x robotgeek sensor shield
1 x battery
1 x robotgeek buzzer
1 x 2-line lcd
1 x ir receiver
1 x ir gamepad
thingiverse
free

Spiral Double Fidget Spinner by Amit_jain
...eed to print two wheels, two caps and 1 spacer
apart from this, you need a 10mm bearing with a 3mm center
and a 3mm wooden skewer
thingiverse
free

The Meme Machine- Chip-E by GhostSkullStudios
...duino
1 x robotgeek sensor shield
1 x battery
1 x robotgeek buzzer
1 x 2-line lcd
1 x ir receiver
1 x ir gamepad
then you are set
3dwarehouse
free

623ZZ 3x10x4
...623zz 3x10x4
3dwarehouse
623zz shielded ball bearings 3mm x 10mm x 4mm
thingiverse
free

LM2596 Mount
...ount.
uses two m2.5 x 4mm (or 3mm) screws to mount the module to the mount and two m4 x whatever length you need to hold it down.
thingiverse
free
Bearing Oldham Coupler by 83scr
...3mm x 10mm bolts and 3mm washers once the coupler is printed out i just used a 2.5mm drill to open up all holes for the 3mm bolts
thingiverse
free

Mini 623 Bearing Fidget Spinner by jerryt74332
...mini 623 bearing fidget spinner by jerryt74332
thingiverse
small spinner for 623zz bearings 3mm x 10mm x 4mm
thingiverse
free

USB-Hub Holder Mount 45mm x 24mm by MZwergi
...8mm by 3mm for the screw head
by the way, it's my first design uploaded.
i hope somebody needs something like that and enjoy!
thingiverse
free

Hictop Adjustable x axis by Thumper72
...mm screw and lock nut for the bearing and the rest is all stock except the end 3mm screw which if i recall correctly is 25mm long
Greatwolf


Gor
turbosquid
$55

Gor motorcycle
... available on turbo squid, the world's leading provider of digital 3d models for visualization, films, television, and games.
3d_export
$45

Gor motorcycle 3D Model
...gor motorcycle 3d model
3dexport
bike motorcycle sport transport vehicle
gor motorcycle 3d model gorandodic 4683 3dexport
3d_export
$5
Gun 3D Model
...gun 3d model 3dexport gun lowpoly gor 3d gaming gun 3d model annu001 79625...
archibase_planet
free

Playautomat
...playautomat archibase planet arcade slot machine game play automat gor - 3d model for interior 3d...
archive3d
free

Playautomat 3D Model
...3d model archive3d arcade slot machine game play automat gor - 3d model for interior 3d...
unity_asset_store
$40

Gor Egyptian Gods Pack
...m andryuha1981 and speed up your game development process. find this & other characters options on the unity asset store.
thingiverse
free
GOR AKSU\AK74U handguard by m56pim
...gor aksu\ak74u handguard by m56pim
thingiverse
tactical front handguard on aksu\ak74u airsoft.
blendswap
free

Gor Mon Do
... for the dominance at war v mini challenge.final and original textures are in the blend fileit has no rig, just bones for pose it
thingiverse
free

wtw beastmen gors low poly by castlecrusadercrafts
...ed 110 times? idk
likely going to rig, pose, arm, and sculpt these boys for a proxy beastmen army soon so follow if you want that
E
3ddd
$1
WALL-E
...wall-e
3ddd
wall-e , робот
wall-e
3d_export
$100

e-rickshaw
...e-rickshaw
3dexport
e-rickshaw- it have 3d model of passenger e-rickshaw
3d_ocean
$12

Wall E
...wall e
3docean
character robot wall e
its a 3d model of wall e….
turbosquid
$68

Model-E Droids 2-E Q-E Star Wars
... available on turbo squid, the world's leading provider of digital 3d models for visualization, films, television, and games.
cg_studio
$45

Model-E Droids 2-E Q-E Star Wars3d model
....3ds .c4d .obj .vue - model-e droids 2-e q-e star wars 3d model, royalty free license available, instant download after purchase.
3d_export
$100
e-rickshaw
...e-rickshaw
3dexport
e-rickshaw design for passenger it have all mechanical component
design_connected
$7

Cone E
...cone e
designconnected
bonaldo cone e computer generated 3d model. designed by pasini, ennio.
3ddd
$1

Wall-E NEW
...wall-e new
3ddd
wall-e , робот
wall-e
design_connected
$29

Extrasoft E
...extrasoft e
designconnected
living divani extrasoft e computer generated 3d model. designed by lissoni, piero.
3ddd
$1

E-Turn
... скамейка
современная скамейка фирмы kundalini.
модель e-turn.
дизайнер brodie neil.
размеры: h 42 cm l 185 cm w 54 cm